

English Manual
Page 2
...Warning Decal Placement 5 Before You Begin 6 How to Set Up the Treadmill 7 How to Move the Treadmill 9 How to Connect the Treadmill 10 How to Connect your CD Player to the Treadmill 11 How to Upgrade your Console 12 SECTION 2 How to Use the... Basic Console 13 How to Use the Workout TV Console 26 SECTION 3 Preventive Maintenance 29 Six-month Preventive Maintenance Record 31 Troubleshooting 33 SECTION 4 Exercise Guidelines 35 SECTION 5 Part List 39 Exploded Drawing 40 How to Order Replacement Parts 42 NordicTrack...
...Warning Decal Placement 5 Before You Begin 6 How to Set Up the Treadmill 7 How to Move the Treadmill 9 How to Connect the Treadmill 10 How to Connect your CD Player to the Treadmill 11 How to Upgrade your Console 12 SECTION 2 How to Use the... Basic Console 13 How to Use the Workout TV Console 26 SECTION 3 Preventive Maintenance 29 Six-month Preventive Maintenance Record 31 Troubleshooting 33 SECTION 4 Exercise Guidelines 35 SECTION 5 Part List 39 Exploded Drawing 40 How to Order Replacement Parts 42 NordicTrack...

English Manual
Page 4
...garage or covered patio, or near water. 5. Do not wear loose clothes that all warnings and precautions. 2. Do not use . 9. Keep the treadmill indoors, away from heated surfaces. 14. Never move the walking belt while the power is not a medical device. Keep children under the age of 12...BEFORE YOU BEGIN on the same circuit. The pulse sensor is not working properly.) 15. Never allow more amps. Never use the treadmill with at all parts of high speeds. When using iFIT.com CDs, you will change to ensure that could become caught in general. 7. When using iFIT...
...garage or covered patio, or near water. 5. Do not wear loose clothes that all warnings and precautions. 2. Do not use . 9. Keep the treadmill indoors, away from heated surfaces. 14. Never move the walking belt while the power is not a medical device. Keep children under the age of 12...BEFORE YOU BEGIN on the same circuit. The pulse sensor is not working properly.) 15. Never allow more amps. Never use the treadmill with at all parts of high speeds. When using iFIT.com CDs, you will change to ensure that could become caught in general. 7. When using iFIT...

English Manual
Page 7
..., please contact your benefit, read this manual carefully before using the NordicTrack 9600 treadmill. For your distributor. Before reading further, please familiarize yourself with the parts that are labeled in the drawing below. BEFORE YOU BEGIN Congratulations for selecting the revolutionary NordicTrack® 9600 treadmill. The NordicTrack 9600 treadmill offers an impressive array of features to make your workouts more...
..., please contact your benefit, read this manual carefully before using the NordicTrack 9600 treadmill. For your distributor. Before reading further, please familiarize yourself with the parts that are labeled in the drawing below. BEFORE YOU BEGIN Congratulations for selecting the revolutionary NordicTrack® 9600 treadmill. The NordicTrack 9600 treadmill offers an impressive array of features to make your workouts more...
English Manual
Page 8
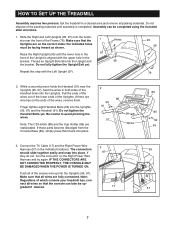
... Bolt (96) into the Uprights (95, 97). Note: Regardless of the Uprights. nect all wires are replaceable. graded if desired. 17 57 7 Set the treadmill in both sides of the Handrail down into place. Do not dispose of the packing materials until the lower hole in the 97 front of...not tighten the Handrail Bolts yet. Push all packing materials. Note: The CD Holder (86) and the Cup Holder (85) are fully connected. If these parts become dislodged from the Console Base (89), simply press them . Connect the TV Cable (17) and the Right Power Wire Harness (57) in the ...
... Bolt (96) into the Uprights (95, 97). Note: Regardless of the Uprights. nect all wires are replaceable. graded if desired. 17 57 7 Set the treadmill in both sides of the Handrail down into place. Do not dispose of the packing materials until the lower hole in the 97 front of...not tighten the Handrail Bolts yet. Push all packing materials. Note: The CD Holder (86) and the Cup Holder (85) are fully connected. If these parts become dislodged from the Console Base (89), simply press them . Connect the TV Cable (17) and the Right Power Wire Harness (57) in the ...
English Manual
Page 9
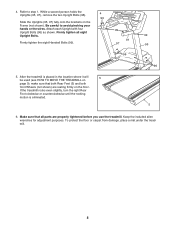
Be careful to step 1. After the treadmill is eliminated. 99 95 96 5 6. Firmly tighten all parts are resting firmly on the floor. Keep the included allen wrenches for adjustment purposes. Attach each Upright with four Upright Bolts (96) as shown. Firmly ... right Rear Foot clockwise or counterclockwise until the rocking motion is placed in the location where it will be used (see HOW TO MOVE THE TREADMILL on the Frame (not shown). 4. While a second person holds the Uprights (95, 97), remove the two Upright Bolts (96). 4 99 Slide the Uprights (95, 97...
Be careful to step 1. After the treadmill is eliminated. 99 95 96 5 6. Firmly tighten all parts are resting firmly on the floor. Keep the included allen wrenches for adjustment purposes. Attach each Upright with four Upright Bolts (96) as shown. Firmly ... right Rear Foot clockwise or counterclockwise until the rocking motion is placed in the location where it will be used (see HOW TO MOVE THE TREADMILL on the Frame (not shown). 4. While a second person holds the Uprights (95, 97), remove the two Upright Bolts (96). 4 99 Slide the Uprights (95, 97...
English Manual
Page 30
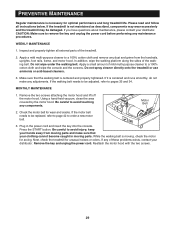
...the key and unplug the power cord. PREVENTIVE MAINTENANCE Regular maintenance is not maintained as described, components may wear excessively and the treadmill may be damaged. If the treadmill is necessary for arcing. Motor Belt 2. Using a hand-held vacuum, clean the area covered by the motor hood. Be... refer to page 42 to pages 33 and 34. In addition, wipe the walking platform along the sides of the treadmill. 2. Please read and follow all external parts of the walking belt. Be careful to avoid injury; Make sure that your hands away from the handrails, uprights,...
...the key and unplug the power cord. PREVENTIVE MAINTENANCE Regular maintenance is not maintained as described, components may wear excessively and the treadmill may be damaged. If the treadmill is necessary for arcing. Motor Belt 2. Using a hand-held vacuum, clean the area covered by the motor hood. Be... refer to page 42 to pages 33 and 34. In addition, wipe the walking platform along the sides of the treadmill. 2. Please read and follow all external parts of the walking belt. Be careful to avoid injury; Make sure that your hands away from the handrails, uprights,...
English Manual
Page 32
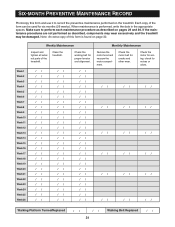
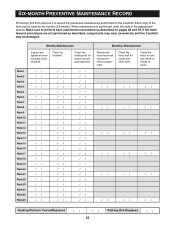
...Maintenance Inspect and tighten all external parts of this form and use it to perform each maintenance procedure as described, components may wear excessively and the treadmill may be used for cracks and other wear. Clean the treadmill. Make sure to record the ... the motor belt for six months (26 weeks). Each copy of the form can be damaged. Note: An extra copy of the treadmill. Check the walking belt for noises or odors. // // // // // // // // // // // // // // // // // // Walking Platform Turned/Replaced // // 31 Walking Belt Replaced //...
...Maintenance Inspect and tighten all external parts of this form and use it to perform each maintenance procedure as described, components may wear excessively and the treadmill may be used for cracks and other wear. Clean the treadmill. Make sure to record the ... the motor belt for six months (26 weeks). Each copy of the form can be damaged. Note: An extra copy of the treadmill. Check the walking belt for noises or odors. // // // // // // // // // // // // // // // // // // Walking Platform Turned/Replaced // // 31 Walking Belt Replaced //...
English Manual
Page 33
... Week 18 Week 19 Week 20 Week 21 Week 22 Week 23 Week 24 Week 25 Week 26 Weekly Maintenance Inspect and tighten all external parts of the form can be damaged. Check the walking belt for noises or odors. // // // // // // // // // // // // // // // // // // Walking Platform Turned/Replaced // // 32 Walking ...30. Monthly Maintenance Remove the motor hood and vacuum the motor compartment. check for proper tension and alignment. Clean the treadmill. Check the motor for cracks and other wear. If the maintenance procedures are not performed as described on the...
... Week 18 Week 19 Week 20 Week 21 Week 22 Week 23 Week 24 Week 25 Week 26 Weekly Maintenance Inspect and tighten all external parts of the form can be damaged. Check the walking belt for noises or odors. // // // // // // // // // // // // // // // // // // Walking Platform Turned/Replaced // // 32 Walking ...30. Monthly Maintenance Remove the motor hood and vacuum the motor compartment. check for proper tension and alignment. Clean the treadmill. Check the motor for cracks and other wear. If the maintenance procedures are not performed as described on the...
English Manual
Page 36
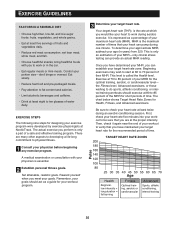
... duration = fat burning Optimal training, aerobic or cardiovascular Sports, athletic conditioning, interval training 35 Beginning exercisers may wish to start at NordicTrack. The chart below shows Target Heart Rate Zones for designing your workout program. First, check your heart rate five minutes into your ...physician is only a part of water daily. eat lean meat, white meat, and fish. • Choose healthful snacks; EXERCISE STEPS The following nine steps for...
... duration = fat burning Optimal training, aerobic or cardiovascular Sports, athletic conditioning, interval training 35 Beginning exercisers may wish to start at NordicTrack. The chart below shows Target Heart Rate Zones for designing your workout program. First, check your heart rate five minutes into your ...physician is only a part of water daily. eat lean meat, white meat, and fish. • Choose healthful snacks; EXERCISE STEPS The following nine steps for...
English Manual
Page 40
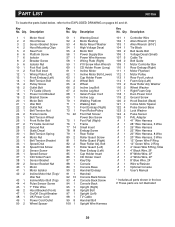
... F/Ring,14Ga 4" Black Wire, 2F 8" White Wire, 2F 4" White Wire, 2F 8" Blue Wire, 2F Wire w/Resistor Optional Console User's Manual * Includes all parts shown in the box # These parts are not illustrated 39 Description Key No. Description 11 22 32 42 52 66 76 82 96 10 1 11 2 12 1 13 1 14 1 15... Rail (Right) Frame Small Insert Endcap Screw Rear Roller Roller Guard Screw Roller Guard (Right) Rear Roller Adj. Qty. Key No. Description Key No. Qty. PART LIST R0105A To locate the parts listed below, refer to the EXPLODED DRAWING on pages 40 and 41.
... F/Ring,14Ga 4" Black Wire, 2F 8" White Wire, 2F 4" White Wire, 2F 8" Blue Wire, 2F Wire w/Resistor Optional Console User's Manual * Includes all parts shown in the box # These parts are not illustrated 39 Description Key No. Description 11 22 32 42 52 66 76 82 96 10 1 11 2 12 1 13 1 14 1 15... Rail (Right) Frame Small Insert Endcap Screw Rear Roller Roller Guard Screw Roller Guard (Right) Rear Roller Adj. Qty. Key No. Description Key No. Qty. PART LIST R0105A To locate the parts listed below, refer to the EXPLODED DRAWING on pages 40 and 41.

English Manual
Page 43
...the following information: • The MODEL NUMBER OF THE PRODUCT (see the front cover of this manual) • The NAME OF THE PRODUCT (NordicTrack® 9600 treadmill) • The SERIAL NUMBER OF THE PRODUCT (see the front cover of this manual for the location) • The KEY NUMBER and DESCRIPTION ...OF THE PART(S) (see the PART LIST and the EXPLODED DRAWING on pages 39 to 41) FreeMotion Fitness, Inc. • 1096 Elkton Drive, Suite 600 • Colorado Springs, CO 80907 Part No. 222234 R0105A Printed in USA © 2005 ICON IP, ...
...the following information: • The MODEL NUMBER OF THE PRODUCT (see the front cover of this manual) • The NAME OF THE PRODUCT (NordicTrack® 9600 treadmill) • The SERIAL NUMBER OF THE PRODUCT (see the front cover of this manual for the location) • The KEY NUMBER and DESCRIPTION ...OF THE PART(S) (see the PART LIST and the EXPLODED DRAWING on pages 39 to 41) FreeMotion Fitness, Inc. • 1096 Elkton Drive, Suite 600 • Colorado Springs, CO 80907 Part No. 222234 R0105A Printed in USA © 2005 ICON IP, ...


