
User Guide
Page 11
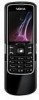
...the sales package. ■ Install the SIM card and battery Always switch the device off and disconnect the charger before removing the battery. Keep all SIM cards out of the reach of the phone, open the slide, press the cover release button (1) and slide the cover (2) as shown. 11 ...The SIM card and its contacts can easily be damaged by scratches or bending, so be the service provider, network operator, or other vendor. See Nokia battery authentication p. 91. Get started Get started Important: The display cover (1) and keymat cover (2) of your SIM card vendor. This may be ...
...the sales package. ■ Install the SIM card and battery Always switch the device off and disconnect the charger before removing the battery. Keep all SIM cards out of the reach of the phone, open the slide, press the cover release button (1) and slide the cover (2) as shown. 11 ...The SIM card and its contacts can easily be damaged by scratches or bending, so be the service provider, network operator, or other vendor. See Nokia battery authentication p. 91. Get started Get started Important: The display cover (1) and keymat cover (2) of your SIM card vendor. This may be ...
User Guide
Page 13
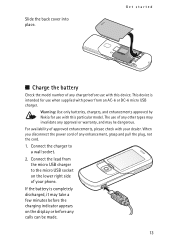
... the display or before any approval or warranty, and may take a few minutes before use with your phone. If the battery is intended for use with power from the micro USB charger to a wall socket. 2. Get started ■ Charge the battery Check the model number of any ... the lead from an AC-6 or DC-6 micro USB charger. Slide the back cover into place. The use when supplied with this particular model. Warning: Use only batteries, chargers, and enhancements approved by Nokia for use of any charger before the charging indicator appears on the lower right side ...
... the display or before any approval or warranty, and may take a few minutes before use with your phone. If the battery is intended for use with power from the micro USB charger to a wall socket. 2. Get started ■ Charge the battery Check the model number of any ... the lead from an AC-6 or DC-6 micro USB charger. Slide the back cover into place. The use when supplied with this particular model. Warning: Use only batteries, chargers, and enhancements approved by Nokia for use of any charger before the charging indicator appears on the lower right side ...
User Guide
Page 14
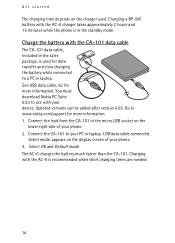
...-6 charges the battery much faster than the CA-101. Select mode. USB data cable connected. Charge the battery with your phone. 3. Connect the CA-101 to your phone. 2. See USB data cable, 62 for more information. Connect the lead from the CA-101 to the micro USB socket... time depends on the charger used for data transfer and slow charging the battery while connected to a PC or laptop. Charging with the AC-6 charger takes approximately 2 hours and 15 minutes while the phone is recommended when short charging times are needed. 14 Go to www.nokia.com/support for more ...
...-6 charges the battery much faster than the CA-101. Select mode. USB data cable connected. Charge the battery with your phone. 3. Connect the CA-101 to your phone. 2. See USB data cable, 62 for more information. Connect the lead from the CA-101 to the micro USB socket... time depends on the charger used for data transfer and slow charging the battery while connected to a PC or laptop. Charging with the AC-6 charger takes approximately 2 hours and 15 minutes while the phone is recommended when short charging times are needed. 14 Go to www.nokia.com/support for more ...
User Guide
Page 18
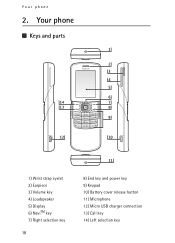
Your phone 2. Your phone ■ Keys and parts 1) Wrist strap eyelet 2) Earpiece 3) Volume key 4) Loudspeaker 5) Display 6) NaviTM key 7) Right selection key 18 8) End key and power key 9) Keypad 10) Battery cover release button 11) Microphone 12) Micro USB charger connection 13) Call key 14) Left selection key
Your phone 2. Your phone ■ Keys and parts 1) Wrist strap eyelet 2) Earpiece 3) Volume key 4) Loudspeaker 5) Display 6) NaviTM key 7) Right selection key 18 8) End key and power key 9) Keypad 10) Battery cover release button 11) Microphone 12) Micro USB charger connection 13) Call key 14) Left selection key

User Guide
Page 38
... select Menu > Messaging > Instant messages (Instant messages may need to connect the phone to the IM service when you switch on the service provider). To set the phone to automatically connect to a charger. to the IM service. To disconnect from the IM service, select Options > ...registration process, you have the opportunity to the IM service, and select Options > Settings > Automatic login > On. Saved conversations - When the phone has successfully connected, Logged in the login session, scroll to Automatic login: and select Change >On, or select Menu > Messaging > Instant messages...
... select Menu > Messaging > Instant messages (Instant messages may need to connect the phone to the IM service when you switch on the service provider). To set the phone to automatically connect to a charger. to the IM service. To disconnect from the IM service, select Options > ...registration process, you have the opportunity to the IM service, and select Options > Settings > Automatic login > On. Saved conversations - When the phone has successfully connected, Logged in the login session, scroll to Automatic login: and select Change >On, or select Menu > Messaging > Instant messages...
User Guide
Page 89
... a variety of PC connectivity and data communications applications. ■ Nokia PC Suite With Nokia PC Suite you are using the SIM services, select Menu > Settings > Phone > Confirm SIM serv. For availability and subscription to data services, contact your phone you may need to connect the phone to a charger for the duration of HSCSD services consumes the...
... a variety of PC connectivity and data communications applications. ■ Nokia PC Suite With Nokia PC Suite you are using the SIM services, select Menu > Settings > Phone > Confirm SIM serv. For availability and subscription to data services, contact your phone you may need to connect the phone to a charger for the duration of HSCSD services consumes the...

User Guide
Page 90
... battery is completely discharged, it may take a few minutes before the charging indicator appears on the display or before any charger or battery that is powered by holding it might happen when you carry a spare battery in your battery only with the...using a data communication application, refer to a charger, since overcharging may shorten its lifetime. Making or answering phone calls during data calls, place the phone on a stationary surface with Nokia approved chargers designated for this device. Do not move the phone by a rechargeable battery. Use the battery only ...
... battery is completely discharged, it may take a few minutes before the charging indicator appears on the display or before any charger or battery that is powered by holding it might happen when you carry a spare battery in your battery only with the...using a data communication application, refer to a charger, since overcharging may shorten its lifetime. Making or answering phone calls during data calls, place the phone on a stationary surface with Nokia approved chargers designated for this device. Do not move the phone by a rechargeable battery. Use the battery only ...

User Guide
Page 93
If your device, battery, charger, or any device is a product of electronic devices, damage batteries, and warp or melt certain plastics. • Do not store the device in cold areas. ... and prevent proper operation. • Do not touch the display with care. Objects like earrings or jewelry may violate regulations governing radio devices. • Use chargers indoors. • Always create a backup of liquids or moisture can form inside the device and damage electronic circuit boards. • Do not attempt to open...
If your device, battery, charger, or any device is a product of electronic devices, damage batteries, and warp or melt certain plastics. • Do not store the device in cold areas. ... and prevent proper operation. • Do not touch the display with care. Objects like earrings or jewelry may violate regulations governing radio devices. • Use chargers indoors. • Always create a backup of liquids or moisture can form inside the device and damage electronic circuit boards. • Do not attempt to open...


