Instruction Manual
Page 6
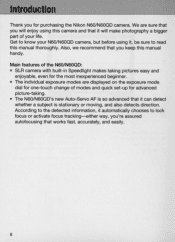
...either way, you will enjoy using it can detect whether a subject is so advanced that works fast, accurately, and easily. 6 Main features of modes and quick set-up for advanced picture-taking pictures easy and enjoyable, even for purchasing the Nikon N60/N60QD camera. Introduction Thank you keep .... According to read this manual thoroughly. We are displayed on the exposure mode dial for one-touch change of the N60/N60QD: • SLR camera with built-in Speedlight makes taking . • The N60/N60QD's new Auto-Servo AF is stationary or moving, and also detects direction .
...either way, you will enjoy using it can detect whether a subject is so advanced that works fast, accurately, and easily. 6 Main features of modes and quick set-up for advanced picture-taking pictures easy and enjoyable, even for purchasing the Nikon N60/N60QD camera. Introduction Thank you keep .... According to read this manual thoroughly. We are displayed on the exposure mode dial for one-touch change of the N60/N60QD: • SLR camera with built-in Speedlight makes taking . • The N60/N60QD's new Auto-Servo AF is stationary or moving, and also detects direction .
Instruction Manual
Page 7
Using your camera serviced by other than Nikon brand accessories. 7 Have Nikon spot check your camera regularly Nikon recommends that you have your camera correctly The Nikon N60/N60QD's performance has been optimized for use with other manufacturers may not meet Nikon's criteria for specifications, and nonconforming accessories could damage the N60/N60QD's components. Accessories made by an authorized dealer or service center...
Using your camera serviced by other than Nikon brand accessories. 7 Have Nikon spot check your camera regularly Nikon recommends that you have your camera correctly The Nikon N60/N60QD's performance has been optimized for use with other manufacturers may not meet Nikon's criteria for specifications, and nonconforming accessories could damage the N60/N60QD's components. Accessories made by an authorized dealer or service center...
Instruction Manual
Page 8
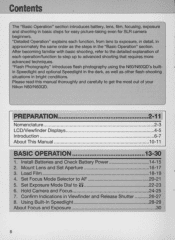
... situations in basic steps for easy picture-taking even for SLR camera beginners. Set Exposure Mode Dial to AF 20-21 5. Mount Lens and Set Aperture 16-17 3. "Flash Photography" introduces flash photography using the N60/N60QD's builtin Speedlight and optional Speedlight in the dark, ... up to the detailed explanation of your Nikon N60/N60QD. Set Focus Mode Selector to 8 22-23 6. Hold Camera and Focus 24-25 7. After becoming familiar with basic shooting, refer to advanced shooting that requires more advanced techniques. Using Built-In Speedlight 28-29 About Focus ...
... situations in basic steps for easy picture-taking even for SLR camera beginners. Set Exposure Mode Dial to AF 20-21 5. Mount Lens and Set Aperture 16-17 3. "Flash Photography" introduces flash photography using the N60/N60QD's builtin Speedlight and optional Speedlight in the dark, ... up to the detailed explanation of your Nikon N60/N60QD. Set Focus Mode Selector to 8 22-23 6. Hold Camera and Focus 24-25 7. After becoming familiar with basic shooting, refer to advanced shooting that requires more advanced techniques. Using Built-In Speedlight 28-29 About Focus ...

Instruction Manual
Page 9
... Flash Photography 58-63 Built-in Speed light and Matrix Balanced Fill-Flash 58 Flash shooting distance range 58 Flash sync mode features 59 USing built-in Speedlight 60-61 Usable lenses with built-in Speedlight 61 Usable Optional Speedlights 62-63 Available Mode Combinations 64 MISCELLANEOUS 65-77 Optional Accessories 66...
... Flash Photography 58-63 Built-in Speed light and Matrix Balanced Fill-Flash 58 Flash shooting distance range 58 Flash sync mode features 59 USing built-in Speedlight 60-61 Usable lenses with built-in Speedlight 61 Usable Optional Speedlights 62-63 Available Mode Combinations 64 MISCELLANEOUS 65-77 Optional Accessories 66...
Instruction Manual
Page 10
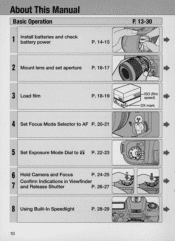
About This Manual [ Basic Operation 1 Install batteries and check battery power P. 14-15 P. 13-30 • 2 Mount lens and set aperture P.16-17 • 3 Load film P.18-19 • 4 Set Focus Mode Selector to AF P.20-21 • 5 Set Exposure Mode Dial to 8 P. 22-23 • 6 Hold Camera and Focus ~ ~ P. 24-25 7 Confirm Indications in Viewfinder and Release Shutter P.26-27 • 8 Using Built-In Speedlight P.28-29 • 10
About This Manual [ Basic Operation 1 Install batteries and check battery power P. 14-15 P. 13-30 • 2 Mount lens and set aperture P.16-17 • 3 Load film P.18-19 • 4 Set Focus Mode Selector to AF P.20-21 • 5 Set Exposure Mode Dial to 8 P. 22-23 • 6 Hold Camera and Focus ~ ~ P. 24-25 7 Confirm Indications in Viewfinder and Release Shutter P.26-27 • 8 Using Built-In Speedlight P.28-29 • 10
Instruction Manual
Page 11
... (P. 57) Flash Photography (P. 58-63)-Built-in Speedlight and Matrix Balanced Fill-Flash (P. 58)/ Flash shooting distance range (P. 58)/Flash sync mode features (P. 59)/ Using built-in Speedlight (P. 60-61)/Usable lenses with built-in Each Exposure Mode (P. 39-44)-8: General Purpose (P. 39)/ P: Auto-Multi (P. 40)/S: Shutter-Priority Auto (P. 41 )/A: Aperture-Priority...
... (P. 57) Flash Photography (P. 58-63)-Built-in Speedlight and Matrix Balanced Fill-Flash (P. 58)/ Flash shooting distance range (P. 58)/Flash sync mode features (P. 59)/ Using built-in Speedlight (P. 60-61)/Usable lenses with built-in Each Exposure Mode (P. 39-44)-8: General Purpose (P. 39)/ P: Auto-Multi (P. 40)/S: Shutter-Priority Auto (P. 41 )/A: Aperture-Priority...

Instruction Manual
Page 14
1 Install Batteries and Check Battery Power Use two CR1 23A or DL123Atype lithium batteri es with this camera. (Other batteri es can not be used.) 1.1 Turn off the main switch and open the battery chamber cover. 1.2 Insert batteries with the "EB" and "8 " ends positioned as marked inside the battery chamber cover, then firmly close the battery chamber cover. e • Incorrect positioning of EB and poles may cause damage to the camera. 14
1 Install Batteries and Check Battery Power Use two CR1 23A or DL123Atype lithium batteri es with this camera. (Other batteri es can not be used.) 1.1 Turn off the main switch and open the battery chamber cover. 1.2 Insert batteries with the "EB" and "8 " ends positioned as marked inside the battery chamber cover, then firmly close the battery chamber cover. e • Incorrect positioning of EB and poles may cause damage to the camera. 14

Instruction Manual
Page 15
...turn off 5 sec. l=.....Ll1I • Shutter speed and aperture indications in the LCD panel and viewfinder. after turning the main switch on and camera is left unused . • Battery power ~ appears: Sufficient battery power. ~ appears: Batteries are exhausted. IZI Check points ~---o--K-e-ep--th-e--b-at ... turn the main switch off and 0 replace both batteries at -te-r-ie-s-o-u-t-o-f-c-h-ild-r-e-n-'s-r-e-a-ch-.-I-f -sw-a-l-lo-w-e-d-,-c-o-n-ta-c-t-a----- Always use fresh batteries of the same brand. 2 ~ o We recommend that you take spare batteries with the ~~ indication.
...turn off 5 sec. l=.....Ll1I • Shutter speed and aperture indications in the LCD panel and viewfinder. after turning the main switch on and camera is left unused . • Battery power ~ appears: Sufficient battery power. ~ appears: Batteries are exhausted. IZI Check points ~---o--K-e-ep--th-e--b-at ... turn the main switch off and 0 replace both batteries at -te-r-ie-s-o-u-t-o-f-c-h-ild-r-e-n-'s-r-e-a-ch-.-I-f -sw-a-l-lo-w-e-d-,-c-o-n-ta-c-t-a----- Always use fresh batteries of the same brand. 2 ~ o We recommend that you take spare batteries with the ~~ indication.
Instruction Manual
Page 17
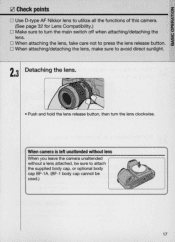
...optional body cap BF-1A. (BF-1 body cap cannot be sure to press the lens release button. When camera is left unattended without lens Wh en you leave the camera unattended without a lens attached , be use d .) 17 lens. D When attaching/detaching the lens, make sure to turn the lens clockwise. D .... • • Push and hold the lens release button , then turn the main switch off when attaching/detaching the o o ! ____IZ_l _C_h_ec_k__p_O_in_ts 0Z D Use D-type AF Nikkor lens to utilize all the functions of this camera. ~ (See page 32 for Lens Compatibility.) W Q.
...optional body cap BF-1A. (BF-1 body cap cannot be sure to press the lens release button. When camera is left unattended without lens Wh en you leave the camera unattended without a lens attached , be use d .) 17 lens. D When attaching/detaching the lens, make sure to turn the lens clockwise. D .... • • Push and hold the lens release button , then turn the main switch off when attaching/detaching the o o ! ____IZ_l _C_h_ec_k__p_O_in_ts 0Z D Use D-type AF Nikkor lens to utilize all the functions of this camera. ~ (See page 32 for Lens Compatibility.) W Q.

Instruction Manual
Page 18
When the camera is turned on, film is loaded and the camera back is closed , the film automat- ___"'7llLUL_ ISO (film speed) ~I DX mark ically advances to the first frame 3.1 Turn on the main switch, then open the camera back and insert film . • Insert from the bottom of the film cartridge. 3.2 Pull film leader out to red index mark. • Do not insert the film leader beyond the red index mark. • Hold the film cartridge and ensure film is set automatically (18025- 5000). 3 Load Film Use a DX-coded film. Film speed r is properly positioned with no slack . 18
When the camera is turned on, film is loaded and the camera back is closed , the film automat- ___"'7llLUL_ ISO (film speed) ~I DX mark ically advances to the first frame 3.1 Turn on the main switch, then open the camera back and insert film . • Insert from the bottom of the film cartridge. 3.2 Pull film leader out to red index mark. • Do not insert the film leader beyond the red index mark. • Hold the film cartridge and ensure film is set automatically (18025- 5000). 3 Load Film Use a DX-coded film. Film speed r is properly positioned with no slack . 18

Instruction Manual
Page 19
When film other than ffi OX-coded film is inserted , 1ZI Check points o z ~ D Only OX-coded film can be used with this camera.
When film other than ffi OX-coded film is inserted , 1ZI Check points o z ~ D Only OX-coded film can be used with this camera.

Instruction Manual
Page 20
In such situations, focus on a different subject located at the same distance, use focus lock (page 38) then recompose. • When you are unable to perform foc·us lock, set to AF (autofocus), the camera focuses automatically. 4.1 Set the focus mode selector to AF (autofocus). • Make sure ...to M (manual) and focus manually using the clear matte field . · 20 4 Set Focus Mode Selector to AF When ...
In such situations, focus on a different subject located at the same distance, use focus lock (page 38) then recompose. • When you are unable to perform foc·us lock, set to AF (autofocus), the camera focuses automatically. 4.1 Set the focus mode selector to AF (autofocus). • Make sure ...to M (manual) and focus manually using the clear matte field . · 20 4 Set Focus Mode Selector to AF When ...

Instruction Manual
Page 23
... Shutter speed and aperture are available with this program in -focus area). Portrait Program P. 46 Landscape Program P.46 Close-Up Program P.46 Use this program to accentuate your closeups will be sharply focused . With a deep depth of field , the overall landscape will be exposed so it...beauty of distant scenes. various shooting situations. With a shallow depth of the in oQ. Use this program to easily choose proper exposure controls in -focus area; Night Scene Program P.47 Use this camera. Even a very dark subject will be blurred. near and far subjects can be sharply ...
... Shutter speed and aperture are available with this program in -focus area). Portrait Program P. 46 Landscape Program P.46 Close-Up Program P.46 Use this program to accentuate your closeups will be sharply focused . With a deep depth of field , the overall landscape will be exposed so it...beauty of distant scenes. various shooting situations. With a shallow depth of the in oQ. Use this program to easily choose proper exposure controls in -focus area; Night Scene Program P.47 Use this camera. Even a very dark subject will be blurred. near and far subjects can be sharply ...

Instruction Manual
Page 24
...subject is recommended for support. • Stand with one foot forward a half step and keep your upper body still. • Grasp the camera handgrip with your right hand and use your body for shooting at slower shutter speeds. NOTE: Composing frame The frame coverage of the finder of this...image you should set the shutter speed faster than '1/focallength of your lens' sec. (Example: when using a 50mm lens, set the shutter speed faster than 1/50 sec.) Use of a tripod is in the viewfinder. 6.1 Hold the camera properly. • Keep your elbow propped against your left hand to cradle the...
...subject is recommended for support. • Stand with one foot forward a half step and keep your upper body still. • Grasp the camera handgrip with your right hand and use your body for shooting at slower shutter speeds. NOTE: Composing frame The frame coverage of the finder of this...image you should set the shutter speed faster than '1/focallength of your lens' sec. (Example: when using a 50mm lens, set the shutter speed faster than 1/50 sec.) Use of a tripod is in the viewfinder. 6.1 Hold the camera properly. • Keep your elbow propped against your left hand to cradle the...

Instruction Manual
Page 25
The camera focuses automatically and focus indicator • appears or blinks. • appears: Subject is activated to focus with autofocus. o o iii photos/negatives (page 52). Automatically tracks ... , see page 36. • To take a picture of a subject outside the focus brackets, use focus lock (page 38). When the subject is dark, the camera's AF-Assist Illuminator is in focus. o To take a picture of a off-center subject, use focus lock (page 38). • In situations where autofocus may not work as expected...
The camera focuses automatically and focus indicator • appears or blinks. • appears: Subject is activated to focus with autofocus. o o iii photos/negatives (page 52). Automatically tracks ... , see page 36. • To take a picture of a subject outside the focus brackets, use focus lock (page 38). When the subject is dark, the camera's AF-Assist Illuminator is in focus. o To take a picture of a off-center subject, use focus lock (page 38). • In situations where autofocus may not work as expected...

Instruction Manual
Page 26
... depressing the shutter rel ease button . 7.1 Confirm indications in the viewfinder while lightly pressing the shutter release button . • When " (ready-lig ht indication) blinks, use the built-in Speedlight. (See page 28/58.) • If a warn ing indication appears in the viewfinder, see page 70. 7.2 Confirm focus indicator. appears without...
... depressing the shutter rel ease button . 7.1 Confirm indications in the viewfinder while lightly pressing the shutter release button . • When " (ready-lig ht indication) blinks, use the built-in Speedlight. (See page 28/58.) • If a warn ing indication appears in the viewfinder, see page 70. 7.2 Confirm focus indicator. appears without...

Instruction Manual
Page 28
... bu ilt- Wait for the main subject and background, and ensures adequate flash output. (For details, see page 58.) NOTE: Continuous use of built-in Speedlight, it may stop firing to protect the firing tube. in Speedlight. 8.1 Press the Speedlight lock-release button to release the ...soon as the Speedlight is released it starts recharging , and when the Speedlight is ready to fire 'I appears without blinking in the viewfinder (when the camera's meter is on). • To close the Speedlight, press gently until it clicks shut. (To conserve power, keep the Speedlight closed when it is...
... bu ilt- Wait for the main subject and background, and ensures adequate flash output. (For details, see page 58.) NOTE: Continuous use of built-in Speedlight, it may stop firing to protect the firing tube. in Speedlight. 8.1 Press the Speedlight lock-release button to release the ...soon as the Speedlight is released it starts recharging , and when the Speedlight is ready to fire 'I appears without blinking in the viewfinder (when the camera's meter is on). • To close the Speedlight, press gently until it clicks shut. (To conserve power, keep the Speedlight closed when it is...

Instruction Manual
Page 29
...details, are also available. For details, see page 59 . • With dark subjects (within O.5m to 3m or 1.6 to 9.8 ft.), the camera's AFAssist Illuminator (page 36) is introduced in the viewfinder approx. 3 sec. Check the flash shooting distance range (page 58) and shoot again . ...page 61.) 8.2 Confirm ~ in viewfinder, then compose, focus and take the picture. • ~ blinks in this happens, under exposure may have limitations using Speedlight and may cause vignetting. (For details, see page 58.) uo0; Flash with Red-Eye Reduction , which reduces the "red-eye" effect with ...
...details, are also available. For details, see page 59 . • With dark subjects (within O.5m to 3m or 1.6 to 9.8 ft.), the camera's AFAssist Illuminator (page 36) is introduced in the viewfinder approx. 3 sec. Check the flash shooting distance range (page 58) and shoot again . ...page 61.) 8.2 Confirm ~ in viewfinder, then compose, focus and take the picture. • ~ blinks in this happens, under exposure may have limitations using Speedlight and may cause vignetting. (For details, see page 58.) uo0; Flash with Red-Eye Reduction , which reduces the "red-eye" effect with ...

Instruction Manual
Page 32
F - - set using the lens' aperture ring. CAUTION: Nikkor lenses that cannot be attached to the N60/N60QD The following Nikkor lenses cannot be attached to the N60/ N60QD (camera body or lens may be damaged): • AF Teleconverter TC-16A • Non-AI lenses • 400mm f/4 .S and 600mm f/ S.6 ...1000mm f/ 11 (No. 142361 to 143000) • Reflex 2000mm f/ 11 (No. 200310 or smaller) • Medical-Nikkor 200mm f/ S.6 (can be used only when the exposure mode is attached • Usable exposure modes are limited. appears in place of CPU lens OOtype AF Nikkor When a non-CPU...
F - - set using the lens' aperture ring. CAUTION: Nikkor lenses that cannot be attached to the N60/N60QD The following Nikkor lenses cannot be attached to the N60/ N60QD (camera body or lens may be damaged): • AF Teleconverter TC-16A • Non-AI lenses • 400mm f/4 .S and 600mm f/ S.6 ...1000mm f/ 11 (No. 142361 to 143000) • Reflex 2000mm f/ 11 (No. 200310 or smaller) • Medical-Nikkor 200mm f/ S.6 (can be used only when the exposure mode is attached • Usable exposure modes are limited. appears in place of CPU lens OOtype AF Nikkor When a non-CPU...

Instruction Manual
Page 33
""z''"" PC Nikkor - =c.>. AI-S or AI type Nikkor, Series-E, - AI-S or AI type '-i' Teleconverters - AF-S, AF-I Teleconverter - Z Non-D-type AF Nikkor =c.>. (except AF Nikkor 0 c..> for F3AF) AI -P Nikkor - AI-modified Nikkor Medical-Nikkor 120mm f/4 - t.. 0 Reflex-Nikkor - Types of CPU lenses and other usable lenses ~ Focus mode Exposure mode Metering system Manual with Any mode Matrix Lens Autofocus electronic Manual other than rangefinder M M 3D 6segment 6segment CenterWeighted*' D-type AF Nikkor 0 t.. "'"·0 "'" AF-I Nikkor -
""z''"" PC Nikkor - =c.>. AI-S or AI type Nikkor, Series-E, - AI-S or AI type '-i' Teleconverters - AF-S, AF-I Teleconverter - Z Non-D-type AF Nikkor =c.>. (except AF Nikkor 0 c..> for F3AF) AI -P Nikkor - AI-modified Nikkor Medical-Nikkor 120mm f/4 - t.. 0 Reflex-Nikkor - Types of CPU lenses and other usable lenses ~ Focus mode Exposure mode Metering system Manual with Any mode Matrix Lens Autofocus electronic Manual other than rangefinder M M 3D 6segment 6segment CenterWeighted*' D-type AF Nikkor 0 t.. "'"·0 "'" AF-I Nikkor -