
Instruction Manual
Page 1
Nikon -in INSTRUCTION MANUAL ~
Nikon -in INSTRUCTION MANUAL ~
Instruction Manual
Page 6
... Thank you for one-touch change of your N60/N60QD camera, but before using this camera and that you keep this manual thoroughly. We are displayed on the exposure mode dial for purchasing the Nikon N60/N60QD camera. Get to know your life. Main features of the N60/N60QD: • SLR camera with built-in Speedlight makes taking . • The...
... Thank you for one-touch change of your N60/N60QD camera, but before using this camera and that you keep this manual thoroughly. We are displayed on the exposure mode dial for purchasing the Nikon N60/N60QD camera. Get to know your life. Main features of the N60/N60QD: • SLR camera with built-in Speedlight makes taking . • The...
Instruction Manual
Page 8
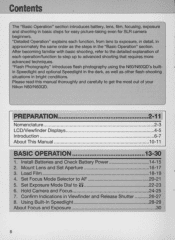
...explanation of your Nikon N60/N60QD. Install Batteries and Check Battery Power 14-15 2. Confirm Indications in basic steps for easy picture-taking even for SLR camera beginners. Using Built-In Speedlight 28-29 About Focus and Exposure 30 8 Please read this manual thoroughly and carefully...Operation" section. PREPARATION 2-11 Nomenclature 2-3 LCDNiewfinder Displays 4-5 Introduction 6-7 About This Manual 10-11 BASIC OPERATION 13-30 1. Load Film 18-19 4. Set Exposure Mode Dial to AF 20-21 5. Hold Camera and Focus 24-25 7. Mount Lens and Set Aperture 16-17 3. Contents ...
...explanation of your Nikon N60/N60QD. Install Batteries and Check Battery Power 14-15 2. Confirm Indications in basic steps for easy picture-taking even for SLR camera beginners. Using Built-In Speedlight 28-29 About Focus and Exposure 30 8 Please read this manual thoroughly and carefully...Operation" section. PREPARATION 2-11 Nomenclature 2-3 LCDNiewfinder Displays 4-5 Introduction 6-7 About This Manual 10-11 BASIC OPERATION 13-30 1. Load Film 18-19 4. Set Exposure Mode Dial to AF 20-21 5. Hold Camera and Focus 24-25 7. Mount Lens and Set Aperture 16-17 3. Contents ...
Instruction Manual
Page 10
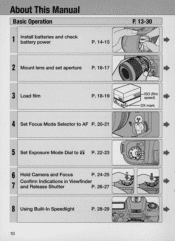
About This Manual [ Basic Operation 1 Install batteries and check battery power P. 14-15 P. 13-30 • 2 Mount lens and set aperture P.16-17 • 3 Load film P.18-19 • 4 Set Focus Mode Selector to AF P.20-21 • 5 Set Exposure Mode Dial to 8 P. 22-23 • 6 Hold Camera and Focus ~ ~ P. 24-25 7 Confirm Indications in Viewfinder and Release Shutter P.26-27 • 8 Using Built-In Speedlight P.28-29 • 10
About This Manual [ Basic Operation 1 Install batteries and check battery power P. 14-15 P. 13-30 • 2 Mount lens and set aperture P.16-17 • 3 Load film P.18-19 • 4 Set Focus Mode Selector to AF P.20-21 • 5 Set Exposure Mode Dial to 8 P. 22-23 • 6 Hold Camera and Focus ~ ~ P. 24-25 7 Confirm Indications in Viewfinder and Release Shutter P.26-27 • 8 Using Built-In Speedlight P.28-29 • 10
Instruction Manual
Page 11
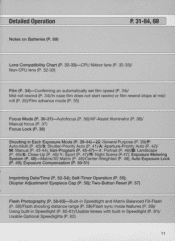
...Speedlight and Matrix Balanced Fill-Flash (P. 58)/ Flash shooting distance range (P. 58)/Flash sync mode features (P. 59)/ Using built-in Speedlight (P. 60-61)/Usable lenses with built-in Each Exposure Mode (P. 39-44)-8: General Purpose (P. 39)/ P: Auto-Multi (P. 40)/S: Shutter-Priority Auto ...rewind or film rewind stops at midroll (P. 35)/Film advance mode (P. 35) Focus Mode (P. 36-37)-Autofocus (P. 36)/AF-Assist Illuminator (P. 36)/ Manual focus (P. 37) Focus Lock (P. 38) Shooting in Speedlight (P. 61)/ Usable Optional Speedlights (P. 62) 11 Self-Timer Operation (P. 55); Vari-Program...
...Speedlight and Matrix Balanced Fill-Flash (P. 58)/ Flash shooting distance range (P. 58)/Flash sync mode features (P. 59)/ Using built-in Speedlight (P. 60-61)/Usable lenses with built-in Each Exposure Mode (P. 39-44)-8: General Purpose (P. 39)/ P: Auto-Multi (P. 40)/S: Shutter-Priority Auto ...rewind or film rewind stops at midroll (P. 35)/Film advance mode (P. 35) Focus Mode (P. 36-37)-Autofocus (P. 36)/AF-Assist Illuminator (P. 36)/ Manual focus (P. 37) Focus Lock (P. 38) Shooting in Speedlight (P. 61)/ Usable Optional Speedlights (P. 62) 11 Self-Timer Operation (P. 55); Vari-Program...
Instruction Manual
Page 16
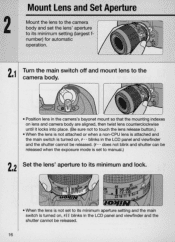
... LCD panel and viewfinder and the shutter cannot be released . (F - - does not blink and shutter can be released when the exposure mode is set to manual.) 2•2 Set the lens' aperture to its minimum and lock. • When the lens is not set the lens' aperture to its minimum setting (largest... , FE E blinks in the LCD panel and viewfinder and the shutter cannot be released. 16 2 Mount Lens and Set Aperture Mount the lens to the camera body and set to touch the lens release button.) • When the lens is not attached or when a non-CPU lens is attached and the...
... LCD panel and viewfinder and the shutter cannot be released . (F - - does not blink and shutter can be released when the exposure mode is set to manual.) 2•2 Set the lens' aperture to its minimum and lock. • When the lens is not set the lens' aperture to its minimum setting (largest... , FE E blinks in the LCD panel and viewfinder and the shutter cannot be released. 16 2 Mount Lens and Set Aperture Mount the lens to the camera body and set to touch the lens release button.) • When the lens is not attached or when a non-CPU lens is attached and the...

Instruction Manual
Page 20
... recompose. • When you are unable to perform foc·us lock, set to AF (autofocus), the camera focuses automatically. 4.1 Set the focus mode selector to AF (autofocus). • Make sure to M (manual) and focus manually using the clear matte field . · 20 4 Set Focus Mode Selector to AF When the focus mode...
... recompose. • When you are unable to perform foc·us lock, set to AF (autofocus), the camera focuses automatically. 4.1 Set the focus mode selector to AF (autofocus). • Make sure to M (manual) and focus manually using the clear matte field . · 20 4 Set Focus Mode Selector to AF When the focus mode...

Instruction Manual
Page 21
... brackets For example, when shooting an animal inside a cage or a person in shadow. 21 o With the focus mode set to rotate the lens' focus ring manually with the subject located at AF, the shutter cannot be released when the 0 subject is in a forest. Low contrast scenes For example, where the subject...
... brackets For example, when shooting an animal inside a cage or a person in shadow. 21 o With the focus mode set to rotate the lens' focus ring manually with the subject located at AF, the shutter cannot be released when the 0 subject is in a forest. Low contrast scenes For example, where the subject...

Instruction Manual
Page 23
.... it freezes the motion of distant scenes. Portrait Program P. 46 Landscape Program P.46 Close-Up Program P.46 Use this camera. various shooting situations. near and far subjects can be sharply focused or the background can be sharply focused . Even a ...very dark subject will be blurred. With a shallow depth of program Aperture-Priority Auto P. 42 You set manually. o See step 5.2 for the summary of each exposure mode and each reference page for the operating instructions and details. ~ Symbol A M J~ . • E ~...
.... it freezes the motion of distant scenes. Portrait Program P. 46 Landscape Program P.46 Close-Up Program P.46 Use this camera. various shooting situations. near and far subjects can be sharply focused or the background can be sharply focused . Even a ...very dark subject will be blurred. With a shallow depth of program Aperture-Priority Auto P. 42 You set manually. o See step 5.2 for the summary of each exposure mode and each reference page for the operating instructions and details. ~ Symbol A M J~ . • E ~...
Instruction Manual
Page 30
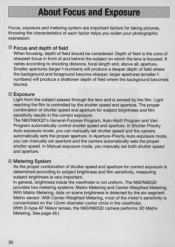
... and aperture. See page 48.) 30 In Aperture-Priority Auto exposure mode, you can manually set aperture and the camera automatically sets the proper shutter speed. The N60/N60QD provides two metering systems: Matrix Metering and Center-Weighted Metering. Focus and depth of...combination of field where the background becomes blurred. With Center-Weighted Metering , most of each factor helps you manually set shutter speed and the camera automatically sets the proper aperture. It varies according to subject brightness and film sensitivity, measuring subject brightness is ...
... and aperture. See page 48.) 30 In Aperture-Priority Auto exposure mode, you can manually set aperture and the camera automatically sets the proper shutter speed. The N60/N60QD provides two metering systems: Matrix Metering and Center-Weighted Metering. Focus and depth of...combination of field where the background becomes blurred. With Center-Weighted Metering , most of each factor helps you manually set shutter speed and the camera automatically sets the proper aperture. It varies according to subject brightness and film sensitivity, measuring subject brightness is ...

Instruction Manual
Page 32
CPU contacts of the aperture indication in the LCD panel and viewfinder; O-type AF lenses give you access to M (manual). (Shutter cannot be released with this camera. A non-CPU lens can be used only when the exposure mode is attached • Usable exposure modes are limited. F - - ...CAUTION: Nikkor lenses that cannot be attached to the N60/N60QD The following Nikkor lenses cannot be attached to the N60/ N60QD (camera body or lens may be damaged): • AF Teleconverter TC-16A • Non-AI lenses • 400mm f/4...
CPU contacts of the aperture indication in the LCD panel and viewfinder; O-type AF lenses give you access to M (manual). (Shutter cannot be released with this camera. A non-CPU lens can be used only when the exposure mode is attached • Usable exposure modes are limited. F - - ...CAUTION: Nikkor lenses that cannot be attached to the N60/N60QD The following Nikkor lenses cannot be attached to the N60/ N60QD (camera body or lens may be damaged): • AF Teleconverter TC-16A • Non-AI lenses • 400mm f/4...

Instruction Manual
Page 33
AI-modified Nikkor Medical-Nikkor 120mm f/4 - AI-S or AI type Nikkor, Series-E, - ""z''"" PC Nikkor - =c.>. AI-S or AI type '-i' Teleconverters - AF-S, AF-I Teleconverter - "'"·0 "'" AF-I Nikkor - Types of CPU lenses and other usable lenses ~ Focus mode Exposure mode Metering system Manual with Any mode Matrix Lens Autofocus electronic Manual other than rangefinder M M 3D 6segment 6segment CenterWeighted*' D-type AF Nikkor 0 t.. Z Non-D-type AF Nikkor =c.>. (except AF Nikkor 0 c..> for F3AF) AI -P Nikkor - t.. 0 Reflex-Nikkor -
AI-modified Nikkor Medical-Nikkor 120mm f/4 - AI-S or AI type Nikkor, Series-E, - ""z''"" PC Nikkor - =c.>. AI-S or AI type '-i' Teleconverters - AF-S, AF-I Teleconverter - "'"·0 "'" AF-I Nikkor - Types of CPU lenses and other usable lenses ~ Focus mode Exposure mode Metering system Manual with Any mode Matrix Lens Autofocus electronic Manual other than rangefinder M M 3D 6segment 6segment CenterWeighted*' D-type AF Nikkor 0 t.. Z Non-D-type AF Nikkor =c.>. (except AF Nikkor 0 c..> for F3AF) AI -P Nikkor - t.. 0 Reflex-Nikkor -

Instruction Manual
Page 37
... may not work as expected (page 20) or lens other than AF Nikkor (page 32) is activated automatically and cannot be canceled . Manual focus • Set the focus mode selector to 9.8 ft .). does not appear in the viewfinder. AF-Assist Illuminator with optional Speedlight When...in situations where autofocus may stop emitting light to protect the firing tube. See page 62 for a while before using the Illuminator again. In manual focus , shutter can be released anytime. The Electronic Rangefinder works with a focal length of f/ 5.6 or faster. 37 Look through the viewfinder...
... may not work as expected (page 20) or lens other than AF Nikkor (page 32) is activated automatically and cannot be canceled . Manual focus • Set the focus mode selector to 9.8 ft .). does not appear in the viewfinder. AF-Assist Illuminator with optional Speedlight When...in situations where autofocus may stop emitting light to protect the firing tube. See page 62 for a while before using the Illuminator again. In manual focus , shutter can be released anytime. The Electronic Rangefinder works with a focal length of f/ 5.6 or faster. 37 Look through the viewfinder...

Instruction Manual
Page 41
... Command Dial. If the warning indication still remains on , use Speedlight. • When - - blinks in the LCD panel or viewfinder. • ;-; the camera automatically selects the proper aperture to manually set the shutter speed (30-1/2000 sec.) with slower speeds, you can freeze the motion of the following warning indications will appear...
... Command Dial. If the warning indication still remains on , use Speedlight. • When - - blinks in the LCD panel or viewfinder. • ;-; the camera automatically selects the proper aperture to manually set the shutter speed (30-1/2000 sec.) with slower speeds, you can freeze the motion of the following warning indications will appear...

Instruction Manual
Page 42
Shootin in Each Ex osure Mode-continued A: Aperture- By varying the aperture, and thus controll ing the depth of field, you a correct exposure. The camera automatically selects a suitable shutter speed to give you can make the background and foreground sharper, or blur the background. In flash photography, varying the aperture changes L-~~__ the flash shooting distance. For avai lable mode com binations. Priority Auto Enables you to A, then set your desired aperture manually. see page 64. 1 Set the exposure mode dial to set the aperture using the Command Dial. 60 _
Shootin in Each Ex osure Mode-continued A: Aperture- By varying the aperture, and thus controll ing the depth of field, you a correct exposure. The camera automatically selects a suitable shutter speed to give you can make the background and foreground sharper, or blur the background. In flash photography, varying the aperture changes L-~~__ the flash shooting distance. For avai lable mode com binations. Priority Auto Enables you to A, then set your desired aperture manually. see page 64. 1 Set the exposure mode dial to set the aperture using the Command Dial. 60 _
Instruction Manual
Page 43
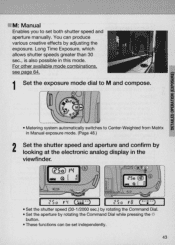
... effects by rotating the Command Dial while pressing the @ button . • These functions can be set both shutter speed and aperture manually. M: Manual Enables you to Center-Weighted from Matrix in Manual exposure mode. (Page 48.) 2 Set the shutter speed and aperture and confirm by looking at the electronic analog display in this...
... effects by rotating the Command Dial while pressing the @ button . • These functions can be set both shutter speed and aperture manually. M: Manual Enables you to Center-Weighted from Matrix in Manual exposure mode. (Page 48.) 2 Set the shutter speed and aperture and confirm by looking at the electronic analog display in this...

Instruction Manual
Page 44
... close the shutter. Use lens' aperture ring . Continuous exposure is possible for shooting nighttime scenes or stars. Not available with a fresh set with Manual exposure mode. However, the camera's meter will tum off). Select Long Time Exposure (of lithium batteries. Press the shutter release button again to -1 .5EV + · •0•·...
... close the shutter. Use lens' aperture ring . Continuous exposure is possible for shooting nighttime scenes or stars. Not available with a fresh set with Manual exposure mode. However, the camera's meter will tum off). Select Long Time Exposure (of lithium batteries. Press the shutter release button again to -1 .5EV + · •0•·...

Instruction Manual
Page 48
...on brightness within the 12mm-diameter circ le in the viewfinder and is thus useful for basing exposure on a specific area of this camera is normally set to Manual (page 43) or when the Auto Exposure Lock function (page 49) is used . 48 With D-type AF Nikkor lenses, 3D... Matrix Metering automatically activates to use scene brightness, scene contrast and subject distance information to Manual or when the Auto Exposure Lock function (page 49) is used . All exposure modes except Manual exposure and the Auto Exposure Lock function (page 49) employ Matrix Metering. The metering system ...
...on brightness within the 12mm-diameter circ le in the viewfinder and is thus useful for basing exposure on a specific area of this camera is normally set to Manual (page 43) or when the Auto Exposure Lock function (page 49) is used . 48 With D-type AF Nikkor lenses, 3D... Matrix Metering automatically activates to use scene brightness, scene contrast and subject distance information to Manual or when the Auto Exposure Lock function (page 49) is used . All exposure modes except Manual exposure and the Auto Exposure Lock function (page 49) employ Matrix Metering. The metering system ...

Instruction Manual
Page 55
Self-Timer 0 eration You can also be canceled by leaving the camera untouched for more than Manual , cover the eyepiece with ~ the supplied eyepiece cap (page 56) or hand ...setting the self-timer in autofocus to; mode. after setting the function. 55 Use a tripod or place the camera on the LCD panel. :Iozli t; :z ir ~ • When button is released . before or during self...timer operation), press button again, turn the main switch off or perform Two-Button Reset (page 57). of camera's meter changes to be in focus with autofocus). 0 ~ • To shoot in 10 seconds. The...
Self-Timer 0 eration You can also be canceled by leaving the camera untouched for more than Manual , cover the eyepiece with ~ the supplied eyepiece cap (page 56) or hand ...setting the self-timer in autofocus to; mode. after setting the function. 55 Use a tripod or place the camera on the LCD panel. :Iozli t; :z ir ~ • When button is released . before or during self...timer operation), press button again, turn the main switch off or perform Two-Button Reset (page 57). of camera's meter changes to be in focus with autofocus). 0 ~ • To shoot in 10 seconds. The...

Instruction Manual
Page 60
...Shutter-Priority Auto Available shutter speed Automatically set 1/125-30 sec:' Available aperture Automatically set Page ---3:9w- ~ - 41 Aperture-Priority Auto Manual Automatically set the aperture according to the flash shooting distance range table on the Speedlight to retract. 2 Set exposure mode and confirm shutter... flash is fired (or attached optional Speedlight is set and ~ button is released . • Press down gently on page 58. 60 -continued 1Using built-in Speedlight Release the built-in Speedlight by pressing the Speed light lock-release button, and set the flash sync ...
...Shutter-Priority Auto Available shutter speed Automatically set 1/125-30 sec:' Available aperture Automatically set Page ---3:9w- ~ - 41 Aperture-Priority Auto Manual Automatically set the aperture according to the flash shooting distance range table on the Speedlight to retract. 2 Set exposure mode and confirm shutter... flash is fired (or attached optional Speedlight is set and ~ button is released . • Press down gently on page 58. 60 -continued 1Using built-in Speedlight Release the built-in Speedlight by pressing the Speed light lock-release button, and set the flash sync ...