Instruction Manual
Page 6
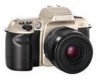
...the N60/N60QD: • SLR camera with built-in Speedlight makes taking pictures easy and enjoyable, even for the most inexperienced beginner. • The individual exposure modes are sure that you will make photography a bigger part of modes and quick set-up for purchasing the Nikon N60/N60QD camera. We... autofocusing that it will enjoy using it can detect whether a subject is so advanced that you keep this manual handy. Introduction Thank you for advanced picture-taking . • The N60/N60QD's new Auto-Servo AF is stationary or moving, and also detects direction .
...the N60/N60QD: • SLR camera with built-in Speedlight makes taking pictures easy and enjoyable, even for the most inexperienced beginner. • The individual exposure modes are sure that you will make photography a bigger part of modes and quick set-up for purchasing the Nikon N60/N60QD camera. We... autofocusing that it will enjoy using it can detect whether a subject is so advanced that you keep this manual handy. Introduction Thank you for advanced picture-taking . • The N60/N60QD's new Auto-Servo AF is stationary or moving, and also detects direction .
Instruction Manual
Page 8
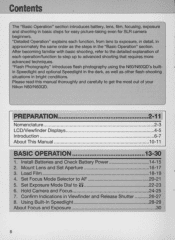
... ...........26-27 8. Mount Lens and Set Aperture 16-17 3. Confirm Indications in basic steps for easy picture-taking even for SLR camera beginners. Set Exposure Mode Dial to AF 20-21 5. Using Built-In Speedlight 28-29 About Focus and Exposure 30 8 .... PREPARATION 2-11 Nomenclature 2-3 LCDNiewfinder Displays 4-5 Introduction 6-7 About This Manual 10-11 BASIC OPERATION 13-30 1. Load Film 18-19 4. Set Focus Mode Selector to 8 22-23 6. "Detailed Operation" explains each operation/function to step up to the detailed explanation of your Nikon N60/N60QD.
... ...........26-27 8. Mount Lens and Set Aperture 16-17 3. Confirm Indications in basic steps for easy picture-taking even for SLR camera beginners. Set Exposure Mode Dial to AF 20-21 5. Using Built-In Speedlight 28-29 About Focus and Exposure 30 8 .... PREPARATION 2-11 Nomenclature 2-3 LCDNiewfinder Displays 4-5 Introduction 6-7 About This Manual 10-11 BASIC OPERATION 13-30 1. Load Film 18-19 4. Set Focus Mode Selector to 8 22-23 6. "Detailed Operation" explains each operation/function to step up to the detailed explanation of your Nikon N60/N60QD.
Instruction Manual
Page 10
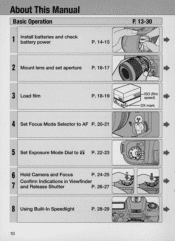
About This Manual [ Basic Operation 1 Install batteries and check battery power P. 14-15 P. 13-30 • 2 Mount lens and set aperture P.16-17 • 3 Load film P.18-19 • 4 Set Focus Mode Selector to AF P.20-21 • 5 Set Exposure Mode Dial to 8 P. 22-23 • 6 Hold Camera and Focus ~ ~ P. 24-25 7 Confirm Indications in Viewfinder and Release Shutter P.26-27 • 8 Using Built-In Speedlight P.28-29 • 10
About This Manual [ Basic Operation 1 Install batteries and check battery power P. 14-15 P. 13-30 • 2 Mount lens and set aperture P.16-17 • 3 Load film P.18-19 • 4 Set Focus Mode Selector to AF P.20-21 • 5 Set Exposure Mode Dial to 8 P. 22-23 • 6 Hold Camera and Focus ~ ~ P. 24-25 7 Confirm Indications in Viewfinder and Release Shutter P.26-27 • 8 Using Built-In Speedlight P.28-29 • 10
Instruction Manual
Page 16
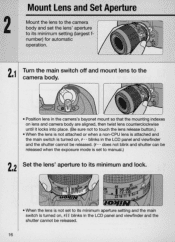
... not attached or when a non-CPU lens is attached and the main switch is turned on , FE E blinks in the camera's bayonet mount so that the mounting indexes on lens and camera body are aligned, then twist lens counterclockwise until it locks into place. (Be sure not to its minimum aperture setting... the lens is turned on , F - - blinks in the LCD panel and viewfinder and the shutter cannot be released when the exposure mode is set to manual.) 2•2 Set the lens' aperture to its minimum setting (largest fnumber) for automatic operation . 2.1 Turn the main switch off and mount lens to the...
... not attached or when a non-CPU lens is attached and the main switch is turned on , FE E blinks in the camera's bayonet mount so that the mounting indexes on lens and camera body are aligned, then twist lens counterclockwise until it locks into place. (Be sure not to its minimum aperture setting... the lens is turned on , F - - blinks in the LCD panel and viewfinder and the shutter cannot be released when the exposure mode is set to manual.) 2•2 Set the lens' aperture to its minimum setting (largest fnumber) for automatic operation . 2.1 Turn the main switch off and mount lens to the...

Instruction Manual
Page 20
... recompose. • When you are unable to perform foc·us lock, set to AF (autofocus), the camera focuses automatically. 4.1 Set the focus mode selector to AF (autofocus). • Make sure to M (manual) and focus manually using the clear matte field . · 20 4 Set Focus Mode Selector to AF When the focus mode...
... recompose. • When you are unable to perform foc·us lock, set to AF (autofocus), the camera focuses automatically. 4.1 Set the focus mode selector to AF (autofocus). • Make sure to M (manual) and focus manually using the clear matte field . · 20 4 Set Focus Mode Selector to AF When the focus mode...

Instruction Manual
Page 23
...landscape will be blurred. [ZJ Check pOints o z o ~ Ten exposure modes are set the desired aperture, and based on that, the camera selects the correct shutter speed . Lets you to take pictures of the in the evening or at night. Night Scene Program P.47 Use this... Suited to situations where it creates a blurred background to take up-close pictures. it is difficult to create exciting action photos. Manual P. 43-44 Shutter speed and aperture are available with an artistically blurred background . With a shallow depth of program Aperture-Priority Auto P....
...landscape will be blurred. [ZJ Check pOints o z o ~ Ten exposure modes are set the desired aperture, and based on that, the camera selects the correct shutter speed . Lets you to take pictures of the in the evening or at night. Night Scene Program P.47 Use this... Suited to situations where it creates a blurred background to take up-close pictures. it is difficult to create exciting action photos. Manual P. 43-44 Shutter speed and aperture are available with an artistically blurred background . With a shallow depth of program Aperture-Priority Auto P....
Instruction Manual
Page 30
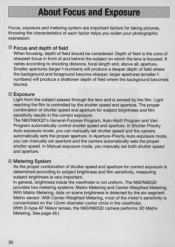
... lens and is sensed by the six-segment Matrix sensor. The N60/N60QD's General-Purpose Program, Auto-Multi Program and VariProgram automatically control shutter speed and aperture. In Aperture-Priority Auto exposure mode, you can manually set shutter speed and the camera automatically sets the proper aperture. It varies according to subject brightness...
... lens and is sensed by the six-segment Matrix sensor. The N60/N60QD's General-Purpose Program, Auto-Multi Program and VariProgram automatically control shutter speed and aperture. In Aperture-Priority Auto exposure mode, you can manually set shutter speed and the camera automatically sets the proper aperture. It varies according to subject brightness...

Instruction Manual
Page 32
appears in place of CPU lens OOtype AF Nikkor When a non-CPU lens is set to M (manual). (Shutter cannot be released with other modes.) With a non-CPU lens, the exposure meter cannot be activated and the aperture cannot be used in the ... be set /confirm aperture using the aperture button and Command Dial. CAUTION: Nikkor lenses that cannot be attached to the N60/N60QD The following Nikkor lenses cannot be attached to the N60/ N60QD (camera body or lens may be damaged): • AF Teleconverter TC-16A • Non-AI lenses • 400mm f/4 .S and 600mm...
appears in place of CPU lens OOtype AF Nikkor When a non-CPU lens is set to M (manual). (Shutter cannot be released with other modes.) With a non-CPU lens, the exposure meter cannot be activated and the aperture cannot be used in the ... be set /confirm aperture using the aperture button and Command Dial. CAUTION: Nikkor lenses that cannot be attached to the N60/N60QD The following Nikkor lenses cannot be attached to the N60/ N60QD (camera body or lens may be damaged): • AF Teleconverter TC-16A • Non-AI lenses • 400mm f/4 .S and 600mm...

Instruction Manual
Page 41
...; For available mode combinations, see page 44. 41 With high shutter speeds, you to provide a correct exposure. I: Select higher shutter speed . the camera automatically selects the proper aperture to manually set the shutter speed (30-1/2000 sec.) with slower speeds, you can freeze the motion of the following warning indications will appear...
...; For available mode combinations, see page 44. 41 With high shutter speeds, you to provide a correct exposure. I: Select higher shutter speed . the camera automatically selects the proper aperture to manually set the shutter speed (30-1/2000 sec.) with slower speeds, you can freeze the motion of the following warning indications will appear...

Instruction Manual
Page 42
Priority Auto Enables you can make the background and foreground sharper, or blur the background. In flash photography, varying the aperture changes L-~~__ the flash shooting distance. For avai lable mode com binations. see page 64. 1 Set the exposure mode dial to A, then set your desired aperture manually. Shootin in Each Ex osure Mode-continued A: Aperture- By varying the aperture, and thus controll ing the depth of field, you to give you a correct exposure. The camera automatically selects a suitable shutter speed to set the aperture using the Command Dial. 60 _
Priority Auto Enables you can make the background and foreground sharper, or blur the background. In flash photography, varying the aperture changes L-~~__ the flash shooting distance. For avai lable mode com binations. see page 64. 1 Set the exposure mode dial to A, then set your desired aperture manually. Shootin in Each Ex osure Mode-continued A: Aperture- By varying the aperture, and thus controll ing the depth of field, you to give you a correct exposure. The camera automatically selects a suitable shutter speed to set the aperture using the Command Dial. 60 _

Instruction Manual
Page 44
... by using the self-timer (page 55) and tripod . Continuous exposure is possible for shooting nighttime scenes or stars. However, the camera's meter will tum off). long Time Exposure This function is reduced when shooting in the viewfinder and shoot. • A Non-CPU... hours with a fresh set with the @ button and the Command Dial. Correct exposure or ±0.5EV • + · 0 · - Not available with Manual exposure mode. Press the shutter release button again to -1 .5EV + · •0•· - .....Over +1.5EV + ·0·- 3 Confirm focus indicator...
... by using the self-timer (page 55) and tripod . Continuous exposure is possible for shooting nighttime scenes or stars. However, the camera's meter will tum off). long Time Exposure This function is reduced when shooting in the viewfinder and shoot. • A Non-CPU... hours with a fresh set with the @ button and the Command Dial. Correct exposure or ±0.5EV • + · 0 · - Not available with Manual exposure mode. Press the shutter release button again to -1 .5EV + · •0•· - .....Over +1.5EV + ·0·- 3 Confirm focus indicator...

Instruction Manual
Page 48
...brightness, scene contrast and subject distance information to Matrix Metering. The metering system automatically switches to Center-Weighted Metering when exposure mode is set to Manual (page 43) or when the Auto Exposure Lock function (page 49) is used . Matrix Metering/3D Matrix Metering Matrix Metering provides correct ...on brightness within the 12mm-diameter circ le in the viewfinder and is thus useful for basing exposure on a specific area of this camera is used . 48 All exposure modes except Manual exposure and the Auto Exposure Lock function (page 49) employ Matrix Metering.
...brightness, scene contrast and subject distance information to Matrix Metering. The metering system automatically switches to Center-Weighted Metering when exposure mode is set to Manual (page 43) or when the Auto Exposure Lock function (page 49) is used . Matrix Metering/3D Matrix Metering Matrix Metering provides correct ...on brightness within the 12mm-diameter circ le in the viewfinder and is thus useful for basing exposure on a specific area of this camera is used . 48 All exposure modes except Manual exposure and the Auto Exposure Lock function (page 49) employ Matrix Metering.

Instruction Manual
Page 55
...self-timer is pressed , duration of pressing the button. :z • The self-timer cannot be performed unless the camera's shutter can be canceled by leaving the camera untouched for more than Manual , cover the eyepiece with ~ the supplied eyepiece cap (page 56) or hand before the shutter is set, ...the self-timer/ red -eye reduction lamp lights for 2 sec. Use a tripod or place the camera on a stable surface before ...
...self-timer is pressed , duration of pressing the button. :z • The self-timer cannot be performed unless the camera's shutter can be canceled by leaving the camera untouched for more than Manual , cover the eyepiece with ~ the supplied eyepiece cap (page 56) or hand before the shutter is set, ...the self-timer/ red -eye reduction lamp lights for 2 sec. Use a tripod or place the camera on a stable surface before ...
Instruction Manual
Page 62
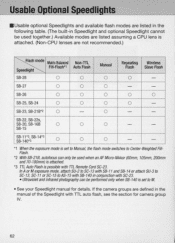
...; Ultraviolet and infrared photography can be performed only when S8-140 is set to Manual, the flash mode switches to M. • See your Speedlight manual for camera group IV. 62 SB-27 0 0 0 - - If the camera groups are defined in the manual of the Speedlight with TTL auto flash , see the section for details. SB-26... modes are listed assuming a CPU lens is attached. (Non-CPU lenses are not recommended .) ::s:: Speedlight Matrix Balanced Fill-Flash*1 SB-28 0 Non-TIL Auto Flash 0 Manual 0 Repeating Wireless Flash Slave Flash 0 -
...; Ultraviolet and infrared photography can be performed only when S8-140 is set to Manual, the flash mode switches to M. • See your Speedlight manual for camera group IV. 62 SB-27 0 0 0 - - If the camera groups are defined in the manual of the Speedlight with TTL auto flash , see the section for details. SB-26... modes are listed assuming a CPU lens is attached. (Non-CPU lenses are not recommended .) ::s:: Speedlight Matrix Balanced Fill-Flash*1 SB-28 0 Non-TIL Auto Flash 0 Manual 0 Repeating Wireless Flash Slave Flash 0 -

Instruction Manual
Page 63
... using a lens with 250V or higher). However, when a non-TIL Auto Flash or manual flash is used, the Red-Eye Reduction lamp on the camera body (not on Speedlight unit) illuminates. • The AF-Assist Illuminator on the camera body lights up instead . • Set the exposure mode to A or M when...circuit due to minimum aperture. • Attach the optional Sync Terminal Adapter AS-15 when a sync terminal is needed. • Use only Nikon Speed lights. electric contact alignment or switch phase. 63 Ifyou are using an optional Speed light. • Available film speeds for TIL Auto ...
... using a lens with 250V or higher). However, when a non-TIL Auto Flash or manual flash is used, the Red-Eye Reduction lamp on the camera body (not on Speedlight unit) illuminates. • The AF-Assist Illuminator on the camera body lights up instead . • Set the exposure mode to A or M when...circuit due to minimum aperture. • Attach the optional Sync Terminal Adapter AS-15 when a sync terminal is needed. • Use only Nikon Speed lights. electric contact alignment or switch phase. 63 Ifyou are using an optional Speed light. • Available film speeds for TIL Auto ...

Instruction Manual
Page 64
Available Mode Combinations .The following chart lists available modes when an AF Nikkor is attached (except IX-Nikkor, AF-S or AF-I !!!: #j it: ~ t ; 9 f ·s~ .;.:.$.;.; ....!t/ ~ qI; : ~ ~ f 8 {!: .1' tg ~ i ~ .i.I lens). -§ ~ {!: ~ ~ .tJ -§ ~ ~ 3 Auto-Servo AF P Auto-Servo AF S Auto-Servo AF A Auto-Servo AF : !
Available Mode Combinations .The following chart lists available modes when an AF Nikkor is attached (except IX-Nikkor, AF-S or AF-I !!!: #j it: ~ t ; 9 f ·s~ .;.:.$.;.; ....!t/ ~ qI; : ~ ~ f 8 {!: .1' tg ~ i ~ .i.I lens). -§ ~ {!: ~ ~ .tJ -§ ~ ~ 3 Auto-Servo AF P Auto-Servo AF S Auto-Servo AF A Auto-Servo AF : !

Instruction Manual
Page 68
...this manual. 68 This will enable you do not intend to use the camera for a long time, remove the batteries to protect the camera from battery leakage. • In a humid environment, store the camera inside a plastic bag with a desiccant If you to keep out dust, moisture and salt. Nikon ...cannot be held responsible for any malfunction resulting from heat or humidity. • Change the desiccant occasionally since it does not absorb moisture effectively after using it for a while. • Leaving the camera unused for many years. Keep the batteries...
...this manual. 68 This will enable you do not intend to use the camera for a long time, remove the batteries to protect the camera from battery leakage. • In a humid environment, store the camera inside a plastic bag with a desiccant If you to keep out dust, moisture and salt. Nikon ...cannot be held responsible for any malfunction resulting from heat or humidity. • Change the desiccant occasionally since it does not absorb moisture effectively after using it for a while. • Leaving the camera unused for many years. Keep the batteries...
Instruction Manual
Page 70
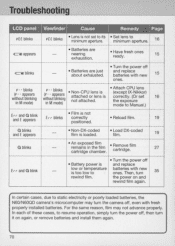
...• Non-CPU lens is attached or lens is not attached. • Attach CPU lens (except IX-Nikkor) correctly. (Or set the exposure mode to Manual.) 16 E,-r and Q blink and E appears • Film is not set to its • Set lens to ones. Troubleshootin FE E blinks FE E... cartridge chamber. • Remove film cartridge. 27 E,- ,- In each of these cases, to static electricity or poorly loaded batteries, the N60/ N60QO camera's microcomputer may not advance properly. the power on again, or remove batteries and install them again. 70 Then, turn it on and rewind...
...• Non-CPU lens is attached or lens is not attached. • Attach CPU lens (except IX-Nikkor) correctly. (Or set the exposure mode to Manual.) 16 E,-r and Q blink and E appears • Film is not set to its • Set lens to ones. Troubleshootin FE E blinks FE E... cartridge chamber. • Remove film cartridge. 27 E,- ,- In each of these cases, to static electricity or poorly loaded batteries, the N60/ N60QO camera's microcomputer may not advance properly. the power on again, or remove batteries and install them again. 70 Then, turn it on and rewind...
Instruction Manual
Page 72
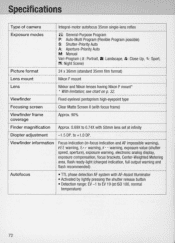
... Viewfinder frame coverage Approx.90% Finder magnification Approx . 0.69X to +1.0 DP. warning, F- - S ecifications Type of camera Integral-motor autofocus 35mm single-lens reflex Exposure modes 8': General-Purpose Program P: Auto-Multi Program (Flexible Program possible) s: Shutter...-Priority Auto A: Aperture-Priority Auto M: Manual Vari -Program (:I: Portrait, . : Landscape, ,or.: Close-Up, -'.z: Sport, ~: Night Scene) Picture format 24 x 36mm (standard 35mm film format) Lens mount Nikon F mount Lens Nikkor and Nikon lenses having Nikon F mount' • With limitation; to ...
... Viewfinder frame coverage Approx.90% Finder magnification Approx . 0.69X to +1.0 DP. warning, F- - S ecifications Type of camera Integral-motor autofocus 35mm single-lens reflex Exposure modes 8': General-Purpose Program P: Auto-Multi Program (Flexible Program possible) s: Shutter...-Priority Auto A: Aperture-Priority Auto M: Manual Vari -Program (:I: Portrait, . : Landscape, ,or.: Close-Up, -'.z: Sport, ~: Night Scene) Picture format 24 x 36mm (standard 35mm film format) Lens mount Nikon F mount Lens Nikkor and Nikon lenses having Nikon F mount' • With limitation; to ...

Instruction Manual
Page 73
...Film speed setting Exposure meter Exposure compensation Auto exposure lock Shutter Shutter speeds Self-timer Sync contact AF: Auto-Servo AF : Camera automatically chooses Single Servo AF or Continuous Servo AF operation according to 1/125 sec. after removing finger from button , or ...for 5 sec. Automatically set to 5000 Activated by turning on a moving (including directional information). - stationary or moving subject M: Manual Focus is locked when shutter release button is lightly pressed and subject is locked - after releasing shutter With exposure compensation button; &#...
...Film speed setting Exposure meter Exposure compensation Auto exposure lock Shutter Shutter speeds Self-timer Sync contact AF: Auto-Servo AF : Camera automatically chooses Single Servo AF or Continuous Servo AF operation according to 1/125 sec. after removing finger from button , or ...for 5 sec. Automatically set to 5000 Activated by turning on a moving (including directional information). - stationary or moving subject M: Manual Focus is locked when shutter release button is lightly pressed and subject is locked - after releasing shutter With exposure compensation button; &#...