Instruction Manual
Page 6
...subject is so advanced that it will enjoy using it, be sure to read this manual handy. Main features of the N60/N60QD: • SLR camera with built-in Speedlight makes taking pictures easy and enjoyable, even for the most inexperienced beginner. • The individual ...N60/N60QD camera, but before using this camera and that it automatically chooses to know your life. Get to lock focus or activate focus tracking-either way, you're assured autofocusing that you keep this manual thoroughly. We are displayed on the exposure mode dial for purchasing the Nikon N60/N60QD camera...
...subject is so advanced that it will enjoy using it, be sure to read this manual handy. Main features of the N60/N60QD: • SLR camera with built-in Speedlight makes taking pictures easy and enjoyable, even for the most inexperienced beginner. • The individual ...N60/N60QD camera, but before using this camera and that it automatically chooses to know your life. Get to lock focus or activate focus tracking-either way, you're assured autofocusing that you keep this manual thoroughly. We are displayed on the exposure mode dial for purchasing the Nikon N60/N60QD camera...
Instruction Manual
Page 7
... center at important occasions like wedding or graduations. Have Nikon spot check your camera regularly Nikon recommends that you have your camera correctly The Nikon N60/N60QD's performance has been optimized for specifications, and nonconforming accessories could damage the N60/N60QD's components. Using your camera serviced by other manufacturers may not meet Nikon's criteria for use with other than...
... center at important occasions like wedding or graduations. Have Nikon spot check your camera regularly Nikon recommends that you have your camera correctly The Nikon N60/N60QD's performance has been optimized for specifications, and nonconforming accessories could damage the N60/N60QD's components. Using your camera serviced by other manufacturers may not meet Nikon's criteria for use with other than...
Instruction Manual
Page 8
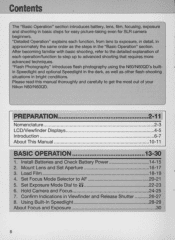
...even for SLR camera beginners. Please read this manual thoroughly and carefully to 8 22-23 6. Mount Lens and Set Aperture 16-17 3. Using Built-In Speedlight 28-29 About Focus and Exposure 30 8 "Flash Photography" introduces flash photography using the N60/N60QD's... order as other flash-shooting situations in the "Basic Operation" section. Hold Camera and Focus 24-25 7. After becoming familiar with basic shooting, refer to the detailed explanation of your Nikon N60/N60QD. PREPARATION 2-11 Nomenclature 2-3 LCDNiewfinder Displays 4-5 Introduction 6-7 About This Manual...
...even for SLR camera beginners. Please read this manual thoroughly and carefully to 8 22-23 6. Mount Lens and Set Aperture 16-17 3. Using Built-In Speedlight 28-29 About Focus and Exposure 30 8 "Flash Photography" introduces flash photography using the N60/N60QD's... order as other flash-shooting situations in the "Basic Operation" section. Hold Camera and Focus 24-25 7. After becoming familiar with basic shooting, refer to the detailed explanation of your Nikon N60/N60QD. PREPARATION 2-11 Nomenclature 2-3 LCDNiewfinder Displays 4-5 Introduction 6-7 About This Manual...

Instruction Manual
Page 9
...-63 Built-in Speed light and Matrix Balanced Fill-Flash 58 Flash shooting distance range 58 Flash sync mode features 59 USing built-in Speedlight 60-61 Usable lenses with built-in Speedlight 61 Usable Optional Speedlights 62-63 Available Mode Combinations 64 MISCELLANEOUS 65-77 Optional Accessories 66...
...-63 Built-in Speed light and Matrix Balanced Fill-Flash 58 Flash shooting distance range 58 Flash sync mode features 59 USing built-in Speedlight 60-61 Usable lenses with built-in Speedlight 61 Usable Optional Speedlights 62-63 Available Mode Combinations 64 MISCELLANEOUS 65-77 Optional Accessories 66...
Instruction Manual
Page 10
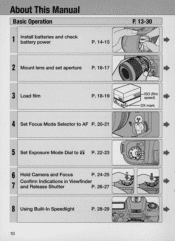
About This Manual [ Basic Operation 1 Install batteries and check battery power P. 14-15 P. 13-30 • 2 Mount lens and set aperture P.16-17 • 3 Load film P.18-19 • 4 Set Focus Mode Selector to AF P.20-21 • 5 Set Exposure Mode Dial to 8 P. 22-23 • 6 Hold Camera and Focus ~ ~ P. 24-25 7 Confirm Indications in Viewfinder and Release Shutter P.26-27 • 8 Using Built-In Speedlight P.28-29 • 10
About This Manual [ Basic Operation 1 Install batteries and check battery power P. 14-15 P. 13-30 • 2 Mount lens and set aperture P.16-17 • 3 Load film P.18-19 • 4 Set Focus Mode Selector to AF P.20-21 • 5 Set Exposure Mode Dial to 8 P. 22-23 • 6 Hold Camera and Focus ~ ~ P. 24-25 7 Confirm Indications in Viewfinder and Release Shutter P.26-27 • 8 Using Built-In Speedlight P.28-29 • 10

Instruction Manual
Page 13
Settings are as follows : Attached lens Focus mode Exposure mode Exposure metering Built-in Speedlight D-type AF Nikkor Autofocus 8' (General-Purpose Progam) 3D Matrix Metering* Normal sync* * Automatically set when exposure mode is set to 8'. 13 BASIC OPERATION This section guides you through basic operations with the camera set to ~ mode.
Settings are as follows : Attached lens Focus mode Exposure mode Exposure metering Built-in Speedlight D-type AF Nikkor Autofocus 8' (General-Purpose Progam) 3D Matrix Metering* Normal sync* * Automatically set when exposure mode is set to 8'. 13 BASIC OPERATION This section guides you through basic operations with the camera set to ~ mode.

Instruction Manual
Page 14
1 Install Batteries and Check Battery Power Use two CR1 23A or DL123Atype lithium batteri es with this camera. (Other batteri es can not be used.) 1.1 Turn off the main switch and open the battery chamber cover. 1.2 Insert batteries with the "EB" and "8 " ends positioned as marked inside the battery chamber cover, then firmly close the battery chamber cover. e • Incorrect positioning of EB and poles may cause damage to the camera. 14
1 Install Batteries and Check Battery Power Use two CR1 23A or DL123Atype lithium batteri es with this camera. (Other batteri es can not be used.) 1.1 Turn off the main switch and open the battery chamber cover. 1.2 Insert batteries with the "EB" and "8 " ends positioned as marked inside the battery chamber cover, then firmly close the battery chamber cover. e • Incorrect positioning of EB and poles may cause damage to the camera. 14

Instruction Manual
Page 15
... switch on the main switch and confirm battery power with the ~~ indication. l=.....Ll1I • Shutter speed and aperture indications in some areas. . - - - , @ 1.3 Turn on and camera is left unused . • Battery power ~ appears: Sufficient battery power. ~ appears: Batteries are exhausted. after you , especially when traveling, since the batteries used may be...
... switch on the main switch and confirm battery power with the ~~ indication. l=.....Ll1I • Shutter speed and aperture indications in some areas. . - - - , @ 1.3 Turn on and camera is left unused . • Battery power ~ appears: Sufficient battery power. ~ appears: Batteries are exhausted. after you , especially when traveling, since the batteries used may be...
Instruction Manual
Page 16
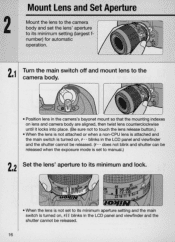
...attached or when a non-CPU lens is attached and the main switch is turned on , F - - 2 Mount Lens and Set Aperture Mount the lens to the camera body and set to its minimum setting (largest fnumber) for automatic operation . 2.1 Turn the main switch off and mount lens to the... camera body. • Position lens in the camera's bayonet mount so that the mounting indexes on lens and camera body are aligned, then twist lens counterclockwise until it locks into place. (Be sure not to its...
...attached or when a non-CPU lens is attached and the main switch is turned on , F - - 2 Mount Lens and Set Aperture Mount the lens to the camera body and set to its minimum setting (largest fnumber) for automatic operation . 2.1 Turn the main switch off and mount lens to the... camera body. • Position lens in the camera's bayonet mount so that the mounting indexes on lens and camera body are aligned, then twist lens counterclockwise until it locks into place. (Be sure not to its...
Instruction Manual
Page 17
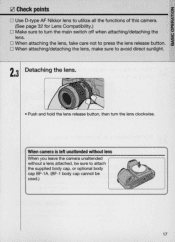
... lens release button. D When attaching the lens, take care not to utilize all the functions of this camera. ~ (See page 32 for Lens Compatibility.) W Q. When camera is left unattended without lens Wh en you leave the camera unattended without a lens attached , be sure to avoid direct sunlight. 23 Detaching the lens. • •...
... lens release button. D When attaching the lens, take care not to utilize all the functions of this camera. ~ (See page 32 for Lens Compatibility.) W Q. When camera is left unattended without lens Wh en you leave the camera unattended without a lens attached , be sure to avoid direct sunlight. 23 Detaching the lens. • •...

Instruction Manual
Page 18
When the camera is turned on, film is loaded and the camera back is closed , the film automat- ___"'7llLUL_ ISO (film speed) ~I DX mark ically advances to the first frame 3.1 Turn on the main switch, then open the camera back and insert film . • Insert from the bottom of the film cartridge. 3.2 Pull film leader out to red index mark. • Do not insert the film leader beyond the red index mark. • Hold the film cartridge and ensure film is set automatically (18025- 5000). Film speed r is properly positioned with no slack . 18 3 Load Film Use a DX-coded film.
When the camera is turned on, film is loaded and the camera back is closed , the film automat- ___"'7llLUL_ ISO (film speed) ~I DX mark ically advances to the first frame 3.1 Turn on the main switch, then open the camera back and insert film . • Insert from the bottom of the film cartridge. 3.2 Pull film leader out to red index mark. • Do not insert the film leader beyond the red index mark. • Hold the film cartridge and ensure film is set automatically (18025- 5000). Film speed r is properly positioned with no slack . 18 3 Load Film Use a DX-coded film.

Instruction Manual
Page 19
1ZI Check points o z ~ D Only OX-coded film can be used with this camera. When film other than ffi OX-coded film is inserted ,
1ZI Check points o z ~ D Only OX-coded film can be used with this camera. When film other than ffi OX-coded film is inserted ,

Instruction Manual
Page 20
... same distance, use focus lock (page 38) then recompose. • When you are unable to perform foc·us lock, set to AF (autofocus), the camera focuses automatically. 4.1 Set the focus mode selector to AF (autofocus). • Make sure to M (manual) and focus manually using the clear matte field . · 20...
... same distance, use focus lock (page 38) then recompose. • When you are unable to perform foc·us lock, set to AF (autofocus), the camera focuses automatically. 4.1 Set the focus mode selector to AF (autofocus). • Make sure to M (manual) and focus manually using the clear matte field . · 20...

Instruction Manual
Page 22
... shutter speed or create blur with a slower speed . 22 You set to 8 (General-Purpose Program), the camera will automatical ly control your desired shutter speed, and the camera selects the correct aperture. Suitable for general shooting . Camera controls exposure automatically, while allowing you want to make other settings, such as Flexible Program or...
... shutter speed or create blur with a slower speed . 22 You set to 8 (General-Purpose Program), the camera will automatical ly control your desired shutter speed, and the camera selects the correct aperture. Suitable for general shooting . Camera controls exposure automatically, while allowing you want to make other settings, such as Flexible Program or...

Instruction Manual
Page 23
... to easily choose proper exposure controls in oQ. With a deep depth of fast-moving subjects to take up-close pictures. Sport Program P. 47 Use this camera. W Programs enable you determine the depth of all the light available in -focus area; various shooting situations. Using a fast shutter speed, it captures the beauty... background can be taken with an artistically blurred background . [ZJ Check pOints o z o ~ Ten exposure modes are set the desired aperture, and based on that, the camera selects the correct shutter speed . With a shallow depth of Vari-
... to easily choose proper exposure controls in oQ. With a deep depth of fast-moving subjects to take up-close pictures. Sport Program P. 47 Use this camera. W Programs enable you determine the depth of all the light available in -focus area; various shooting situations. Using a fast shutter speed, it captures the beauty... background can be taken with an artistically blurred background . [ZJ Check pOints o z o ~ Ten exposure modes are set the desired aperture, and based on that, the camera selects the correct shutter speed . With a shallow depth of Vari-

Instruction Manual
Page 24
...: Composing frame The frame coverage of the finder of a negative film are partially cropped by most labs. 24 to cradle the camera (or lens). Note that the edges of this camera is recommended for support. • Stand with one foot forward a half step and keep your upper body still. • Grasp the... camera handgrip with your right hand and use your lens' sec. (Example: when using a 50mm lens, set the shutter speed faster than 1/50 sec.) Use of a ...
...: Composing frame The frame coverage of the finder of a negative film are partially cropped by most labs. 24 to cradle the camera (or lens). Note that the edges of this camera is recommended for support. • Stand with one foot forward a half step and keep your upper body still. • Grasp the... camera handgrip with your right hand and use your lens' sec. (Example: when using a 50mm lens, set the shutter speed faster than 1/50 sec.) Use of a ...

Instruction Manual
Page 25
... pOints o z o Diopter adjustment (page 56) is available to enable you to see page 20. 25 When the subject is dark, the camera's AF-Assist Illuminator is in focus. The camera focuses automatically and focus indicator • appears or blinks. • appears: Subject is activated to focus with autofocus. o For N60QD only: Date...
... pOints o z o Diopter adjustment (page 56) is available to enable you to see page 20. 25 When the subject is dark, the camera's AF-Assist Illuminator is in focus. The camera focuses automatically and focus indicator • appears or blinks. • appears: Subject is activated to focus with autofocus. o For N60QD only: Date...

Instruction Manual
Page 27
W If any other indications appear, see page 55. 7.3 Film starts to rewind automatically when film reaches the end of the exposures for the film roll may be confirmed in the LCD panel during film rewind and the frame counter counts backwards until rewind is completely rewound, then remove film cartridge. ~--... @ ,I; [ Ie'S FS.D @ __ (:l [36] • When you reach the end of the film roll , the film starts to development procedures. 7.4 Confirm film is complete. o automatically . Pictures taken on frames beyond the indicated number of the roll. o For mid-roll rewind, ...
W If any other indications appear, see page 55. 7.3 Film starts to rewind automatically when film reaches the end of the exposures for the film roll may be confirmed in the LCD panel during film rewind and the frame counter counts backwards until rewind is completely rewound, then remove film cartridge. ~--... @ ,I; [ Ie'S FS.D @ __ (:l [36] • When you reach the end of the film roll , the film starts to development procedures. 7.4 Confirm film is complete. o automatically . Pictures taken on frames beyond the indicated number of the roll. o For mid-roll rewind, ...

Instruction Manual
Page 28
... soon as the Speedlight is released it starts recharging , and when the Speedlight is ready to fire 'I appears without blinking in the viewfinder (when the camera's meter is on). • To close the Speedlight, press gently until it clicks shut. (To conserve power, keep the Speedlight closed when it is not...
... soon as the Speedlight is released it starts recharging , and when the Speedlight is ready to fire 'I appears without blinking in the viewfinder (when the camera's meter is on). • To close the Speedlight, press gently until it clicks shut. (To conserve power, keep the Speedlight closed when it is not...

Instruction Manual
Page 29
... have limitations using Speedlight and may have occurred . For details, see page 59 . • With dark subjects (within O.5m to 3m or 1.6 to 9.8 ft.), the camera's AFAssist Illuminator (page 36) is introduced in the viewfinder approx. 3 sec. Check the flash shooting distance range (page 58) and shoot again . • Normal Sync...
... have limitations using Speedlight and may have occurred . For details, see page 59 . • With dark subjects (within O.5m to 3m or 1.6 to 9.8 ft.), the camera's AFAssist Illuminator (page 36) is introduced in the viewfinder approx. 3 sec. Check the flash shooting distance range (page 58) and shoot again . • Normal Sync...
