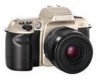

Instruction Manual
Page 3
... - when data is imprinted. 7. Date/time display LCD 2. ' : Year indicator 3. MODE button : Push to select one of five available displays. 4. L button P. 49 Command Dial P. 41 Battery chamber cover lock release P. 14 Mid-roll rewind button P. 34 Tripod socket N60QD only: Data imprint LCD/buttons 1-----, r----5 2 w::s!::::;!~~"'-6 GIml) SELECT ADJUST ~•~• •7 1.
... - when data is imprinted. 7. Date/time display LCD 2. ' : Year indicator 3. MODE button : Push to select one of five available displays. 4. L button P. 49 Command Dial P. 41 Battery chamber cover lock release P. 14 Mid-roll rewind button P. 34 Tripod socket N60QD only: Data imprint LCD/buttons 1-----, r----5 2 w::s!::::;!~~"'-6 GIml) SELECT ADJUST ~•~• •7 1.

Instruction Manual
Page 4
... the temperature drops to read . Shutter speed 2. Exposure compensation (page 50) 8. Film (page 19) About LCD • At high temperatures of 60°C (140°F) or above, the display tums black, making it returns to normal. 4 when the temperature rises , it impossible to 20&#... slows; Flexible program (page 40) 3. Flash sync mode (page 59) 4. Frame counter/ exposure compensation value (page 19, 50) 9. Battery power (page 15) 5. fro.~,.o.~, ~~~+ @ SLOW. - , L~'.L~'~ 6 7 8 5 9 1. Self-timer (page 55) 6. LCDNiewfinder Dis la s 1 2 3 4 (a-, a-, oI .~, o.~,Io...
... the temperature drops to read . Shutter speed 2. Exposure compensation (page 50) 8. Film (page 19) About LCD • At high temperatures of 60°C (140°F) or above, the display tums black, making it returns to normal. 4 when the temperature rises , it impossible to 20&#... slows; Flexible program (page 40) 3. Flash sync mode (page 59) 4. Frame counter/ exposure compensation value (page 19, 50) 9. Battery power (page 15) 5. fro.~,.o.~, ~~~+ @ SLOW. - , L~'.L~'~ 6 7 8 5 9 1. Self-timer (page 55) 6. LCDNiewfinder Dis la s 1 2 3 4 (a-, a-, oI .~, o.~,Io...
Instruction Manual
Page 8
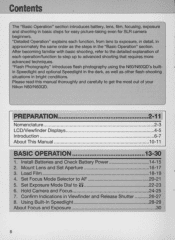
... conditions. Install Batteries and Check Battery Power 14-15 2. Hold Camera and Focus 24-25 7. Using Built-In Speedlight 28-29 About Focus and Exposure 30 8 After becoming familiar with basic shooting, refer to the detailed explanation of your Nikon N60/N60QD. Set ...Exposure Mode Dial to AF 20-21 5. PREPARATION 2-11 Nomenclature 2-3 LCDNiewfinder Displays 4-5 Introduction 6-7 About This Manual 10-11 BASIC OPERATION 13-30 1. Confirm Indications in basic steps for easy picture-taking even for SLR camera beginners. "Detailed...
... conditions. Install Batteries and Check Battery Power 14-15 2. Hold Camera and Focus 24-25 7. Using Built-In Speedlight 28-29 About Focus and Exposure 30 8 After becoming familiar with basic shooting, refer to the detailed explanation of your Nikon N60/N60QD. Set ...Exposure Mode Dial to AF 20-21 5. PREPARATION 2-11 Nomenclature 2-3 LCDNiewfinder Displays 4-5 Introduction 6-7 About This Manual 10-11 BASIC OPERATION 13-30 1. Confirm Indications in basic steps for easy picture-taking even for SLR camera beginners. "Detailed...

Instruction Manual
Page 9
... distance range 58 Flash sync mode features 59 USing built-in Speedlight 60-61 Usable lenses with built-in Speedlight 61 Usable Optional Speedlights 62-63 Available Mode Combinations 64 MISCELLANEOUS 65-77 Optional Accessories 66 Camera Care 67-68 Notes on Batteries 69 Troubleshooting 70-71 Specifications 72-75 Index 76-77 9 ---=...c:- _.
... distance range 58 Flash sync mode features 59 USing built-in Speedlight 60-61 Usable lenses with built-in Speedlight 61 Usable Optional Speedlights 62-63 Available Mode Combinations 64 MISCELLANEOUS 65-77 Optional Accessories 66 Camera Care 67-68 Notes on Batteries 69 Troubleshooting 70-71 Specifications 72-75 Index 76-77 9 ---=...c:- _.
Instruction Manual
Page 10
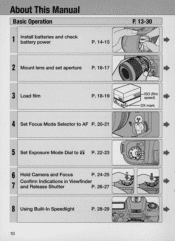
About This Manual [ Basic Operation 1 Install batteries and check battery power P. 14-15 P. 13-30 • 2 Mount lens and set aperture P.16-17 • 3 Load film P.18-19 • 4 Set Focus Mode Selector to AF P.20-21 • 5 Set Exposure Mode Dial to 8 P. 22-23 • 6 Hold Camera and Focus ~ ~ P. 24-25 7 Confirm Indications in Viewfinder and Release Shutter P.26-27 • 8 Using Built-In Speedlight P.28-29 • 10
About This Manual [ Basic Operation 1 Install batteries and check battery power P. 14-15 P. 13-30 • 2 Mount lens and set aperture P.16-17 • 3 Load film P.18-19 • 4 Set Focus Mode Selector to AF P.20-21 • 5 Set Exposure Mode Dial to 8 P. 22-23 • 6 Hold Camera and Focus ~ ~ P. 24-25 7 Confirm Indications in Viewfinder and Release Shutter P.26-27 • 8 Using Built-In Speedlight P.28-29 • 10
Instruction Manual
Page 11
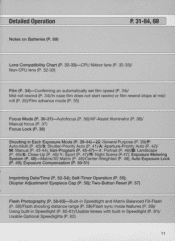
...in Speedlight and Matrix Balanced Fill-Flash (P. 58)/ Flash shooting distance range (P. 58)/Flash sync mode features (P. 59)/ Using built-in Speedlight (P. 60-61)/Usable lenses with built-in Each Exposure Mode (P. 39-44)-8: General Purpose (P. 39)/ P: Auto-Multi (P. 40)/S: Shutter-Priority Auto (P. 41... )/A: Aperture-Priority Auto (P. 42)/ M: Manual (P. 43-44); Detailed Operation Notes on Batteries (P. 69) P. 31-64,69 Lens Compatibility Chart (P. 32-33)-CPU Nikkor lens (P. 32-33)/ Non-CPU lens (P. 32-33) Film (P. 34)-Confirming...
...in Speedlight and Matrix Balanced Fill-Flash (P. 58)/ Flash shooting distance range (P. 58)/Flash sync mode features (P. 59)/ Using built-in Speedlight (P. 60-61)/Usable lenses with built-in Each Exposure Mode (P. 39-44)-8: General Purpose (P. 39)/ P: Auto-Multi (P. 40)/S: Shutter-Priority Auto (P. 41... )/A: Aperture-Priority Auto (P. 42)/ M: Manual (P. 43-44); Detailed Operation Notes on Batteries (P. 69) P. 31-64,69 Lens Compatibility Chart (P. 32-33)-CPU Nikkor lens (P. 32-33)/ Non-CPU lens (P. 32-33) Film (P. 34)-Confirming...

Instruction Manual
Page 14
e • Incorrect positioning of EB and poles may cause damage to the camera. 14 1 Install Batteries and Check Battery Power Use two CR1 23A or DL123Atype lithium batteri es with this camera. (Other batteri es can not be used.) 1.1 Turn off the main switch and open the battery chamber cover. 1.2 Insert batteries with the "EB" and "8 " ends positioned as marked inside the battery chamber cover, then firmly close the battery chamber cover.
e • Incorrect positioning of EB and poles may cause damage to the camera. 14 1 Install Batteries and Check Battery Power Use two CR1 23A or DL123Atype lithium batteri es with this camera. (Other batteri es can not be used.) 1.1 Turn off the main switch and open the battery chamber cover. 1.2 Insert batteries with the "EB" and "8 " ends positioned as marked inside the battery chamber cover, then firmly close the battery chamber cover.

Instruction Manual
Page 15
... in the LCD panel and viewfinder. l=.....Ll1I • Shutter speed and aperture indications in some areas. . - - - , @ 1.3 Turn on and camera is left unused . • Battery power ~ appears: Sufficient battery power. ~ appears: Batteries are exhausted. after you , especially when traveling, since the batteries used may be sure to turn the main switch off and 0 replace both...
... in the LCD panel and viewfinder. l=.....Ll1I • Shutter speed and aperture indications in some areas. . - - - , @ 1.3 Turn on and camera is left unused . • Battery power ~ appears: Sufficient battery power. ~ appears: Batteries are exhausted. after you , especially when traveling, since the batteries used may be sure to turn the main switch off and 0 replace both...

Instruction Manual
Page 35
In case film does not start to rewi nd or film rewind stops at mid-roll ./ -j r r- @) ~ -[' 3 6 1 ~ • When battery power is very low, or in low temperatures, film may not start rewinding or film rewind may stop at mid-roll, and --
In case film does not start to rewi nd or film rewind stops at mid-roll ./ -j r r- @) ~ -[' 3 6 1 ~ • When battery power is very low, or in low temperatures, film may not start rewinding or film rewind may stop at mid-roll, and --

Instruction Manual
Page 44
... only with Long Time Exposure. Select Long Time Exposure (of lithium batteries. Pressing the shutter release button once opens the shutter (LCD indications will be reduced by rotating the Command Dial until - - Camera shake can be disabled. Shootin in Each Ex osure Mode---i:ontinued Electronic... analog display The electronic analog display in the viewfinder and LCD panel. However, the camera's meter will tum off). appears in the viewfinder indicates the difference between the selected exposure (shutter speed and aperture), and ...
... only with Long Time Exposure. Select Long Time Exposure (of lithium batteries. Pressing the shutter release button once opens the shutter (LCD indications will be reduced by rotating the Command Dial until - - Camera shake can be disabled. Shootin in Each Ex osure Mode---i:ontinued Electronic... analog display The electronic analog display in the viewfinder and LCD panel. However, the camera's meter will tum off). appears in the viewfinder indicates the difference between the selected exposure (shutter speed and aperture), and ...

Instruction Manual
Page 52
...be difficult to set correct date/time after changing battery, page 53). Battery life is approx. 3 years. NOTE: Battery requirements for imprinting Imprinting of date/time requires one CR2025 3V lithium battery separate from the batteries required for imprinting Open camera back, remove the screw on the photo appears ...faded and/or the display of the imprinted date/time. Replace the battery (making sure to read against bright colors such as white or reddish hues. - Changing battery for the camera body. DatelTime (for N60QD only) You can imprint the fo llowing date ...
...be difficult to set correct date/time after changing battery, page 53). Battery life is approx. 3 years. NOTE: Battery requirements for imprinting Imprinting of date/time requires one CR2025 3V lithium battery separate from the batteries required for imprinting Open camera back, remove the screw on the photo appears ...faded and/or the display of the imprinted date/time. Replace the battery (making sure to read against bright colors such as white or reddish hues. - Changing battery for the camera body. DatelTime (for N60QD only) You can imprint the fo llowing date ...

Instruction Manual
Page 68
Nikon cannot be held responsible for any malfunction resulting from the use the camera for a long time, remove the batteries to protect the camera from heat or humidity. • Change the desiccant occasionally since it does not absorb moisture effectively after using it a few times once ... maintain the built-in Speedlight in malfunction. Turn the power on and release the shutter a few times every month. Camera Care-continued • Remove the batteries and store the camera with a desiccant to keep out dust, moisture and salt. This will enable you do not intend to use of ...
Nikon cannot be held responsible for any malfunction resulting from the use the camera for a long time, remove the batteries to protect the camera from heat or humidity. • Change the desiccant occasionally since it does not absorb moisture effectively after using it a few times once ... maintain the built-in Speedlight in malfunction. Turn the power on and release the shutter a few times every month. Camera Care-continued • Remove the batteries and store the camera with a desiccant to keep out dust, moisture and salt. This will enable you do not intend to use of ...

Instruction Manual
Page 69
... and ends positioned correctly. • Stains on Batteries & WARNING Do not leave Keep batteries out of their life and prepare spare batteries before important photographic occasions. • Turn the camera power off when changing batteries e Turn the camera power off before installing. • Use fresh batteries at low temperatures Battery power diminishes at low temperatures. If someone accidentally...
... and ends positioned correctly. • Stains on Batteries & WARNING Do not leave Keep batteries out of their life and prepare spare batteries before important photographic occasions. • Turn the camera power off when changing batteries e Turn the camera power off before installing. • Use fresh batteries at low temperatures Battery power diminishes at low temperatures. If someone accidentally...
Instruction Manual
Page 70
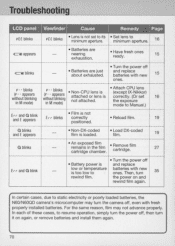
... OX-coded film . 19 Q blinks • An exposed film remains in M mode) F- - blinks (F - - In each of these cases, to static electricity or poorly loaded batteries, the N60/ N60QO camera's microcomputer may not advance properly. F - - appears without blinking in the film cartridge chamber. • Remove film cartridge. 27 E,- ,- Troubleshootin FE E blinks FE E blinks •...
... OX-coded film . 19 Q blinks • An exposed film remains in M mode) F- - blinks (F - - In each of these cases, to static electricity or poorly loaded batteries, the N60/ N60QO camera's microcomputer may not advance properly. F - - appears without blinking in the film cartridge chamber. • Remove film cartridge. 27 E,- ,- Troubleshootin FE E blinks FE E blinks •...

Instruction Manual
Page 75
... batteries are nearing exhaustion; Camera back Hinged back with timing accuracy within ±90 seconds a month; Specifications and design are subject to change without batteries) N60: Approx. 575g (20.3 oz.) N600D: Approx. 585g (20.6 oz.) All specifications apply when fresh CR123A-type batteries are completely exhausted or improperly installed Tripod socket 1/4 inch diameter Dimensions (WxHxD) N60...
... batteries are nearing exhaustion; Camera back Hinged back with timing accuracy within ±90 seconds a month; Specifications and design are subject to change without batteries) N60: Approx. 575g (20.3 oz.) N600D: Approx. 585g (20.6 oz.) All specifications apply when fresh CR123A-type batteries are completely exhausted or improperly installed Tripod socket 1/4 inch diameter Dimensions (WxHxD) N60...
