
Instruction Manual
Page 3
... function (F4 15 Viewing the log list (F5 16 Deleting all logs (F6 17 Operation diagram of the setting menus 18 Measurement Adjusting the focus of the internal display 19 The measurement display mode 20 Changing the measurement display mode 21 Measuring 22 Measuring with 2 points mode 23 Measuring with 3 points mode 24 Technical notes Specifications 25 Troubleshooting/Repair 28 3
... function (F4 15 Viewing the log list (F5 16 Deleting all logs (F6 17 Operation diagram of the setting menus 18 Measurement Adjusting the focus of the internal display 19 The measurement display mode 20 Changing the measurement display mode 21 Measuring 22 Measuring with 2 points mode 23 Measuring with 3 points mode 24 Technical notes Specifications 25 Troubleshooting/Repair 28 3

Instruction Manual
Page 4
...user is subject to EU EMC directive. These limits are subject to radio or television reception, which can radiate radio frequency energy and, if not installed and used as official evidence. If this manual may differ from the actual product. • Nikon... a particular installation. Notice for purchasing the Nikon Laser Rangefinder. After reading this first Fr Thank you for customers in a residential installation. This equipment generates, uses and can be used in a readily accessible place for a Class B digital device, pursuant to Part 15 of this manual thoroughly to ...
...user is subject to EU EMC directive. These limits are subject to radio or television reception, which can radiate radio frequency energy and, if not installed and used as official evidence. If this manual may differ from the actual product. • Nikon... a particular installation. Notice for purchasing the Nikon Laser Rangefinder. After reading this first Fr Thank you for customers in a residential installation. This equipment generates, uses and can be used in a readily accessible place for a Class B digital device, pursuant to Part 15 of this manual thoroughly to ...

Instruction Manual
Page 5
... look at lasers with a Nikon authorized service representative. fingers away from the PWR button to use immediately and consult with other small parts ignoring the contents described repair the product. The laser out of reach of the product. If the product is no ...lasers while using others. disassembled, remodeled, or repaired, it in the case. • If this product when not in SAFETY PRECAUTIONS (Laser) This product uses an invisible laser beam. SAFETY PRECAUTIONS (Monocular) En order to avoid accidentally emitting the laser. „„SAFETY AND OPERATION...
... look at lasers with a Nikon authorized service representative. fingers away from the PWR button to use immediately and consult with other small parts ignoring the contents described repair the product. The laser out of reach of the product. If the product is no ...lasers while using others. disassembled, remodeled, or repaired, it in the case. • If this product when not in SAFETY PRECAUTIONS (Laser) This product uses an invisible laser beam. SAFETY PRECAUTIONS (Monocular) En order to avoid accidentally emitting the laser. „„SAFETY AND OPERATION...

Instruction Manual
Page 6
... to observe the following: • Install the battery with plenty of this product in an PRECAUTIONS HANDLING AND OPERATION unstable place. poles positioned correctly. • Remove the battery when this product while walking. You may fall and cause injury or malfunction. • Do not swing this product by the strap. Do not use the product underwater. • Wipe off any...
... to observe the following: • Install the battery with plenty of this product in an PRECAUTIONS HANDLING AND OPERATION unstable place. poles positioned correctly. • Remove the battery when this product while walking. You may fall and cause injury or malfunction. • Do not swing this product by the strap. Do not use the product underwater. • Wipe off any...

Instruction Manual
Page 7
...product is to be on the body surface with a damp, soft, The following apply only to users in European countries This symbol indicates that this battery is En to be removed with a blower, wipe the lens with a dry soft cloth or * A rubber cleaning tool that this fails, gently wipe the lens using... in a cool, dry place. Wiping too firmly or wiping with a blower*. Do not use at an appropriate collection point. The condenser effect of high humidity. • Do not leave the eyepiece in a cool, dry place. separate collection at a seaside, wipe off salt that on...
...product is to be on the body surface with a damp, soft, The following apply only to users in European countries This symbol indicates that this battery is En to be removed with a blower, wipe the lens with a dry soft cloth or * A rubber cleaning tool that this fails, gently wipe the lens using... in a cool, dry place. Wiping too firmly or wiping with a blower*. Do not use at an appropriate collection point. The condenser effect of high humidity. • Do not leave the eyepiece in a cool, dry place. separate collection at a seaside, wipe off salt that on...

Instruction Manual
Page 8
Description of parts and indicators En „„Nomenclature/Composition Fr 1 2 9 3 0 a WATERPROOF 6x21 4 5 6 • Body ×1 • Case ×1 b c 87 Composition • Strap ×1 • Lithium battery (CR2) ×1 1 MODE button 2 PWR button (POWER ON/Measurement button) 3 6× monocular eyepiece 4 Eyecup/Diopter adjustment ring 5 Diopter index 6 Strap eyelet 7 Battery-chamber cover 8 Battery-chamber cover "Open" indication 9 Monocular objective lens/Laser emission aperture 0 External display a Invisible laser detector aperture b Product number...
Description of parts and indicators En „„Nomenclature/Composition Fr 1 2 9 3 0 a WATERPROOF 6x21 4 5 6 • Body ×1 • Case ×1 b c 87 Composition • Strap ×1 • Lithium battery (CR2) ×1 1 MODE button 2 PWR button (POWER ON/Measurement button) 3 6× monocular eyepiece 4 Eyecup/Diopter adjustment ring 5 Diopter index 6 Strap eyelet 7 Battery-chamber cover 8 Battery-chamber cover "Open" indication 9 Monocular objective lens/Laser emission aperture 0 External display a Invisible laser detector aperture b Product number...

Instruction Manual
Page 9
...lens side while this mark is shown. 6 Unit of measure (m: meter/YD: yard/ft: feet) 7 Target Priority mode (1st: First Target Priority mode/ Dst: Distant Target Priority mode) 8 Battery level indicator 9 Log indicator*3 0 Distance... or height*2 (main indicator) : "Failed to measure" or "Unable to measure. 0 Position the target at the center of this product is being emitted for a measurement. Although... of the mark. 9 5 Laser emission mark : Appears while the laser is enlarged by the eyepiece.
...lens side while this mark is shown. 6 Unit of measure (m: meter/YD: yard/ft: feet) 7 Target Priority mode (1st: First Target Priority mode/ Dst: Distant Target Priority mode) 8 Battery level indicator 9 Log indicator*3 0 Distance... or height*2 (main indicator) : "Failed to measure" or "Unable to measure. 0 Position the target at the center of this product is being emitted for a measurement. Although... of the mark. 9 5 Laser emission mark : Appears while the laser is enlarged by the eyepiece.

Instruction Manual
Page 11
... blinking 3 times, automatically powers off . Battery should be difficult to rotate because this product uses a rubber seal to maintain its waterproof capabilities. „„Battery level indicator Internal display After power on , displays for 2 seconds only. Rotate the battery-chamber cover counterclockwise to replace the battery. Blinks. Prepare to open it firmly. • The battery-chamber cover may be replaced with the positive...
... blinking 3 times, automatically powers off . Battery should be difficult to rotate because this product uses a rubber seal to maintain its waterproof capabilities. „„Battery level indicator Internal display After power on , displays for 2 seconds only. Rotate the battery-chamber cover counterclockwise to replace the battery. Blinks. Prepare to open it firmly. • The battery-chamber cover may be replaced with the positive...
Instruction Manual
Page 12
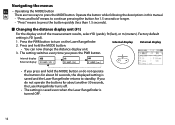
...this manual. - Press and hold " means to continue pressing the button for 1.5 seconds or longer. - If you do not operate the buttons for about 30 seconds, the displayed setting is saved and the Laser Rangefinder returns to press the MODE button. The setting ...operate the buttons for about another 30 seconds, the Laser Rangefinder turns off. • The setting is saved even when the Laser Rangefinder is YD (yard). 1. "Press" means to turn on the Laser Rangefinder. Press the PWR button to press the button quickly (less than 1.5 seconds). „„Changing the distance...
...this manual. - Press and hold " means to continue pressing the button for 1.5 seconds or longer. - If you do not operate the buttons for about 30 seconds, the displayed setting is saved and the Laser Rangefinder returns to press the MODE button. The setting ...operate the buttons for about another 30 seconds, the Laser Rangefinder turns off. • The setting is saved even when the Laser Rangefinder is YD (yard). 1. "Press" means to turn on the Laser Rangefinder. Press the PWR button to press the button quickly (less than 1.5 seconds). „„Changing the distance...
Instruction Manual
Page 13
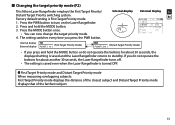
...distance of the closest subject and Distant Target Priority mode displays that of the farthest subject. 13 Press and hold the MODE button or do not operate the buttons for about another 30 seconds, the Laser Rangefinder turns off. • The setting is saved even when the Laser Rangefinder...DIST: [ Dst ] • If you press the PWR button. The setting switches every time you press and hold the MODE button. 3. „„Changing the target priority mode (F2) This Nikon Laser Rangefinder employs the First Target Priority/ Distant Target Priority switching system. Press the PWR...
...distance of the closest subject and Distant Target Priority mode displays that of the farthest subject. 13 Press and hold the MODE button or do not operate the buttons for about another 30 seconds, the Laser Rangefinder turns off. • The setting is saved even when the Laser Rangefinder...DIST: [ Dst ] • If you press the PWR button. The setting switches every time you press and hold the MODE button. 3. „„Changing the target priority mode (F2) This Nikon Laser Rangefinder employs the First Target Priority/ Distant Target Priority switching system. Press the PWR...
Instruction Manual
Page 14
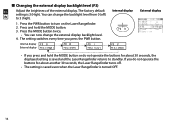
...Adjust the brightness of the external display. Press the MODE button twice. • You can change the external display backlight level. 4. You can now change the backlight level from 0 (off . • The setting is saved even when the Laser Rangefinder is turned OFF. 14 The setting switches every time you do not operate... the buttons for about 30 seconds, the displayed setting is 3 (High). Press the PWR button to ...
...Adjust the brightness of the external display. Press the MODE button twice. • You can change the external display backlight level. 4. You can now change the backlight level from 0 (off . • The setting is saved even when the Laser Rangefinder is turned OFF. 14 The setting switches every time you do not operate... the buttons for about 30 seconds, the displayed setting is 3 (High). Press the PWR button to ...
Instruction Manual
Page 15
...setting is saved and the Laser Rangefinder returns to turn on the external display. Delete logs using F6 (page 17). 1. Press the MODE button three times. • You can enable or disable the measurement log function. When the log indicator on both the internal and external display blinks (page 10), new...the MODE button or do not operate the buttons for about another 30 seconds, the Laser Rangefinder turns off. • The setting is saved even when the Laser Rangefinder is displayed Internal display on the Laser Rangefinder. 2. The setting switches every time you press and...
...setting is saved and the Laser Rangefinder returns to turn on the external display. Delete logs using F6 (page 17). 1. Press the MODE button three times. • You can enable or disable the measurement log function. When the log indicator on both the internal and external display blinks (page 10), new...the MODE button or do not operate the buttons for about another 30 seconds, the Laser Rangefinder turns off. • The setting is saved even when the Laser Rangefinder is displayed Internal display on the Laser Rangefinder. 2. The setting switches every time you press and...

Instruction Manual
Page 16
...the MODE button or do not operate the buttons for about another 30 seconds, the Laser Rangefinder turns off. • A maximum of 250 logs (50 pages) can view the measurement log on the Laser Rangefinder. Fr 2. Press the PWR button to enter the log list mode. • Every time you... press the MODE button, the page changes in reverse. Press the PWR button to standby. If you do not operate the buttons for about 30 seconds, the Laser Rangefinder returns to turn on the external display. 1. Internal display Internal display External display External display (next page, if ...
...the MODE button or do not operate the buttons for about another 30 seconds, the Laser Rangefinder turns off. • A maximum of 250 logs (50 pages) can view the measurement log on the Laser Rangefinder. Fr 2. Press the PWR button to enter the log list mode. • Every time you... press the MODE button, the page changes in reverse. Press the PWR button to standby. If you do not operate the buttons for about 30 seconds, the Laser Rangefinder returns to turn on the external display. 1. Internal display Internal display External display External display (next page, if ...
Instruction Manual
Page 18
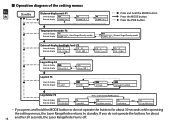
...list: F5 Internal display External display 1st page 2nd page (next page, if available) Log delete: F6 Internal display External display Press and hold the MODE button. If you press and hold the MODE button or do not operate the buttons for about 18 another 30 seconds, the Laser Rangefinder turns off. „„Operation diagram... of the setting menus En Standby Distance display unit: F1 Fr Internal display External display...
...list: F5 Internal display External display 1st page 2nd page (next page, if available) Log delete: F6 Internal display External display Press and hold the MODE button. If you press and hold the MODE button or do not operate the buttons for about 18 another 30 seconds, the Laser Rangefinder turns off. „„Operation diagram... of the setting menus En Standby Distance display unit: F1 Fr Internal display External display...

Instruction Manual
Page 19
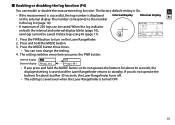
...the PWR button to confirm each menu setting. Diopter adjustment ring 19 Measurement Caution - Fr • Before measuring, be sure to turn on the power. 2. See "Navigating the menus" (page 12) for more information. „„Adjusting the focus of procedures other than those specified ...negative effects or damage to your health due to see, adjust the focus with the following procedure. 1. Look through the eyepiece and rotate the diopter adjustment ring until the internal display comes into focus. Controls, adjustments or usage of the internal display If the internal display is...
...the PWR button to confirm each menu setting. Diopter adjustment ring 19 Measurement Caution - Fr • Before measuring, be sure to turn on the power. 2. See "Navigating the menus" (page 12) for more information. „„Adjusting the focus of procedures other than those specified ...negative effects or damage to your health due to see, adjust the focus with the following procedure. 1. Look through the eyepiece and rotate the diopter adjustment ring until the internal display comes into focus. Controls, adjustments or usage of the internal display If the internal display is...

Instruction Manual
Page 22
...automatically turns off automatically. 2. During measurement, the measured result is displayed consecutively while the laser emission mark is used here as an example. 1. Result errors are not saved. 22 If you can check it in the log list...power. • If you do not operate the buttons for more information on to the number in the log list. Note: The last measured result is...target. En „„Measuring Fr Actual distance mode is flashing. l Continuous measurement In Actual distance, Horizontal distance, Height, and Angle mode, you release your finger from ...
...automatically turns off automatically. 2. During measurement, the measured result is displayed consecutively while the laser emission mark is used here as an example. 1. Result errors are not saved. 22 If you can check it in the log list...power. • If you do not operate the buttons for more information on to the number in the log list. Note: The last measured result is...target. En „„Measuring Fr Actual distance mode is flashing. l Continuous measurement In Actual distance, Horizontal distance, Height, and Angle mode, you release your finger from ...

Instruction Manual
Page 25
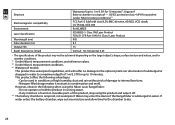
... of view (real) (˚) 7.5 Eye relief (mm) 18.0 Exit pupil (mm) 3.5 Diopter adjustment ±2.5 m-1 Dimensions (L × H × W) (mm/in.) 110 × 74 × 42/4.3 × 2.9 × 1.7 Weight (g/oz.) Approx. 170/6.0 (without battery) Operating temperature (˚C/˚F) -10 - +50/14 - 122 Operating humidity (%RH) 80 or less (without dew condensation) Power source CR2 lithium battery × 1 (DC 3V) Automatic power...
... of view (real) (˚) 7.5 Eye relief (mm) 18.0 Exit pupil (mm) 3.5 Diopter adjustment ±2.5 m-1 Dimensions (L × H × W) (mm/in.) 110 × 74 × 42/4.3 × 2.9 × 1.7 Weight (g/oz.) Approx. 170/6.0 (without battery) Operating temperature (˚C/˚F) -10 - +50/14 - 122 Operating humidity (%RH) 80 or less (without dew condensation) Power source CR2 lithium battery × 1 (DC 3V) Automatic power...
Instruction Manual
Page 26
... using the Nikon Laser Rangefinder: • Do not operate or hold the product in conditions of high humidity, dust and rain without risk of 1 m/3.3 ft for 10 minutes)*3, fogproof Battery chamber is found on the target object's shape, surface texture and nature, and/or weather conditions. *1 Under Nikon's measurement conditions and reference values. *2 Under Nikon's measurement conditions. *3 Waterproof models This product has waterproof...
... using the Nikon Laser Rangefinder: • Do not operate or hold the product in conditions of high humidity, dust and rain without risk of 1 m/3.3 ft for 10 minutes)*3, fogproof Battery chamber is found on the target object's shape, surface texture and nature, and/or weather conditions. *1 Under Nikon's measurement conditions and reference values. *2 Under Nikon's measurement conditions. *3 Waterproof models This product has waterproof...
Instruction Manual
Page 27
... from the rangefinder to climatic and environmental conditions, as well as a guide. Due to natural electrical discharge, the life of water • Target measured through glass • When the target is glass or a mirror • When laser incidence to the target's reflective surface is for measuring. l About laser This product uses an invisible laser beam for operation checking...
... from the rangefinder to climatic and environmental conditions, as well as a guide. Due to natural electrical discharge, the life of water • Target measured through glass • When the target is glass or a mirror • When laser incidence to the target's reflective surface is for measuring. l About laser This product uses an invisible laser beam for operation checking...

Instruction Manual
Page 28
...; Check that Nikon is a problem with a new one. • Confirm the settings. • Confirm if it can measure a large target close to you (example: a building approx. 15 m/15 yd./49 ft ahead of the external display, and adjust it . Please note that the battery is inserted correctly. • Replace the battery with the product. En „„Troubleshooting/Repair Fr If...
...; Check that Nikon is a problem with a new one. • Confirm the settings. • Confirm if it can measure a large target close to you (example: a building approx. 15 m/15 yd./49 ft ahead of the external display, and adjust it . Please note that the battery is inserted correctly. • Replace the battery with the product. En „„Troubleshooting/Repair Fr If...


