Instruction Manual
Page 4
...determination . .... . .18-25 Setting the shutter speed 18-19 Setting the aperture 20 Exposure determination 21 Exposure display 21 Metering range of exposure meter 22 Stop-down exposure measurement 23 Exposure measurement in special cases 24 Duplication work and photomicrography 25 Viewfinder/viewing & focusing 26-27...31 Memo holder 32 Infrared compensation index 32 Flash photography 33-35 Ready-light 34-35 ACCESSORIES 36-44 Interchangeable focusing screens 36- 37 Close-up equipment 38 Motor Drive MD-12 39 Nikon Speedlights 40 Data Back MF-16 41 Anti -Cold Battery Pack OB&#...
...determination . .... . .18-25 Setting the shutter speed 18-19 Setting the aperture 20 Exposure determination 21 Exposure display 21 Metering range of exposure meter 22 Stop-down exposure measurement 23 Exposure measurement in special cases 24 Duplication work and photomicrography 25 Viewfinder/viewing & focusing 26-27...31 Memo holder 32 Infrared compensation index 32 Flash photography 33-35 Ready-light 34-35 ACCESSORIES 36-44 Interchangeable focusing screens 36- 37 Close-up equipment 38 Motor Drive MD-12 39 Nikon Speedlights 40 Data Back MF-16 41 Anti -Cold Battery Pack OB&#...

Instruction Manual
Page 7
Be sure to switch the exposure meter on while looking through the viewfinder. If one or two of the red LED exposure indicator lamps inside lights up . If none of the exposure indicator lamps will light up this would mean normal condition. You can unlock the shutter release button... the standoff position . 5 Press the shutter • release button lightly to set the dial at another position. after you should change the battery. 7 The meter itself stays on B (bulb), none of the exposure indicator lamps light up, either the battery is improperly instal/ed-in which case you...
Be sure to switch the exposure meter on while looking through the viewfinder. If one or two of the red LED exposure indicator lamps inside lights up . If none of the exposure indicator lamps will light up this would mean normal condition. You can unlock the shutter release button... the standoff position . 5 Press the shutter • release button lightly to set the dial at another position. after you should change the battery. 7 The meter itself stays on B (bulb), none of the exposure indicator lamps light up, either the battery is improperly instal/ed-in which case you...
Instruction Manual
Page 12
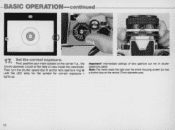
Nota: The meter reads the light over the entire focusing screen but not of shutter speed are usable. Then turn the shutter speed dial ® and/or lens aperture ring @ until the LED lamp for the symbol for correct exposure 0 lights up. Important! Intermediate settings of view inside the viewfinder. -BASIC OPERATION-continued---------- 1l Set the correct exposure. • First, position your main subject at the center (i.e., the 12mm-diameter circle) of the field of lens aperture but has a distinct bias on the central 12mm-diameter area. 12
Nota: The meter reads the light over the entire focusing screen but not of shutter speed are usable. Then turn the shutter speed dial ® and/or lens aperture ring @ until the LED lamp for the symbol for correct exposure 0 lights up. Important! Intermediate settings of view inside the viewfinder. -BASIC OPERATION-continued---------- 1l Set the correct exposure. • First, position your main subject at the center (i.e., the 12mm-diameter circle) of the field of lens aperture but has a distinct bias on the central 12mm-diameter area. 12
Instruction Manual
Page 17
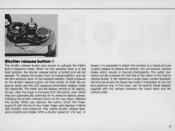
...touch the fingerguard ® with the tip of your index finger and depress it lightly with the camera between the lens barrel and the head may make it is ... release the shutter; If the tripod has a large head, contact between the tripod head and the camera body. 17 To release the button from the button, after the finger is locked and will not operate. Slight...switch on both the exposure meter and the LED exposure information display inside the viewfinder. Shutter re.e••e button ® The shutter release button also serves to activate the FM2's built-in the flush ...
...touch the fingerguard ® with the tip of your index finger and depress it lightly with the camera between the lens barrel and the head may make it is ... release the shutter; If the tripod has a large head, contact between the tripod head and the camera body. 17 To release the button from the button, after the finger is locked and will not operate. Slight...switch on both the exposure meter and the LED exposure information display inside the viewfinder. Shutter re.e••e button ® The shutter release button also serves to activate the FM2's built-in the flush ...

Instruction Manual
Page 22
... brightness. Also, if the combination of aperture and shutter speed is improper for the brightness of the subject, the exposure meter will not light up , indicating correct exposure. You should try altogether different combinations of aperture and shutter speed. at f/2.B and 1/4000 sec...It is necessary to illuminate the subject or to EV20 22 -CONTROLS IN DETAIL-contlnued----------, Metering range of exposure meter When there is a proper combination of lens aperture and shutter speed, 0 lights up when the aperture and shutter speed combination is not suitable for correct exposure, then ...
... brightness. Also, if the combination of aperture and shutter speed is improper for the brightness of the subject, the exposure meter will not light up , indicating correct exposure. You should try altogether different combinations of aperture and shutter speed. at f/2.B and 1/4000 sec...It is necessary to illuminate the subject or to EV20 22 -CONTROLS IN DETAIL-contlnued----------, Metering range of exposure meter When there is a proper combination of lens aperture and shutter speed, 0 lights up when the aperture and shutter speed combination is not suitable for correct exposure, then ...

Instruction Manual
Page 23
... ® , then take your picture and·secure subject focus . 3) Press the shutter release button lightly to turn the meter on. 4) Perform exposure measurement, depending on the type of lens, the aperture is mounted on the camera body, such as follows: 1) Set the ASA/ ISO number. 2) Compose your finger off the lever and... cannot be changed according to the aperture because in this type of lens used when the diaphragm on the lens does not link with the meter coupling lever on the camera.
... ® , then take your picture and·secure subject focus . 3) Press the shutter release button lightly to turn the meter on. 4) Perform exposure measurement, depending on the type of lens, the aperture is mounted on the camera body, such as follows: 1) Set the ASA/ ISO number. 2) Compose your finger off the lever and... cannot be changed according to the aperture because in this type of lens used when the diaphragm on the lens does not link with the meter coupling lever on the camera.
Instruction Manual
Page 24
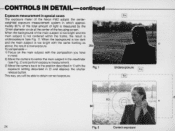
mately 60 % of the total amount of light is overexposure. To compensate1) Focus on the main subject with the composition you will be able to obtain correct exposure. Fig. 1 o Underexposure ~ I I I I I ..... - - ...framing as above, the result is measured by the 12 mm·diameter circle at the center of the Nikon FM2 adopts the centerweighted exposure measurement system in 2) and depress the shutter release button. When the background of ... Fig . 1). -CONTROLS IN DETAIL-continued------ - - - Exposure measurement in special cases The exposure meter of the focusing screen.
mately 60 % of the total amount of light is overexposure. To compensate1) Focus on the main subject with the composition you will be able to obtain correct exposure. Fig. 1 o Underexposure ~ I I I I I ..... - - ...framing as above, the result is measured by the 12 mm·diameter circle at the center of the Nikon FM2 adopts the centerweighted exposure measurement system in 2) and depress the shutter release button. When the background of ... Fig . 1). -CONTROLS IN DETAIL-continued------ - - - Exposure measurement in special cases The exposure meter of the focusing screen.
Instruction Manual
Page 35
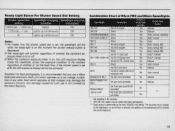
pcsure meter is on , the LED expcsure display inside the viewfinder shows the expcsure condition of the moment regardless of Nlkon FM2 and Nlkon Speedlights Speedloght Connection Camera's ready-light I Shutler speed dial Speedlight charging Speedlight charging setting complete incomplete 1/4000 sec. - 1/500 sec.... 120mm f14 1F Via 3-pln sync cord 8C-22 (provided) Yes - Lights up continuously Off B Lights up continuously Off Notes: 1) No matter how the shutter speed dial is determined by the Nikon Warrant y. The focusing ring is coupled to provide the correct exposure. 35...
pcsure meter is on , the LED expcsure display inside the viewfinder shows the expcsure condition of the moment regardless of Nlkon FM2 and Nlkon Speedlights Speedloght Connection Camera's ready-light I Shutler speed dial Speedlight charging Speedlight charging setting complete incomplete 1/4000 sec. - 1/500 sec.... 120mm f14 1F Via 3-pln sync cord 8C-22 (provided) Yes - Lights up continuously Off B Lights up continuously Off Notes: 1) No matter how the shutter speed dial is determined by the Nikon Warrant y. The focusing ring is coupled to provide the correct exposure. 35...
Instruction Manual
Page 39
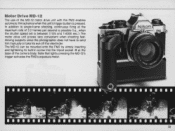
...Note that lightly pressing the MO-12's trigger activates the FM2's exposure meter. 39 The motor drive unit proves very convenient when shooting fastmoving subjects since the photographer does not have to single -frame shooting, continuous firing at the base of the camera body. The MO-12 can be mounted onto the FM2 by ...simply inserting and tightening its built-in screw into the tripod socket @ at the maximum rate of the MO-12 motor drive unit with the FM2 enables automatic film advance when the unit's...
...Note that lightly pressing the MO-12's trigger activates the FM2's exposure meter. 39 The motor drive unit proves very convenient when shooting fastmoving subjects since the photographer does not have to single -frame shooting, continuous firing at the base of the camera body. The MO-12 can be mounted onto the FM2 by ...simply inserting and tightening its built-in screw into the tripod socket @ at the maximum rate of the MO-12 motor drive unit with the FM2 enables automatic film advance when the unit's...
Instruction Manual
Page 42
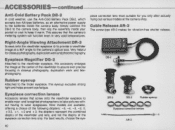
...-2 Attached to the camera body, then slip the assembly inside the camera body. Nine models are available, offering a choice of the eyepiece correction lens only. Simply connect the OB-2 to the viewfinder eyepiece, this eyecup excludes strong light and helps prevent eye fatigue...to provide a viewfinder image at a 90· angle to wear eyeglasses. Eyepiece correction lenses Accessory lenses that the camera 's metering system will function even in closeup photography, duplication work and photomicrography. Rubbereyecup Attached to the finder eyepiece, this accessory enlarges the ...
...-2 Attached to the camera body, then slip the assembly inside the camera body. Nine models are available, offering a choice of the eyepiece correction lens only. Simply connect the OB-2 to the viewfinder eyepiece, this eyecup excludes strong light and helps prevent eye fatigue...to provide a viewfinder image at a 90· angle to wear eyeglasses. Eyepiece correction lenses Accessory lenses that the camera 's metering system will function even in closeup photography, duplication work and photomicrography. Rubbereyecup Attached to the finder eyepiece, this accessory enlarges the ...

Instruction Manual
Page 43
... come in four styles : screw-in, slip-on, snap-on the table, Nikon filters are broadly divided into the screw-in, drop-in, and bayonet type, Because the FM2 incorporates a TIL full-aperture metering, the filter factor can be fitted with the lens hood specially designed for it.... the R60 in daylight, set the aperture three f/stops wider than the figure indicated by the exposure meter, Notes: 1) For lens protection, the NC filter is recommended, 2) When shooting a backlit subject or if there's a bright light source in the frame, a ghost Image is shown on , and collapsible-rubber. G.."
... come in four styles : screw-in, slip-on, snap-on the table, Nikon filters are broadly divided into the screw-in, drop-in, and bayonet type, Because the FM2 incorporates a TIL full-aperture metering, the filter factor can be fitted with the lens hood specially designed for it.... the R60 in daylight, set the aperture three f/stops wider than the figure indicated by the exposure meter, Notes: 1) For lens protection, the NC filter is recommended, 2) When shooting a backlit subject or if there's a bright light source in the frame, a ghost Image is shown on , and collapsible-rubber. G.."

Instruction Manual
Page 48
... and vertical line etchings (E) optionally available. matically resets to 1/4000 sec. sync Ready-light: Provided inside the viewfinder Exposure meter: TTL center-weighted full aperture exposure measuring system using a pair of camera : Usable ...film : Picture format: Lens mount: Shutter: Shutter speed settings : Self-timer: Viewfinder : Viewfinder display: Focusing screen : Mirror: 35mm single-lens reflex (SLR) focal plane shutter camera Any cartridge-type 35 mm film 24mmx36mm Nikon...
... and vertical line etchings (E) optionally available. matically resets to 1/4000 sec. sync Ready-light: Provided inside the viewfinder Exposure meter: TTL center-weighted full aperture exposure measuring system using a pair of camera : Usable ...film : Picture format: Lens mount: Shutter: Shutter speed settings : Self-timer: Viewfinder : Viewfinder display: Focusing screen : Mirror: 35mm single-lens reflex (SLR) focal plane shutter camera Any cartridge-type 35 mm film 24mmx36mm Nikon...

Instruction Manual
Page 49
...Exposure meter switch: Battery power check: Camera back: Dimensions (W x H x D): (camera body only) Weight: (camera body only) ASAIISO 12"'6400 Choice of one 3V lithium battery, two 1.55V silver-oxide batteries, or two 1.5V alkaline-manganese batteries Light pressure on shutter release button switches meter on... back lock is switched on ; after finger leaves button, then automatically switches off LED exposure display inside viewfinder lights up when the exposure meter is pushed ; Approx. 540g or 19 oz. memo holder provided. Specifications are subject to change without notice....
...Exposure meter switch: Battery power check: Camera back: Dimensions (W x H x D): (camera body only) Weight: (camera body only) ASAIISO 12"'6400 Choice of one 3V lithium battery, two 1.55V silver-oxide batteries, or two 1.5V alkaline-manganese batteries Light pressure on shutter release button switches meter on... back lock is switched on ; after finger leaves button, then automatically switches off LED exposure display inside viewfinder lights up when the exposure meter is pushed ; Approx. 540g or 19 oz. memo holder provided. Specifications are subject to change without notice....