
D2Xs User's Manual
Page 2
...reference CD contains information on pages 256-257 of unpacking and setting up your Nikon digital camera, taking your first photographs, and transferring them to your camera. Guide to Digital Photography The Guide to Digital Photography (this manual, or have the low-pass filter cleaned by ...pass filter, where it may be sure to replace the body cap provided with the low-pass filter during production and shipping. The D2Xs, however, is in photographs taken under certain conditions. Once inside the camera, this product includes the manuals listed below.
...reference CD contains information on pages 256-257 of unpacking and setting up your Nikon digital camera, taking your first photographs, and transferring them to your camera. Guide to Digital Photography The Guide to Digital Photography (this manual, or have the low-pass filter cleaned by ...pass filter, where it may be sure to replace the body cap provided with the low-pass filter during production and shipping. The D2Xs, however, is in photographs taken under certain conditions. Once inside the camera, this product includes the manuals listed below.

D2Xs User's Manual
Page 6
...heated building on the curtain, poke it to a soft cloth and wipe the lens carefully. • See "Technical Notes: Caring for Your Camera" for information on the lens, apply a small amount of humidity. Rusting of equipment that these elements are especially susceptible to strong shocks or vibration... point the lens at strong light sources for extended periods Avoid pointing the lens at regular intervals. Cleaning • When cleaning the camera body, use or store this may cause the material to light up or darken. Avoid sudden changes in temperature Sudden changes in temperature, ...
...heated building on the curtain, poke it to a soft cloth and wipe the lens carefully. • See "Technical Notes: Caring for Your Camera" for information on the lens, apply a small amount of humidity. Rusting of equipment that these elements are especially susceptible to strong shocks or vibration... point the lens at strong light sources for extended periods Avoid pointing the lens at regular intervals. Cleaning • When cleaning the camera body, use or store this may cause the material to light up or darken. Avoid sudden changes in temperature Sudden changes in temperature, ...

D2Xs User's Manual
Page 17
Camera Body Bracketing ( ) button: 100, 105 Metering selector: 86 Metering selector lock button: 86 Exposure mode ( ) button: 87 Format ( ) button: 23 Mode dial lock release: 44 Mode dial: 44 Eyelet for camera strap: 15 Flash sync mode ( ) button: 113 Command lock ( ) button: 96 Power switch: 27 Shutter-release button:...85 LCD Illuminators Holding the power switch in the dark. After the power switch is released, the illuminator will remain lit while the camera exposure meters are active or until the shutter is released. 3 You may find it helpful to bookmark this section and ...
Camera Body Bracketing ( ) button: 100, 105 Metering selector: 86 Metering selector lock button: 86 Exposure mode ( ) button: 87 Format ( ) button: 23 Mode dial lock release: 44 Mode dial: 44 Eyelet for camera strap: 15 Flash sync mode ( ) button: 113 Command lock ( ) button: 96 Power switch: 27 Shutter-release button:...85 LCD Illuminators Holding the power switch in the dark. After the power switch is released, the illuminator will remain lit while the camera exposure meters are active or until the shutter is released. 3 You may find it helpful to bookmark this section and ...

D2Xs User's Manual
Page 18
Introduction-Getting to Know the Camera Camera Body (continued) Depth-of cover) DC-in connector (under cover): 247 USB connector (under cover): 236 Lens release button: 21 Focus-mode selector: 74 Battery cover ...
Introduction-Getting to Know the Camera Camera Body (continued) Depth-of cover) DC-in connector (under cover): 247 USB connector (under cover): 236 Lens release button: 21 Focus-mode selector: 74 Battery cover ...

D2Xs User's Manual
Page 29
... iv-v Step 3 Basic Setup For information on changing the clock battery, see: •Technical Notes: Caring for Your Camera 17-19 255 Step 4 Attach a Lens To learn more about the lenses available for the D2Xs, see: • Technical Notes: Optional Accessories 20-21 244-246 Step 5 Insert a Memory Card To learn more...: Approved Memory Cards For more information on formatting memory cards, see: •The Setup Menu: Formatting Memory Cards 22-24 252 214 Step 1-Attach the Camera Strap Attach the camera strap securely to the two eyelets on the camera body as shown below.
... iv-v Step 3 Basic Setup For information on changing the clock battery, see: •Technical Notes: Caring for Your Camera 17-19 255 Step 4 Attach a Lens To learn more about the lenses available for the D2Xs, see: • Technical Notes: Optional Accessories 20-21 244-246 Step 5 Insert a Memory Card To learn more...: Approved Memory Cards For more information on formatting memory cards, see: •The Setup Menu: Formatting Memory Cards 22-24 252 214 Step 1-Attach the Camera Strap Attach the camera strap securely to the two eyelets on the camera body as shown below.
D2Xs User's Manual
Page 34
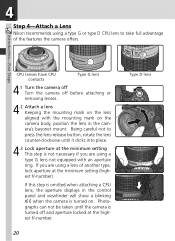
...the control panel and viewfinder will show a blinking when the camera is turned on the camera body, position the lens in the camera's bayonet mount. If you are using a lens of the features the camera offers. Being careful not to take full advantage of another type, lock...4.3 Lock aperture at the minimum setting (highest f/-number). 4 Step 4-Attach a Lens Nikon recommends using a type G or type D CPU lens to press the lens-release button, rotate the lens counter-clockwise until the camera is turned off before attaching or removing lenses. 4.2 Attach a lens Keeping the mounting ...
...the control panel and viewfinder will show a blinking when the camera is turned on the camera body, position the lens in the camera's bayonet mount. If you are using a lens of the features the camera offers. Being careful not to take full advantage of another type, lock...4.3 Lock aperture at the minimum setting (highest f/-number). 4 Step 4-Attach a Lens Nikon recommends using a type G or type D CPU lens to press the lens-release button, rotate the lens counter-clockwise until the camera is turned off before attaching or removing lenses. 4.2 Attach a lens Keeping the mounting ...

D2Xs User's Manual
Page 35
When exchanging lens or replacing the body cap, keep the lens mount covered with the supplied BF-1A body cap . When no lens is off when removing or exchanging lenses. To remove the lens, press and hold the lens-release button while turning the lens clockwise. 21 Detaching the Lens Be sure the camera is in your photographs or the viewfinder display. Introduction-First Steps 4 Protect the Camera from Dirt and Dust Any dust, dirt, or other foreign matter inside your camera could show up as specks or blotches in place, keep the lens mount pointed down.
When exchanging lens or replacing the body cap, keep the lens mount covered with the supplied BF-1A body cap . When no lens is off when removing or exchanging lenses. To remove the lens, press and hold the lens-release button while turning the lens clockwise. 21 Detaching the Lens Be sure the camera is in your photographs or the viewfinder display. Introduction-First Steps 4 Protect the Camera from Dirt and Dust Any dust, dirt, or other foreign matter inside your camera could show up as specks or blotches in place, keep the lens mount pointed down.

D2Xs User's Manual
Page 45
...front of -6 m-1 to +3 m-1. Corrective lenses (available separately; 248) allow diopters of the other and your upper body stable. Hold the handgrip in your right hand and cradle the camera body or lens with one foot a half pace in the range -3 m-1 to +1 m-1. The recommended stance for support....Lenses Before attaching a diopter-adjustment viewfinder lens, remove the DK-17 viewfinder eyepiece by unsteady hands (camera shake), hold the camera steadily in both hands, with your elbows propped lightly against your torso for taking photographs in sharp focus (ባ). To adjust...
...front of -6 m-1 to +3 m-1. Corrective lenses (available separately; 248) allow diopters of the other and your upper body stable. Hold the handgrip in your right hand and cradle the camera body or lens with one foot a half pace in the range -3 m-1 to +1 m-1. The recommended stance for support....Lenses Before attaching a diopter-adjustment viewfinder lens, remove the DK-17 viewfinder eyepiece by unsteady hands (camera shake), hold the camera steadily in both hands, with your elbows propped lightly against your torso for taking photographs in sharp focus (ባ). To adjust...

D2Xs User's Manual
Page 99
... the active focus area, press the shutter-release button halfway and rotate the lens focusing ring until the image displayed on the camera body. A-M Selection/Autofocus with your subject and the camera, measure from the focal plane mark on the clear matte field in the viewfinder is available for details...
... the active focus area, press the shutter-release button halfway and rotate the lens focusing ring until the image displayed on the camera body. A-M Selection/Autofocus with your subject and the camera, measure from the focal plane mark on the clear matte field in the viewfinder is available for details...

D2Xs User's Manual
Page 259
...has not been specified using lens aperture ring before determining exposure and taking photograph. • PF-4 Reprocopy Outfit requires PA-4 Camera Holder. Aperture-priority auto will be used at in manual exposure modes at maximum zoom, in-focus indicator may be displayed in shooting menu, ...exposure mode, preset aperture using Non-CPU lens data option in viewfinder and top control panel. 17 Exposure determined by camera body. PB-6D may be used with the D2Xs: • Non-AI lenses • Lenses for details. 19 Requires PK-12 or PK-13 auto extension ring. If...
...has not been specified using lens aperture ring before determining exposure and taking photograph. • PF-4 Reprocopy Outfit requires PA-4 Camera Holder. Aperture-priority auto will be used at in manual exposure modes at maximum zoom, in-focus indicator may be displayed in shooting menu, ...exposure mode, preset aperture using Non-CPU lens data option in viewfinder and top control panel. 17 Exposure determined by camera body. PB-6D may be used with the D2Xs: • Non-AI lenses • Lenses for details. 19 Requires PK-12 or PK-13 auto extension ring. If...

D2Xs User's Manual
Page 267
...or lens cleaning solutions. the display will not be damaged if foreign matter gets inside the camera body. Caring for the Camera Storage and Maintenance Technical Notes-Caring for the Camera Storage When the camera will shortly return to remove dust, dirt, or sand then wipe gently with a soft ...the monitor break, care should be taken to avoid injury caused by dirt or sand. Cleaning Camera body Use a blower to normal. 253 Nikon cannot accept liability for more information. If using the camera at the beach or seaside, wipe off any sand or salt with a dry cloth lightly...
...or lens cleaning solutions. the display will not be damaged if foreign matter gets inside the camera body. Caring for the Camera Storage and Maintenance Technical Notes-Caring for the Camera Storage When the camera will shortly return to remove dust, dirt, or sand then wipe gently with a soft ...the monitor break, care should be taken to avoid injury caused by dirt or sand. Cleaning Camera body Use a blower to normal. 253 Nikon cannot accept liability for more information. If using the camera at the beach or seaside, wipe off any sand or salt with a dry cloth lightly...

D2Xs User's Manual
Page 271
...low-pass filter. • Do not turn the camera off while the mirror is raised, the shutter curtain will return to warn that filter be removed by Nikon-authorized service personnel. Replace the lens or body cap and disconnect the AC adapter. Use a Reliable Power ...Source The camera shutter curtain is complete. 2 Remove dust and lint from the filter with ...
...low-pass filter. • Do not turn the camera off while the mirror is raised, the shutter curtain will return to warn that filter be removed by Nikon-authorized service personnel. Replace the lens or body cap and disconnect the AC adapter. Use a Reliable Power ...Source The camera shutter curtain is complete. 2 Remove dust and lint from the filter with ...

D2Xs User's Manual
Page 278
... 1070 g (2 lb 6 oz) without prior notice. Servicing the Camera and Accessories The D2Xs is used with a fully-charged battery operating at an ambient temperature of 20 °C (68 °F). • Nikon reserves the right to change the specifications of the hardware and...Nikon will not be selected from any time and without battery, memory card, body cap, or monitor cover Operating environment Temperature 0 - 40 °C (32 - 104 °F) Humidity Less than 85% (no condensation) • Unless otherwise stated, all figures are particularly recommended if the camera...
... 1070 g (2 lb 6 oz) without prior notice. Servicing the Camera and Accessories The D2Xs is used with a fully-charged battery operating at an ambient temperature of 20 °C (68 °F). • Nikon reserves the right to change the specifications of the hardware and...Nikon will not be selected from any time and without battery, memory card, body cap, or monitor cover Operating environment Temperature 0 - 40 °C (32 - 104 °F) Humidity Less than 85% (no condensation) • Unless otherwise stated, all figures are particularly recommended if the camera...
