
D2Xs User's Manual
Page 2
...setting up your Nikon digital camera, taking your first photographs, and transferring them to be used with interchangeable lenses, and foreign matter may enter the camera when lenses are removed or exchanged. To protect the camera when no lens is designed to your camera....manuals listed below. The D2Xs, however, is in dusty environments. Once inside the camera, this manual) provides complete operating instructions for viewing instructions. Photographs affected by authorized Nikon service personnel. To prevent foreign matter from entering the camera, do not exchange lenses ...
...setting up your Nikon digital camera, taking your first photographs, and transferring them to be used with interchangeable lenses, and foreign matter may enter the camera when lenses are removed or exchanged. To protect the camera when no lens is designed to your camera....manuals listed below. The D2Xs, however, is in dusty environments. Once inside the camera, this manual) provides complete operating instructions for viewing instructions. Photographs affected by authorized Nikon service personnel. To prevent foreign matter from entering the camera, do not exchange lenses ...

D2Xs User's Manual
Page 3
... conventions used in this manual and the names of camera parts, then set up the camera as described in "First Steps." Refer to these sections for more on playback... ...on recording and playing voice memos... ...on camera menus and custom settings... ...on connecting to a computer, printer, or ...aware of the warnings, cautions, and notices on accessories and troubleshooting. Once you have mastered the basics of digital photography, you are ready to Know the Camera First Steps Basic Photography Basic Playback High-Speed Crop Choosing a Shooting Mode Image Quality and Size ISO Sensitivity...
... conventions used in this manual and the names of camera parts, then set up the camera as described in "First Steps." Refer to these sections for more on playback... ...on recording and playing voice memos... ...on camera menus and custom settings... ...on connecting to a computer, printer, or ...aware of the warnings, cautions, and notices on accessories and troubleshooting. Once you have mastered the basics of digital photography, you are ready to Know the Camera First Steps Basic Photography Basic Playback High-Speed Crop Choosing a Shooting Mode Image Quality and Size ISO Sensitivity...
D2Xs User's Manual
Page 10
...Basic Setup 17 Step 4-Attach a Lens 20 Step 5-Insert a Memory Card 22 Tutorial 25 Basic Photography 26 Step 1-Ready the Camera 27 Step 2-Adjust Camera Settings 29 Step 3-Frame a Photograph 31 Step 4-Focus 32 Step 5-Check Exposure 33 Step 6-Take the Photograph 34 Basic Playback 35... Taking Photographs 37 Using Camera Menus 39 High-Speed Crop 41 Choosing a Shooting Mode 43 Image Quality and Size 45 Image...
...Basic Setup 17 Step 4-Attach a Lens 20 Step 5-Insert a Memory Card 22 Tutorial 25 Basic Photography 26 Step 1-Ready the Camera 27 Step 2-Adjust Camera Settings 29 Step 3-Frame a Photograph 31 Step 4-Focus 32 Step 5-Check Exposure 33 Step 6-Take the Photograph 34 Basic Playback 35... Taking Photographs 37 Using Camera Menus 39 High-Speed Crop 41 Choosing a Shooting Mode 43 Image Quality and Size 45 Image...

D2Xs User's Manual
Page 12
Menu Guide 155 The Playback Menu 156 Delete ...156 Playback Folder 158 Slide Show ...159 Hide Image...161 Print Set ...163 Display Mode 166 Image Review 166 After Delete ...167 Rotate Tall ...167 The Shooting Menu 168 Shooting Menu Bank 169 Reset Shooting Menu 171 ......177 Color Mode...177 Hue Adjustment 177 Image Overlay 177 Multiple Exposure 177 Trim ...178 Interval Timer Shooting 178 Non-CPU Lens Data 178 Custom Settings 179 The Setup Menu 213 Format ...214 LCD Brightness 215 Mirror Lock-up 215 Video Mode ...216 x
Menu Guide 155 The Playback Menu 156 Delete ...156 Playback Folder 158 Slide Show ...159 Hide Image...161 Print Set ...163 Display Mode 166 Image Review 166 After Delete ...167 Rotate Tall ...167 The Shooting Menu 168 Shooting Menu Bank 169 Reset Shooting Menu 171 ......177 Color Mode...177 Hue Adjustment 177 Image Overlay 177 Multiple Exposure 177 Trim ...178 Interval Timer Shooting 178 Non-CPU Lens Data 178 Custom Settings 179 The Setup Menu 213 Format ...214 LCD Brightness 215 Mirror Lock-up 215 Video Mode ...216 x
D2Xs User's Manual
Page 13
... Voice Memo Button 220 Audio Output 220 USB...220 Dust Off Ref Photo 221 Battery Info ...223 Wireless LAN ...223 Image Authentication 231 Save/Load Settings 232 Firmware Version 232 Connections 233 Television Playback 234 Connecting to a Computer 235 Connecting to a Printer 238 Technical Notes 243 Optional Accessories 244 Lenses for...
... Voice Memo Button 220 Audio Output 220 USB...220 Dust Off Ref Photo 221 Battery Info ...223 Wireless LAN ...223 Image Authentication 231 Save/Load Settings 232 Firmware Version 232 Connections 233 Television Playback 234 Connecting to a Computer 235 Connecting to a Printer 238 Technical Notes 243 Optional Accessories 244 Lenses for...

D2Xs User's Manual
Page 15
Introduction Getting Started This chapter is divided into the following sections: Overview Read this section for a description of how this section and refer to ready the camera for use: inserting the battery and memory card, attaching a lens and camera strap, and setting the date, time, and language. 1 Getting to Know the Camera Bookmark this manual is organized and for information on the names and functions of the symbols and conventions used. First Steps This section details the steps required to it for an explanation of camera parts.
Introduction Getting Started This chapter is divided into the following sections: Overview Read this section for a description of how this section and refer to ready the camera for use: inserting the battery and memory card, attaching a lens and camera strap, and setting the date, time, and language. 1 Getting to Know the Camera Bookmark this manual is organized and for information on the names and functions of the symbols and conventions used. First Steps This section details the steps required to it for an explanation of camera parts.

D2Xs User's Manual
Page 16
... URL below for damages or lost profits that may be available from product malfunction. This icon marks settings that can be adjusted using the camera. Nikon will not be held liable for contact information: http://nikonimaging.com/ 2 Read this manual or in the Quick...information, tips, answers to frequently-asked questions (FAQs), and general advice on important occasions (for your purchase of a Nikon D2Xs single-lens reflex (SLR) digital camera with your area. This manual has been written to help you enjoy taking pictures with interchangeable lenses. To make it...
... URL below for damages or lost profits that may be available from product malfunction. This icon marks settings that can be adjusted using the camera. Nikon will not be held liable for contact information: http://nikonimaging.com/ 2 Read this manual or in the Quick...information, tips, answers to frequently-asked questions (FAQs), and general advice on important occasions (for your purchase of a Nikon D2Xs single-lens reflex (SLR) digital camera with your area. This manual has been written to help you enjoy taking pictures with interchangeable lenses. To make it...
D2Xs User's Manual
Page 23
Introduction-Getting to Know the Camera 1 Custom settings bank 182 2 "Remaining" indicator 28 3 Shooting menu settings bank ..... 169 4 ISO sensitivity indicator 52 Auto ISO sensitivity indicator....... 191 5 ISO sensitivity 52 ISO sensitivity (high gain 52 Number of exposures remaining 28 Length ...
Introduction-Getting to Know the Camera 1 Custom settings bank 182 2 "Remaining" indicator 28 3 Shooting menu settings bank ..... 169 4 ISO sensitivity indicator 52 Auto ISO sensitivity indicator....... 191 5 ISO sensitivity 52 ISO sensitivity (high gain 52 Number of exposures remaining 28 Length ...
D2Xs User's Manual
Page 26
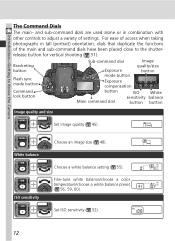
...choose a color temperature/choose a white balance preset ( 56, 59, 60). Choose a white balance setting ( 55). Bracketing button Flash sync mode button Command lock button Sub-command dial Exposure mode button Image...Main command dial sensitivity balance button button Image quality and size Set image quality ( 45). and sub-command dials are used alone or in tall (...portrait) orientation, dials that duplicate the functions of settings. White balance ISO sensitivity Choose an image size ( 48). Set ISO sensitivity ( 52). 12 For ease of access when taking ...
...choose a color temperature/choose a white balance preset ( 56, 59, 60). Choose a white balance setting ( 55). Bracketing button Flash sync mode button Command lock button Sub-command dial Exposure mode button Image...Main command dial sensitivity balance button button Image quality and size Set image quality ( 45). and sub-command dials are used alone or in tall (...portrait) orientation, dials that duplicate the functions of settings. White balance ISO sensitivity Choose an image size ( 48). Set ISO sensitivity ( 52). 12 For ease of access when taking ...
D2Xs User's Manual
Page 27
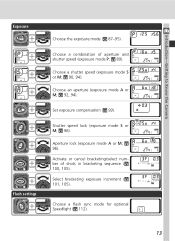
... (exposure mode S or M; 96). Aperture lock (exposure mode A or M; 96). Select bracketing exposure increment ( 101, 105). Set exposure compensation ( 99). Activate or cancel bracketing/select number of aperture and shutter speed (exposure mode P; 89). Choose an aperture (...exposure mode A or M; 92, 94). Choose a flash sync mode for optional Speedlight ( 112). 13 Introduction-Getting to Know the Camera Exposure Flash settings Choose the exposure mode ( 87-95). Choose a shutter speed (exposure mode S or M; 90, 94). Choose a combination of shots in bracketing ...
... (exposure mode S or M; 96). Aperture lock (exposure mode A or M; 96). Select bracketing exposure increment ( 101, 105). Set exposure compensation ( 99). Activate or cancel bracketing/select number of aperture and shutter speed (exposure mode P; 89). Choose an aperture (...exposure mode A or M; 92, 94). Choose a flash sync mode for optional Speedlight ( 112). 13 Introduction-Getting to Know the Camera Exposure Flash settings Choose the exposure mode ( 87-95). Choose a shutter speed (exposure mode S or M; 90, 94). Choose a combination of shots in bracketing ...
D2Xs User's Manual
Page 31
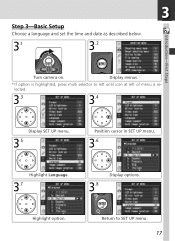
Highlight option. 3 Step 3-Basic Setup Choose a language and set the time and date as described below. 3.1 3.2 Introduction-First Steps Turn camera on. Return to left until icon at left of menu is highlighted, press multi selector to SET UP menu. 17 Display menus. * * If option is selected. 3.3 3.4 Display SET UP menu. 3.5 Position cursor in SET UP menu. 3.6 Highlight Language. 3.7 3.8 Display options.
Highlight option. 3 Step 3-Basic Setup Choose a language and set the time and date as described below. 3.1 3.2 Introduction-First Steps Turn camera on. Return to left until icon at left of menu is highlighted, press multi selector to SET UP menu. 17 Display menus. * * If option is selected. 3.3 3.4 Display SET UP menu. 3.5 Position cursor in SET UP menu. 3.6 Highlight Language. 3.7 3.8 Display options.

D2Xs User's Manual
Page 33
... infor- tery with a life of about four years. Introduction-First Steps 3.17 3.18 3 Edit Year, Month, Day, Hour, Minute, and Second. The camera clock is exhausted, a icon will be reset using the World time option in the top control panel while the exposure meters are on replacing the... clock battery, see "Technical Notes: Caring for the Camera" ( 255). 19 Press multi selector left or right to select item, up or down to SET UP menu. Press button to set date and time and return to to WORLD TIME menu. 3.19 Highlight Date format....
... infor- tery with a life of about four years. Introduction-First Steps 3.17 3.18 3 Edit Year, Month, Day, Hour, Minute, and Second. The camera clock is exhausted, a icon will be reset using the World time option in the top control panel while the exposure meters are on replacing the... clock battery, see "Technical Notes: Caring for the Camera" ( 255). 19 Press multi selector left or right to select item, up or down to SET UP menu. Press button to set date and time and return to to WORLD TIME menu. 3.19 Highlight Date format....
D2Xs User's Manual
Page 34
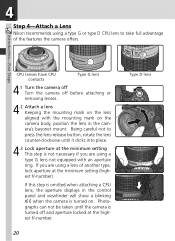
4 Step 4-Attach a Lens Nikon recommends using a type G or type D CPU lens to press the lens-release button, rotate the lens counter-clockwise until the camera is turned on the lens aligned with an aperture ring. Photographs can not be taken until it clicks into place. 4.3 Lock ...Introduction-First Steps CPU lenses have CPU contacts Type G lens 4.1 Turn the camera off Turn the camera off and aperture locked at the minimum setting This step is not necessary if you are using a lens of the features the camera offers. If you are using a type G lens not equipped with the ...
4 Step 4-Attach a Lens Nikon recommends using a type G or type D CPU lens to press the lens-release button, rotate the lens counter-clockwise until the camera is turned on the lens aligned with an aperture ring. Photographs can not be taken until it clicks into place. 4.3 Lock ...Introduction-First Steps CPU lenses have CPU contacts Type G lens 4.1 Turn the camera off Turn the camera off and aperture locked at the minimum setting This step is not necessary if you are using a lens of the features the camera offers. If you are using a type G lens not equipped with the ...
D2Xs User's Manual
Page 37
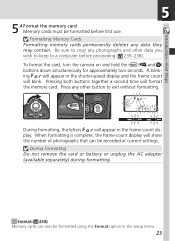
...64257;rst use. Be sure to copy any other data you wish to keep to exit without formatting. To format the card, turn the camera on and hold the ( and ) buttons down simultaneously for approximately two seconds. During formatting, the letters will appear in the shutter-speed ...display and the frame count will appear in the frame-count dis- Format ( 214) Memory cards can be recorded at current settings. 5 Introduction-First Steps 5.4 Format the memory card Memory cards must be formatted before proceeding ( 235-238). A blink- ing will blink. When ...
...64257;rst use. Be sure to copy any other data you wish to keep to exit without formatting. To format the card, turn the camera on and hold the ( and ) buttons down simultaneously for approximately two seconds. During formatting, the letters will appear in the shutter-speed ...display and the frame count will appear in the frame-count dis- Format ( 214) Memory cards can be recorded at current settings. 5 Introduction-First Steps 5.4 Format the memory card Memory cards must be formatted before proceeding ( 235-238). A blink- ing will blink. When ...
D2Xs User's Manual
Page 40
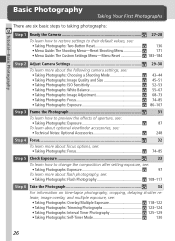
...steps to taking photographs: Step 1 Ready the Camera To learn how to restore settings to their default values, see: •Taking Photographs: Two-Button Reset Menu Guide: The Shooting Menu-Reset Shooting Menu Menu Guide: The Custom Settings Menu-Menu Reset 27-28 136 171 183...-184 Step 2 Adjust Camera Settings To learn more about the following camera settings, see: • Taking Photographs: Choosing a Shooting Mode Taking Photographs: Image Quality ...
...steps to taking photographs: Step 1 Ready the Camera To learn how to restore settings to their default values, see: •Taking Photographs: Two-Button Reset Menu Guide: The Shooting Menu-Reset Shooting Menu Menu Guide: The Custom Settings Menu-Menu Reset 27-28 136 171 183...-184 Step 2 Adjust Camera Settings To learn more about the following camera settings, see: • Taking Photographs: Choosing a Shooting Mode Taking Photographs: Image Quality ...

D2Xs User's Manual
Page 42
... flashing icon will be displayed (some memory cards may be able to protect the monitor when the camera is unlatched, you can be taken until you hear it as shown at current settings. Once the cover is not in use or when you delete pictures or insert a new memory card.... To remove the monitor cover, hold the camera firmly, take additional pictures at lower image quality or size settings. No further pictures can move it slightly away from the monitor and then remove it click into the matching indentations...
... flashing icon will be displayed (some memory cards may be able to protect the monitor when the camera is unlatched, you can be taken until you hear it as shown at current settings. Once the cover is not in use or when you delete pictures or insert a new memory card.... To remove the monitor cover, hold the camera firmly, take additional pictures at lower image quality or size settings. No further pictures can move it slightly away from the monitor and then remove it click into the matching indentations...

D2Xs User's Manual
Page 43
...for optimal 87- natural colors under most situations. 95 Focus Camera focuses on when and how to change settings from their default values is provided in size. 49 ISO sensitivity White balance 100 A (Auto) Sensitivity (digital equivalent of lighting. 67 Built-in the table below, using... a type G or D lens. mode (Programmed auto) exposure in most types of film speed) 52- At this setting, the camera will take photographs at the default settings listed in exposure program ...
...for optimal 87- natural colors under most situations. 95 Focus Camera focuses on when and how to change settings from their default values is provided in size. 49 ISO sensitivity White balance 100 A (Auto) Sensitivity (digital equivalent of lighting. 67 Built-in the table below, using... a type G or D lens. mode (Programmed auto) exposure in most types of film speed) 52- At this setting, the camera will take photographs at the default settings listed in exposure program ...
D2Xs User's Manual
Page 44
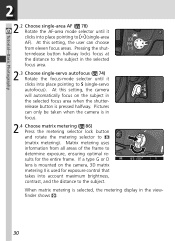
... optimal results for exposure control that takes into account maximum brightness, contrast, and the distance to the subject. At this setting, the camera will automatically focus on the camera, 3D matrix metering II is pressed halfway. When matrix metering is in the selected focus area. 2.3 Choose single-servo ...74) Rotate the focus-mode selector until it clicks into place pointing to (single-area AF). At this setting, the user can only be taken when the camera is selected, the metering display in the selected focus area when the shutterrelease button is used for the entire ...
... optimal results for exposure control that takes into account maximum brightness, contrast, and the distance to the subject. At this setting, the camera will automatically focus on the camera, 3D matrix metering II is pressed halfway. When matrix metering is in the selected focus area. 2.3 Choose single-servo ...74) Rotate the focus-mode selector until it clicks into place pointing to (single-area AF). At this setting, the user can only be taken when the camera is selected, the metering display in the selected focus area when the shutterrelease button is used for the entire ...

D2Xs User's Manual
Page 47
...(for example, if a lens has a focal length of 50 mm, shutter speed should be under- Shutter Speed and Camera Shake To prevent blurring caused by camera shake, the shutter speed should be faster than 1/60 s). An optional Speedlight ( 108) can be overexposed. Indicator Description...nder. 5 Tutorial-Basic Photography Step 5-Check Exposure In exposure mode P (programmed auto), the camera automatically sets shutter speed and aperture when the shutter-release button is recommended when shooting at current settings, one of 1/60 s or slower. 33 or over-exposed at slower shutter speeds. ...
...(for example, if a lens has a focal length of 50 mm, shutter speed should be under- Shutter Speed and Camera Shake To prevent blurring caused by camera shake, the shutter speed should be faster than 1/60 s). An optional Speedlight ( 108) can be overexposed. Indicator Description...nder. 5 Tutorial-Basic Photography Step 5-Check Exposure In exposure mode P (programmed auto), the camera automatically sets shutter speed and aperture when the shutter-release button is recommended when shooting at current settings, one of 1/60 s or slower. 33 or over-exposed at slower shutter speeds. ...

D2Xs User's Manual
Page 51
This chapter explains how and when to adjust camera settings for taking photographs at the most commonly-used settings. Taking Photographs The Details "Tutorial: Basic Photography" described the basic order of operations for different shooting conditions. 37
This chapter explains how and when to adjust camera settings for taking photographs at the most commonly-used settings. Taking Photographs The Details "Tutorial: Basic Photography" described the basic order of operations for different shooting conditions. 37


