
Instruction Manual
Page 4
Load Film...20-21 4. Set Focus Mode and AF Area Mode 24-25 2. Hold Camera and Focus 28-29 4. Release Shutter ...30-31 About Metering Systems and Exposure 32 BASIC OPERATION 2 33-42 Shooting with Vari-Program 34-37 Using Built-In Speed ... Exposure Mode 58-59 Manual Exposure Mode 60-61 Long Time Exposure 62 4 Set Date and Time (N75QD only 22 BASIC OPERATION 1 23-31 1. Mount Lens ...18-19 3. Contents BEFORE YOU BEGIN 2-11 Introduction ...2-3 Nomenclature ...6-7 LCD PanelNiewfinder Display 8-9 Available Exposure Modes 10-11 Start Shooting Immediately 12-13 About Shutter ...
Load Film...20-21 4. Set Focus Mode and AF Area Mode 24-25 2. Hold Camera and Focus 28-29 4. Release Shutter ...30-31 About Metering Systems and Exposure 32 BASIC OPERATION 2 33-42 Shooting with Vari-Program 34-37 Using Built-In Speed ... Exposure Mode 58-59 Manual Exposure Mode 60-61 Long Time Exposure 62 4 Set Date and Time (N75QD only 22 BASIC OPERATION 1 23-31 1. Mount Lens ...18-19 3. Contents BEFORE YOU BEGIN 2-11 Introduction ...2-3 Nomenclature ...6-7 LCD PanelNiewfinder Display 8-9 Available Exposure Modes 10-11 Start Shooting Immediately 12-13 About Shutter ...

Instruction Manual
Page 5
... Mode 79 Auto Exposure Lock 80-81 Diopter AdjustmentNiewfind er Accessories 82 Depth-of Field 102 MISCELLANEOUS 103-131 Lens Compatibi lity ...104-106 Usable Optional Speedlights 107-111 Optional Accessories 112-11 3 Camera Care ...114-11 5 Notes on Batteries ...11 6 Troubleshooting ...117-120 Glossary ...121- 123 Specifications ...124-128 Index ...129...
... Mode 79 Auto Exposure Lock 80-81 Diopter AdjustmentNiewfind er Accessories 82 Depth-of Field 102 MISCELLANEOUS 103-131 Lens Compatibi lity ...104-106 Usable Optional Speedlights 107-111 Optional Accessories 112-11 3 Camera Care ...114-11 5 Notes on Batteries ...11 6 Troubleshooting ...117-120 Glossary ...121- 123 Specifications ...124-128 Index ...129...
Instruction Manual
Page 12
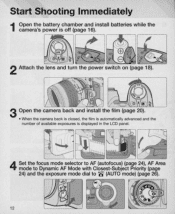
"---~--' Attach the lens and turn the power switch on (page 18). 3 Open the camera back and install the film (page 20). • When the camera back is closed, the film is automatically advanced and the number of available exposures is off (page 16). ~. """d) ~ fl ~"d) < 2 " @ ...'" .. Start Shooting Immediately 1 Open the battery chamber and install batteries while the camera's power is displayed in the LCD panel. 4 Set the focus mode selector to AF (autofocus) (page 24), AF Area mode to Dynamic AF Mode with Closest-Subject Priority (page 24) and the exposure...
"---~--' Attach the lens and turn the power switch on (page 18). 3 Open the camera back and install the film (page 20). • When the camera back is closed, the film is automatically advanced and the number of available exposures is off (page 16). ~. """d) ~ fl ~"d) < 2 " @ ...'" .. Start Shooting Immediately 1 Open the battery chamber and install batteries while the camera's power is displayed in the LCD panel. 4 Set the focus mode selector to AF (autofocus) (page 24), AF Area mode to Dynamic AF Mode with Closest-Subject Priority (page 24) and the exposure...

Instruction Manual
Page 15
PREPARATION This section introduces the various operations necessary before you start shooting. • Install batteries and check battery power • Mount lens • Load film • Set date and time (N75QD only) 15
PREPARATION This section introduces the various operations necessary before you start shooting. • Install batteries and check battery power • Mount lens • Load film • Set date and time (N75QD only) 15

Instruction Manual
Page 17
3 Turn the power switch on Camera's meter off Meaning ~ (appears) No indication No indication Sufficient battery power. I IB ~ u~~~u Sufficient battery power Insufficient battery power Viewfinder LCD panel Camera's meter on and confirm battery power with the ~ indication. ~ ,--;---F-=_==_ ~~ON .: '.
3 Turn the power switch on Camera's meter off Meaning ~ (appears) No indication No indication Sufficient battery power. I IB ~ u~~~u Sufficient battery power Insufficient battery power Viewfinder LCD panel Camera's meter on and confirm battery power with the ~ indication. ~ ,--;---F-=_==_ ~~ON .: '.

Instruction Manual
Page 18
..., aperture does not need to the camera body. 1 Check the lens type. See page 106 for a non-CPU lens. 18 Mount Lens Turn the power switch off when attaching/detaching the lens. • Avoid direct sunlight when attaching/detaching the lens. NOTE: Non-CPU Nikkor lens When a non-CPU Nikkor lens is attached and the power switch is...
..., aperture does not need to the camera body. 1 Check the lens type. See page 106 for a non-CPU lens. 18 Mount Lens Turn the power switch off when attaching/detaching the lens. • Avoid direct sunlight when attaching/detaching the lens. NOTE: Non-CPU Nikkor lens When a non-CPU Nikkor lens is attached and the power switch is...

Instruction Manual
Page 19
... place. (Be sure not to touch the lens release button.) • With CPU Nikkor lens w ith aperture ring (other t han G-type) , set the lens aperture to it s minimum and lock. 2 Turn t he power switch off and mount t he lens to the camera body. • Position lens in the camera's bayonet mount so that the mounting indexes on...
... place. (Be sure not to touch the lens release button.) • With CPU Nikkor lens w ith aperture ring (other t han G-type) , set the lens aperture to it s minimum and lock. 2 Turn t he power switch off and mount t he lens to the camera body. • Position lens in the camera's bayonet mount so that the mounting indexes on...
Instruction Manual
Page 23
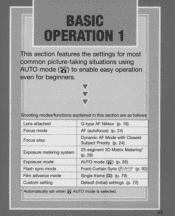
... mod esIfunct'Ions expIal'ned IOn th IOS sec Ion are as f0 IIows: Lens attached Focus mode Focus an~a Exposure metering system Exposure mode Flash sync mode Film advance mode Custom setting G-type AF Nikkor (p. 18) AF (autofocus) (p. 24) Dynamic AF Mode with ClosestSubject Priority (p. 24) 25-segment 3D Matrix Metering...
... mod esIfunct'Ions expIal'ned IOn th IOS sec Ion are as f0 IIows: Lens attached Focus mode Focus an~a Exposure metering system Exposure mode Flash sync mode Film advance mode Custom setting G-type AF Nikkor (p. 18) AF (autofocus) (p. 24) Dynamic AF Mode with ClosestSubject Priority (p. 24) 25-segment 3D Matrix Metering...
Instruction Manual
Page 24
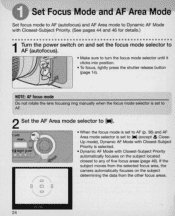
...shutter release button (page 14). Close- Set Focus Mode and AF Area Mode Set focus mode to AF (autofocus) and AF Area mode to Dynamic AF Mode with Closest-Subject Priority automatically focuses on the subject located closest to... any of fi ve focus areas (page 46). NOTE: AF focus mode Do not rotate the lens focusing ring manually when the focus mode selector is set to AF. 2 Set the AF Area mode selector ... [_ ] (except .'E. If the subject moves from the selected focus area, the camera automatically focuses on the subject determining the data from the other focus areas. 24
...shutter release button (page 14). Close- Set Focus Mode and AF Area Mode Set focus mode to AF (autofocus) and AF Area mode to Dynamic AF Mode with Closest-Subject Priority automatically focuses on the subject located closest to... any of fi ve focus areas (page 46). NOTE: AF focus mode Do not rotate the lens focusing ring manually when the focus mode selector is set to AF. 2 Set the AF Area mode selector ... [_ ] (except .'E. If the subject moves from the selected focus area, the camera automatically focuses on the subject determining the data from the other focus areas. 24

Instruction Manual
Page 26
...Sync (p. 93) and Red-Eye Reduction with Slow Sync (p. 93) cannot be set to ~ , the camera automatically controls all exposure modes except Manual exposure mode (page 60). Set Exposure Mode to A8° When... the exposure mode is set . 26 This camera ~ II / RF 9F DDD DDDDDDDDDD V II ~ automatically selects Matrix Metering in the LCD panel... mode is set to '8', Mat rix Metering is automatically selected . or D-type Nikkor lens (3D Matrix Metering is selected in extremely complex lighting conditions. Center-Weighted Metering is performed...
...Sync (p. 93) and Red-Eye Reduction with Slow Sync (p. 93) cannot be set to ~ , the camera automatically controls all exposure modes except Manual exposure mode (page 60). Set Exposure Mode to A8° When... the exposure mode is set . 26 This camera ~ II / RF 9F DDD DDDDDDDDDD V II ~ automatically selects Matrix Metering in the LCD panel... mode is set to '8', Mat rix Metering is automatically selected . or D-type Nikkor lens (3D Matrix Metering is selected in extremely complex lighting conditions. Center-Weighted Metering is performed...

Instruction Manual
Page 28
...support. appears in focus, that the subject to cradle the camera (or lens). o Lightly pressing the shutter release button automatically focuses the camera on the subject located closest to any of five focus areas. o Grasp the camera handgrip with your right hand and use your upper body ...Subject Priority (pages 26, 47) is set, camera automatically maintains focus on the subject and when the subject is in the viewfinder. 28 Hold Camera and EOcus------I Lightly pressing the shutter release button automatically focuses the camera on your subject, and focus by lightly pressing...
...support. appears in focus, that the subject to cradle the camera (or lens). o Lightly pressing the shutter release button automatically focuses the camera on the subject located closest to any of five focus areas. o Grasp the camera handgrip with your right hand and use your upper body ...Subject Priority (pages 26, 47) is set, camera automatically maintains focus on the subject and when the subject is in the viewfinder. 28 Hold Camera and EOcus------I Lightly pressing the shutter release button automatically focuses the camera on your subject, and focus by lightly pressing...

Instruction Manual
Page 32
or O-type Nikkor lenses, the N75/ N75QO camera performs 25-segment 3D Matrix Metering by the shutter speed and aperture. VariProgram gives you the option to choose from the subject passes through the lens and exposes the film. With Matrix Metering, data on scene brightness is not uniform. The proper combination of shutter speed...
or O-type Nikkor lenses, the N75/ N75QO camera performs 25-segment 3D Matrix Metering by the shutter speed and aperture. VariProgram gives you the option to choose from the subject passes through the lens and exposes the film. With Matrix Metering, data on scene brightness is not uniform. The proper combination of shutter speed...
Instruction Manual
Page 35
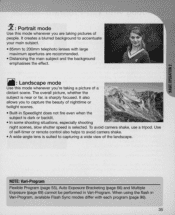
... fire even when the subject is dark or backlit. • In some shooting situations, especially shooting night scenes, slow shutter speed is suited to avoid camera shake. • A wide-angle lens is selected. The overall picture, whether the subject is near or far, is sharply focused . To avoid...
... fire even when the subject is dark or backlit. • In some shooting situations, especially shooting night scenes, slow shutter speed is suited to avoid camera shake. • A wide-angle lens is selected. The overall picture, whether the subject is near or far, is sharply focused . To avoid...
Instruction Manual
Page 36
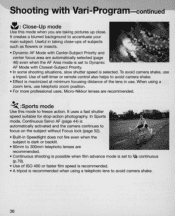
... Use of ISO 400 or faster film speed is recommended. • A tripod is recommended when using a telephoto lens to avoid camera shake. • Effect is selected. When using a zoom lens, use telephoto zoom position. • For more professional uses, Micro-Nikkor lenses are recommended . • Continuous shooting... 52). • Built-in Speedlight does not fire even when the subject is dark or backlit. • 80mm to accentuate your main subject. To avoid camera shake, use a tripod. Shooting with Closest-Subject Priority. • In some shooting situations, slow shutter speed is...
... Use of ISO 400 or faster film speed is recommended. • A tripod is recommended when using a telephoto lens to avoid camera shake. • Effect is selected. When using a zoom lens, use telephoto zoom position. • For more professional uses, Micro-Nikkor lenses are recommended . • Continuous shooting... 52). • Built-in Speedlight does not fire even when the subject is dark or backlit. • 80mm to accentuate your main subject. To avoid camera shake, use a tripod. Shooting with Closest-Subject Priority. • In some shooting situations, slow shutter speed is...

Instruction Manual
Page 38
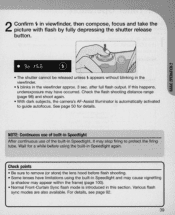
...is canceled for details. 38 Built-in Speedlight and Multi-Sensor Balanced Fill-Flash • The built-in iii or ~) . or D-type Nikkor lens enables use of the main subject and background , whi le providing adequate flash output to take pictures .w.it clicks shut while lightly pressing the shutter...a guide number of 12 (ISO 100, m). Fully depress the shutter release button to fire, ~ appears without blinking in the viewfinder (when the camera's meter is on). • When you remove your finger from Matri x Metering , the 3D Multi-Sensor Balanced Fill-Flash ensures proper exposure of ...
...is canceled for details. 38 Built-in Speedlight and Multi-Sensor Balanced Fill-Flash • The built-in iii or ~) . or D-type Nikkor lens enables use of the main subject and background , whi le providing adequate flash output to take pictures .w.it clicks shut while lightly pressing the shutter...a guide number of 12 (ISO 100, m). Fully depress the shutter release button to fire, ~ appears without blinking in the viewfinder (when the camera's meter is on). • When you remove your finger from Matri x Metering , the 3D Multi-Sensor Balanced Fill-Flash ensures proper exposure of ...
Instruction Manual
Page 39
...use of built-in Speedlight again. Various flash sync modes are also available. Check points • Be sure to remove (or store) the lens hood before using the built-in Speedlight and may cause vignetting (a shadow may appear within the frame) (page 100). • Normal Front...details. For details, see page 92. 39 If this happens, underexposure may stop firing to guide autofocus. Check the flash shooting distance range (page 98) and shoot again. • With dark subjects, the camera's AF-Assist Illuminator is introduced in the viewfinder approx. 3 sec. 2 Confirm ~ in viewfinder,...
...use of built-in Speedlight again. Various flash sync modes are also available. Check points • Be sure to remove (or store) the lens hood before using the built-in Speedlight and may cause vignetting (a shadow may appear within the frame) (page 100). • Normal Front...details. For details, see page 92. 39 If this happens, underexposure may stop firing to guide autofocus. Check the flash shooting distance range (page 98) and shoot again. • With dark subjects, the camera's AF-Assist Illuminator is introduced in the viewfinder approx. 3 sec. 2 Confirm ~ in viewfinder,...

Instruction Manual
Page 40
...you want to prevent interference from stray light and achieve correct exposure. • Do not stand in front of the lens when setting the self-timer in the photograph or reduce camera shake. 1 Press @) (self-timer) button and confirm that 19 appears on the LCD panel. (Or, rotate ... eyepiece cap DK-5 (page 82) or with your hand before pressing the shutter release button to be in autofocus mode. 40 delay release for remote control Check points • Use a tripod or place the camera on the LCD paneL) :25 @ 5.6 6E~ ::~ II. . [36) @ The display changes as follows: No display (cancel...
...you want to prevent interference from stray light and achieve correct exposure. • Do not stand in front of the lens when setting the self-timer in the photograph or reduce camera shake. 1 Press @) (self-timer) button and confirm that 19 appears on the LCD panel. (Or, rotate ... eyepiece cap DK-5 (page 82) or with your hand before pressing the shutter release button to be in autofocus mode. 40 delay release for remote control Check points • Use a tripod or place the camera on the LCD paneL) :25 @ 5.6 6E~ ::~ II. . [36) @ The display changes as follows: No display (cancel...
Instruction Manual
Page 45
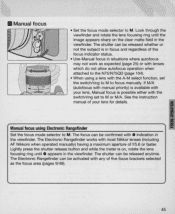
...and regardless of five focus brackets selected as expected (page 25) or with lenses which do not allow autofocus operation when attached to the N75/ N75QD (page 104). • When using Electronic Rangefinder Set the focus mode selector to focus manually.... • Manual focus • Set the focus mode selector to M or M/A. The shutter can be released whether or not the subject is in the viewfinder. If M/A (autofocus with manual priority) is available with your lens...
...and regardless of five focus brackets selected as expected (page 25) or with lenses which do not allow autofocus operation when attached to the N75/ N75QD (page 104). • When using Electronic Rangefinder Set the focus mode selector to focus manually.... • Manual focus • Set the focus mode selector to M or M/A. The shutter can be released whether or not the subject is in the viewfinder. If M/A (autofocus with manual priority) is available with your lens...

Instruction Manual
Page 50
...when the AF-Assist Illuminator is used repeatedly in the following situations: Focus mode is autofocus, AF Nikkor lens is used continuously, illumination is approx. 0.5-3m (1.6-9.8 ft.). With other optional Speedlights, the camera's Illuminator turns on (page 109). ~ :e : AF-Assist Illuminator can be careful ...optional Speedlight automatically turns on. AF-Assist Illuminator automatically turns on in a short period of time, be canceled (p.76). Autofocus using the camera 's AF-Assist Illuminator cannot be performed due to vignetting with some lenses at a shooting distance less than 1m (page...
...when the AF-Assist Illuminator is used repeatedly in the following situations: Focus mode is autofocus, AF Nikkor lens is used continuously, illumination is approx. 0.5-3m (1.6-9.8 ft.). With other optional Speedlights, the camera's Illuminator turns on (page 109). ~ :e : AF-Assist Illuminator can be careful ...optional Speedlight automatically turns on. AF-Assist Illuminator automatically turns on in a short period of time, be canceled (p.76). Autofocus using the camera 's AF-Assist Illuminator cannot be performed due to vignetting with some lenses at a shooting distance less than 1m (page...
Instruction Manual
Page 51
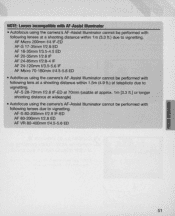
...35mm fl2.B ED AF 1B-35mm f/3. 5-4.5 ED AF 20-35mm f/2. B ED AF VR BO-400mm f/ 4.5-5.6 ED i 51 B IF-ED at 70mm (usable at approx. 1m [3 .3 ft .] or longer shooting distance at wideang le) • Autofocus using the camera's AF-Assist Illuminator cannot be performed with following lens... at telephoto due to vignetting. B-4 IF AF 24-120mm f/ 3.5-5.6 IF AF Micro 70-1BOmm fl4.5-5.6 ED • Autofocus using the camera's AF-Assist Illuminator cannot be performed...
...35mm fl2.B ED AF 1B-35mm f/3. 5-4.5 ED AF 20-35mm f/2. B ED AF VR BO-400mm f/ 4.5-5.6 ED i 51 B IF-ED at 70mm (usable at approx. 1m [3 .3 ft .] or longer shooting distance at wideang le) • Autofocus using the camera's AF-Assist Illuminator cannot be performed with following lens... at telephoto due to vignetting. B-4 IF AF 24-120mm f/ 3.5-5.6 IF AF Micro 70-1BOmm fl4.5-5.6 ED • Autofocus using the camera's AF-Assist Illuminator cannot be performed...
