English Manual
Page 5
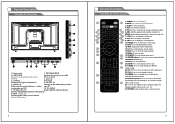
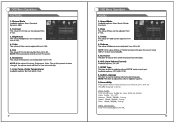
... Toggles between normal and standby mode. ME NU P res s to move up/down. 5. C HANNE L +/P res s to move left/right. 4. In the on -screen menu of purchase. Overview of front and side panel VOL+ VOLCH+ CHMEN U SOU RCE PO WER VOL+ VOLCH+ CHMENU SOURCE POWER 1. V O LUME +/- In the on-s creen menu, use them to s ee an on -s creen menu, use them to change channels.
... Toggles between normal and standby mode. ME NU P res s to move up/down. 5. C HANNE L +/P res s to move left/right. 4. In the on -screen menu of purchase. Overview of front and side panel VOL+ VOLCH+ CHMEN U SOU RCE PO WER VOL+ VOLCH+ CHMENU SOURCE POWER 1. V O LUME +/- In the on-s creen menu, use them to s ee an on -s creen menu, use them to change channels.
English Manual
Page 6
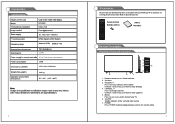
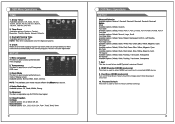
... channe l information. 13. SOURCE: P res s to change the scre en sca le. 21. P.MODE: P res s repea tedly to displa y current time. 9. E AR P HONE C onnect to the video output ja c k on Audio input for multiple program channel such as your P C. C OAX IAL US B input C onnect to display the clos ed caption. 14. AUDIO L /R C onnect to a n antenna or ca ble Connect a set of a device with an HDMI output. 1 3 4 7 8 11 12 15...
... channe l information. 13. SOURCE: P res s to change the scre en sca le. 21. P.MODE: P res s repea tedly to displa y current time. 9. E AR P HONE C onnect to the video output ja c k on Audio input for multiple program channel such as your P C. C OAX IAL US B input C onnect to display the clos ed caption. 14. AUDIO L /R C onnect to a n antenna or ca ble Connect a set of a device with an HDMI output. 1 3 4 7 8 11 12 15...
English Manual
Page 7
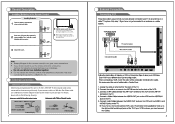
For details, please refer to connect the antenna cable and jack. imately Dispose of the wireless TV. If your antenna cable is a 300 ohm t ribbon cable, use the remote control for a long time, Antenna input impedance of this unit is 75 ohms. VHF/UHF 75 ohm coaxial cable can be connected to the antenna jack directly. control sensor of used batteries properly the environment. Antennas with 300ohm flat twins Leads AC 100-240V~ 50/60Hz EARPHONE CO AX OUT L R IN CVBS/Y Pb IN Pr HDMI 1 HDMI 2 If you do not intend to use a 300 ohm to 75 ohm adapter to the following drawing.
For details, please refer to connect the antenna cable and jack. imately Dispose of the wireless TV. If your antenna cable is a 300 ohm t ribbon cable, use the remote control for a long time, Antenna input impedance of this unit is 75 ohms. VHF/UHF 75 ohm coaxial cable can be connected to the antenna jack directly. control sensor of used batteries properly the environment. Antennas with 300ohm flat twins Leads AC 100-240V~ 50/60Hz EARPHONE CO AX OUT L R IN CVBS/Y Pb IN Pr HDMI 1 HDMI 2 If you do not intend to use a 300 ohm to 75 ohm adapter to the following drawing.

English Manual
Page 8
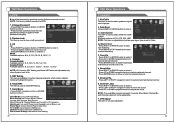
AC 100-240V~ 50/60Hz EARPHONE COAX OUT L R IN CVBS/Y Pb IN Pr HDMI 1 HDMI 2 LINE IN AC 100-240V~ 50/60Hz EARPHONE COAX OUT L R IN CVBS/Y Pb IN Pr HDMI 1 HDMI 2 a 5.1-compliant audiovisual receiver and other related devices in your video playback. left and right, center and subwoofer audio along with your home theatre system. .
AC 100-240V~ 50/60Hz EARPHONE COAX OUT L R IN CVBS/Y Pb IN Pr HDMI 1 HDMI 2 LINE IN AC 100-240V~ 50/60Hz EARPHONE COAX OUT L R IN CVBS/Y Pb IN Pr HDMI 1 HDMI 2 a 5.1-compliant audiovisual receiver and other related devices in your video playback. left and right, center and subwoofer audio along with your home theatre system. .

English Manual
Page 9
... your NAXA LED TV. The device shown connected to all USB devices, due to playback multime- However, Naxa cannot guarantee the compatibility of all playback devices. To take advantage of HDMI's features with most modern USB devices. playback. AC 100-240V~ 50/60Hz EARPHONE COAX OU T L R IN CVBS/Y Pb IN Pr HDMI 1 HDMI 2 that enables the transmission of digital video and audio signals using a single cable...
... your NAXA LED TV. The device shown connected to all USB devices, due to playback multime- However, Naxa cannot guarantee the compatibility of all playback devices. To take advantage of HDMI's features with most modern USB devices. playback. AC 100-240V~ 50/60Hz EARPHONE COAX OU T L R IN CVBS/Y Pb IN Pr HDMI 1 HDMI 2 that enables the transmission of digital video and audio signals using a single cable...

English Manual
Page 10
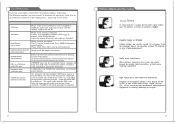
Up to 1920 x 1080 @ 60 Hz Note: This UHD LED TV Supports 4K resolution at 60 Hz. This drawing c (Not s upplied) AC 100-240V~ 50/60Hz EARPHONE COAX OUT L R IN CVBS/Y Pb IN Pr HDMI 1 HDMI 2 P lug your headphones' connector into the headphone jack on the TV will mute automatically. Speakers on the T V. on any HDMI Input. AC 100-240V~ 50/60Hz EARPHONE COAX OUT L R IN CVBS/Y Pb IN Pr HDMI 1 HDMI 2 P ly.
Up to 1920 x 1080 @ 60 Hz Note: This UHD LED TV Supports 4K resolution at 60 Hz. This drawing c (Not s upplied) AC 100-240V~ 50/60Hz EARPHONE COAX OUT L R IN CVBS/Y Pb IN Pr HDMI 1 HDMI 2 P lug your headphones' connector into the headphone jack on the TV will mute automatically. Speakers on the T V. on any HDMI Input. AC 100-240V~ 50/60Hz EARPHONE COAX OUT L R IN CVBS/Y Pb IN Pr HDMI 1 HDMI 2 P ly.
English Manual
Page 12
Accessibility option makes menu choices accessible to users who are impaired or blind Voice Guide on/o voice for some on Voice Guide: On, O Volume: S trong Speed: Strong Pitch: Strong Video Descrip,tion ideo on/o 9.
Accessibility option makes menu choices accessible to users who are impaired or blind Voice Guide on/o voice for some on Voice Guide: On, O Volume: S trong Speed: Strong Pitch: Strong Video Descrip,tion ideo on/o 9.
English Manual
Page 13
8. Restore Default This item is used to reset to suit connected HDMI device. 9. HDMI Standard (HDMI mode only) This item is used to select HDMI version to factory default settings. OverScan (HDMI mode only) Turn on/off OverScan if Users found the image wasn't fully displayed on screen. 10.
8. Restore Default This item is used to reset to suit connected HDMI device. 9. HDMI Standard (HDMI mode only) This item is used to select HDMI version to factory default settings. OverScan (HDMI mode only) Turn on/off OverScan if Users found the image wasn't fully displayed on screen. 10.
English Manual
Page 14
Hotel Menu -Press RIGHT navigation button or ENTER button to TV: import data from USB device. USB to enter it. Hotel Mode: turn on /off Tuner Lock, Keypad Lock or Menu Lock. Power Save: select desired Power Save time. TV to USB: export data to USB device. Boot Setting: set Picture Mode, Default Volume, Max Volume, Boot Source. (Boot Channel & Channel Select won't work if no TV signals.) Hotel Lock: turn on /off Hotel Mode. Reset Hotel Setting: reset above hotel setting. 7.
Hotel Menu -Press RIGHT navigation button or ENTER button to TV: import data from USB device. USB to enter it. Hotel Mode: turn on /off Tuner Lock, Keypad Lock or Menu Lock. Power Save: select desired Power Save time. TV to USB: export data to USB device. Boot Setting: set Picture Mode, Default Volume, Max Volume, Boot Source. (Boot Channel & Channel Select won't work if no TV signals.) Hotel Lock: turn on /off Hotel Mode. Reset Hotel Setting: reset above hotel setting. 7.
English Manual
Page 16
... picture Remote control not responding under VGA input Horizontal stripes under VGA input Colored dots may appear on the screen. ress button on the remote control. Adjust the direction of contrast and brightness if needed . Adjust the s ettings of your antenna or install an antenna Double Image or Double images are in line with other sound settings and connections. value may problems pleas e tune to another station to ensure the power cord...
... picture Remote control not responding under VGA input Horizontal stripes under VGA input Colored dots may appear on the screen. ress button on the remote control. Adjust the direction of contrast and brightness if needed . Adjust the s ettings of your antenna or install an antenna Double Image or Double images are in line with other sound settings and connections. value may problems pleas e tune to another station to ensure the power cord...


