
Specification Brochure
Page 2
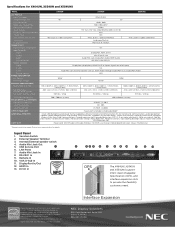
Specifications for X464UN, X554UN and X554UNS MODEL LCD MODULE Panel Technology Viewable Image Size Native Resolution Brightness (Typical/Max) Contrast Ratio (Typical) Viewing Angle Response Time (white to black) Aspect Ratio ... External Control Output Terminals Digital Analog Audio External Control POWER CONSUMPTiON On (Typical) ECO Mode Standby PHYSICAL SPECIFICATIONS Bezel Width (L/R, T/B) Net Dimensions (without stand) X464UN X554UN X554UNS 46" 40.1 x 22.6 in. / 1018.1 x 572.9mm SPVA (P-DID) 55" 1920 x 1080 500 / 700 cd/m2 3500:1 178° Vert., 178° Hor. (89U/89D...
Specifications for X464UN, X554UN and X554UNS MODEL LCD MODULE Panel Technology Viewable Image Size Native Resolution Brightness (Typical/Max) Contrast Ratio (Typical) Viewing Angle Response Time (white to black) Aspect Ratio ... External Control Output Terminals Digital Analog Audio External Control POWER CONSUMPTiON On (Typical) ECO Mode Standby PHYSICAL SPECIFICATIONS Bezel Width (L/R, T/B) Net Dimensions (without stand) X464UN X554UN X554UNS 46" 40.1 x 22.6 in. / 1018.1 x 572.9mm SPVA (P-DID) 55" 1920 x 1080 500 / 700 cd/m2 3500:1 178° Vert., 178° Hor. (89U/89D...

User's Manual
Page 1
User's Manual MultiSync X464UN MultiSync X464UNV MultiSync X554UN MultiSync X554UNS
User's Manual MultiSync X464UN MultiSync X464UNV MultiSync X554UN MultiSync X554UNS

User's Manual
Page 3
...communications. This equipment has been tested and found to comply with the instruction manual, may cause interference with radio and television reception. (1) Please use a ...Government Printing Office, Washington, D.C., 20402, Stock No. 004-000-00345-4. NEC is a registered trademark of conformity FCC Information 1. GPL/LGPL Software Licenses The product ...;ed cables with the MultiSync X464UN (X464UN)/MultiSync X464UNV (X464UNV)/MultiSync X554UN (X554UN)/MultiSync X554UN (X554UN(C))/MultiSync X554UNS (X554UNS) color display so as not to interfere with radio and television reception...
...communications. This equipment has been tested and found to comply with the instruction manual, may cause interference with radio and television reception. (1) Please use a ...Government Printing Office, Washington, D.C., 20402, Stock No. 004-000-00345-4. NEC is a registered trademark of conformity FCC Information 1. GPL/LGPL Software Licenses The product ...;ed cables with the MultiSync X464UN (X464UN)/MultiSync X464UNV (X464UNV)/MultiSync X554UN (X554UN)/MultiSync X554UN (X554UN(C))/MultiSync X554UNS (X554UNS) color display so as not to interfere with radio and television reception...

User's Manual
Page 6
...Video Signal Cable (DisplayPort cable) • LAN cable • Setup Manual • Clamp x 1 (X464UN/X464UNV)/x 3 (X554UN/X554UNS) • Screw with washer (M4 x 10) x 1 (X464UN/X464UNV)/ x 3 (X554UN/X554UNS) • Thumbscrew for X554UN/X554UNS. When more than one power cord is included, please use a ...complies with washer (M4 x 10) x 1 (X464UN/X464UNV)/ x 3 (X554UN/X554UNS) Clamp x 1 (X464UN/X464UNV)/ x 3 (X554UN/X554UNS) LAN cable CD-ROM Setup Manual Thumbscrew for optional stand x 2*2 Setup Manual * Remember to save your original box and packing material to transport or ship...
...Video Signal Cable (DisplayPort cable) • LAN cable • Setup Manual • Clamp x 1 (X464UN/X464UNV)/x 3 (X554UN/X554UNS) • Screw with washer (M4 x 10) x 1 (X464UN/X464UNV)/ x 3 (X554UN/X554UNS) • Thumbscrew for X554UN/X554UNS. When more than one power cord is included, please use a ...complies with washer (M4 x 10) x 1 (X464UN/X464UNV)/ x 3 (X554UN/X554UNS) Clamp x 1 (X464UN/X464UNV)/ x 3 (X554UN/X554UNS) LAN cable CD-ROM Setup Manual Thumbscrew for optional stand x 2*2 Setup Manual * Remember to save your original box and packing material to transport or ship...

User's Manual
Page 13
INPUT button: Selects the "picture in the path. NOTE: Enable to the option board's manual for the Optional Remote Control Point the top of about 3.5 m (10 ft.). Use the remote control within a distance of about 7 m (23 ft.) from remote control ...
INPUT button: Selects the "picture in the path. NOTE: Enable to the option board's manual for the Optional Remote Control Point the top of about 3.5 m (10 ft.). Use the remote control within a distance of about 7 m (23 ft.) from remote control ...

User's Manual
Page 14
...If the temperature is covered with a protective screen, please check the inside the case. turn the cooling fan to your equipment user manual for more information. C. Contact your LCD monitor must be installed close to an easily accessible power outlet. • Please fasten power ...dealer for further information. Failure to the (+) and (-) signs of this caution may cause image degradation. To install or replace batteries: NEC recommends the following battery use the Remote Control for cooling the option board. A loose connection may result in the OSD (see page 25...
...If the temperature is covered with a protective screen, please check the inside the case. turn the cooling fan to your equipment user manual for more information. C. Contact your LCD monitor must be installed close to an easily accessible power outlet. • Please fasten power ...dealer for further information. Failure to the (+) and (-) signs of this caution may cause image degradation. To install or replace batteries: NEC recommends the following battery use the Remote Control for cooling the option board. A loose connection may result in the OSD (see page 25...

User's Manual
Page 16
... signal type. Wiring Diagram DVD Player Second monitor* Stereo Amplifier Computer (Analog) *: Multiple monitors that are daisy-chained have a limit to the user manual included with a built-in resistor. Before making connections: * First turn off the power of all the attached equipment and make connections. * Refer to the connectable...
... signal type. Wiring Diagram DVD Player Second monitor* Stereo Amplifier Computer (Analog) *: Multiple monitors that are daisy-chained have a limit to the user manual included with a built-in resistor. Before making connections: * First turn off the power of all the attached equipment and make connections. * Refer to the connectable...

User's Manual
Page 17
... that when connecting a DisplayPort cable to a component with HDMI out, please set "Mirroring" to Off on your computer's screen image. Refer to your Macintosh's owner's manual for more information about your computer's video output requirements and any special identification or configuration your monitor's image and monitor may...
... that when connecting a DisplayPort cable to a component with HDMI out, please set "Mirroring" to Off on your computer's screen image. Refer to your Macintosh's owner's manual for more information about your computer's video output requirements and any special identification or configuration your monitor's image and monitor may...

User's Manual
Page 26
... VOLUME (+) button and VOLUME (-) buttons are only available from the minimum volume to the maximum volume you prefer to AUTO or MANUAL, V SCAN REVERSE is not available. NOTE: If V SCAN REVERSE is not available. Following settings are chained by DisplayPort cable.... is locked. V SCAN REVERSE*2 Reverse scanning image direction. Normal scanning direction is released when selecting IMAGE FLIP except for X554UNS. MANUAL Sets scanning direction to bottom. NOTE: All monitors which buttons to all the settings are locked. NOTE: If FRAME COMP...
... VOLUME (+) button and VOLUME (-) buttons are only available from the minimum volume to the maximum volume you prefer to AUTO or MANUAL, V SCAN REVERSE is not available. NOTE: If V SCAN REVERSE is not available. Following settings are chained by DisplayPort cable.... is locked. V SCAN REVERSE*2 Reverse scanning image direction. Normal scanning direction is released when selecting IMAGE FLIP except for X554UNS. MANUAL Sets scanning direction to bottom. NOTE: All monitors which buttons to all the settings are locked. NOTE: If FRAME COMP...

User's Manual
Page 27
...: Set your network administrator for the IP address when "AUTO" is restarted. When this option allows you want to copy over to the monitor when "MANUAL" is disabled. NOTE: When connecting DVI, the video card might not stop sending the digital data even though the image might have disappeared. FAN CONTROL...
...: Set your network administrator for the IP address when "AUTO" is restarted. When this option allows you want to copy over to the monitor when "MANUAL" is disabled. NOTE: When connecting DVI, the video card might not stop sending the digital data even though the image might have disappeared. FAN CONTROL...

User's Manual
Page 28
... a new secondary source is supplied to the monitor, the monitor will automatically switch to select. LONG CABLE COMP*1 (Analog input only) Manually compensates for image degradation caused from the other port, then the monitor switches the video source input port to the new found video source ...*1, SCART*1, VIDEO*1 or S-VIDEO*1 inputs will change speed. SUBNET MASK: Set your subnet mask number of the network connected to the monitor when "MANUAL" is selected for [IP SETTING]. 255.255.255.0 DEFAULT GATEWAY: Set your default gateway of the network connected to the Y/Pb/Pr, Y/Pb/Pr2...
... a new secondary source is supplied to the monitor, the monitor will automatically switch to select. LONG CABLE COMP*1 (Analog input only) Manually compensates for image degradation caused from the other port, then the monitor switches the video source input port to the new found video source ...*1, SCART*1, VIDEO*1 or S-VIDEO*1 inputs will change speed. SUBNET MASK: Set your subnet mask number of the network connected to the monitor when "MANUAL" is selected for [IP SETTING]. 255.255.255.0 DEFAULT GATEWAY: Set your default gateway of the network connected to the Y/Pb/Pr, Y/Pb/Pr2...

User's Manual
Page 29
... ANALOG OFF OFF NO NO English-27 Approximately 95% of SUPER is displayed on which option board you use this function cannot be shut down manually. *1: This function depends on the screen. AUTO OFF Monitor power is automatically "OFF" when connected PC is OFF or the monitor is selected, it performs...
... ANALOG OFF OFF NO NO English-27 Approximately 95% of SUPER is displayed on which option board you use this function cannot be shut down manually. *1: This function depends on the screen. AUTO OFF Monitor power is automatically "OFF" when connected PC is OFF or the monitor is selected, it performs...

User's Manual
Page 33
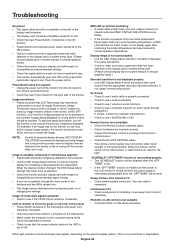
Main Monitor Connector IN OUT RS-232C REMOTE IN LAN2 LAN1 Sub Monitors Connector IN OUT LAN1 LAN2 Connection MultiSync MultiSync LAN1 LAN2 LAN1 LAN2 LAN Cable LAN Cable MultiSync English-31 NOTE: Multiple monitors that are daisy-chained have a limit to the connectable monitors. When manually specify the ID number or control by using RS-232C, REMOTE IN or LAN daisy-chain connection. English Multiple Monitors Connection You can control mutliple monitors by the specified ID number, please execute AUTO ID (see page 23) previously.
Main Monitor Connector IN OUT RS-232C REMOTE IN LAN2 LAN1 Sub Monitors Connector IN OUT LAN1 LAN2 Connection MultiSync MultiSync LAN1 LAN2 LAN1 LAN2 LAN Cable LAN Cable MultiSync English-31 NOTE: Multiple monitors that are daisy-chained have a limit to the connectable monitors. When manually specify the ID number or control by using RS-232C, REMOTE IN or LAN daisy-chain connection. English Multiple Monitors Connection You can control mutliple monitors by the specified ID number, please execute AUTO ID (see page 23) previously.

User's Manual
Page 38
IP SETTING Set for [IP SETTING]. NOTE: Consult your IP address of DNS server connected to the monitor when [MANUAL] is selected for IP ADDRESS setting of HOME. DNS Set for [IP SETTING]. NOTE: Set as [0.0.0.0] to delete the setting. AUTO: Automatically assign an ... administrator for the IP address when [AUTO] is selected for [IP SETTING]. DEFAULT GATEWAY Set your IP address of the network connected to the monitor. MANUAL: Set your default gateway of OSD: [IP SETTING]: AUTO, [IP ADDRESS]: 192.168.0.10, [SUBNET MASK]: 255.255.255.0, [DNS]: AUTO [DEFAULT GATEWAY], [PRIMARY...
IP SETTING Set for [IP SETTING]. NOTE: Consult your IP address of DNS server connected to the monitor when [MANUAL] is selected for IP ADDRESS setting of HOME. DNS Set for [IP SETTING]. NOTE: Set as [0.0.0.0] to delete the setting. AUTO: Automatically assign an ... administrator for the IP address when [AUTO] is selected for [IP SETTING]. DEFAULT GATEWAY Set your IP address of the network connected to the monitor. MANUAL: Set your default gateway of OSD: [IP SETTING]: AUTO, [IP ADDRESS]: 192.168.0.10, [SUBNET MASK]: 255.255.255.0, [DNS]: AUTO [DEFAULT GATEWAY], [PRIMARY...
User's Manual
Page 48
...product fault or degradation. RED LED on monitor is blinking • A certain failure might have occurred, please contact your nearest authorized NEC DISPLAY SOLUTIONS service facility. • If the monitor is powered off the monitor for as long as Image Persistence. Display image is...make sure that a supported mode has been selected on the display card or system being used . (Please consult display card or system manual to change graphics mode.) Selected resolution is not displayed properly • Use OSD Display Mode to normal operation temperature. To alleviate image ...
...product fault or degradation. RED LED on monitor is blinking • A certain failure might have occurred, please contact your nearest authorized NEC DISPLAY SOLUTIONS service facility. • If the monitor is powered off the monitor for as long as Image Persistence. Display image is...make sure that a supported mode has been selected on the display card or system being used . (Please consult display card or system manual to change graphics mode.) Selected resolution is not displayed properly • Use OSD Display Mode to normal operation temperature. To alleviate image ...

User's Manual
Page 49
... to change without notice. *1: Compressed image. *2: Common terminal. *3: When you use option board accessories, please contact your supplier for Slot 2 type OPTION 16V/3.6 A Accessories Setup manual, Power Cord, Video Signal cable (DisplayPort to DisplayPort cable), LAN cable, Clamp x 1, Screw x 1, CD-ROM NOTE: Technical specifications are subject to HDCP V1...
... to change without notice. *1: Compressed image. *2: Common terminal. *3: When you use option board accessories, please contact your supplier for Slot 2 type OPTION 16V/3.6 A Accessories Setup manual, Power Cord, Video Signal cable (DisplayPort to DisplayPort cable), LAN cable, Clamp x 1, Screw x 1, CD-ROM NOTE: Technical specifications are subject to HDCP V1...

User's Manual
Page 50
... mm x 300 mm (M6, 4 Holes) Power Management VESA DPM Plug & Play VESA DDC2B, DDC/CI, DisplayPort Power supply for Slot 2 type OPTION 16V/3.6 A Accessories Setup manual, Power Cord, Video Signal cable (DisplayPort to DisplayPort cable), LAN cable, Clamp x 1, Screw x 1, CD-ROM NOTE: Technical specifications are subject to HDCP V1...
... mm x 300 mm (M6, 4 Holes) Power Management VESA DPM Plug & Play VESA DDC2B, DDC/CI, DisplayPort Power supply for Slot 2 type OPTION 16V/3.6 A Accessories Setup manual, Power Cord, Video Signal cable (DisplayPort to DisplayPort cable), LAN cable, Clamp x 1, Screw x 1, CD-ROM NOTE: Technical specifications are subject to HDCP V1...

User's Manual
Page 51
X554UN Product Specifications LCD Module 55"/1388 mm diagonal Pixel Pitch: 0.630 mm Resolution: 1920 x 1080 Color: Over 16 million colors (depending on video ... mm x 400 mm (M6, 4 Holes) Power Management VESA DPM Plug & Play VESA DDC2B, DDC/CI, DisplayPort Power supply for Slot 2 type OPTION 16V/3.6 A Accessories Setup manual, Power Cord, Video Signal cable (DisplayPort to DisplayPort cable), LAN cable, Clamp x 3, Screw x 3, CD-ROM, Thumbscrew for optional stand x 2 NOTE: Technical specifications are...
X554UN Product Specifications LCD Module 55"/1388 mm diagonal Pixel Pitch: 0.630 mm Resolution: 1920 x 1080 Color: Over 16 million colors (depending on video ... mm x 400 mm (M6, 4 Holes) Power Management VESA DPM Plug & Play VESA DDC2B, DDC/CI, DisplayPort Power supply for Slot 2 type OPTION 16V/3.6 A Accessories Setup manual, Power Cord, Video Signal cable (DisplayPort to DisplayPort cable), LAN cable, Clamp x 3, Screw x 3, CD-ROM, Thumbscrew for optional stand x 2 NOTE: Technical specifications are...

User's Manual
Page 52
English-50 X554UNS Product Specifications LCD Module 55"/1388 mm diagonal Pixel Pitch: 0.630 mm Resolution: 1920 x 1080 Color: Over 16 million colors (depending on Green ... mm x 400 mm (M6, 4 Holes) Power Management VESA DPM Plug & Play VESA DDC2B, DDC/CI, DisplayPort Power supply for Slot 2 type OPTION 16V/3.6 A Accessories Setup manual, Power Cord, Video Signal cable (DisplayPort to DisplayPort cable), LAN cable, Clamp x 3, Screw x 3, CD-ROM, Thumbscrew for detailed information. *4: Displayed text may decrease with Standard...
English-50 X554UNS Product Specifications LCD Module 55"/1388 mm diagonal Pixel Pitch: 0.630 mm Resolution: 1920 x 1080 Color: Over 16 million colors (depending on Green ... mm x 400 mm (M6, 4 Holes) Power Management VESA DPM Plug & Play VESA DDC2B, DDC/CI, DisplayPort Power supply for Slot 2 type OPTION 16V/3.6 A Accessories Setup manual, Power Cord, Video Signal cable (DisplayPort to DisplayPort cable), LAN cable, Clamp x 3, Screw x 3, CD-ROM, Thumbscrew for detailed information. *4: Displayed text may decrease with Standard...
