Motorola warranty terms and conditions
Page 1
... other peripheral equipment are excluded from the date of purchase by the first consumer purchaser of the product. This limited warranty is Motorola's standard Limited Warranty. Periodic maintenance, repair and replacement of parts due to normal wear and tear are excluded from coverage. ƒ...liquid, water, rain, extreme humidity or heavy perspiration, sand, dirt or the like, extreme heat, or food; (c) use of Non-Motorola branded or certified Products, Accessories, Software or other acts which are Repaired or Replaced. Consumer and Professional Two-Way Radio Accessories. The balance...
... other peripheral equipment are excluded from the date of purchase by the first consumer purchaser of the product. This limited warranty is Motorola's standard Limited Warranty. Periodic maintenance, repair and replacement of parts due to normal wear and tear are excluded from coverage. ƒ...liquid, water, rain, extreme humidity or heavy perspiration, sand, dirt or the like, extreme heat, or food; (c) use of Non-Motorola branded or certified Products, Accessories, Software or other acts which are Repaired or Replaced. Consumer and Professional Two-Way Radio Accessories. The balance...
Motorola warranty terms and conditions
Page 2
... to this warranty. Applies only to or use functionally equivalent reconditioned/refurbished/ preowned or new Products, Accessories or parts. What Will Motorola Do? How to requesting service. ƒ Unauthorized Service or Modification. Software that embodies the copy of the software (e.g. We may... may use with which they are used. CD-ROM, or floppy disk). Exclusions ƒ Software Embodied in Physical Media. Motorola, at www.motorola.com/servicemyphone Phone support 1-800-331-6456 iDEN phone support 1-800-453-0920 (Boost, Southern LINC, Nextel customers) Two-...
... to this warranty. Applies only to or use functionally equivalent reconditioned/refurbished/ preowned or new Products, Accessories or parts. What Will Motorola Do? How to requesting service. ƒ Unauthorized Service or Modification. Software that embodies the copy of the software (e.g. We may... may use with which they are used. CD-ROM, or floppy disk). Exclusions ƒ Software Embodied in Physical Media. Motorola, at www.motorola.com/servicemyphone Phone support 1-800-331-6456 iDEN phone support 1-800-453-0920 (Boost, Southern LINC, Nextel customers) Two-...
Motorola warranty terms and conditions
Page 3
...TO THE FULL EXTENT THESE DAMAGES MAY BE DISCLAIMED BY LAW. Laws in , and redistributed with, the Products associated with such Motorola software. Some states and jurisdictions do not allow the limitation or exclusion of incidental or consequential damages, or limitation on how to ...(e) your address and telephone number. This warranty gives you specific legal rights, and you may also have other countries preserve for Motorola certain exclusive rights for Motorola, is permitted What Other Limitations Are There? To obtain service, you must include: (a) a copy of your receipt, bill of...
...TO THE FULL EXTENT THESE DAMAGES MAY BE DISCLAIMED BY LAW. Laws in , and redistributed with, the Products associated with such Motorola software. Some states and jurisdictions do not allow the limitation or exclusion of incidental or consequential damages, or limitation on how to ...(e) your address and telephone number. This warranty gives you specific legal rights, and you may also have other countries preserve for Motorola certain exclusive rights for Motorola, is permitted What Other Limitations Are There? To obtain service, you must include: (a) a copy of your receipt, bill of...
User Guide
Page 3
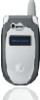
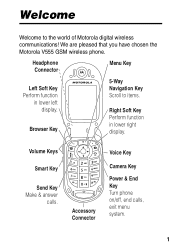
Accessory Connector Voice Key Camera Key Power & End Key Turn phone on/off, end calls, exit menu system. 1 Volume Keys Smart Key Send Key Make & answer calls. Headphone Connector Menu Key Left Soft Key Perform function in lower left display. 040488a Browser Key 5-Way Navigation Key Scroll to the world of Motorola digital wireless communications! We are pleased that you have chosen the Motorola V555 GSM wireless phone. Welcome Welcome to items. Right Soft Key Perform function in lower right display.
Accessory Connector Voice Key Camera Key Power & End Key Turn phone on/off, end calls, exit menu system. 1 Volume Keys Smart Key Send Key Make & answer calls. Headphone Connector Menu Key Left Soft Key Perform function in lower left display. 040488a Browser Key 5-Way Navigation Key Scroll to the world of Motorola digital wireless communications! We are pleased that you have chosen the Motorola V555 GSM wireless phone. Welcome Welcome to items. Right Soft Key Perform function in lower right display.

User Guide
Page 4
...6809493A64-O 2 under license. and other product or service names are provided "as required by their respective owners. © Motorola, Inc., 2005. The contents of Motorola's user's guides are the property of this guide. Caution: Changes or modifications made in relation to , the implied ..., including, but not limited to the accuracy, reliability, or contents of their proprietor and used by Motorola, will void the user's authority to operate the equipment. Motorola, Inc. Consumer Advocacy Office 1307 East Algonquin Road Schaumburg, IL 60196 www.hellomoto.com 1-800-331...
...6809493A64-O 2 under license. and other product or service names are provided "as required by their respective owners. © Motorola, Inc., 2005. The contents of Motorola's user's guides are the property of this guide. Caution: Changes or modifications made in relation to , the implied ..., including, but not limited to the accuracy, reliability, or contents of their proprietor and used by Motorola, will void the user's authority to operate the equipment. Motorola, Inc. Consumer Advocacy Office 1307 East Algonquin Road Schaumburg, IL 60196 www.hellomoto.com 1-800-331...
User Guide
Page 5
Contents Getting Started 6 About This Guide 6 Installing the SIM Card 6 Battery Tips 7 Installing the Battery 8 Charging the Battery 9 Turning Your Phone On 10 Adjusting Volume 11 Making a Call 11 Answering a Call 12 Viewing Your Phone Number 12 Highlight Features 13 Taking and Sending a Photo 13 Recording Video Clips 15 Sending a Multimedia Message 17 Receiving a Multimedia Message 19 Using the Phonebook 20 Learning to Use Your Phone 23 Using the Display 23 Using the 5-Way Navigation Key 27 Using Menus 28 Entering Text 30 Using the Smart Key 40 Using the External ...
Contents Getting Started 6 About This Guide 6 Installing the SIM Card 6 Battery Tips 7 Installing the Battery 8 Charging the Battery 9 Turning Your Phone On 10 Adjusting Volume 11 Making a Call 11 Answering a Call 12 Viewing Your Phone Number 12 Highlight Features 13 Taking and Sending a Photo 13 Recording Video Clips 15 Sending a Multimedia Message 17 Receiving a Multimedia Message 19 Using the Phonebook 20 Learning to Use Your Phone 23 Using the Display 23 Using the 5-Way Navigation Key 27 Using Menus 28 Entering Text 30 Using the Smart Key 40 Using the External ...
User Guide
Page 6
Setting Up Your Phone 45 Storing Your Name and Phone Number 45 Setting the Time and Date 45 Setting a Ring Style 46 Setting Answer Options 46 Setting a Wallpaper Image 47 Setting a Screen Saver Image 48 Setting Display Skin 49 Setting Display Brightness 49 Adjusting the Backlight 49 Setting Display Timeout 49 Conserving Battery Power 49 Calling Features 51 Changing the Active Line 51 Redialing a Number 51 Using Automatic Redial 52 Using Caller ID 52 Canceling an Incoming Call 53 Turning Off a Call Alert 53 Calling an Emergency Number 53 Dialing International Numbers 54 ...
Setting Up Your Phone 45 Storing Your Name and Phone Number 45 Setting the Time and Date 45 Setting a Ring Style 46 Setting Answer Options 46 Setting a Wallpaper Image 47 Setting a Screen Saver Image 48 Setting Display Skin 49 Setting Display Brightness 49 Adjusting the Backlight 49 Setting Display Timeout 49 Conserving Battery Power 49 Calling Features 51 Changing the Active Line 51 Redialing a Number 51 Using Automatic Redial 52 Using Caller ID 52 Canceling an Incoming Call 53 Turning Off a Call Alert 53 Calling an Emergency Number 53 Dialing International Numbers 54 ...

User Guide
Page 8
Optional Features This label identifies an optional network, SIM card, or subscription-dependent feature that requires an optional Motorola Original™ accessory. Contact your phone number, service details, and phonebook/message memory. 6 Installing the SIM Card Your Subscriber Identity ... in the gray-edged pages at the back of this guide. 032257o About This Guide This guide describes the basic features of your Motorola wireless phone. Getting Started Getting Started CAUTION: Before using the phone for more information. Optional Accessories This label identifies a feature that ...
Optional Features This label identifies an optional network, SIM card, or subscription-dependent feature that requires an optional Motorola Original™ accessory. Contact your phone number, service details, and phonebook/message memory. 6 Installing the SIM Card Your Subscriber Identity ... in the gray-edged pages at the back of this guide. 032257o About This Guide This guide describes the basic features of your Motorola wireless phone. Getting Started Getting Started CAUTION: Before using the phone for more information. Optional Accessories This label identifies a feature that ...

User Guide
Page 9
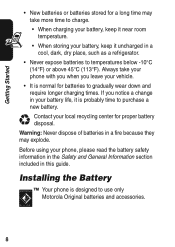
The warranty does not cover damage caused by non-Motorola batteries and/or chargers. 7 Caution: Do not bend or scratch your SIM card to static electricity, water, or dirt. Avoid exposing your SIM card. Getting Started 1 2 3 4 Battery Tips Battery life depends on the network, signal strength, temperature, features, and accessories you use. • Always use Motorola Original batteries and battery chargers.
The warranty does not cover damage caused by non-Motorola batteries and/or chargers. 7 Caution: Do not bend or scratch your SIM card to static electricity, water, or dirt. Avoid exposing your SIM card. Getting Started 1 2 3 4 Battery Tips Battery life depends on the network, signal strength, temperature, features, and accessories you use. • Always use Motorola Original batteries and battery chargers.
User Guide
Page 10
... above 45°C (113°F). Warning: Never dispose of batteries in a cool, dark, dry place, such as a refrigerator. • Never expose batteries to use only Motorola Original batteries and accessories. 8 If you leave your battery life, it uncharged in a fire because they may take your phone with you when you notice...
... above 45°C (113°F). Warning: Never dispose of batteries in a cool, dark, dry place, such as a refrigerator. • Never expose batteries to use only Motorola Original batteries and accessories. 8 If you leave your battery life, it uncharged in a fire because they may take your phone with you when you notice...
User Guide
Page 11
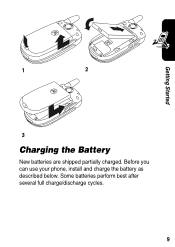
Before you can use your phone, install and charge the battery as described below. Getting Started 1 2 3 Charging the Battery New batteries are shipped partially charged. Some batteries perform best after several full charge/discharge cycles. 9
Before you can use your phone, install and charge the battery as described below. Getting Started 1 2 3 Charging the Battery New batteries are shipped partially charged. Some batteries perform best after several full charge/discharge cycles. 9
User Guide
Page 12
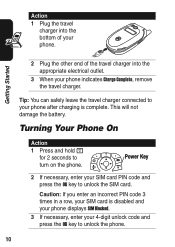
Action 1 Plug the travel charger into the bottom of the travel charger into the appropriate electrical outlet. 3 When your phone indicates Charge Complete, remove the travel charger connected to your SIM card PIN code and press the OK key to unlock the SIM card. Power Key 2 If necessary, enter your phone after charging is disabled and your phone displays SIM Blocked. 3 If necessary, enter your phone. Tip: You can safely leave the travel charger. Caution: If you enter an incorrect PIN code 3 times in a row, your SIM card is complete. This will not damage the battery. Turning ...
Action 1 Plug the travel charger into the bottom of the travel charger into the appropriate electrical outlet. 3 When your phone indicates Charge Complete, remove the travel charger connected to your SIM card PIN code and press the OK key to unlock the SIM card. Power Key 2 If necessary, enter your phone after charging is disabled and your phone displays SIM Blocked. 3 If necessary, enter your phone. Tip: You can safely leave the travel charger. Caution: If you enter an incorrect PIN code 3 times in a row, your SIM card is complete. This will not damage the battery. Turning ...

User Guide
Page 13
Press the up " the phone when you are finished 11 Press it again to switch to vibrate alert, then ring alert. Getting Started Adjusting Volume Press up or down volume key once to switch to vibrate alert. Making a Call Press To 1 keypad keys dial the phone number 2n make the call 3o end the call alert • increase or decrease the ringer volume setting when the home screen is visible Tip: At the lowest volume setting, press the down on volume keys to: • increase or decrease earpiece volume during a call Volume Keys • turn off an incoming call and "hang up...
Press the up " the phone when you are finished 11 Press it again to switch to vibrate alert, then ring alert. Getting Started Adjusting Volume Press up or down volume key once to switch to vibrate alert. Making a Call Press To 1 keypad keys dial the phone number 2n make the call 3o end the call alert • increase or decrease the ringer volume setting when the home screen is visible Tip: At the lowest volume setting, press the down on volume keys to: • increase or decrease earpiece volume during a call Volume Keys • turn off an incoming call and "hang up...
User Guide
Page 14
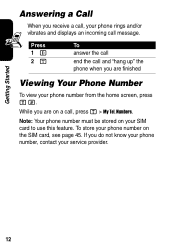
Getting Started Answering a Call When you are on your SIM card to use this feature. While you do not know your phone number, contact your phone rings and/or vibrates and displays an incoming call , press M > My Tel. Numbers. Press 1n 2o To answer the call end the call and "hang up" the phone when you receive a call, your service provider. 12 Note: Your phone number must be stored on a call message. If you are finished Viewing Your Phone Number To view your phone number on the SIM card, see page 45. To store your phone number from the home screen, press M #.
Getting Started Answering a Call When you are on your SIM card to use this feature. While you do not know your phone number, contact your phone rings and/or vibrates and displays an incoming call , press M > My Tel. Numbers. Press 1n 2o To answer the call end the call and "hang up" the phone when you receive a call, your service provider. 12 Note: Your phone number must be stored on a call message. If you are finished Viewing Your Phone Number To view your phone number on the SIM card, see page 45. To store your phone number from the home screen, press M #.

User Guide
Page 15
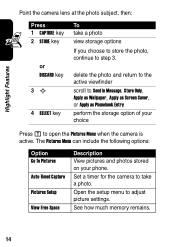
Take a photo. Taking and Sending a Photo Press j to display the camera viewfinder: Press S up or down to zoom in or out. 040501a IMAGE AREA Remaining Memory Press S left or right to open Pictures menu. Photo Viewfinder Memory Used:70% BACK CAPTURE Press M to change brightness. This section describes some of your phone than make and receive calls! Return to previous screen. 13 Highlight Features Highlight Features You can do much more with your phone's highlight features.
Take a photo. Taking and Sending a Photo Press j to display the camera viewfinder: Press S up or down to zoom in or out. 040501a IMAGE AREA Remaining Memory Press S left or right to open Pictures menu. Photo Viewfinder Memory Used:70% BACK CAPTURE Press M to change brightness. This section describes some of your phone than make and receive calls! Return to previous screen. 13 Highlight Features Highlight Features You can do much more with your phone's highlight features.
User Guide
Page 16
Set a timer for the camera to take a photo view storage options If you choose to store the photo, continue to Send in Message, Store Only, Apply as Wallpaper, Apply as Screen Saver, or Apply as Phonebook Entry perform the storage option of your phone. See how much memory remains. 14 Highlight Features Point the camera lens at the photo subject, then: Press 1 CAPTURE key 2 STORE key or DISCARD key 3S 4 SELECT key To take a photo. delete the photo and return to the active viewfinder scroll to step 3. The Pictures Menu can include the following options: Option Go To Pictures Auto-...
Set a timer for the camera to take a photo view storage options If you choose to store the photo, continue to Send in Message, Store Only, Apply as Wallpaper, Apply as Screen Saver, or Apply as Phonebook Entry perform the storage option of your phone. See how much memory remains. 14 Highlight Features Point the camera lens at the photo subject, then: Press 1 CAPTURE key 2 STORE key or DISCARD key 3S 4 SELECT key To take a photo. delete the photo and return to the active viewfinder scroll to step 3. The Pictures Menu can include the following options: Option Go To Pictures Auto-...

User Guide
Page 17
Press S 040502a Remaining up or down to previous Video Menu. VIDEO CLIP AREA Start or stop the video 15 Point the camera lens at the video subject, then: Press 1 CAPTURE key 2 STOP key To start recording. Press M to open Return to Memory zoom in or out. brightness. screen. Highlight Features Recording Video Clips To record a video on your phone: Find the Feature M > Multimedia > Videos > New Video The active viewfinder image displays. Note: You can only zoom before you start the video stop Press S left or right to change Video Viewfinder Memory Used:70% ...
Press S 040502a Remaining up or down to previous Video Menu. VIDEO CLIP AREA Start or stop the video 15 Point the camera lens at the video subject, then: Press 1 CAPTURE key 2 STOP key To start recording. Press M to open Return to Memory zoom in or out. brightness. screen. Highlight Features Recording Video Clips To record a video on your phone: Find the Feature M > Multimedia > Videos > New Video The active viewfinder image displays. Note: You can only zoom before you start the video stop Press S left or right to change Video Viewfinder Memory Used:70% ...
User Guide
Page 18
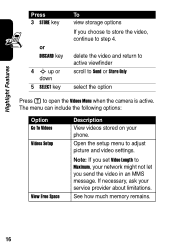
delete the video and return to active viewfinder scroll to Send or Store Only select the option Press M to adjust picture and video settings. The menu can include the following options: Option Go To Videos Videos Setup View Free Space Description View videos stored on your service provider about limitations. Open the setup menu to open the Videos Menu when the camera is active. See how much memory remains. 16 If necessary, ask your phone. Note: If you send the video in an MMS message. Highlight Features Press 3 STORE key or DISCARD key 4 S up or down 5 SELECT key To view...
delete the video and return to active viewfinder scroll to Send or Store Only select the option Press M to adjust picture and video settings. The menu can include the following options: Option Go To Videos Videos Setup View Free Space Description View videos stored on your service provider about limitations. Open the setup menu to open the Videos Menu when the camera is active. See how much memory remains. 16 If necessary, ask your phone. Note: If you send the video in an MMS message. Highlight Features Press 3 STORE key or DISCARD key 4 S up or down 5 SELECT key To view...

User Guide
Page 19
open the MMS Menu scroll to Insert display a list of items you want insert the object To add another slide to email addresses. You can insert scroll to a type of object to insert select the object type highlight the object you can send the multimedia message to other wireless phone users, and to the message, continue. Find the Feature M > Messages > Create Message > New Multimedia Msg Highlight Features Press 1 keypad keys 2M 3S 4 SELECT key 5S 6 SELECT key 7S 8 SELECT key 9M To enter slide text open the MMS Menu to step 14. Sending a Multimedia Message A Multimedia ...
open the MMS Menu scroll to Insert display a list of items you want insert the object To add another slide to email addresses. You can insert scroll to a type of object to insert select the object type highlight the object you can send the multimedia message to other wireless phone users, and to the message, continue. Find the Feature M > Messages > Create Message > New Multimedia Msg Highlight Features Press 1 keypad keys 2M 3S 4 SELECT key 5S 6 SELECT key 7S 8 SELECT key 9M To enter slide text open the MMS Menu to step 14. Sending a Multimedia Message A Multimedia ...

User Guide
Page 20
store the message scroll to a Send To option: • Highlight [One Time Entry] to enter one or more phone numbers and/or email addresses. • Highlight [New Phonebook Entry] to enter a number/address and add it to enter contents for the new slide. Highlight Features Press 10 S 11 SELECT key 12 S 13 SELECT key 14 OK key 15 S 16 SELECT key or ADD key 17 DONE key 18 To scroll to Insert display a list of recipients store the numbers/addresses select [One Time Entry] or [New Phonebook Entry] and enter a number/address add a phonebook entry to the list of items you can insert scroll ...
store the message scroll to a Send To option: • Highlight [One Time Entry] to enter one or more phone numbers and/or email addresses. • Highlight [New Phonebook Entry] to enter a number/address and add it to enter contents for the new slide. Highlight Features Press 10 S 11 SELECT key 12 S 13 SELECT key 14 OK key 15 S 16 SELECT key or ADD key 17 DONE key 18 To scroll to Insert display a list of recipients store the numbers/addresses select [One Time Entry] or [New Phonebook Entry] and enter a number/address add a phonebook entry to the list of items you can insert scroll ...
