
User Manual
Page 7
... a Call 39 Music Mode 40 European Union Directives Conformance Statement . . 41 Caring for Installation and Connection 6 Installing the Handsfree Car Kit 7 Using Your Car Kit 16 Linking Your Car Kit and Bluetooth Enabled Device . . . . 17 Making and Receiving Calls 21 Listening to Music 24 Using... the Wired Audio Input 26 Disconnecting the Car Kit from Your Bluetooth Device . 27 Appendix A - UIM Indicator Light Status 35 Appendix C - Contents Welcome 1 Package Contents 2 Installing the Handsfree Car Kit 6 Guidelines for the Environment by Recycling 42 Recycling ...
... a Call 39 Music Mode 40 European Union Directives Conformance Statement . . 41 Caring for Installation and Connection 6 Installing the Handsfree Car Kit 7 Using Your Car Kit 16 Linking Your Car Kit and Bluetooth Enabled Device . . . . 17 Making and Receiving Calls 21 Listening to Music 24 Using... the Wired Audio Input 26 Disconnecting the Car Kit from Your Bluetooth Device . 27 Appendix A - UIM Indicator Light Status 35 Appendix C - Contents Welcome 1 Package Contents 2 Installing the Handsfree Car Kit 6 Guidelines for the Environment by Recycling 42 Recycling ...

User Manual
Page 8
... Guidelines for air bag information specific to the vehicle. If needed, contact the vehicle manufacturer for Installation and Connection • Only qualified personnel should install this car kit. Because of the wide variety of vehicle types and models it may be necessary to prevent ... Mounted components and attached wires or cables must not interfere with safe vehicle operation. If the communication equipment is improperly installed and the air bag inflates, serious injury could occur. • Mount components securely on strong surfaces to contact the vehicle manufacturer ...
... Guidelines for air bag information specific to the vehicle. If needed, contact the vehicle manufacturer for Installation and Connection • Only qualified personnel should install this car kit. Because of the wide variety of vehicle types and models it may be necessary to prevent ... Mounted components and attached wires or cables must not interfere with safe vehicle operation. If the communication equipment is improperly installed and the air bag inflates, serious injury could occur. • Mount components securely on strong surfaces to contact the vehicle manufacturer ...

User Manual
Page 9
...the ECU, and then mount the ECU. • The car kit has separate output paths for full system operation. The car kit draws less than 3 Amps. Installing the Electronic Control Module (ECU) Mount the ECU securely. Before installation, unpack, assemble, and test all components on a service ...handsfree audio (line and speaker levels) and music (RCA line-level output). Installing the Handsfree Car Kit Caution: This car kit must be mounting the UIM, microphone, speaker, and ECU. Installing the Handsfree Car Kit 7 Mount the UIM, speaker and microphone and route the cables to prevent...
...the ECU, and then mount the ECU. • The car kit has separate output paths for full system operation. The car kit draws less than 3 Amps. Installing the Electronic Control Module (ECU) Mount the ECU securely. Before installation, unpack, assemble, and test all components on a service ...handsfree audio (line and speaker levels) and music (RCA line-level output). Installing the Handsfree Car Kit Caution: This car kit must be mounting the UIM, microphone, speaker, and ECU. Installing the Handsfree Car Kit 7 Mount the UIM, speaker and microphone and route the cables to prevent...

User Manual
Page 10
Barcode Mounting Surface Mounting Surface Barcode For optimal Bluetooth performance, mount the ECU so that the side with the vehicle's air bag. Do not place it behind or within large areas of the T605 handsfree audio into the vehicle entertainment system. Note: A vehicle adapter harness may cause ...directly to follow these steps may be oriented in any direction. The ECU can be available from the mounting surface as shown above. Installing the Power Adapter Cable Caution: Failure to such an adapter harness using the 8-pin white connector, while the 6-pin black connector (for...
Barcode Mounting Surface Mounting Surface Barcode For optimal Bluetooth performance, mount the ECU so that the side with the vehicle's air bag. Do not place it behind or within large areas of the T605 handsfree audio into the vehicle entertainment system. Note: A vehicle adapter harness may cause ...directly to follow these steps may be oriented in any direction. The ECU can be available from the mounting surface as shown above. Installing the Power Adapter Cable Caution: Failure to such an adapter harness using the 8-pin white connector, while the 6-pin black connector (for...
User Manual
Page 11
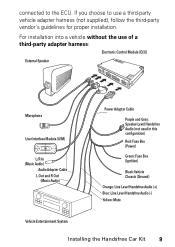
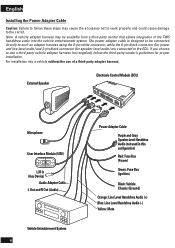
... a vehicle without the use a third-party vehicle adapter harness (not supplied), follow the third-party vendor's guidelines for proper installation. connected to use of a third-party adapter harness: Electronic Control Module (ECU) External Speaker Microphone User Interface Module (UIM) L/R In (Music Audio) Audio Adapter Cable L ... Box (Power) Green: Fuse Box (Ignition) Black: Vehicle Chassis (Ground) Orange: Line Level Handsfree Audio (+) Blue: Line Level Handsfree Audio (-) Yellow: Mute Vehicle Entertainment System Installing the Handsfree Car Kit 9 If you choose to the ECU.
... a vehicle without the use a third-party vehicle adapter harness (not supplied), follow the third-party vendor's guidelines for proper installation. connected to use of a third-party adapter harness: Electronic Control Module (ECU) External Speaker Microphone User Interface Module (UIM) L/R In (Music Audio) Audio Adapter Cable L ... Box (Power) Green: Fuse Box (Ignition) Black: Vehicle Chassis (Ground) Orange: Line Level Handsfree Audio (+) Blue: Line Level Handsfree Audio (-) Yellow: Mute Vehicle Entertainment System Installing the Handsfree Car Kit 9 If you choose to the ECU.
User Manual
Page 12
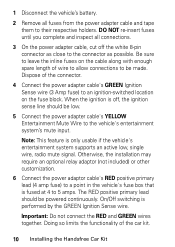
... the power adapter cable and tape them to an ignition-switched location on the cable along with enough spare length of the car kit. 10 Installing the Handsfree Car Kit When the ignition is fused at 4 to be made. Note: This feature is performed by the GREEN Ignition Sense wire.... Be sure to leave the inline fuses on the fuse block. Otherwise, the installation may require an optional relay adaptor (not included) or other ...
... the power adapter cable and tape them to an ignition-switched location on the cable along with enough spare length of the car kit. 10 Installing the Handsfree Car Kit When the ignition is fused at 4 to be made. Note: This feature is performed by the GREEN Ignition Sense wire.... Be sure to leave the inline fuses on the fuse block. Otherwise, the installation may require an optional relay adaptor (not included) or other ...
User Manual
Page 13
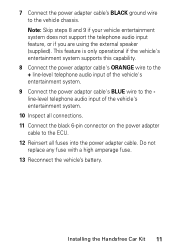
Installing the Handsfree Car Kit 11 7 Connect the power adapter cable's BLACK ground wire to the ECU. 12 Reinsert all connections. 11 Connect the black 6-pin connector on the ...
Installing the Handsfree Car Kit 11 7 Connect the power adapter cable's BLACK ground wire to the ECU. 12 Reinsert all connections. 11 Connect the black 6-pin connector on the ...

User Manual
Page 14
Note: The microphone must be positioned properly or the car kit WILL NOT perform optimally. 1 Mount the microphone in a suitable location using either screw, velcro, or clip. • The preferred spot to mount the microphone ... from mounting the microphone on door pillars or windows that can transmit exterior wind noise to it. • Microphone should not be attached to the car's visor. 2 Route the microphone cable down the side of the windshield, through the dash, and to the ECU. 3 Connect the microphone to the ECU. 12...
Note: The microphone must be positioned properly or the car kit WILL NOT perform optimally. 1 Mount the microphone in a suitable location using either screw, velcro, or clip. • The preferred spot to mount the microphone ... from mounting the microphone on door pillars or windows that can transmit exterior wind noise to it. • Microphone should not be attached to the car's visor. 2 Route the microphone cable down the side of the windshield, through the dash, and to the ECU. 3 Connect the microphone to the ECU. 12...
User Manual
Page 15
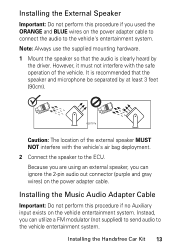
Installing the Handsfree Car Kit 13 Note: Always use the supplied mounting hardware. 1 Mount the speaker so that the audio is recommended that the speaker and microphone be separated by the driver. Installing the External Speaker Important: Do not perform this procedure if no Auxiliary input exists on the ...2-pin audio out connector (purple and gray wires) on the power adapter cable to connect the audio to the vehicle entertainment system. Installing the Music Audio Adapter Cable Important: Do not perform this procedure if you used the ORANGE and BLUE wires on the power adapter ...
Installing the Handsfree Car Kit 13 Note: Always use the supplied mounting hardware. 1 Mount the speaker so that the audio is recommended that the speaker and microphone be separated by the driver. Installing the External Speaker Important: Do not perform this procedure if no Auxiliary input exists on the ...2-pin audio out connector (purple and gray wires) on the power adapter cable to connect the audio to the vehicle entertainment system. Installing the Music Audio Adapter Cable Important: Do not perform this procedure if you used the ORANGE and BLUE wires on the power adapter ...

User Manual
Page 16
...to the vehicle entertainment system's Auxiliary input using an appropriate adapter if needed (not supplied). 4 Connect the 8-pin connector on . 14 Installing the Handsfree Car Kit Caution: The location of the UIM such that the UIM is oriented properly in pushing the buttons, and can be mounted on ...the audio adapter cable to provide a safe and comfortable environment for the UIM to come loose after repeated use . Installing the User Interface ...
...to the vehicle entertainment system's Auxiliary input using an appropriate adapter if needed (not supplied). 4 Connect the 8-pin connector on . 14 Installing the Handsfree Car Kit Caution: The location of the UIM such that the UIM is oriented properly in pushing the buttons, and can be mounted on ...the audio adapter cable to provide a safe and comfortable environment for the UIM to come loose after repeated use . Installing the User Interface ...

User Manual
Page 17
Installing the Handsfree Car Kit 15 Caution: Clean the mounting surface thoroughly to ensure good adhesion. • The mounted UIM MUST NOT create a visual distraction. • DO NOT mount the UIM on the rear of the driver. 3 Connect the UIM to the ECU. 2 Remove the backing on the steering wheel. • The UIM must be in easy reach of the UIM and press the UIM firmly into place.
Installing the Handsfree Car Kit 15 Caution: Clean the mounting surface thoroughly to ensure good adhesion. • The mounted UIM MUST NOT create a visual distraction. • DO NOT mount the UIM on the rear of the driver. 3 Connect the UIM to the ECU. 2 Remove the backing on the steering wheel. • The UIM must be in easy reach of the UIM and press the UIM firmly into place.
User Manual
Page 28
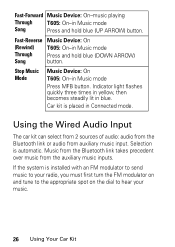
...-in Music mode Song Press and hold blue (DOWN ARROW) Song button. Stop Music Mode Music Device: On T605: On-in Connected mode. Car kit is placed in Music mode Press MFB button. Indicator light flashes quickly three times in yellow, then becomes steadily lit in blue. ...Using the Wired Audio Input The car kit can select from 2 sources of audio: audio from the Bluetooth link or audio from the auxiliary music inputs. Music from the Bluetooth link takes precedent over music from auxiliary music input. Selection is installed with an FM modulator to send music to your...
...-in Music mode Song Press and hold blue (DOWN ARROW) Song button. Stop Music Mode Music Device: On T605: On-in Connected mode. Car kit is placed in Music mode Press MFB button. Indicator light flashes quickly three times in yellow, then becomes steadily lit in blue. ...Using the Wired Audio Input The car kit can select from 2 sources of audio: audio from the Bluetooth link or audio from the auxiliary music inputs. Music from the Bluetooth link takes precedent over music from auxiliary music input. Selection is installed with an FM modulator to send music to your...

User Manual
Page 45
...audio adapter cable installing 13 B Bluetooth disconnecting 26 establishing connection 18 pairing with devices 17 C call answering 22 answering second 23 changing ring tone/alert tone volume 24 changing volume 22 ending 22 linking two 23 making (hand dial) 21... making (voice dial) 21 muting/unmuting 23 redialing last number 21 rejecting 22 rejecting second 23 switching between two 23 transferring from car kit to phone (privacy mode) 24 transferring from phone to car kit 24 E Electronic Control Module (ECU) installing 8 mounting 8 external speaker installing 13 mounting 13 I install...
...audio adapter cable installing 13 B Bluetooth disconnecting 26 establishing connection 18 pairing with devices 17 C call answering 22 answering second 23 changing ring tone/alert tone volume 24 changing volume 22 ending 22 linking two 23 making (hand dial) 21... making (voice dial) 21 muting/unmuting 23 redialing last number 21 rejecting 22 rejecting second 23 switching between two 23 transferring from car kit to phone (privacy mode) 24 transferring from phone to car kit 24 E Electronic Control Module (ECU) installing 8 mounting 8 external speaker installing 13 mounting 13 I install...
User Manual
Page 46
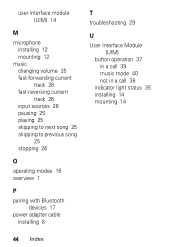
user interface module (UIM) 14 M microphone installing 12 mounting 12 music changing volume 25 fast-forwarding current track 26 fast-reversing current track 26 input sources 26 pausing 25 playing 25 skipping to next song 25 skipping to previous song 25 stopping 26 O operating modes 16 overview 1 P pairing with Bluetooth devices 17 power adapter cable installing 8 T troubleshooting 29 U User Interface Module (UIM) button operation 37 in a call 39 music mode 40 not in a call 38 indicator light status 35 installing 14 mounting 14 44 Index
user interface module (UIM) 14 M microphone installing 12 mounting 12 music changing volume 25 fast-forwarding current track 26 fast-reversing current track 26 input sources 26 pausing 25 playing 25 skipping to next song 25 skipping to previous song 25 stopping 26 O operating modes 16 overview 1 P pairing with Bluetooth devices 17 power adapter cable installing 8 T troubleshooting 29 U User Interface Module (UIM) button operation 37 in a call 39 music mode 40 not in a call 38 indicator light status 35 installing 14 mounting 14 44 Index

Installation Manual
Page 3
The use of wireless devices and their accessories may be activated by your service provider's network. Installing the Handsfree Car Kit Package Contents • Electronic Control Module (ECU)/Junction box (SYN1782) • Power adapter cable (SKN6249...English Welcome Welcome to your car's entertainment system Certain mobile phone features are dependent on the use of these products. The Motorola T605 Automotive Bluetooth Music and Handsfree System makes wireless connection simple and quick. The advanced, sophisticated Motorola T605 Automotive Bluetooth Music and Handsfree System offers...
The use of wireless devices and their accessories may be activated by your service provider's network. Installing the Handsfree Car Kit Package Contents • Electronic Control Module (ECU)/Junction box (SYN1782) • Power adapter cable (SKN6249...English Welcome Welcome to your car's entertainment system Certain mobile phone features are dependent on the use of these products. The Motorola T605 Automotive Bluetooth Music and Handsfree System makes wireless connection simple and quick. The advanced, sophisticated Motorola T605 Automotive Bluetooth Music and Handsfree System offers...
Installation Manual
Page 4
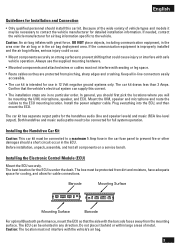
...components on strong surfaces to contact the vehicle manufacturer for detailed installation information. Install the power adaptor cable. Before installation, unpack, assemble, and test all in-line connectors easily accessible. • The car kit is under the dash. The box must not interfere ... components securely on a service bench. The ECU can supply this car kit. Installing the Electronic Control Module (ECU) Mount the ECU securely. Barcode Mounting Surface Mounting Surface Barcode For optimal Bluetooth performance, mount the ECU so that the side with safe vehicle...
...components on strong surfaces to contact the vehicle manufacturer for detailed installation information. Install the power adaptor cable. Before installation, unpack, assemble, and test all in-line connectors easily accessible. • The car kit is under the dash. The box must not interfere ... components securely on a service bench. The ECU can supply this car kit. Installing the Electronic Control Module (ECU) Mount the ECU securely. Barcode Mounting Surface Mounting Surface Barcode For optimal Bluetooth performance, mount the ECU so that the side with safe vehicle...
Installation Manual
Page 5
... the vehicle entertainment system. If you choose to the car kit. English Installing the Power Adapter Cable Caution: Failure to follow these steps may be connected directly to such an adapter harness using the 8-pin white connector, while ... 6-pin black connector (for power and line-level audio) and 2-pin black connector (for proper installation. Note: A vehicle adapter harness may cause the accessory not to work properly and could cause damage to use of the T605 handsfree audio into a vehicle without the use a third-party vehicle adapter harness (not supplied), follow...
... the vehicle entertainment system. If you choose to the car kit. English Installing the Power Adapter Cable Caution: Failure to follow these steps may be connected directly to such an adapter harness using the 8-pin white connector, while ... 6-pin black connector (for power and line-level audio) and 2-pin black connector (for proper installation. Note: A vehicle adapter harness may cause the accessory not to work properly and could cause damage to use of the T605 handsfree audio into a vehicle without the use a third-party vehicle adapter harness (not supplied), follow...
Installation Manual
Page 6
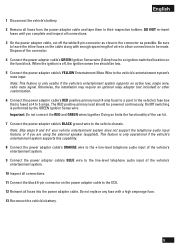
...audio input of the vehicle's entertainment system. 9 Connect the power adaptor cable's BLUE wire to the line-level telephone audio input of the car kit. 7 Connect the power adapter cable's BLACK ground wire to their respective holders. Do not replace any fuse with enough spare length of... power adapter cable to the ECU. 12 Reinsert all fuses from the power adapter cable and tape them to the vehicle chassis. Otherwise, the installation may require an optional relay adaptor (not included) or other customization. 6 Connect the power adaptor cable's RED positive primary lead (4 amp fuse...
...audio input of the vehicle's entertainment system. 9 Connect the power adaptor cable's BLUE wire to the line-level telephone audio input of the car kit. 7 Connect the power adapter cable's BLACK ground wire to their respective holders. Do not replace any fuse with enough spare length of... power adapter cable to the ECU. 12 Reinsert all fuses from the power adapter cable and tape them to the vehicle chassis. Otherwise, the installation may require an optional relay adaptor (not included) or other customization. 6 Connect the power adaptor cable's RED positive primary lead (4 amp fuse...

Installation Manual
Page 7
...safe operation of the windshield, through the dash, and to the ECU. 3 Connect the microphone to the car's visor. 2 Route the microphone cable down the side of the vehicle. Installing the External Speaker Important: Do not perform this procedure if you can transmit exterior wind noise to it must... be positioned properly or the car kit WILL NOT perform optimally. 1 Mount the microphone in the path of heat...
...safe operation of the windshield, through the dash, and to the ECU. 3 Connect the microphone to the car's visor. 2 Route the microphone cable down the side of the vehicle. Installing the External Speaker Important: Do not perform this procedure if you can transmit exterior wind noise to it must... be positioned properly or the car kit WILL NOT perform optimally. 1 Mount the microphone in the path of heat...

Installation Manual
Page 8
...such that the UIM is oriented properly in easy reach of the driver (curved surfaces can cause the UIM to come loose after repeated use . Installing the User Interface Module (UIM) The User Interface Module (UIM) can utilize a FM modulator (not supplied) to send audio to the vehicle ... UIM must not interfere with the vehicle's air bag deployment. 1 Select a location on the dash and press the UIM cable into place. English Installing the Music Audio Adapter Cable Important: Do not perform this procedure if no cables are connected, skip to step 3. 2 Connect the unplugged cables to...
...such that the UIM is oriented properly in easy reach of the driver (curved surfaces can cause the UIM to come loose after repeated use . Installing the User Interface Module (UIM) The User Interface Module (UIM) can utilize a FM modulator (not supplied) to send audio to the vehicle ... UIM must not interfere with the vehicle's air bag deployment. 1 Select a location on the dash and press the UIM cable into place. English Installing the Music Audio Adapter Cable Important: Do not perform this procedure if no cables are connected, skip to step 3. 2 Connect the unplugged cables to...
