
User Manual
Page 4
... 12 Installing the NiCd Battery Pack . . . .12 Battery Meter 13 Using the Desk Stand Charger (Optional Accessory 13 Attaching the Belt Clip 15 Removing the Belt Clip 15 Turning Your Radio On and Off . . . . .15 Setting the Volume 15 Setting a Channel 16 Channels and Frequencies 16...20 2 Scan Advance 21 Removing Channels from the Scan List (Nuisance Delete Feature 21 Handsfree Use Without Accessories (iVox 22 Handsfree Use With Accessories (VOX 22 Weather (Model T5950 Only 23 Turning Weather Channel Reception On and Off 23 Setting the Weather Channel 24 Turning Keypad Beeps On...
... 12 Installing the NiCd Battery Pack . . . .12 Battery Meter 13 Using the Desk Stand Charger (Optional Accessory 13 Attaching the Belt Clip 15 Removing the Belt Clip 15 Turning Your Radio On and Off . . . . .15 Setting the Volume 15 Setting a Channel 16 Channels and Frequencies 16...20 2 Scan Advance 21 Removing Channels from the Scan List (Nuisance Delete Feature 21 Handsfree Use Without Accessories (iVox 22 Handsfree Use With Accessories (VOX 22 Weather (Model T5950 Only 23 Turning Weather Channel Reception On and Off 23 Setting the Weather Channel 24 Turning Keypad Beeps On...
User Manual
Page 7
... for this product. Facilities To avoid electromagnetic interference and/or compatibility conflicts, turn off your body when transmitting, always place the radio in the normal use one of non-Motorola-approved accessories may be using any facility where posted notices instruct you do so. Hospitals or health care facilities may exceed FCC/Health...
... for this product. Facilities To avoid electromagnetic interference and/or compatibility conflicts, turn off your body when transmitting, always place the radio in the normal use one of non-Motorola-approved accessories may be using any facility where posted notices instruct you do so. Hospitals or health care facilities may exceed FCC/Health...

User Manual
Page 13
Control Buttons Use P to: • Turn power on/off • Adjust volume LED Indicator Light Use M(Push to Talk) to: • Talk • Save a setting Use ^ to: • Transmit call tone Speaker Accessory Jack with Cover Use J to: • Monitor channel activity • Activate enhanced scanning Use ] and [ to: • Scroll through menus Microphone Use \ to: • Lock the keypad (when held down and not in a menu) • Exit the menu (when pressed while in a menu) 11 Control Buttons
Control Buttons Use P to: • Turn power on/off • Adjust volume LED Indicator Light Use M(Push to Talk) to: • Talk • Save a setting Use ^ to: • Transmit call tone Speaker Accessory Jack with Cover Use J to: • Monitor channel activity • Activate enhanced scanning Use ] and [ to: • Scroll through menus Microphone Use \ to: • Lock the keypad (when held down and not in a menu) • Exit the menu (when pressed while in a menu) 11 Control Buttons
User Manual
Page 15
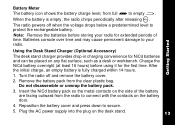
... corrode over time and may cause permanent damage to your radio for extended periods of the battery are facing outward from the radio to protect the rechargeable battery. After the initial charge, an empty battery is empty, the radio chirps periodically after releasing M. Do not disassemble or unwrap ...Turn the radio off when the voltage drops below a predetermined level to connect with the contacts on the side of time. Battery Meter The battery icon shows the battery charge level, from the clear plastic bag. Getting Started Using the Desk Stand Charger (Optional Accessory) The ...
... corrode over time and may cause permanent damage to your radio for extended periods of the battery are facing outward from the radio to protect the rechargeable battery. After the initial charge, an empty battery is empty, the radio chirps periodically after releasing M. Do not disassemble or unwrap ...Turn the radio off when the voltage drops below a predetermined level to connect with the contacts on the side of time. Battery Meter The battery icon shows the battery charge level, from the clear plastic bag. Getting Started Using the Desk Stand Charger (Optional Accessory) The ...
User Manual
Page 24
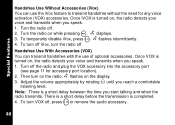
... while pressing M. Adjust the volume appropriately by rotating P until you speak. 1. Turn the radio off the radio and plug the VOX accessory into the accessory port (see page 11 for any voice activation (VOX) accessories. Turn off . 2. Special Features Handsfree Use Without Accessories (iVox) You can transmit handsfree with the use the iVox feature to transmit...
... while pressing M. Adjust the volume appropriately by rotating P until you speak. 1. Turn the radio off the radio and plug the VOX accessory into the accessory port (see page 11 for any voice activation (VOX) accessories. Turn off . 2. Special Features Handsfree Use Without Accessories (iVox) You can transmit handsfree with the use the iVox feature to transmit...
User Manual
Page 30
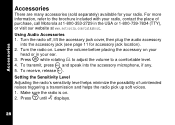
... or in the USA or 1-800-739-7834 (TTY), or visit our website at www.motorola.com/talkabout. Accessories Accessories There are many accessories (sold separately) available for accessory jack location). 2. To transmit, press M and speak into the accessory jack (see page 11 for your radio, contact the place of unintended noises triggering a transmission and helps the...
... or in the USA or 1-800-739-7834 (TTY), or visit our website at www.motorola.com/talkabout. Accessories Accessories There are many accessories (sold separately) available for accessory jack location). 2. To transmit, press M and speak into the accessory jack (see page 11 for your radio, contact the place of unintended noises triggering a transmission and helps the...

User Manual
Page 31
Note: If iVox is activated while setting the sensitivity level, a I is automatically set to select the sensitivity level: 3 = High Sensitivity 2 = Medium Sensitivity 1 = Low Sensitivity for quiet environments for most environments for noisy environments When you connect a VOX accessory, the radio is displayed above g. 29 Accessories 3. Press ] or [ to the last chosen sensitivity level. If VOX is activated while setting the sensitivity level, an H is displayed above g.
Note: If iVox is activated while setting the sensitivity level, a I is automatically set to select the sensitivity level: 3 = High Sensitivity 2 = Medium Sensitivity 1 = Low Sensitivity for quiet environments for most environments for noisy environments When you connect a VOX accessory, the radio is displayed above g. 29 Accessories 3. Press ] or [ to the last chosen sensitivity level. If VOX is activated while setting the sensitivity level, an H is displayed above g.
User Manual
Page 36
...rechargeable battery pack. Enhanced Scanning Easily finds your local weather office for longer Weather radio service may not be used as a toy or plaything. Privately alerts you of their respective owners. © Motorola...accessories. Easy to read your settings 38 standard codes plus 61 Use of this warranty prior to purchase, please ask your home • • Motorola... and T5950 only). • 22 Channels (8 GMRS, • 8 Weather Channels • Keypad Lock 7 GMRS/FRS, 7 FRS) (Model T5950 only) Prevents your group can identify who's calling. FCC GMRS License Required...
...rechargeable battery pack. Enhanced Scanning Easily finds your local weather office for longer Weather radio service may not be used as a toy or plaything. Privately alerts you of their respective owners. © Motorola...accessories. Easy to read your settings 38 standard codes plus 61 Use of this warranty prior to purchase, please ask your home • • Motorola... and T5950 only). • 22 Channels (8 GMRS, • 8 Weather Channels • Keypad Lock 7 GMRS/FRS, 7 FRS) (Model T5950 only) Prevents your group can identify who's calling. FCC GMRS License Required...