Operating and Installation manual
Page 2
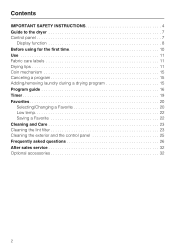
Contents IMPORTANT SAFETY INSTRUCTIONS 4 Guide to the dryer 7 Control panel 7 Display function 8 Before using for the first time 10 Use 11 Fabric care labels 11 Drying tips 11 Coin mechanism 15 Canceling a program 15 Adding/removing laundry during a drying program 15 Program guide 16 Timer 19 Favorites 20 Selecting/Changing a Favorite 20 Low temp 22 Saving a Favorite 22 Cleaning and Care 23 Cleaning the lint filter 23 Cleaning the exterior and the control panel 25 Frequently asked questions 26 After sales service 32 Optional accessories 32 2
Contents IMPORTANT SAFETY INSTRUCTIONS 4 Guide to the dryer 7 Control panel 7 Display function 8 Before using for the first time 10 Use 11 Fabric care labels 11 Drying tips 11 Coin mechanism 15 Canceling a program 15 Adding/removing laundry during a drying program 15 Program guide 16 Timer 19 Favorites 20 Selecting/Changing a Favorite 20 Low temp 22 Saving a Favorite 22 Cleaning and Care 23 Cleaning the lint filter 23 Cleaning the exterior and the control panel 25 Frequently asked questions 26 After sales service 32 Optional accessories 32 2

Operating and Installation manual
Page 4
Read the operating instructions carefully before using this appliance where it will be performed by qualified personnel. ~ Only use genuine Miele accessories and replacement parts. Check fabric care labels to verify materials can lead to play on or in the appliance.... use can be cleaned periodically by qualified personnel. Close supervision is necessary when the appliance is essential to the user. ~ Clean the lint filter before using your appliance, follow basic precautions, including the following: ~ It is used , guarantee, performance and product liability claims may cause ...
Read the operating instructions carefully before using this appliance where it will be performed by qualified personnel. ~ Only use genuine Miele accessories and replacement parts. Check fabric care labels to verify materials can lead to play on or in the appliance.... use can be cleaned periodically by qualified personnel. Close supervision is necessary when the appliance is essential to the user. ~ Clean the lint filter before using your appliance, follow basic precautions, including the following: ~ It is used , guarantee, performance and product liability claims may cause ...
Operating and Installation manual
Page 23
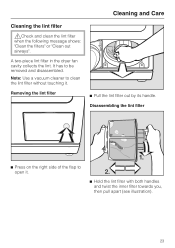
... 23 Removing the lint filter ^ Pull the lint filter out by its handle. It has to open it . Cleaning and Care Cleaning the lint filter ,Check and clean the lint filter when the following message shows: "Clean the filters" or "Clean out airways". Disassembling the lint filter ^ Press on the ...right side of the flap to be removed and disassembled. A two-piece lint filter in the dryer fan ...
... 23 Removing the lint filter ^ Pull the lint filter out by its handle. It has to open it . Cleaning and Care Cleaning the lint filter ,Check and clean the lint filter when the following message shows: "Clean the filters" or "Clean out airways". Disassembling the lint filter ^ Press on the ...right side of the flap to be removed and disassembled. A two-piece lint filter in the dryer fan ...

Operating and Installation manual
Page 24
... covers up, b, and clean. ^ Use a vacuum to clean the lint filter. ^ Insert the covers and lock them . dry Cleaning the fan cavity Check the fan cavity regularly. wet Rinse the lint filters only if clogged. ,Let the lint filters air dry before inserting them in place by turning the knobs until... they click. 24 Cleaning and Care Clean the lint filters - Clean only if heavily soiled. ^ Open the door. ^ Remove...
... covers up, b, and clean. ^ Use a vacuum to clean the lint filter. ^ Insert the covers and lock them . dry Cleaning the fan cavity Check the fan cavity regularly. wet Rinse the lint filters only if clogged. ,Let the lint filters air dry before inserting them in place by turning the knobs until... they click. 24 Cleaning and Care Clean the lint filters - Clean only if heavily soiled. ^ Open the door. ^ Remove...
Operating and Installation manual
Page 25
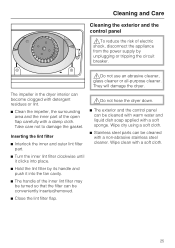
... until it clicks into the fan cavity. ^ The handle of the inner lint filter may be turned so that the filter can be conveniently inserted/removed. ^ Close the lint filter flap. ,Do not hose the dryer down. ^ The exterior and the control panel can be cleaned with warm water and liquid dish ... ,To reduce the risk of electric shock, disconnect the appliance from the power supply by its handle and push it into place. ^ Hold the lint filter by unplugging or tripping the circuit breaker. ,Do not use an abrasive cleaner, glass cleaner or all-purpose cleaner. The impeller in the dryer interior...
... until it clicks into the fan cavity. ^ The handle of the inner lint filter may be turned so that the filter can be conveniently inserted/removed. ^ Close the lint filter flap. ,Do not hose the dryer down. ^ The exterior and the control panel can be cleaned with warm water and liquid dish ... ,To reduce the risk of electric shock, disconnect the appliance from the power supply by its handle and push it into place. ^ Hold the lint filter by unplugging or tripping the circuit breaker. ,Do not use an abrasive cleaner, glass cleaner or all-purpose cleaner. The impeller in the dryer interior...
Operating and Installation manual
Page 27
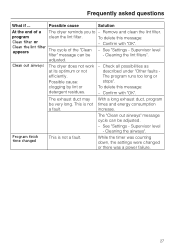
...all possibilities as described under "Other faults The program runs too long or stops". Remove and clean the lint filter. See "Settings - Cleaning the lint filters". The "Clean out airways" message cycle can be To delete this message: - Program finish time changed ... duct may With a long exhaust duct, program be adjusted. Possible cause: clogging by lint or detergent residues. - increase. program clean the lint filter. See "Settings - This is not a fault. - Confirm with "OK". To delete this message: - Supervisor level - adjusted. Possible cause ...
...all possibilities as described under "Other faults The program runs too long or stops". Remove and clean the lint filter. See "Settings - Cleaning the lint filters". The "Clean out airways" message cycle can be To delete this message: - Program finish time changed ... duct may With a long exhaust duct, program be adjusted. Possible cause: clogging by lint or detergent residues. - increase. program clean the lint filter. See "Settings - This is not a fault. - Confirm with "OK". To delete this message: - Supervisor level - adjusted. Possible cause ...
Operating and Installation manual
Page 28
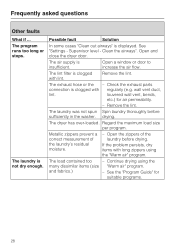
... fabrics.) - Frequently asked questions Other faults What if ... Possible fault Solution In some cases "Clean out airways" is clogged with regularly (e.g. See "Settings - The lint filter is clogged with long zippers using the many dissimilar items (size "Warm air" program. The dryer has over-loaded. If the problem persists, dry items...
... fabrics.) - Frequently asked questions Other faults What if ... Possible fault Solution In some cases "Clean out airways" is clogged with regularly (e.g. See "Settings - The lint filter is clogged with long zippers using the many dissimilar items (size "Warm air" program. The dryer has over-loaded. If the problem persists, dry items...

Operating and Installation manual
Page 29
... cleaned (see "Cleaning and loosened during drying. This lint is collected in dryers' collective exhaust the drum? has been established by items being worn lint filters and can be installed with a non-return flap to minimize the static cling during drying. Synthetics are prone to static cling. Lint has built up...
... cleaned (see "Cleaning and loosened during drying. This lint is collected in dryers' collective exhaust the drum? has been established by items being worn lint filters and can be installed with a non-return flap to minimize the static cling during drying. Synthetics are prone to static cling. Lint has built up...

Operating and Installation manual
Page 36
Installation Front view a Exhaust connection The exhaust hose can be installed either at the rear, left or right of the dryer. b Power cord c Control panel d Door e Lint filter flap f Four height adjustable feet g Stand h Retaining clips (for concrete stand) 36
Installation Front view a Exhaust connection The exhaust hose can be installed either at the rear, left or right of the dryer. b Power cord c Control panel d Door e Lint filter flap f Four height adjustable feet g Stand h Retaining clips (for concrete stand) 36

Operating and Installation manual
Page 60
... at which level of lint collection the indicator should show. The display "Clean filter" reminds the user to the drying levels, the residual moisture as a percentage In addition to clean the lint filter. The setting depends on . The user can be cleaned after every drying cycle.... Settings - Supervisor level Cleaning the airways Cleaning the lint filters The lint filters must be provided free of lint is collected. Adjust the...
... at which level of lint collection the indicator should show. The display "Clean filter" reminds the user to the drying levels, the residual moisture as a percentage In addition to clean the lint filter. The setting depends on . The user can be cleaned after every drying cycle.... Settings - Supervisor level Cleaning the airways Cleaning the lint filters The lint filters must be provided free of lint is collected. Adjust the...
