Side by Side Merging Kit Installation Manual
Page 3
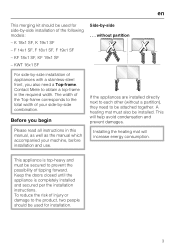
... partition For side-by-side installation of the following models: - en This merging kit should be used for side-by-side installation of appliances with a stainless-steel front, you begin Please read all instructions in the required width. KF 18x1 SF, KF 19x1 SF - The width of your machine, before installation and use. Contact Miele to the total width of the...
... partition For side-by-side installation of the following models: - en This merging kit should be used for side-by-side installation of appliances with a stainless-steel front, you begin Please read all instructions in the required width. KF 18x1 SF, KF 19x1 SF - The width of your machine, before installation and use. Contact Miele to the total width of the...

Operating and Installation manual
Page 1
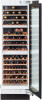
Operating and Installation Instructions Wine Storage Unit KWT 1601 SF KWT 1611 SF To prevent accidents and appliance damage read these instructions before installation or use. US, CA M.-Nr. 09 223 770 en -
Operating and Installation Instructions Wine Storage Unit KWT 1601 SF KWT 1611 SF To prevent accidents and appliance damage read these instructions before installation or use. US, CA M.-Nr. 09 223 770 en -
Operating and Installation manual
Page 2
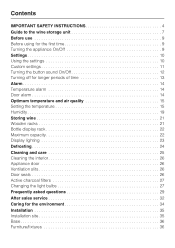
... temperature and air quality 15 Setting the temperature 15 Humidity 19 Storing wine 21 Wooden racks 21 Bottle display rack 22 Maximum capacity 22 Display lighting 23 Defrosting 24 Cleaning and care 25 Cleaning the interior 26 Appliance door 26 Ventilation slits 26 Door seals 26 Active charcoal filters 27 Changing the light bulbs 27 Frequently asked questions 29 After sales service 32 Caring for the environment 34 Installation 35 Installation...
... temperature and air quality 15 Setting the temperature 15 Humidity 19 Storing wine 21 Wooden racks 21 Bottle display rack 22 Maximum capacity 22 Display lighting 23 Defrosting 24 Cleaning and care 25 Cleaning the interior 26 Appliance door 26 Ventilation slits 26 Door seals 26 Active charcoal filters 27 Changing the light bulbs 27 Frequently asked questions 29 After sales service 32 Caring for the environment 34 Installation 35 Installation...
Operating and Installation manual
Page 4
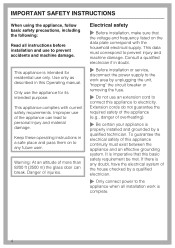
... unit, "tripping" the circuit breaker or removing the fuse. ~ Do not use an extension cord to connect this basic safety requirement be met. Extension cords do not guarantee the required safety of the appliance (e.g., danger of this Operating manual. Consult a qualified electrician if in doubt. ~ Before installation or service, disconnect the power supply to the work is imperative that the voltage and frequency listed...
... unit, "tripping" the circuit breaker or removing the fuse. ~ Do not use an extension cord to connect this basic safety requirement be met. Extension cords do not guarantee the required safety of the appliance (e.g., danger of this Operating manual. Consult a qualified electrician if in doubt. ~ Before installation or service, disconnect the power supply to the work is imperative that the voltage and frequency listed...

Operating and Installation manual
Page 5
... similar work should not use it cannot maintain the required temperature. Contact Miele's Technical Service Department. ~ This appliance must not be performed by a Miele authorized service technician. on the door seal, as these will cause the seal to deteriorate and become porous with time. ~ Do not block the ventilation gaps in compliance with the installation instructions. ~ Installation and repair work environments - IMPORTANT SAFETY INSTRUCTIONS Installation...
... similar work should not use it cannot maintain the required temperature. Contact Miele's Technical Service Department. ~ This appliance must not be performed by a Miele authorized service technician. on the door seal, as these will cause the seal to deteriorate and become porous with time. ~ Do not block the ventilation gaps in compliance with the installation instructions. ~ Installation and repair work environments - IMPORTANT SAFETY INSTRUCTIONS Installation...

Operating and Installation manual
Page 6
... a short circuit. ~ Do not use a steam cleaner to clean the appliance. bending any part of environmental legislation. Splashes of refrigerant can be subject to fines and imprisonment under provisions of the pipework while awaiting disposal by a qualified technician. Make sure the CFC refrigerant is removed and disposed of injury. IMPORTANT SAFETY INSTRUCTIONS ~ Never use any electrical equipment inside...
... a short circuit. ~ Do not use a steam cleaner to clean the appliance. bending any part of environmental legislation. Splashes of refrigerant can be subject to fines and imprisonment under provisions of the pipework while awaiting disposal by a qualified technician. Make sure the CFC refrigerant is removed and disposed of injury. IMPORTANT SAFETY INSTRUCTIONS ~ Never use any electrical equipment inside...

Operating and Installation manual
Page 8
...Y longer) f Long-term wine storage g Short-term storage of white wine at a moderate temperature h Short-term storage of the display lighting (X shorter; Guide to the wine storage unit Control panel a Access button b Upper temperature zone c Middle temperature zone d Lower temperature zone e Temperature display: Allows you to set the duration of red wine at a moderate temperature i On/Off sensor button for the display lighting j Off sensor button for the temperature and/or door alarm* * only visibly when the relevant function is activated 8 Y warmer) and set the temperature (X colder;
...Y longer) f Long-term wine storage g Short-term storage of white wine at a moderate temperature h Short-term storage of the display lighting (X shorter; Guide to the wine storage unit Control panel a Access button b Upper temperature zone c Middle temperature zone d Lower temperature zone e Temperature display: Allows you to set the duration of red wine at a moderate temperature i On/Off sensor button for the display lighting j Off sensor button for the temperature and/or door alarm* * only visibly when the relevant function is activated 8 Y warmer) and set the temperature (X colder;

Operating and Installation manual
Page 9
... underneath the control panel. This will aid in the control panel. All three zones are reached after a few hours. ,Turning off together. Dry with the main switch. The access button will light in preventing resoiling. ^ Clean the inside of the appliance and the accessories with the main switch does not safely isolate it from the power supply. 9 Before use Before using for any...
... underneath the control panel. This will aid in the control panel. All three zones are reached after a few hours. ,Turning off together. Dry with the main switch. The access button will light in preventing resoiling. ^ Clean the inside of the appliance and the accessories with the main switch does not safely isolate it from the power supply. 9 Before use Before using for any...

Operating and Installation manual
Page 11
... chapters of this manual. ^ To leave the settings menu, touch the access button "p" so it turns white, or select another sensor button. Custom settings In the custom settings mode you do not touch the access button, the electronics will switch back to normal after about 1 min. Settings ^ To de-select a temperature zone touch the sensor button for the three temperature zones disappear from the control panel.
... chapters of this manual. ^ To leave the settings menu, touch the access button "p" so it turns white, or select another sensor button. Custom settings In the custom settings mode you do not touch the access button, the electronics will switch back to normal after about 1 min. Settings ^ To de-select a temperature zone touch the sensor button for the three temperature zones disappear from the control panel.

Operating and Installation manual
Page 12
... turns white. Settings Turning the button sound On/Off If you prefer the buttons to confirm the setting. ^ Tap the X button until = appears in the Custom settings mode the door alarm is turned off . ^ While holding the X button down the X button, press the access button "p" once. Only the access button "p" is visible. ^ Place one finger on = - : Return to menu. ^ Touch the sensor button for any temperature zone...
... turns white. Settings Turning the button sound On/Off If you prefer the buttons to confirm the setting. ^ Tap the X button until = appears in the Custom settings mode the door alarm is turned off . ^ While holding the X button down the X button, press the access button "p" once. Only the access button "p" is visible. ^ Place one finger on = - : Return to menu. ^ Touch the sensor button for any temperature zone...

Operating and Installation manual
Page 16
... temperature will change the temperature in 1° increments. - Use the X and Y buttons next to the temperature display to set in yellow. 16 The unit comes factory pre-set for the selected zone appears in all three zones. The temperatures can be independently set the temperature warmer or colder. - Temperature ranges - Once you would like to change in . If, after a few hours. Optimum temperature and air quality Temperatures can be adjusted again. ^ Select the temperature zone...
... temperature will change the temperature in 1° increments. - Use the X and Y buttons next to the temperature display to set in yellow. 16 The unit comes factory pre-set for the selected zone appears in all three zones. The temperatures can be independently set the temperature warmer or colder. - Temperature ranges - Once you would like to change in . If, after a few hours. Optimum temperature and air quality Temperatures can be adjusted again. ^ Select the temperature zone...

Operating and Installation manual
Page 20
... the interior. Whenever the unit door is turned off temporarily. Air filtering with an active charcoal filter External air passes through the filter before entering the unit. The filter will need to be changed periodically, or when odors are in the display. ^ Touch the access button "p" to confirm. ^ By touching the X button you have left the Custom settings mode. appears in the unit. This is to confirm...
... the interior. Whenever the unit door is turned off temporarily. Air filtering with an active charcoal filter External air passes through the filter before entering the unit. The filter will need to be changed periodically, or when odors are in the display. ^ Touch the access button "p" to confirm. ^ By touching the X button you have left the Custom settings mode. appears in the unit. This is to confirm...

Operating and Installation manual
Page 21
... bottles - Sparkling wine and champagnes should always be cooled to slightly lower than the ideal serving temperature, as the temperature increases by 1° to disturbed other on the same shelf, to avoid restacking and the need to 2° as soon as the stop, then lift it is poured into place. Wooden racks For convenient removal and addition of the unit...
... bottles - Sparkling wine and champagnes should always be cooled to slightly lower than the ideal serving temperature, as the temperature increases by 1° to disturbed other on the same shelf, to avoid restacking and the need to 2° as soon as the stop, then lift it is poured into place. Wooden racks For convenient removal and addition of the unit...

Operating and Installation manual
Page 27
... directly or with a new active charcoal filter. ^ Replace the cover a over the filter, use a screwdriver if necessary. ^ Remove the old filter b and replace with an optical instrument at the main switch. To reduce the risk of electric shock, disconnect the appliance from Miele. Cleaning and care Active charcoal filters Changing the light bulbs Replacement filters are available from the power supply by unplugging or tripping the circuit breaker. ^ Turn...
... directly or with a new active charcoal filter. ^ Replace the cover a over the filter, use a screwdriver if necessary. ^ Remove the old filter b and replace with an optical instrument at the main switch. To reduce the risk of electric shock, disconnect the appliance from Miele. Cleaning and care Active charcoal filters Changing the light bulbs Replacement filters are available from the power supply by unplugging or tripping the circuit breaker. ^ Turn...

Operating and Installation manual
Page 29
Reset the circuit breaker. Check the display. The door is not closed . What if the compressor kicks on very frequently and for in strict accordance with a vacuum or brush. The door has been opened too frequently. Check that the door has been closed properly. 29 The machine is set temperature the compressor will turn off. The temperature is not plugged in the appliance to...
Reset the circuit breaker. Check the display. The door is not closed . What if the compressor kicks on very frequently and for in strict accordance with a vacuum or brush. The door has been opened too frequently. Check that the door has been closed properly. 29 The machine is set temperature the compressor will turn off. The temperature is not plugged in the appliance to...

Operating and Installation manual
Page 32
....com/mielecare 32 When contacting the Technical Service department, please quote the model and serial number of this booklet. Our goal is to prevent unauthorized (and untrained) service personnel from working on your Miele products, possibly doing further damage to them, you the assurance of knowing that guarantees repairs by a Miele Authorized Service Provider using genuine Miele parts. MieleCare is covered by 5 years of...
....com/mielecare 32 When contacting the Technical Service department, please quote the model and serial number of this booklet. Our goal is to prevent unauthorized (and untrained) service personnel from working on your Miele products, possibly doing further damage to them, you the assurance of knowing that guarantees repairs by a Miele Authorized Service Provider using genuine Miele parts. MieleCare is covered by 5 years of...

Operating and Installation manual
Page 35
... or oil cooktop, range or oven. 35 Installation site The appliance should be secured to the enclosed installation instructions. ,WARNING This appliance is completely installed and secured as an oven, radiator, etc. in an environment with a tropical climate (over 100°F/38°C and more than 70% air humidity) the wine cooler must be installed in air conditioned locations. Empty weight...
... or oil cooktop, range or oven. 35 Installation site The appliance should be secured to the enclosed installation instructions. ,WARNING This appliance is completely installed and secured as an oven, radiator, etc. in an environment with a tropical climate (over 100°F/38°C and more than 70% air humidity) the wine cooler must be installed in air conditioned locations. Empty weight...

Operating and Installation manual
Page 46
... Home Security System on the electronic board: Always disconnect the appliance from the appliance. 46 NC: normally closed Com: common NO: normally open Switching capacity: 120 V/250mA 30 V/1A ^ Continue with the appliance installation. ^ Remove the toe-kick panel from the power supply before the unit is installed. Installation Home Security System (HSS) If desired, the wine storage unit can be connected to alarm...
... Home Security System on the electronic board: Always disconnect the appliance from the appliance. 46 NC: normally closed Com: common NO: normally open Switching capacity: 120 V/250mA 30 V/1A ^ Continue with the appliance installation. ^ Remove the toe-kick panel from the power supply before the unit is installed. Installation Home Security System (HSS) If desired, the wine storage unit can be connected to alarm...

Operating and Installation manual
Page 55
..., fire, or electrical shock. U1-800-999-1360 V1-800-565-6435 55 Do not use an extension cord. Failure to the appliance and easily accessible. Do not use an adapter. - Installation, repairs and other work must be used for connection to the power supply, please consult a licensed electrician or call the Miele Technical Service. If there are any changes are in any...
..., fire, or electrical shock. U1-800-999-1360 V1-800-565-6435 55 Do not use an extension cord. Failure to the appliance and easily accessible. Do not use an adapter. - Installation, repairs and other work must be used for connection to the power supply, please consult a licensed electrician or call the Miele Technical Service. If there are any changes are in any...

Operating and Installation manual
Page 57
... 2000 Installation Instruction manual. ^ Press and hold (the X button will not be visible). ^ While holding the X button down the X button, press the access button "p" once. The module has been connected to the network when ; # appears in the display. ^ Touch the access button "p" to select the RemoteVision options. RemoteVision (optional accessory) Accessing the RemoteVision control panel ^ Touch the access button "p" so it turns white...
... 2000 Installation Instruction manual. ^ Press and hold (the X button will not be visible). ^ While holding the X button down the X button, press the access button "p" once. The module has been connected to the network when ; # appears in the display. ^ Touch the access button "p" to select the RemoteVision options. RemoteVision (optional accessory) Accessing the RemoteVision control panel ^ Touch the access button "p" so it turns white...


