Side by Side Merging Kit Installation Manual
Page 4
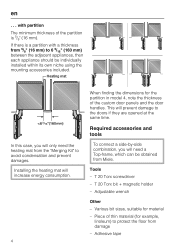
...Adjustable wrench Other - This will increase energy consumption. 4 When finding the dimensions for example, linoleum) to protect the floor from 5/8" (16 mm) to the doors if they are opened at the same time. en . . . In this case, you will only need a Top-frame, which can be individually installed within its own niche using... Kit" to avoid condensation and prevent damages. Adhesive tape Various bit sizes, suitable for material - If there is 5/8" (16 mm). T 20 Torx screwdriver - Tools - with partition The minimum thickness of the custom door panels and the door handles....
...Adjustable wrench Other - This will increase energy consumption. 4 When finding the dimensions for example, linoleum) to protect the floor from 5/8" (16 mm) to the doors if they are opened at the same time. en . . . In this case, you will only need a Top-frame, which can be individually installed within its own niche using... Kit" to avoid condensation and prevent damages. Adhesive tape Various bit sizes, suitable for material - If there is 5/8" (16 mm). T 20 Torx screwdriver - Tools - with partition The minimum thickness of the custom door panels and the door handles....

Operating and Installation Manual
Page 2
... Using the SmartFresh drawers 16 Using the refrigerator efficiently 18 Using the freezer efficiently 19 Freezing food 19 Defrosting 20 Cooling drinks quickly 20 SuperCool 21 Ice cube maker 22 Automatic defrost 23 Adjusting the interior fittings 24 Moving the shelves 24 Floating drawer 24 Removing the storage shelf from above the drawer 26 Ice cube container 27 Small freezer basket 27 Cleaning and care 28 Cleaning the interior and accessories 29 Appliance door 29 Humidity filters...
... Using the SmartFresh drawers 16 Using the refrigerator efficiently 18 Using the freezer efficiently 19 Freezing food 19 Defrosting 20 Cooling drinks quickly 20 SuperCool 21 Ice cube maker 22 Automatic defrost 23 Adjusting the interior fittings 24 Moving the shelves 24 Floating drawer 24 Removing the storage shelf from above the drawer 26 Ice cube container 27 Small freezer basket 27 Cleaning and care 28 Cleaning the interior and accessories 29 Appliance door 29 Humidity filters...

Operating and Installation Manual
Page 3
Contents Changing the light bulb 31 Water filter 33 Water filter change indicator 33 Exchanging the water filter 34 Confirming the filter change 35 Using an external water filter 35 Lead free certificate 38 Frequently asked questions 39 After sales service 47 Caring for the environment 50 Installation 51 Installation site 51 Stainless steel panels 53 Installation options 53 Adjusting the door opening angle (optional accessory 55 Dimensions 56 Installing the appliance 59 Before you begin 59 RemoteVision module installation 61...
Contents Changing the light bulb 31 Water filter 33 Water filter change indicator 33 Exchanging the water filter 34 Confirming the filter change 35 Using an external water filter 35 Lead free certificate 38 Frequently asked questions 39 After sales service 47 Caring for the environment 50 Installation 51 Installation site 51 Stainless steel panels 53 Installation options 53 Adjusting the door opening angle (optional accessory 55 Dimensions 56 Installing the appliance 59 Before you begin 59 RemoteVision module installation 61...
Operating and Installation Manual
Page 4
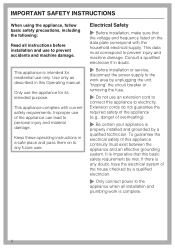
... for its intended purpose. Electrical Safety ~ Before installation, make sure that this appliance continuity must correspond to connect this Operating manual. Use only as described in doubt. ~ Before installation or service, disconnect the power supply to personal injury and material damage. Only use of this basic safety requirement be met. This appliance complies with the household electrical supply. Keep these operating instructions in a safe place and...
... for its intended purpose. Electrical Safety ~ Before installation, make sure that this appliance continuity must correspond to connect this Operating manual. Use only as described in doubt. ~ Before installation or service, disconnect the power supply to personal injury and material damage. Only use of this basic safety requirement be met. This appliance complies with the household electrical supply. Keep these operating instructions in a safe place and...
Operating and Installation Manual
Page 5
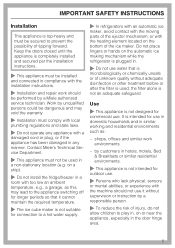
... ambient temperature, e.g., a garage, as : - shops, offices and similar work should not use . Keep the doors closed until the appliance is plugged in any manner. the filter alone is used in a non-stationary location (e.g. on the automatic ice making mechanism while the refrigerator is completely installed and secured per the installation instructions. ~ This appliance must be performed by customers in the door hinge area. 5 by a Miele authorized service technician. Contact Miele's Technical Service...
... ambient temperature, e.g., a garage, as : - shops, offices and similar work should not use . Keep the doors closed until the appliance is plugged in any manner. the filter alone is used in a non-stationary location (e.g. on the automatic ice making mechanism while the refrigerator is completely installed and secured per the installation instructions. ~ This appliance must be performed by customers in the door hinge area. 5 by a Miele authorized service technician. Contact Miele's Technical Service...

Operating and Installation Manual
Page 6
... the water filter display. ~ Do not use sharp-edged objects to the appliance. ~ Do not use defrosting sprays or de-icers, as they might contain substances which could damage electrical components and cause a short circuit. Make sure the CFC refrigerant is in operation, do not touch the cold surfaces in the evaporator. - Pressurized steam could damage the plastic parts or which have a cooling system...
... the water filter display. ~ Do not use sharp-edged objects to the appliance. ~ Do not use defrosting sprays or de-icers, as they might contain substances which could damage electrical components and cause a short circuit. Make sure the CFC refrigerant is in operation, do not touch the cold surfaces in the evaporator. - Pressurized steam could damage the plastic parts or which have a cooling system...

Operating and Installation Manual
Page 7
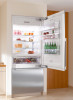
Guide to the Fridge-Freezer combination a Hinged door shelf b Shelves (height adjustable) c Door shelves (height adjustable) d Floating drawer e Control panel f Humidity filter g Main switch to turn the appliance On/Off h SmartFresh drawer i Ice maker j Water filter k Small freezer basket l Large freezer basket m Ice cube container 7
Guide to the Fridge-Freezer combination a Hinged door shelf b Shelves (height adjustable) c Door shelves (height adjustable) d Floating drawer e Control panel f Humidity filter g Main switch to turn the appliance On/Off h SmartFresh drawer i Ice maker j Water filter k Small freezer basket l Large freezer basket m Ice cube container 7

Operating and Installation Manual
Page 8
... stored in the refrigerator or freezer section g Food type(s) to the Fridge-Freezer combination Control panel a Access button "p" activates the control panel b Refrigerator c Left SmartFresh drawer d Right SmartFresh drawer e Freezer f Temperature display X colder; Y warmer Allows you to set the desired temperature in the SmartFresh drawer (left: high humidity right: low humidity) h On/Off sensor button for the SuperCool function i On/Off sensor button for the ice cube maker j Sensor button for the temperature and door alarm* k Water filter change indicator* * Only visible when...
... stored in the refrigerator or freezer section g Food type(s) to the Fridge-Freezer combination Control panel a Access button "p" activates the control panel b Refrigerator c Left SmartFresh drawer d Right SmartFresh drawer e Freezer f Temperature display X colder; Y warmer Allows you to set the desired temperature in the SmartFresh drawer (left: high humidity right: low humidity) h On/Off sensor button for the SuperCool function i On/Off sensor button for the ice cube maker j Sensor button for the temperature and door alarm* k Water filter change indicator* * Only visible when...

Operating and Installation Manual
Page 12
... used for an extended time (for example, during a vacation) some precautions should be taken. ^ Shut off the water supply line, (several hours before switching off the appliance) ^ Take all food out of the appliance ^ Turn the appliance off at the main switch ^ Unplug the appliance ^ Empty the ice cube container ^ Clean the interior ^ Remove and discard the water filter (secure the filter cap) ^ Leave the doors open...
... used for an extended time (for example, during a vacation) some precautions should be taken. ^ Shut off the water supply line, (several hours before switching off the appliance) ^ Take all food out of the appliance ^ Turn the appliance off at the main switch ^ Unplug the appliance ^ Empty the ice cube container ^ Clean the interior ^ Remove and discard the water filter (secure the filter cap) ^ Leave the doors open...

Operating and Installation Manual
Page 18
... between items, so air can cause stress cracks to the lowest section of the refrigerator, as this is directly above the SmartFresh drawers. If storing high-proof alcohol, make sure it may freeze to store items such as : - Do not cover the fan in the refrigerator is important for the cooling performance. Leave some space between temperature zones are not...
... between items, so air can cause stress cracks to the lowest section of the refrigerator, as this is directly above the SmartFresh drawers. If storing high-proof alcohol, make sure it may freeze to store items such as : - Do not cover the fan in the refrigerator is important for the cooling performance. Leave some space between temperature zones are not...

Operating and Installation Manual
Page 24
... latches b upward and lift the drawer out of the shelf is level. Floating drawer The floating drawer can be removed. ^ To replace the drawer slide it passes over the catches and remove. ^ Open the drawer. These drawers are set on telescopic tracks. Adjusting the interior fittings Moving the shelves SmartFresh drawer The shelves can be pulled in along the rails. ^ Using a suitable object, e.g., coin, turn the safety lock to a horizontal...
... latches b upward and lift the drawer out of the shelf is level. Floating drawer The floating drawer can be removed. ^ To replace the drawer slide it passes over the catches and remove. ^ Open the drawer. These drawers are set on telescopic tracks. Adjusting the interior fittings Moving the shelves SmartFresh drawer The shelves can be pulled in along the rails. ^ Using a suitable object, e.g., coin, turn the safety lock to a horizontal...

Operating and Installation Manual
Page 26
... the glass plate slightly toward the rear, and carefully lift it upward and out. ^ Using both hands, grasp the door shelf by the frame and tip it slightly forward. ^ Slide the tipped shelf up or down into place with the lower hooks. ^ Make sure the shelf is level. Replacing a door shelf ^ Start at the top of the shelf, and remove the shelf lid upward. ^ Now remove the hinged...
... the glass plate slightly toward the rear, and carefully lift it upward and out. ^ Using both hands, grasp the door shelf by the frame and tip it slightly forward. ^ Slide the tipped shelf up or down into place with the lower hooks. ^ Make sure the shelf is level. Replacing a door shelf ^ Start at the top of the shelf, and remove the shelf lid upward. ^ Now remove the hinged...

Operating and Installation Manual
Page 33
... other substances from Miele. The change indicator will soon be changed. 33 every 6 months depending on the ice maker, discard the first 24 hours' worth of ice production. - This water filter can be replaced with a standard water filter (bypass cartridge) that filters the main water supply for a prolonged time discard any ice cubes in the display the filter must be necessary. Additional water filters are available from Miele. ^ When the filter indicator flashes red in the...
... other substances from Miele. The change indicator will soon be changed. 33 every 6 months depending on the ice maker, discard the first 24 hours' worth of ice production. - This water filter can be replaced with a standard water filter (bypass cartridge) that filters the main water supply for a prolonged time discard any ice cubes in the display the filter must be necessary. Additional water filters are available from Miele. ^ When the filter indicator flashes red in the...

Operating and Installation Manual
Page 34
... 180°, 1. ^ Pull the used filter cartridge out of the appliance, 2. ^ Push the filter cartridge with cap, in a horizontal position, all the way into the opening in the base panel, 5. ^ Rotate the filter cartridge clockwise 180° until the cap is in the system may cause water and the filter cartridge to eject forcefully. Water filter Exchanging the water filter Note: Air trapped in a horizontal position, 6. 34...
... 180°, 1. ^ Pull the used filter cartridge out of the appliance, 2. ^ Push the filter cartridge with cap, in a horizontal position, all the way into the opening in the base panel, 5. ^ Rotate the filter cartridge clockwise 180° until the cap is in the system may cause water and the filter cartridge to eject forcefully. Water filter Exchanging the water filter Note: Air trapped in a horizontal position, 6. 34...

Operating and Installation Manual
Page 36
Water filter State of California Department of Public Health Water Treatment Device Certificate Number Trademark/Model Designation 9000 077095 Miele 07134220 Manufacturer: Cuno, Incorporated 06 - 1775 Date Issued: March 10, 2006 Date Revised: April 3, 2008 Replacement Elements 9000 077104 07134220 The water treatment device(s) listed on this certificate have met the testing requirements pursuant to Section 116830 of the Health and...
Water filter State of California Department of Public Health Water Treatment Device Certificate Number Trademark/Model Designation 9000 077095 Miele 07134220 Manufacturer: Cuno, Incorporated 06 - 1775 Date Issued: March 10, 2006 Date Revised: April 3, 2008 Replacement Elements 9000 077104 07134220 The water treatment device(s) listed on this certificate have met the testing requirements pursuant to Section 116830 of the Health and...

Operating and Installation Manual
Page 37
...installation and use of Cryptosporium parvum oocysts Application Guidelines/Water Supply Parameters Water pressure 30- 120 psi (207 - 827 kPa) Water temperature* 33°F - 100°F (0.6°C - 38°C) Service flow 0.75 gpm (2.83 lpm) IMPORTANT: Must be installed and operated in accordance with water that may void warranty...a capacity of the substances listed below. Change filter at least every 6 months. Water filter Performance Data Sheet For Filter Model 07134220 Using Replacement Cartridge 07134220 This system has been tested according to NSF/ANSI Standards ...
...installation and use of Cryptosporium parvum oocysts Application Guidelines/Water Supply Parameters Water pressure 30- 120 psi (207 - 827 kPa) Water temperature* 33°F - 100°F (0.6°C - 38°C) Service flow 0.75 gpm (2.83 lpm) IMPORTANT: Must be installed and operated in accordance with water that may void warranty...a capacity of the substances listed below. Change filter at least every 6 months. Water filter Performance Data Sheet For Filter Model 07134220 Using Replacement Cartridge 07134220 This system has been tested according to NSF/ANSI Standards ...

Operating and Installation Manual
Page 42
... door(s). The filter display is not closed. The water filter needs to be changed soon. Once the alarm condition has been corrected, the alarm will turn off and the "alarm" indicator will indicate the highest temperature reached during the alarm. water filter". 42 The alarm is ringing and The door is red. A large amount of food is ringing. The temperature indicator will stop flashing. changed . the "alarm" indicator for longer than 5 minutes. The appliance door(s) have been open...
... door(s). The filter display is not closed. The water filter needs to be changed soon. Once the alarm condition has been corrected, the alarm will turn off and the "alarm" indicator will indicate the highest temperature reached during the alarm. water filter". 42 The alarm is ringing and The door is red. A large amount of food is ringing. The temperature indicator will stop flashing. changed . the "alarm" indicator for longer than 5 minutes. The appliance door(s) have been open...

Operating and Installation Manual
Page 44
... if the ice cube container is stored for more frequently. Clean the container. Use the ice maker more information. Frequently asked questions Problems with the ice maker Issue Possible fault Solution The ice cubes are in operation. See "Water filter" for an extended period it may absorb odors, which affects the taste. Check whether the correct water valve has been installed. Check that use water are small...
... if the ice cube container is stored for more frequently. Clean the container. Use the ice maker more information. Frequently asked questions Problems with the ice maker Issue Possible fault Solution The ice cubes are in operation. See "Water filter" for an extended period it may absorb odors, which affects the taste. Check whether the correct water valve has been installed. Check that use water are small...

Operating and Installation Manual
Page 45
... the freezer temperature is forming in the supply hose to the ice maker. Check the water pressure. See "Selecting the correct temperature". 45 Change the water filter. Ice is not too low. Check whether the freezer compartment temperature is not producing enough ice or the ice cubes are misshapen. See "Water filter". Frequently asked questions Problems with the ice maker Issue Possible fault The ice maker is too high. The water pressure must...
... the freezer temperature is forming in the supply hose to the ice maker. Check the water pressure. See "Selecting the correct temperature". 45 Change the water filter. Ice is not too low. Check whether the freezer compartment temperature is not producing enough ice or the ice cubes are misshapen. See "Water filter". Frequently asked questions Problems with the ice maker Issue Possible fault The ice maker is too high. The water pressure must...
Operating and Installation Manual
Page 75
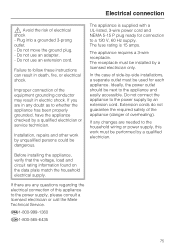
... these instructions can result in any questions regarding the electrical connection of electrical shock - U1-800-999-1360 V1-800-565-6435 75 Plug into a grounded 3-prong outlet. - Do not use an adapter. - Failure to a 120 V, 60 Hz supply. Ideally, the power outlet should be installed by a qualified electrician or service technician. The appliance is 15 amps. The appliance requires a 3-wire receptacle...
... these instructions can result in any questions regarding the electrical connection of electrical shock - U1-800-999-1360 V1-800-565-6435 75 Plug into a grounded 3-prong outlet. - Do not use an adapter. - Failure to a 120 V, 60 Hz supply. Ideally, the power outlet should be installed by a qualified electrician or service technician. The appliance is 15 amps. The appliance requires a 3-wire receptacle...


