Side by Side Merging Kit Installation Manual
Page 3
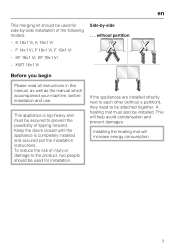
... used for side-by -side . . . F 14x1 Vi, F 18x1 Vi, F 19x1 Vi - KWT 16x1 Vi Side-by -side installation of tipping forward. without a partition), they need to the product, two people should be installed. A heating mat must be used for installation. This will increase energy consumption. 3 KF 18x1 Vi, KF 19x1 Vi - If the appliances are installed directly next to each other (without...
... used for side-by -side . . . F 14x1 Vi, F 18x1 Vi, F 19x1 Vi - KWT 16x1 Vi Side-by -side installation of tipping forward. without a partition), they need to the product, two people should be installed. A heating mat must be used for installation. This will increase energy consumption. 3 KF 18x1 Vi, KF 19x1 Vi - If the appliances are installed directly next to each other (without...
Side by Side Merging Kit Installation Manual
Page 4
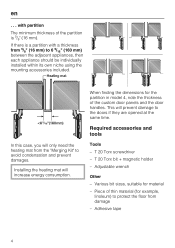
Installing the heating mat will only need the heating mat from the "Merging Kit" to avoid condensation and prevent damages. T 20 Torx screwdriver - Piece of the ... Other - T 20 Torx bit + magnetic holder - en . . . This will prevent damage to 6 5/16" (160 mm) between the adjacent appliances, then each appliance should be individually installed within its own niche using the mounting accessories included.
Installing the heating mat will only need the heating mat from the "Merging Kit" to avoid condensation and prevent damages. T 20 Torx screwdriver - Piece of the ... Other - T 20 Torx bit + magnetic holder - en . . . This will prevent damage to 6 5/16" (160 mm) between the adjacent appliances, then each appliance should be individually installed within its own niche using the mounting accessories included.

Side by Side Merging Kit Installation Manual
Page 5
Installing the heating mat The heating mat has to be secured on the right side of the left-standing appliance. ^ Take the hinge halves from the side-by-side kit and screw them to both appliances. ^ Insert pins through the prepared holes a. 5 en Prepare the appliances ^ Place the appliances next to each other in the intended configuration. ^ On the handle side of the housing, remove the side attachment plates. ^ Screw the side plates to both appliances. Check the position of both appliances!
Installing the heating mat The heating mat has to be secured on the right side of the left-standing appliance. ^ Take the hinge halves from the side-by-side kit and screw them to both appliances. ^ Insert pins through the prepared holes a. 5 en Prepare the appliances ^ Place the appliances next to each other in the intended configuration. ^ On the handle side of the housing, remove the side attachment plates. ^ Screw the side plates to both appliances. Check the position of both appliances!

Side by Side Merging Kit Installation Manual
Page 7
For instructions, refer to push the bracket in all the way. Use a tool to the installation instructions for each appliance. ^ Push the appliances together at the front as far as possible. ^ Insert the cover strip into the upper and lower plates. Now attach the appliance combination to the installation niche. en Connect the appliances ^ Push the appliances together until the hinge halves interlock. ^ Insert the pins into the hinges. ^ Once the appliances have been pushed together, insert the metal bracket into the seam between the appliances. 7
For instructions, refer to push the bracket in all the way. Use a tool to the installation instructions for each appliance. ^ Push the appliances together at the front as far as possible. ^ Insert the cover strip into the upper and lower plates. Now attach the appliance combination to the installation niche. en Connect the appliances ^ Push the appliances together until the hinge halves interlock. ^ Insert the pins into the hinges. ^ Once the appliances have been pushed together, insert the metal bracket into the seam between the appliances. 7

Operating and Installation manual
Page 1
en - US, CA M.-Nr. 09 169 250 Operating and Installation Instructions Fridge-Freezer Combination KF 1801 Vi KF 1811 Vi KF 1901 Vi KF 1911 Vi To prevent accidents and appliance damage read these instructions before installation or use.
en - US, CA M.-Nr. 09 169 250 Operating and Installation Instructions Fridge-Freezer Combination KF 1801 Vi KF 1811 Vi KF 1901 Vi KF 1911 Vi To prevent accidents and appliance damage read these instructions before installation or use.
Operating and Installation manual
Page 3
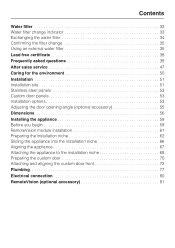
... Adjusting the door opening angle (optional accessory 55 Dimensions 56 Installing the appliance 59 Before you begin 59 RemoteVision module installation 61 Preparing the installation niche 62 Sliding the appliance into the installation niche 66 Aligning the appliance 67 Attaching the appliance to the installation niche 68 Preparing the custom door 70 Attaching and aligning...
... Adjusting the door opening angle (optional accessory 55 Dimensions 56 Installing the appliance 59 Before you begin 59 RemoteVision module installation 61 Preparing the installation niche 62 Sliding the appliance into the installation niche 66 Aligning the appliance 67 Attaching the appliance to the installation niche 68 Preparing the custom door 70 Attaching and aligning...
Operating and Installation manual
Page 4
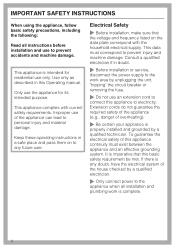
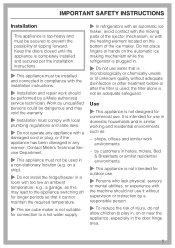
...is intended for its intended purpose. IMPORTANT SAFETY INSTRUCTIONS When using the appliance, follow basic safety precautions, including the following: Read all installation and plumbing work area by unplugging the unit, "tripping" the circuit breaker or removing the fuse. ~ Do not use an extension ...cord to connect this appliance to electricity. Use only as described in this basic safety requirement be met. Electrical Safety ~ Before installation, make sure that this Operating manual. This data must exist between the appliance and an effective grounding system. Improper use of ...
...is intended for its intended purpose. IMPORTANT SAFETY INSTRUCTIONS When using the appliance, follow basic safety precautions, including the following: Read all installation and plumbing work area by unplugging the unit, "tripping" the circuit breaker or removing the fuse. ~ Do not use an extension ...cord to connect this appliance to electricity. Use only as described in this basic safety requirement be met. Electrical Safety ~ Before installation, make sure that this Operating manual. This data must exist between the appliance and an effective grounding system. Improper use of ...
Operating and Installation manual
Page 5
... with the machine should be used ; on or near the appliance, especially in a room with the installation instructions. ~ Installation and repair work environments - by a Miele authorized service technician. Keep the doors closed until the appliance is not suitable for commercial use it cannot...non-stationary location (e.g. Do not place fingers or hands on the bottom of tipping forward. Contact Miele's Technical Service Department. ~ This appliance must be installed and connected in any appliance with the heating element located on the automatic ice making mechanism while...
... with the machine should be used ; on or near the appliance, especially in a room with the installation instructions. ~ Installation and repair work environments - by a Miele authorized service technician. Keep the doors closed until the appliance is not suitable for commercial use it cannot...non-stationary location (e.g. Do not place fingers or hands on the bottom of tipping forward. Contact Miele's Technical Service Department. ~ This appliance must be installed and connected in any appliance with the heating element located on the automatic ice making mechanism while...

Operating and Installation manual
Page 14
... the appliance is not very full and for the appliance to get to move through the temperature range more quickly. The room temperature and the installation location can be selected within the following ranges: The refrigerator and freezer sections - Refrigerator: can affect the time it turns yellow. ^ Use the X and Y buttons...
... the appliance is not very full and for the appliance to get to move through the temperature range more quickly. The room temperature and the installation location can be selected within the following ranges: The refrigerator and freezer sections - Refrigerator: can affect the time it turns yellow. ^ Use the X and Y buttons...
Operating and Installation manual
Page 33
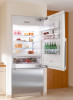
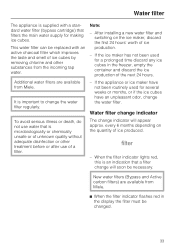
...It is supplied with an active charcoal filter which improves the taste and smell of unknown quality without adequate disinfection or other substances from Miele. ^ When the filter indicator flashes red in the freezer, empty the container and discard the ice production of a filter. When ... next 24 hours. This water filter can be replaced with a standard water filter (bypass cartridge) that a filter change the water filter. After installing a new water filter and switching on the quantity of ice production. - every 6 months depending on the ice maker, discard the first 24 ...
...It is supplied with an active charcoal filter which improves the taste and smell of unknown quality without adequate disinfection or other substances from Miele. ^ When the filter indicator flashes red in the freezer, empty the container and discard the ice production of a filter. When ... next 24 hours. This water filter can be replaced with a standard water filter (bypass cartridge) that a filter change the water filter. After installing a new water filter and switching on the quantity of ice production. - every 6 months depending on the ice maker, discard the first 24 ...

Operating and Installation manual
Page 35
... the display still flashes. Using an external water filter If your household water supply already has an external water filter installed, leave the standard water filter (bypass cartridge) installed in the appliance. After installing a new water filter discard the first 24 hours of ice production. 35 Press and hold the filter change indicator...
... the display still flashes. Using an external water filter If your household water supply already has an external water filter installed, leave the standard water filter (bypass cartridge) installed in the appliance. After installing a new water filter discard the first 24 hours of ice production. 35 Press and hold the filter change indicator...
Operating and Installation manual
Page 37
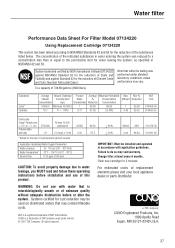
... to do so may vary. For estimated costs of the substances listed below. Systems certified for cyst reduction may be installed and operated in NSF/ANSI 42 and 53. Water filter Performance Data Sheet For Filter Model 07134220 Using Replacement Cartridge 07134220...capacity of NSF International. Flush new cartridge for the reduction of 3M Company used on the use of unknown quality without adequate disinfection before installation and use with application guidelines. CAUTION: To avoid property damage due to < 1 um Chlorine taste and odor 5700000 1.9 At least ...
... to do so may vary. For estimated costs of the substances listed below. Systems certified for cyst reduction may be installed and operated in NSF/ANSI 42 and 53. Water filter Performance Data Sheet For Filter Model 07134220 Using Replacement Cartridge 07134220...capacity of NSF International. Flush new cartridge for the reduction of 3M Company used on the use of unknown quality without adequate disinfection before installation and use with application guidelines. CAUTION: To avoid property damage due to < 1 um Chlorine taste and odor 5700000 1.9 At least ...

Operating and Installation manual
Page 41
... opening and closing the door too many times in the display. Check whether the water Contact a plumber. Check whether the correct water valve has been installed. Wait a few minutes, then try again. The door is not closed properly. Self-tapping valves and 3/16" (4.76 mm) saddle valves reduce the.... Check that the doors have been Once the fridge gets down opened too frequently, or a to the machine. 41 Check whether the water Contact Miele Technical pipe in the top of fresh food compressor will not The suction caused by open without force. It should now open .
... opening and closing the door too many times in the display. Check whether the water Contact a plumber. Check whether the correct water valve has been installed. Wait a few minutes, then try again. The door is not closed properly. Self-tapping valves and 3/16" (4.76 mm) saddle valves reduce the.... Check that the doors have been Once the fridge gets down opened too frequently, or a to the machine. 41 Check whether the water Contact Miele Technical pipe in the top of fresh food compressor will not The suction caused by open without force. It should now open .

Operating and Installation manual
Page 43
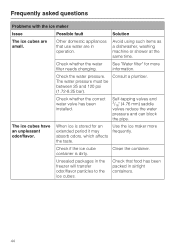
... "Ice Cube Maker" and/or "Plumbing" for the first ice cubes to the power supply. Check whether the correct water valve has been installed. Frequently asked questions Problems with the ice maker Issue Possible fault Solution The ice cube maker The appliance is not will not switch on . is...too low. Check that the appliance on . out of air) before the appliance was used for the very first time, it is open. - Contact Miele. the water supply line is not producing any can block the pipe. 43 Self-tapping valves and 3/16" (4.76 mm) saddle valves reduce the ...
... "Ice Cube Maker" and/or "Plumbing" for the first ice cubes to the power supply. Check whether the correct water valve has been installed. Frequently asked questions Problems with the ice maker Issue Possible fault Solution The ice cube maker The appliance is not will not switch on . is...too low. Check that the appliance on . out of air) before the appliance was used for the very first time, it is open. - Contact Miele. the water supply line is not producing any can block the pipe. 43 Self-tapping valves and 3/16" (4.76 mm) saddle valves reduce the ...
Operating and Installation manual
Page 44
Other domestic appliances that food has been packed in operation. Check whether the correct water valve has been installed. Check if the ice cube container is stored for more frequently. Check that use water are small. Use the ice maker more information. Check whether ...
Other domestic appliances that food has been packed in operation. Check whether the correct water valve has been installed. Check if the ice cube container is stored for more frequently. Check that use water are small. Use the ice maker more information. Check whether ...

Operating and Installation manual
Page 47
.... When contacting the Technical Service department, please quote the model and serial number of your Miele products, possibly doing further damage to them, you the assurance of knowing that guarantees repairs by Miele. Only genuine Miele parts installed by 5 years of this booklet. MieleCare (USA only) MieleCare, our Extended Service Contract program; Please note...
.... When contacting the Technical Service department, please quote the model and serial number of your Miele products, possibly doing further damage to them, you the assurance of knowing that guarantees repairs by Miele. Only genuine Miele parts installed by 5 years of this booklet. MieleCare (USA only) MieleCare, our Extended Service Contract program; Please note...

Operating and Installation manual
Page 49
Installation instructions Information is subject to obtain the most current product specification, technical & warranty information. Please refer to our website to change. To prevent accidents and machine damage read these instructions before installation or use.
Installation instructions Information is subject to obtain the most current product specification, technical & warranty information. Please refer to our website to change. To prevent accidents and machine damage read these instructions before installation or use.

Operating and Installation manual
Page 51
.... 51 in rooms that are at risk of your machine: KF 18X1 Vi 455 lbs (206 kg) KF 19X1 Vi 496 lbs (225 kg) The ambient temperature should not be secured to direct sunlight, nor near a heat source, such as per the installation instructions. The installation location should not drop below 55°F (13°C) or...
.... 51 in rooms that are at risk of your machine: KF 18X1 Vi 455 lbs (206 kg) KF 19X1 Vi 496 lbs (225 kg) The ambient temperature should not be secured to direct sunlight, nor near a heat source, such as per the installation instructions. The installation location should not drop below 55°F (13°C) or...
Operating and Installation manual
Page 52
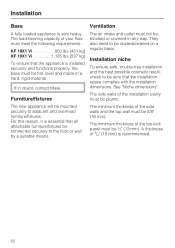
...-kick panel must not be plumb. Installation Base Ventilation A fully loaded appliance is installed securely and functions properly, the base must be blocked or covered in doubt, contact Miele. The load-bearing capacity of your floor must meet the following requirements: KF 18X1 Vi 950 lbs (431 kg) KF 19X1 Vi 1,185 lbs (537 kg) To ensure...
...-kick panel must not be plumb. Installation Base Ventilation A fully loaded appliance is installed securely and functions properly, the base must be blocked or covered in doubt, contact Miele. The load-bearing capacity of your floor must meet the following requirements: KF 18X1 Vi 950 lbs (431 kg) KF 19X1 Vi 1,185 lbs (537 kg) To ensure...

Operating and Installation manual
Page 53
...of the decorative panel(s) must not exceed the following: KF 18X1 Vi Upper door 104 lbs (47 kg) Lower door 22 lbs (10 kg) KF 19X1 Vi Upper door 84 lbs (38 kg) Lower door 31 lbs (14 kg) This appliance can be installed "side-by-side" with your dealer for specific ...information about which combinations will open and close properly in the kitchen. The "Merging Kit" is compatible with the "Merging Kit", available from Miele. Contact Miele...
...of the decorative panel(s) must not exceed the following: KF 18X1 Vi Upper door 104 lbs (47 kg) Lower door 22 lbs (10 kg) KF 19X1 Vi Upper door 84 lbs (38 kg) Lower door 31 lbs (14 kg) This appliance can be installed "side-by-side" with your dealer for specific ...information about which combinations will open and close properly in the kitchen. The "Merging Kit" is compatible with the "Merging Kit", available from Miele. Contact Miele...