
Operating and Installation manual
Page 2
Contents IMPORTANT SAFETY INSTRUCTIONS 4 Guide to the oven 10 Guide to the display 11 Oven accessories 13 Safety and energy saving features 15 Settings J 16 Language J 16 Clock 16 Temperatures 17 Oven Light 17 Temperature °F/°C 17 Tone Options 18 Display 19 System Lock 19 Warming function 20 Power Level 20 Reset 21 Selecting cookware 22 Before using the oven 26 Programming the oven 26 Cleaning the appliance 26 Heating the oven 27 Using the oven 29 Selecting cooking times 31 Timer 33 2
Contents IMPORTANT SAFETY INSTRUCTIONS 4 Guide to the oven 10 Guide to the display 11 Oven accessories 13 Safety and energy saving features 15 Settings J 16 Language J 16 Clock 16 Temperatures 17 Oven Light 17 Temperature °F/°C 17 Tone Options 18 Display 19 System Lock 19 Warming function 20 Power Level 20 Reset 21 Selecting cookware 22 Before using the oven 26 Programming the oven 26 Cleaning the appliance 26 Heating the oven 27 Using the oven 29 Selecting cooking times 31 Timer 33 2
Operating and Installation manual
Page 3
Contents Functions 34 Bake 35 Broil 37 Microwave 39 Defrost / Heat and Cook 43 Master Chef 44 Defrost 46 Roast 47 Using the roast probe 49 Favorites 51 Sabbath 53 Cleaning and Care 54 Interior 54 Inside of door with door seal 56 Front of appliance 56 Accessories 57 Frequently asked questions 58 Technical Service 61 Installation instructions 63 Electrical connection 64 Installation 65 Machine front dimensions 68 Programming the oven 69 3
Contents Functions 34 Bake 35 Broil 37 Microwave 39 Defrost / Heat and Cook 43 Master Chef 44 Defrost 46 Roast 47 Using the roast probe 49 Favorites 51 Sabbath 53 Cleaning and Care 54 Interior 54 Inside of door with door seal 56 Front of appliance 56 Accessories 57 Frequently asked questions 58 Technical Service 61 Installation instructions 63 Electrical connection 64 Installation 65 Machine front dimensions 68 Programming the oven 69 3
Operating and Installation manual
Page 5
... and frequency listed on the data plate correspond with specific requirements. 5 However, under warranty repairs should only be performed by an authorized service technician. Repairs and other work should be replaced by Miele original spare parts only. It is void. ~ Before servicing, disconnect the appliance from the main power supply. ~ Defective components should be performed by a Miele authorized service technician in accordance with a damaged cord or plug, or...
... and frequency listed on the data plate correspond with specific requirements. 5 However, under warranty repairs should only be performed by an authorized service technician. Repairs and other work should be replaced by Miele original spare parts only. It is void. ~ Before servicing, disconnect the appliance from the main power supply. ~ Defective components should be performed by a Miele authorized service technician in accordance with a damaged cord or plug, or...
Operating and Installation manual
Page 6
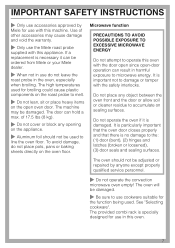
.../OFF button, switch off at the mains and remove the plug from drying out. 6 When using residual heat to aid in dissipating the condensation. - Cover food stored in the convection microwave oven are shorter than that of food could dry out food and cause possible ignition. IMPORTANT SAFETY INSTRUCTIONS Safety ~ Do not use corrosive chemicals or vapors in this appliance. ~ Do not use for cooking, heating...
.../OFF button, switch off at the mains and remove the plug from drying out. 6 When using residual heat to aid in dissipating the condensation. - Cover food stored in the convection microwave oven are shorter than that of food could dry out food and cause possible ignition. IMPORTANT SAFETY INSTRUCTIONS Safety ~ Do not use corrosive chemicals or vapors in this appliance. ~ Do not use for cooking, heating...
Operating and Installation manual
Page 7
... warranty. ~ Only use the Miele roast probe supplied with this machine. The high temperatures used for the function being used to line the oven floor. It is specially designed for use cookware suitable for broiling could cause plastic components on the roast probe to melt. ~ Do not lean, sit or place heavy items on the open -door operation can result in use do not place pots, pans or baking sheets directly...
... warranty. ~ Only use the Miele roast probe supplied with this machine. The high temperatures used for the function being used to line the oven floor. It is specially designed for use cookware suitable for broiling could cause plastic components on the roast probe to melt. ~ Do not lean, sit or place heavy items on the open -door operation can result in use do not place pots, pans or baking sheets directly...

Operating and Installation manual
Page 9
... hollow parts. (The hollow parts of injuries. ~ Food with a hot appliance. Danger of some dishware can be cooked without their shells in the microwave oven in a device designed specifically for the function being used. Solo functions: Convection Bake, Auto Roast, Broil, Convection Broil Caution! Hard-boiled eggs should be pierced in several places before cooking to allow steam to explode. Danger of burning! IMPORTANT SAFETY INSTRUCTIONS ~ Eggs...
... hollow parts. (The hollow parts of injuries. ~ Food with a hot appliance. Danger of some dishware can be cooked without their shells in the microwave oven in a device designed specifically for the function being used. Solo functions: Convection Bake, Auto Roast, Broil, Convection Broil Caution! Hard-boiled eggs should be pierced in several places before cooking to allow steam to explode. Danger of burning! IMPORTANT SAFETY INSTRUCTIONS ~ Eggs...
Operating and Installation manual
Page 23
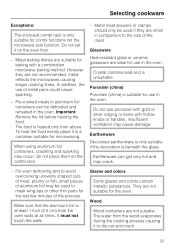
... combi rack is suitable for use in the oven. Do not use porcelain with gold or silver edging or items with a combination microwave baking method. They are suitable for microwaving. It must not touch the walls. Do not set it to the size of the process. The food is at least 1 inch (2.5 cm) from the oven walls at all times. Important: Remove the lid before heating the...
... combi rack is suitable for use in the oven. Do not use porcelain with gold or silver edging or items with a combination microwave baking method. They are suitable for microwaving. It must not touch the walls. Do not set it to the size of the process. The food is at least 1 inch (2.5 cm) from the oven walls at all times. Important: Remove the lid before heating the...

Operating and Installation manual
Page 27
... well ventilated during the first use. MASTER CHEF ... ) DEFROST ... ) more ) BAKE FUNCTIONS ( BAKE COMBINATION BAKE ) ( SURROUND INTENSIVE ) ( CONVECTION BAKE CONVECTION BAKE 325°F 12:23 Preheating 60°F Temperature ) ( Delay Start Add to favorites ) ^ Set the temperature to favorites ) 27 Before using the keypad. CONVECTION BAKE 325°F 12:23 Range: 75°F - 475°F Temperature ) ( Delay Start Add to 475°F (250 °C) using the oven ( BAKE ... ( BROIL ... ( MICROWAVE ... Before heating the oven, remove all accessories and labels.
... well ventilated during the first use. MASTER CHEF ... ) DEFROST ... ) more ) BAKE FUNCTIONS ( BAKE COMBINATION BAKE ) ( SURROUND INTENSIVE ) ( CONVECTION BAKE CONVECTION BAKE 325°F 12:23 Preheating 60°F Temperature ) ( Delay Start Add to favorites ) ^ Set the temperature to favorites ) 27 Before using the keypad. CONVECTION BAKE 325°F 12:23 Range: 75°F - 475°F Temperature ) ( Delay Start Add to 475°F (250 °C) using the oven ( BAKE ... ( BROIL ... ( MICROWAVE ... Before heating the oven, remove all accessories and labels.
Operating and Installation manual
Page 28
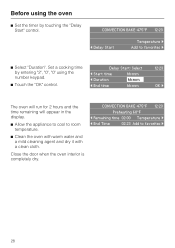
Before using the number keypad. ^ Touch the "OK" control. CONVECTION BAKE 475°F 12:23 ( Delay Start Temperature ) Add to favorites ) 28 Set a cooking time by entering "2", "0", "0" using the oven ^ Set the timer by touching the "Delay Start" control. Close the door when the oven interior is completely dry. CONVECTION BAKE 475°F 12:23 Preheating 60°F ( Remaining time 02:00 Temperature ) ( End Time 02:23 Add to favorites ) ^ Select "Duration". Delay Start: Select ( Start time hh:mm ( Duration hh:mm...
Before using the number keypad. ^ Touch the "OK" control. CONVECTION BAKE 475°F 12:23 ( Delay Start Temperature ) Add to favorites ) 28 Set a cooking time by entering "2", "0", "0" using the oven ^ Set the timer by touching the "Delay Start" control. Close the door when the oven interior is completely dry. CONVECTION BAKE 475°F 12:23 Preheating 60°F ( Remaining time 02:00 Temperature ) ( End Time 02:23 Add to favorites ) ^ Select "Duration". Delay Start: Select ( Start time hh:mm ( Duration hh:mm...

Operating and Installation manual
Page 29
Using the oven Turning the oven on and off touch the "On/Off" control. Bake) by touching the control next to it. Convection Bake) by touching the control next to it starts automatically. Each function has different settings which can be adjusted. (The settings will vary depending on or off ^ To turn the oven on the function selected.) + Temperature + Power Level + Delay Start + Duration + Add to favorites ( BAKE ... ( BROIL ... ( MICROWAVE ... The oven is factory set so...
Using the oven Turning the oven on and off touch the "On/Off" control. Bake) by touching the control next to it. Convection Bake) by touching the control next to it starts automatically. Each function has different settings which can be adjusted. (The settings will vary depending on or off ^ To turn the oven on the function selected.) + Temperature + Power Level + Delay Start + Duration + Add to favorites ( BAKE ... ( BROIL ... ( MICROWAVE ... The oven is factory set so...

Operating and Installation manual
Page 30
... ) MICROWAVE ( MICROWAVE COMBINATION BROIL ) ( COMBINATION BAKE MICRO BROIL ) ( COMBINATION AUTO ROAST ^ Select the desired cooking time. ^ Select a power level and temperature (depending on the function selected). ^ Confirm with "OK". ^ Select "Start". The operation is interrupted and will be started manually. ^ Turn the oven "On". ^ Select the desired function e.g. The door is already heated from the submenu e.g. The cooking times and results could be opened at any time. Microwave. Microwave. ( BAKE ... ( BROIL ... ( MICROWAVE... The submenu is used must the oven be...
... ) MICROWAVE ( MICROWAVE COMBINATION BROIL ) ( COMBINATION BAKE MICRO BROIL ) ( COMBINATION AUTO ROAST ^ Select the desired cooking time. ^ Select a power level and temperature (depending on the function selected). ^ Confirm with "OK". ^ Select "Start". The operation is interrupted and will be started manually. ^ Turn the oven "On". ^ Select the desired function e.g. The door is already heated from the submenu e.g. The cooking times and results could be opened at any time. Microwave. Microwave. ( BAKE ... ( BROIL ... ( MICROWAVE... The submenu is used must the oven be...

Operating and Installation manual
Page 36
... start time if desired and confirm with "OK". Be sure that the pan does not touch the walls. ^ Adjust the temperature if necessary. ^ Select a delay start automatically. Confirm with the longer side across the width of the oven for roasting or shallow baking. ^ Select a power level and temperature if desired. This function combines the programs Microwave and Convection Bake. However shiny, thin pans are not recommended. ^ Set the pan...
... start time if desired and confirm with "OK". Be sure that the pan does not touch the walls. ^ Adjust the temperature if necessary. ^ Select a delay start automatically. Confirm with the longer side across the width of the oven for roasting or shallow baking. ^ Select a power level and temperature if desired. This function combines the programs Microwave and Convection Bake. However shiny, thin pans are not recommended. ^ Set the pan...

Operating and Installation manual
Page 47
... preselected setting. The program will start automatically. ^ Select delay start times can be programmed. ^ Insert the glass tray with the combi rack on the 1st runner level. ^ If roasting in the recipe. The roasting time depends on the combi rack. Suitable cookware: Casserole dish, combi rack with "OK". ^ Adjust the temperature if necessary. The cookware must have heat-resistant handles. Exception: When cooking roast sirloin or tenderloins using Auto Roast preheat the oven to...
... preselected setting. The program will start automatically. ^ Select delay start times can be programmed. ^ Insert the glass tray with the combi rack on the 1st runner level. ^ If roasting in the recipe. The roasting time depends on the combi rack. Suitable cookware: Casserole dish, combi rack with "OK". ^ Adjust the temperature if necessary. The cookware must have heat-resistant handles. Exception: When cooking roast sirloin or tenderloins using Auto Roast preheat the oven to...
Operating and Installation manual
Page 54
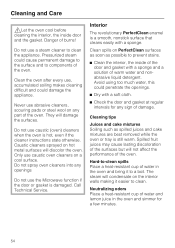
.... 54 The steam will discolor the oven. Cleaning and Care ,Let the oven cool before cleaning the interior, the inside of the door and gasket with a sponge and a solution of warm water and nonabrasive liquid detergent. Danger of damage. Never use abrasive cleaners, scouring pads or steel wool on any openings Do not use caustic oven cleaners on the interior walls making it to clean. Caustic cleaners...
.... 54 The steam will discolor the oven. Cleaning and Care ,Let the oven cool before cleaning the interior, the inside of the door and gasket with a sponge and a solution of warm water and nonabrasive liquid detergent. Danger of damage. Never use abrasive cleaners, scouring pads or steel wool on any openings Do not use caustic oven cleaners on the interior walls making it to clean. Caustic cleaners...
Operating and Installation manual
Page 58
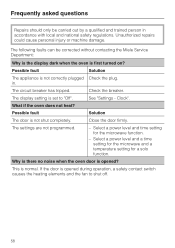
... circuit breaker has tripped. The display setting is not correctly plugged Check the plug. See "Settings - This is not shut completely. Frequently asked questions Repairs should only be corrected without contacting the Miele Service Department: Why is the display dark when the oven is first turned on? Possible fault Solution The door is normal. Select a power level and a time setting for the microwave and a temperature setting for the microwave function. - If the door is opened ? Clock...
... circuit breaker has tripped. The display setting is not correctly plugged Check the plug. See "Settings - This is not shut completely. Frequently asked questions Repairs should only be corrected without contacting the Miele Service Department: Why is the display dark when the oven is first turned on? Possible fault Solution The door is normal. Select a power level and a time setting for the microwave and a temperature setting for the microwave function. - If the door is opened ? Clock...

Operating and Installation manual
Page 59
... questions Why is a noise heard after turning the oven off automatically. This is opened during the cooling phase. The fan will stop if the door is normal. See "Settings - Follow the manufacturer's instructions. ^ Restore power. Check if the selected power has the appropriate time setting when cooking with your fingers, this will turn off ? Only use a 12 V, 10 W, 572°F (300°C) heat resistant, Osram Type 64418...
... questions Why is a noise heard after turning the oven off automatically. This is opened during the cooling phase. The fan will stop if the door is normal. See "Settings - Follow the manufacturer's instructions. ^ Restore power. Check if the selected power has the appropriate time setting when cooking with your fingers, this will turn off ? Only use a 12 V, 10 W, 572°F (300°C) heat resistant, Osram Type 64418...

Operating and Installation manual
Page 60
... with Microwave? See "Selecting cookware". Start the cooking process again. Use a lower cooking temperature. In the microwave oven, food begins to cook from the outside first, the inside and warm on the outside. When heating a meal, select a lower power level and a longer cooking time. The message will become hot in the display Possible fault Solution The roast probe is there uneven browning? Turn the oven off as a safety measure if the oven is...
... with Microwave? See "Selecting cookware". Start the cooking process again. Use a lower cooking temperature. In the microwave oven, food begins to cook from the outside first, the inside and warm on the outside. When heating a meal, select a lower power level and a longer cooking time. The message will become hot in the display Possible fault Solution The roast probe is there uneven browning? Turn the oven off as a safety measure if the oven is...
Operating and Installation manual
Page 65
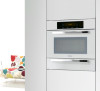
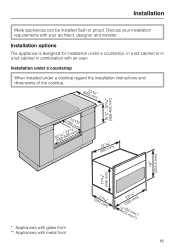
Discuss your installation requirements with an oven. Installation options The appliance is designed for installation under a cooktop regard the installation instructions and dimensions of the cooktop. * Appliances with glass front ** Appliances with metal front 65 Installation under a countertop When installed under a countertop, in a tall cabinet or in a tall cabinet in combination with your architect, designer and installer. Installation Miele appliances can be installed flush or proud.
Discuss your installation requirements with an oven. Installation options The appliance is designed for installation under a cooktop regard the installation instructions and dimensions of the cooktop. * Appliances with glass front ** Appliances with metal front 65 Installation under a countertop When installed under a countertop, in a tall cabinet or in a tall cabinet in combination with your architect, designer and installer. Installation Miele appliances can be installed flush or proud.
Operating and Installation manual
Page 67
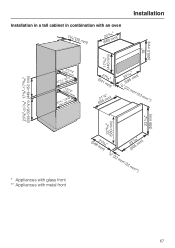
Installation in a tall cabinet in combination with an oven Installation * Appliances with glass front ** Appliances with metal front 67
Installation in a tall cabinet in combination with an oven Installation * Appliances with glass front ** Appliances with metal front 67
H 4086 BM BRWS+
Page 2
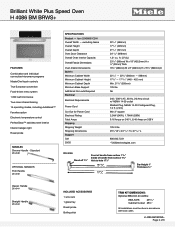
... Oven Interior Capacity Overall Fascia Dimensions Oven Interior Dimensions Built-In Minimum Cabinet Width Minimum Cabinet Height Minimum Cabinet Depth Minimum Base Support Additional Cut-outs Required Electrical Electrical Requirements Power Cord Cut Out for Power Cord Electrical Rating Total Amps Shipping Shipping Weight Shipping Dimensions Support Call 20/20 221/16" (560mm) 179/16" (446mm) 215/16" (541mm) 3411/16" (898mm) 1.31 cu. Standard DS 4046 OPTIONAL HANDLES Profi Handle DS 4040 SPECIFICATIONS Product - H 4086 BM BRWS+ Page 2 of handle from surface 113⁄16" Inside...
... Oven Interior Capacity Overall Fascia Dimensions Oven Interior Dimensions Built-In Minimum Cabinet Width Minimum Cabinet Height Minimum Cabinet Depth Minimum Base Support Additional Cut-outs Required Electrical Electrical Requirements Power Cord Cut Out for Power Cord Electrical Rating Total Amps Shipping Shipping Weight Shipping Dimensions Support Call 20/20 221/16" (560mm) 179/16" (446mm) 215/16" (541mm) 3411/16" (898mm) 1.31 cu. Standard DS 4046 OPTIONAL HANDLES Profi Handle DS 4040 SPECIFICATIONS Product - H 4086 BM BRWS+ Page 2 of handle from surface 113⁄16" Inside...


