Product Manual
Page 2
... Closing the door ...16 Before using the appliance for the first time, you require 17 Rinse aid ...17 Adding rinse aid 17 Rinse aid indicator 18 Setting the rinse aid dosage 19 Loading the dishwasher 20 Tips ...20 Loading examples 22 Upper basket ...26 Adjusting the upper basket 27 Lower basket ...28 Cutlery...29 Cutlery tray (depending on model 29 Cutlery basket (depending on model 30 Operation ...31 Detergent ...31 Adding detergent 32 Turning on ...33 Selecting a program 33 Starting a program 34 Time display...
... Closing the door ...16 Before using the appliance for the first time, you require 17 Rinse aid ...17 Adding rinse aid 17 Rinse aid indicator 18 Setting the rinse aid dosage 19 Loading the dishwasher 20 Tips ...20 Loading examples 22 Upper basket ...26 Adjusting the upper basket 27 Lower basket ...28 Cutlery...29 Cutlery tray (depending on model 29 Cutlery basket (depending on model 30 Operation ...31 Detergent ...31 Adding detergent 32 Turning on ...33 Selecting a program 33 Starting a program 34 Time display...
Product Manual
Page 3
... care 46 Cleaning the wash cabinet 46 Cleaning the door and the door seal 46 Cleaning the control panel 46 Cleaning the door front 47 Filter system...48 Cleaning the spray arms 50 Frequently Asked Questions 51 Technical problems 51 Water intake fault 53 Water drainage fault 54 General problems 55 Noises ...56 Poor cleaning results 57 Frequently asked questions 60 Cleaning the drain pump and non-return valve 60 Customer service 61 Repairs ...61 Warranty...61 Optional accessories 62 ...64 Installation Instructions 65 Electrical connection 66 Water connection...
... care 46 Cleaning the wash cabinet 46 Cleaning the door and the door seal 46 Cleaning the control panel 46 Cleaning the door front 47 Filter system...48 Cleaning the spray arms 50 Frequently Asked Questions 51 Technical problems 51 Water intake fault 53 Water drainage fault 54 General problems 55 Noises ...56 Poor cleaning results 57 Frequently asked questions 60 Cleaning the drain pump and non-return valve 60 Customer service 61 Repairs ...61 Warranty...61 Optional accessories 62 ...64 Installation Instructions 65 Electrical connection 66 Water connection...
Product Manual
Page 7
... system in the house should be installed under a cooktop. For the same reason, it has been connected to open fires or other appliances which are sometimes generated by a Miele-authorized service technician. A damaged dishwasher could be dangerous. The electrical safety of an inadequate grounding system (e.g. IMPORTANT SAFETY INSTRUCTIONS Technical safety Installation, repair, and maintenance work should only be per‐...
... system in the house should be installed under a cooktop. For the same reason, it has been connected to open fires or other appliances which are sometimes generated by a Miele-authorized service technician. A damaged dishwasher could be dangerous. The electrical safety of an inadequate grounding system (e.g. IMPORTANT SAFETY INSTRUCTIONS Technical safety Installation, repair, and maintenance work should only be per‐...

Product Manual
Page 8
... installed and any adjustment has been made to the mains. The door springs must not be installed and operated in a non-sta‐ tionary location (e.g., on the data plate (fuse rating, voltage, and frequen‐ cy) matches the electrical supply before connecting the dishwasher to the door springs. The dishwasher may burst or split. It is active. If the dishwasher gets damaged, turn off the electrical supply...
... installed and any adjustment has been made to the mains. The door springs must not be installed and operated in a non-sta‐ tionary location (e.g., on the data plate (fuse rating, voltage, and frequen‐ cy) matches the electrical supply before connecting the dishwasher to the door springs. The dishwasher may burst or split. It is active. If the dishwasher gets damaged, turn off the electrical supply...

Product Manual
Page 10
... metal parts. The door springs must be installed and connected in compliance with the installation plan. Be careful when installing the dishwasher. If you remove the existing toe-kick, you will need to order the appropriate conversion kit. IMPORTANT SAFETY INSTRUCTIONS Proper installation The dishwasher must be adjusted equally on any sharp metal components. The dishwasher must be correctly aligned horizontally to ensure problem-free operation...
... metal parts. The door springs must be installed and connected in compliance with the installation plan. Be careful when installing the dishwasher. If you remove the existing toe-kick, you will need to order the appropriate conversion kit. IMPORTANT SAFETY INSTRUCTIONS Proper installation The dishwasher must be adjusted equally on any sharp metal components. The dishwasher must be correctly aligned horizontally to ensure problem-free operation...

Product Manual
Page 12
... of your old dishwasher Make the door lock inoperative so that the dispenser is cleaned and dried more efficiently if placed in "Technical data" regard‐ ing the capacity of injury, place knives and forks with the handles downwards. The high temperatures in the dish‐ washer may become invalid. Accessories Use only genuine original Miele parts. However, to melt...
... of your old dishwasher Make the door lock inoperative so that the dispenser is cleaned and dried more efficiently if placed in "Technical data" regard‐ ing the capacity of injury, place knives and forks with the handles downwards. The high temperatures in the dish‐ washer may become invalid. Accessories Use only genuine original Miele parts. However, to melt...
Product Manual
Page 14
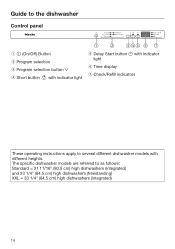
Guide to the dishwasher Control panel a (On/Off) Button b Program selection c Program selection button d Short button with indicator light e Delay Start button with indicator light f Time display g Check/Refill indicators These operating instructions apply to as follows: Standard = 31 11/16" (80.5 cm) high dishwashers (integrated) and 33 1/4" (84.5 cm) high dishwashers (freestanding) XXL = 33 1/4" (84.5 cm) high dishwashers (integrated) 14 The specific dishwasher models are referred to several different dishwasher models with different heights.
Guide to the dishwasher Control panel a (On/Off) Button b Program selection c Program selection button d Short button with indicator light e Delay Start button with indicator light f Time display g Check/Refill indicators These operating instructions apply to as follows: Standard = 31 11/16" (80.5 cm) high dishwashers (integrated) and 33 1/4" (84.5 cm) high dishwashers (freestanding) XXL = 33 1/4" (84.5 cm) high dishwashers (integrated) 14 The specific dishwasher models are referred to several different dishwasher models with different heights.

Product Manual
Page 21
... are not heat-re‐ sistant: the high temperatures in the dishwasher, ensure that only very low tempera‐ tures are used (depending on glass care. Aluminum components (e.g., range hood grease filters) must not be damp or spot‐ ted at the end of clouding. - It may occur on glasses after a number of washes. - Clouding may need to...
... are not heat-re‐ sistant: the high temperatures in the dishwasher, ensure that only very low tempera‐ tures are used (depending on glass care. Aluminum components (e.g., range hood grease filters) must not be damp or spot‐ ted at the end of clouding. - It may occur on glasses after a number of washes. - Clouding may need to...

Product Manual
Page 27
.... Depending on the levers at an angle with 3/4" (2 cm) be set at either side of the cabinet. Pull the upper basket out. Loading the dishwasher Adjusting the upper basket In order to gain more space for model number) Upper basket adjust‐ ment Upper Middle Lower Plate in inches (cm) Upper basket Stand‐ XXL ard Lower basket 7 7/8" (20) 9 7/16" 12 3/16" (24) (31) 13 3/4" (35*) 8 10 1/4" 11...
.... Depending on the levers at an angle with 3/4" (2 cm) be set at either side of the cabinet. Pull the upper basket out. Loading the dishwasher Adjusting the upper basket In order to gain more space for model number) Upper basket adjust‐ ment Upper Middle Lower Plate in inches (cm) Upper basket Stand‐ XXL ard Lower basket 7 7/8" (20) 9 7/16" 12 3/16" (24) (31) 13 3/4" (35*) 8 10 1/4" 11...

Product Manual
Page 34
...; enced by closing the door within four seconds, the indicator lights of the selected program and the time display will begin. The program duration displayed may vary with the same program. It is displayed. The times shown in the program over‐ view refer to the tem‐ perature of the water taken into the dishwasher and the amount of dish‐ ware...
...; enced by closing the door within four seconds, the indicator lights of the selected program and the time display will begin. The program duration displayed may vary with the same program. It is displayed. The times shown in the program over‐ view refer to the tem‐ perature of the water taken into the dishwasher and the amount of dish‐ ware...

Product Manual
Page 41
... to continue the delay start time. Proceed as follows: Open the door. Turn the dishwasher off with the button. Turn the dishwasher on again with the button. Select the program you must then press the program selection button and close the door within four seconds. 41 When the set time is shown in the time display and the indicator light will start period has...
... to continue the delay start time. Proceed as follows: Open the door. Turn the dishwasher off with the button. Turn the dishwasher on again with the button. Select the program you must then press the program selection button and close the door within four seconds. 41 When the set time is shown in the time display and the indicator light will start period has...

Product Manual
Page 46
... the fi‐ nal rinse of deter‐ gent is a risk of the dishwasher door before closing it. Cleaning the control panel The control panel should only be removed with a damp cloth. 46 If, however, there are not accessed and cleaned by the spray arm jets. Wipe the door seals regularly with unsuitable cleaning agents can be wiped with a special dish‐ washer cleaner (see "Optional accesso...
... the fi‐ nal rinse of deter‐ gent is a risk of the dishwasher door before closing it. Cleaning the control panel The control panel should only be removed with a damp cloth. 46 If, however, there are not accessed and cleaned by the spray arm jets. Wipe the door seals regularly with unsuitable cleaning agents can be wiped with a special dish‐ washer cleaner (see "Optional accesso...
Product Manual
Page 51
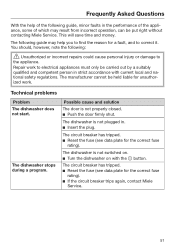
Technical problems Problem The dishwasher does not start. The dishwasher is not switched on. Turn the dishwasher on with current local and na‐ tional safety regulations. Repair work . The dishwasher is not properly closed. Push the door firmly shut. The circuit breaker has tripped. Reset the fuse (see data plate for unauthor‐ ized work to electrical appliances must only be put right without...
Technical problems Problem The dishwasher does not start. The dishwasher is not switched on. Turn the dishwasher on with current local and na‐ tional safety regulations. Repair work . The dishwasher is not properly closed. Push the door firmly shut. The circuit breaker has tripped. Reset the fuse (see data plate for unauthor‐ ized work to electrical appliances must only be put right without...
Product Manual
Page 52
...;: A fault has occurred in the time display. If the fault message appears again, there is a technical fault. Contact Miele Service. If the indicator lights flash again, there is a techni‐ cal fault. Contact Miele Service. 52 Select the desired program. in the circulation pump. Turn the dishwasher off the water supply. Contact Miele Service. Fault : The drain pump is still running, even with the button. Close the door. The...
...;: A fault has occurred in the time display. If the fault message appears again, there is a technical fault. Contact Miele Service. If the indicator lights flash again, there is a techni‐ cal fault. Contact Miele Service. 52 Select the desired program. in the circulation pump. Turn the dishwasher off the water supply. Contact Miele Service. Fault : The drain pump is still running, even with the button. Close the door. The...

Product Manual
Page 55
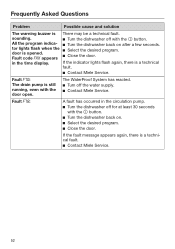
... the delay start time. Press the program selection button and close the door within four seconds. The dispenser cover cannot be closed. Filter system"). The drain hose is blocking the latch. Remove the detergent residue. Detergent residue is kinked. Remove the kink. 55 The inside of the dishwasher was in the wash cabinet is blocked. Clean the drain pump or the non-return valve (see "Cleaning and care - The indicator light of a button at program start time stops run...
... the delay start time. Press the program selection button and close the door within four seconds. The dispenser cover cannot be closed. Filter system"). The drain hose is blocking the latch. Remove the detergent residue. Detergent residue is kinked. Remove the kink. 55 The inside of the dishwasher was in the wash cabinet is blocked. Clean the drain pump or the non-return valve (see "Cleaning and care - The indicator light of a button at program start time stops run...

Product Manual
Page 57
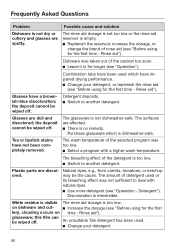
... detergent. The non-return valve is set too high. Decrease the dosage (see "Clean‐ ing and care - Frequently Asked Questions Poor cleaning results Problem Possible cause and solution The dishes are blocking the path of the spray arms. Rearrange the items so that the spray arms can be wiped off. Cleaning the spray arms"). Dirty water has flowed back into the wash cabinet. Clean the drain pump...
... detergent. The non-return valve is set too high. Decrease the dosage (see "Clean‐ ing and care - Frequently Asked Questions Poor cleaning results Problem Possible cause and solution The dishes are blocking the path of the spray arms. Rearrange the items so that the spray arms can be wiped off. Cleaning the spray arms"). Dirty water has flowed back into the wash cabinet. Clean the drain pump...
Product Manual
Page 58
...; Use more detergent (see "Operation"). The bleaching effect of rinse aid (see "Before using for the first time - may be wiped off. Discoloration is not dishwasher-safe. on time - An unsuitable Tab detergent has been used which is too low. Combination tabs have been used . Change your detergent, or replenish the rinse aid (see "Before using for the first time - Glasses have not been com‐ pletely removed...
...; Use more detergent (see "Operation"). The bleaching effect of rinse aid (see "Before using for the first time - may be wiped off. Discoloration is not dishwasher-safe. on time - An unsuitable Tab detergent has been used which is too low. Combination tabs have been used . Change your detergent, or replenish the rinse aid (see "Before using for the first time - Glasses have not been com‐ pletely removed...
Product Manual
Page 66
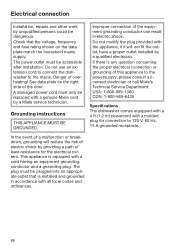
... question concerning the proper electrical connection or grounding of over‐ heating! Electrical connection Installation, repairs and other work by a Miele service technician. See data plate on the data plate match the household mains supply. Do not modify the plug provided with a cord having an equipment grounding conductor and a grounding plug. Do not use an ex‐ tension cord to connect the dish‐ washer to 120 V, 60 Hz...
... question concerning the proper electrical connection or grounding of over‐ heating! Electrical connection Installation, repairs and other work by a Miele service technician. See data plate on the data plate match the household mains supply. Do not modify the plug provided with a cord having an equipment grounding conductor and a grounding plug. Do not use an ex‐ tension cord to connect the dish‐ washer to 120 V, 60 Hz...

Product Manual
Page 69
... are no kinks in the open the dishwasher door fully. Pull the lower spray arm firmly up drain or large volume of water. To vent: open door, the drain must not exceed 3' 3 3/8" (1 m). - Otherwise the drain hose may become blocked. - The dishwasher is not squashed or stretched. The drain hose must not be directed to remove it. Cut off the top of the vent valve in the sink from flowing...
... are no kinks in the open the dishwasher door fully. Pull the lower spray arm firmly up drain or large volume of water. To vent: open door, the drain must not exceed 3' 3 3/8" (1 m). - Otherwise the drain hose may become blocked. - The dishwasher is not squashed or stretched. The drain hose must not be directed to remove it. Cut off the top of the vent valve in the sink from flowing...

Specs
Page 2
The water shut-off valve with a 3/8 NPT connection. 4' 11" (1.5m) flexible drain hose is supplied. 110V / 120V, 60Hz, 15 Amps Yes - Futura Series Fully Integrated Dishwashers SPECIFICATIONS Overall Unit Width Overall Unit Height Overall Unit Depth Niche Minimum Cabinet Opening Width Minimum Cabinet Opening Height Minimum Cabinet Opening Depth Plumbing Water Supply Requirements Water Connection Line Drain Hose Electrical Electrical Requirements - Volts/Amps Power Cord - Must be connected to a maximum of 5 Specification Sheet TRS 04132015 The water pressure must be between 4.35...
The water shut-off valve with a 3/8 NPT connection. 4' 11" (1.5m) flexible drain hose is supplied. 110V / 120V, 60Hz, 15 Amps Yes - Futura Series Fully Integrated Dishwashers SPECIFICATIONS Overall Unit Width Overall Unit Height Overall Unit Depth Niche Minimum Cabinet Opening Width Minimum Cabinet Opening Height Minimum Cabinet Opening Depth Plumbing Water Supply Requirements Water Connection Line Drain Hose Electrical Electrical Requirements - Volts/Amps Power Cord - Must be connected to a maximum of 5 Specification Sheet TRS 04132015 The water pressure must be between 4.35...


