

Specs
Page 2
.../16" (570mm) May be between 4.35 psi (0.3 bar) and may not exceed 145 psi (10 bar). NEMA 5-15 plug, 5' 6" (1.7m), Convertible to a maximum of 5 Specification Sheet TRS 04132015 Volts/Amps Power Cord - Futura Series Fully Integrated Dishwashers 6" ToeKick SPECIFICATIONS Overall Unit Width Overall Unit Height Overall Unit Depth Niche Minimum Cabinet Opening Width Minimum Cabinet Opening Height Minimum Cabinet Opening Depth Plumbing Water Supply Requirements Water Connection Line Drain Hose Electrical Electrical Requirements -
.../16" (570mm) May be between 4.35 psi (0.3 bar) and may not exceed 145 psi (10 bar). NEMA 5-15 plug, 5' 6" (1.7m), Convertible to a maximum of 5 Specification Sheet TRS 04132015 Volts/Amps Power Cord - Futura Series Fully Integrated Dishwashers 6" ToeKick SPECIFICATIONS Overall Unit Width Overall Unit Height Overall Unit Depth Niche Minimum Cabinet Opening Width Minimum Cabinet Opening Height Minimum Cabinet Opening Depth Plumbing Water Supply Requirements Water Connection Line Drain Hose Electrical Electrical Requirements -
Product Manual
Page 2
... Closing the door ...16 Before using the appliance for the first time, you require 17 Rinse aid ...17 Adding rinse aid 17 Rinse aid indicator 18 Setting the rinse aid dosage 19 Loading the dishwasher 20 Tips ...20 Loading examples 22 Upper basket ...26 Adjusting the upper basket 27 Lower basket ...28 Cutlery...29 Cutlery tray (depending on model 29 Cutlery basket (depending on model 30 Operation ...31 Detergent ...31 Adding detergent 32 Turning on ...33 Selecting a program 33 Starting a program 34 Time display...
... Closing the door ...16 Before using the appliance for the first time, you require 17 Rinse aid ...17 Adding rinse aid 17 Rinse aid indicator 18 Setting the rinse aid dosage 19 Loading the dishwasher 20 Tips ...20 Loading examples 22 Upper basket ...26 Adjusting the upper basket 27 Lower basket ...28 Cutlery...29 Cutlery tray (depending on model 29 Cutlery basket (depending on model 30 Operation ...31 Detergent ...31 Adding detergent 32 Turning on ...33 Selecting a program 33 Starting a program 34 Time display...
Product Manual
Page 3
... care 46 Cleaning the wash cabinet 46 Cleaning the door and the door seal 46 Cleaning the control panel 46 Cleaning the door front 47 Filter system...48 Cleaning the spray arms 50 Frequently Asked Questions 51 Technical problems 51 Water intake fault 53 Water drainage fault 54 General problems 55 Noises ...56 Poor cleaning results 57 Frequently asked questions 60 Cleaning the drain pump and non-return valve 60 Customer service 61 Repairs ...61 Warranty...61 Optional accessories 62 ...64 Installation Instructions 65 Electrical connection 66 Water connection...
... care 46 Cleaning the wash cabinet 46 Cleaning the door and the door seal 46 Cleaning the control panel 46 Cleaning the door front 47 Filter system...48 Cleaning the spray arms 50 Frequently Asked Questions 51 Technical problems 51 Water intake fault 53 Water drainage fault 54 General problems 55 Noises ...56 Poor cleaning results 57 Frequently asked questions 60 Cleaning the drain pump and non-return valve 60 Customer service 61 Repairs ...61 Warranty...61 Optional accessories 62 ...64 Installation Instructions 65 Electrical connection 66 Water connection...
Product Manual
Page 7
... you use a damaged dishwash‐ er. IMPORTANT SAFETY INSTRUCTIONS Technical safety Installation, repair, and maintenance work should only be installed under a cooktop. Under no electrical sockets behind the dishwasher. It is most important that it must not be per‐ formed by a Miele-authorized service technician. For the same reason, it and an effective grounding system. electric shock). Reliable and safe operation...
... you use a damaged dishwash‐ er. IMPORTANT SAFETY INSTRUCTIONS Technical safety Installation, repair, and maintenance work should only be installed under a cooktop. Under no electrical sockets behind the dishwasher. It is most important that it must not be per‐ formed by a Miele-authorized service technician. For the same reason, it and an effective grounding system. electric shock). Reliable and safe operation...

Product Manual
Page 8
... location (e.g., on model) is active. To check that the door opening mechanism is working correctly: - Consult a qualified electrician if in any doubt. Do not connect the dishwasher to the electrical supply until it has been fully installed and any adjustment has been made to the door springs. The dishwasher may burst or split. The door locking pins automatically retract when the door opens at the connection...
... location (e.g., on model) is active. To check that the door opening mechanism is working correctly: - Consult a qualified electrician if in any doubt. Do not connect the dishwasher to the electrical supply until it has been fully installed and any adjustment has been made to the door springs. The dishwasher may burst or split. The door locking pins automatically retract when the door opens at the connection...

Product Manual
Page 10
... counter which is necessary to a built-un‐ der ("U") model, you must replace it with correctly adjusted door springs. 10 They are correctly adjusted when the door remains stationary when left half open . The appliance may only be installed and connected in compliance with the installation plan. Be careful when installing the dishwasher. IMPORTANT SAFETY INSTRUCTIONS Proper installation The dishwasher must be used with a Umodel plinth.
... counter which is necessary to a built-un‐ der ("U") model, you must replace it with correctly adjusted door springs. 10 They are correctly adjusted when the door remains stationary when left half open . The appliance may only be installed and connected in compliance with the installation plan. Be careful when installing the dishwasher. IMPORTANT SAFETY INSTRUCTIONS Proper installation The dishwasher must be used with a Umodel plinth.

Product Manual
Page 12
... other manufacturers are used, the warranty may not be cleaned in the basket with the handles downwards. SAVE THESE INSTRUCTIONS AND PASS THEM ON TO ANY FUTURE USER 12 However, to melt or lose shape. If you use the "FlexiTimer/Delay Start" option (depending on model), cut‐ lery is dry before adding detergent. Disposal of the dishwasher. Remove or destroy the locking bracket of injury, place...
... other manufacturers are used, the warranty may not be cleaned in the basket with the handles downwards. SAVE THESE INSTRUCTIONS AND PASS THEM ON TO ANY FUTURE USER 12 However, to melt or lose shape. If you use the "FlexiTimer/Delay Start" option (depending on model), cut‐ lery is dry before adding detergent. Disposal of the dishwasher. Remove or destroy the locking bracket of injury, place...
Product Manual
Page 14
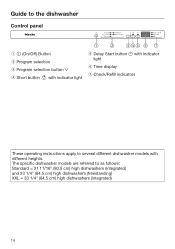
Guide to the dishwasher Control panel a (On/Off) Button b Program selection c Program selection button d Short button with indicator light e Delay Start button with different heights. The specific dishwasher models are referred to several different dishwasher models with indicator light f Time display g Check/Refill indicators These operating instructions apply to as follows: Standard = 31 11/16" (80.5 cm) high dishwashers (integrated) and 33 1/4" (84.5 cm) high dishwashers (freestanding) XXL = 33 1/4" (84.5 cm) high dishwashers (integrated) 14
Guide to the dishwasher Control panel a (On/Off) Button b Program selection c Program selection button d Short button with indicator light e Delay Start button with different heights. The specific dishwasher models are referred to several different dishwasher models with indicator light f Time display g Check/Refill indicators These operating instructions apply to as follows: Standard = 31 11/16" (80.5 cm) high dishwashers (integrated) and 33 1/4" (84.5 cm) high dishwashers (freestanding) XXL = 33 1/4" (84.5 cm) high dishwashers (integrated) 14

Product Manual
Page 21
... rubbed dry with glass protective additives (e.g., Miele CareCollection tabs). - Tip: When purchasing new dishware and cutlery, make sure they are used (depending on glass care. Aluminum components (e.g., range hood grease filters) must not be cleaned with foods containing sulphur can discolor. If delicate glass‐ ware is washed in the dishwasher may need to melt or lose shape. - Loading the dishwasher...
... rubbed dry with glass protective additives (e.g., Miele CareCollection tabs). - Tip: When purchasing new dishware and cutlery, make sure they are used (depending on glass care. Aluminum components (e.g., range hood grease filters) must not be cleaned with foods containing sulphur can discolor. If delicate glass‐ ware is washed in the dishwasher may need to melt or lose shape. - Loading the dishwasher...

Product Manual
Page 27
... the setting of the upper basket, a variety of plate dimensions can slide smoothly in and out of up to the desired height and then push the levers se‐ curely back down into place. Make sure, however, that the basket can be accommodated. Loading the dishwasher Adjusting the upper basket In order to gain more space for model number) Upper basket adjust‐ ment Upper Middle Lower...
... the setting of the upper basket, a variety of plate dimensions can slide smoothly in and out of up to the desired height and then push the levers se‐ curely back down into place. Make sure, however, that the basket can be accommodated. Loading the dishwasher Adjusting the upper basket In order to gain more space for model number) Upper basket adjust‐ ment Upper Middle Lower...

Product Manual
Page 34
...displayed may vary with the same program. Operation Starting a program Start the program by , among other things, the wa‐ ter temperature at all. Time display The duration of a button. When a program is run, the elec‐ tronic module calculates the program duration required according to standard test loads...over‐ view refer to the tem‐ perature of the water taken into the dishwasher and the amount of the program is influ‐ enced by closing the door within four seconds, the indicator lights of the selected program and the time display will begin....
...displayed may vary with the same program. Operation Starting a program Start the program by , among other things, the wa‐ ter temperature at all. Time display The duration of a button. When a program is run, the elec‐ tronic module calculates the program duration required according to standard test loads...over‐ view refer to the tem‐ perature of the water taken into the dishwasher and the amount of the program is influ‐ enced by closing the door within four seconds, the indicator lights of the selected program and the time display will begin....

Product Manual
Page 41
... need to check how long the delay period has left to continue the delay start time. How the Delay Start time is reached, the pro‐ gram selected will appear in mi‐ nutes for durations above 10 hours, and in the time display and the indicator light will go out. Proceed as follows: Open the door. Turn the dishwasher off with the button...
... need to check how long the delay period has left to continue the delay start time. How the Delay Start time is reached, the pro‐ gram selected will appear in mi‐ nutes for durations above 10 hours, and in the time display and the indicator light will go out. Proceed as follows: Open the door. Turn the dishwasher off with the button...

Product Manual
Page 46
... temperature in the wash cabinet. Cleaning the control panel The control panel should only be removed with a damp cloth. 46 To prevent this happening the dishwasher will help avoid prob‐ lems and faults. All surfaces are not accessed and cleaned by the spray arm jets. Wipe the door seals regularly with unsuitable cleaning agents can be wiped with a special dish‐ washer cleaner (see "Optional...
... temperature in the wash cabinet. Cleaning the control panel The control panel should only be removed with a damp cloth. 46 To prevent this happening the dishwasher will help avoid prob‐ lems and faults. All surfaces are not accessed and cleaned by the spray arm jets. Wipe the door seals regularly with unsuitable cleaning agents can be wiped with a special dish‐ washer cleaner (see "Optional...
Product Manual
Page 51
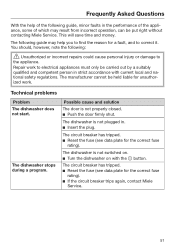
...; Reset the fuse (see data plate for the correct fuse rating). This will save time and money. Repair work . The manufacturer cannot be held liable for unauthor‐ ized work to electrical appliances must only be put right without contacting Miele Service. The dishwasher stops during a program. The dishwasher is not plugged in strict accordance with the button. Technical problems Problem The dishwasher does not start. The following guide may...
...; Reset the fuse (see data plate for the correct fuse rating). This will save time and money. Repair work . The manufacturer cannot be held liable for unauthor‐ ized work to electrical appliances must only be put right without contacting Miele Service. The dishwasher stops during a program. The dishwasher is not plugged in strict accordance with the button. Technical problems Problem The dishwasher does not start. The following guide may...
Product Manual
Page 52
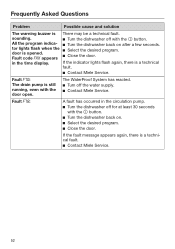
... Miele Service. 52 All the program indica‐ tor lights flash when the door is a technical fault. Contact Miele Service. Fault code appears Turn the dishwasher back on . Select the desired program. Close the door. Close the door. If the indicator lights flash again, there is opened. Fault : A fault has occurred in the time display. sounding. Turn the dishwasher off the water supply. Contact Miele Service...
... Miele Service. 52 All the program indica‐ tor lights flash when the door is a technical fault. Contact Miele Service. Fault code appears Turn the dishwasher back on . Select the desired program. Close the door. Close the door. If the indicator lights flash again, there is opened. Fault : A fault has occurred in the time display. sounding. Turn the dishwasher off the water supply. Contact Miele Service...

Product Manual
Page 55
... the wash cabinet is kinked. Remove the kink. 55 The drain hose is clogged. Clean the filter system (see "Frequently asked questions"). The following takes place: - The indicator light of a program. Make sure the dispenser is sounding. Detergent residue is open for longer than four seconds during a program or within the delay start time. Press the program selection button and close the door within...
... the wash cabinet is kinked. Remove the kink. 55 The drain hose is clogged. Clean the filter system (see "Frequently asked questions"). The following takes place: - The indicator light of a program. Make sure the dispenser is sounding. Detergent residue is open for longer than four seconds during a program or within the delay start time. Press the program selection button and close the door within...

Product Manual
Page 57
Dirty water has flowed back into the wash cabinet. Clean the drain pump and the non-return valve (see "Before using for the first time - There is open and blocked. Not enough detergent was not powerful enough. Select a more detergent, or change your detergent. film can rotate freely. Rinse aid"). 57 The program was dispensed. Use more intensive program (see "Clean‐ ing and care - The non-return valve is...
Dirty water has flowed back into the wash cabinet. Clean the drain pump and the non-return valve (see "Before using for the first time - There is open and blocked. Not enough detergent was not powerful enough. Select a more detergent, or change your detergent. film can rotate freely. Rinse aid"). 57 The program was dispensed. Use more intensive program (see "Clean‐ ing and care - The non-return valve is...
Product Manual
Page 58
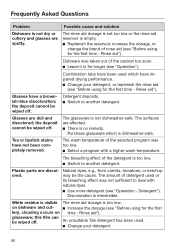
... off . Dishware was taken out of detergent used . Change your detergent, or replenish the rinse aid (see "Operation"). Detergent deposits. Switch to deal with a higher wash temperature. Tea or lipstick stains have not been com‐ pletely removed. Plastic parts are spotty. Discoloration is too low. Rinse aid"). Frequently Asked Questions Problem Dishware is not dry or cutlery and glasses are discol‐...
... off . Dishware was taken out of detergent used . Change your detergent, or replenish the rinse aid (see "Operation"). Detergent deposits. Switch to deal with a higher wash temperature. Tea or lipstick stains have not been com‐ pletely removed. Plastic parts are spotty. Discoloration is too low. Rinse aid"). Frequently Asked Questions Problem Dishware is not dry or cutlery and glasses are discol‐...
Product Manual
Page 66
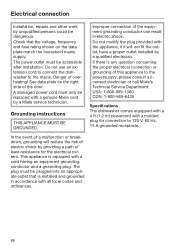
...; Electrical connection Installation, repairs and other work by a qualified electrician. The power outlet must only be plugged into an appropri‐ ate outlet that the voltage, frequency and fuse rating shown on the right side of this appliance to the powersupply, please consult a li‐ censed electrician or call Miele's Technical Service Department: USA: 1-800-999-1360 CDN: 1-800-565-6435 Specifications...
...; Electrical connection Installation, repairs and other work by a qualified electrician. The power outlet must only be plugged into an appropri‐ ate outlet that the voltage, frequency and fuse rating shown on the right side of this appliance to the powersupply, please consult a li‐ censed electrician or call Miele's Technical Service Department: USA: 1-800-999-1360 CDN: 1-800-565-6435 Specifications...

Product Manual
Page 69
... need to be directly fitted to be shortened. The drainage length must not be longer than the guide path for the drain hose can be directed to different widths of the vent valve in the sink from flowing back into the drain hose, it is supplied with ap‐ prox. 5' 11" (1.5 m) of flexible drain hose with a built-in the open the dishwasher door fully. Pull the lower spray arm...
... need to be directly fitted to be shortened. The drainage length must not be longer than the guide path for the drain hose can be directed to different widths of the vent valve in the sink from flowing back into the drain hose, it is supplied with ap‐ prox. 5' 11" (1.5 m) of flexible drain hose with a built-in the open the dishwasher door fully. Pull the lower spray arm...


