
Specs
Page 2
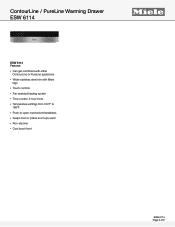
ContourLine / PureLine Warming Drawer ESW 6114 FOREVER BETTER ESW 6114 Features: • Can get combined with either ContourLine or PureLine appliances • Wider stainless steel trim with Miele logo • Touch controls • Fan-assisted heating system • Time control, 4-hour timer • Temperature settings from 104ºF to 185ºF • Push-to-open mechanism/handleless • Keeps food or plates and cups warm • Non-slip liner • Cool touch front ESW 6114 Page 2 of 5
ContourLine / PureLine Warming Drawer ESW 6114 FOREVER BETTER ESW 6114 Features: • Can get combined with either ContourLine or PureLine appliances • Wider stainless steel trim with Miele logo • Touch controls • Fan-assisted heating system • Time control, 4-hour timer • Temperature settings from 104ºF to 185ºF • Push-to-open mechanism/handleless • Keeps food or plates and cups warm • Non-slip liner • Cool touch front ESW 6114 Page 2 of 5
Specs
Page 3
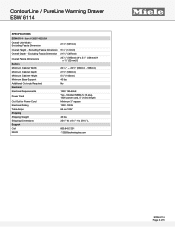
... plug, 120V power cord, 5' (1.5m) length Minimum 3" square 120V .72kW 6A on 120V 46 lbs 253/4" W x 81/2" H x 253/8" L 800.843.7231 82020technologies.com FOREVER BETTER ESW 6114 Page 3 of 5 Excluding Fascia Dimension Overall Fascia Dimensions Built-In Minimum Cabinet Width Minimum Cabinet Depth Minimum Cabinet Height Minimum Base Support Additional Cut-outs..." (387mm) 237/16" (595mm) W x 51/4" (134mm) H x 7/8" (22mm) D 221/16" - 223/8" (560mm - 568mm) 215/8" (550mm) 55/8" (143mm) 43 lbs No 120V 15A 60Hz Yes - ContourLine / PureLine Warming Drawer ESW 6114 SPECIFICATIONS ESW 6114 -
... plug, 120V power cord, 5' (1.5m) length Minimum 3" square 120V .72kW 6A on 120V 46 lbs 253/4" W x 81/2" H x 253/8" L 800.843.7231 82020technologies.com FOREVER BETTER ESW 6114 Page 3 of 5 Excluding Fascia Dimension Overall Fascia Dimensions Built-In Minimum Cabinet Width Minimum Cabinet Depth Minimum Cabinet Height Minimum Base Support Additional Cut-outs..." (387mm) 237/16" (595mm) W x 51/4" (134mm) H x 7/8" (22mm) D 221/16" - 223/8" (560mm - 568mm) 215/8" (550mm) 55/8" (143mm) 43 lbs No 120V 15A 60Hz Yes - ContourLine / PureLine Warming Drawer ESW 6114 SPECIFICATIONS ESW 6114 -
Specs
Page 4
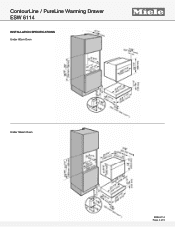
ContourLine / PureLine Warming Drawer ESW 6114 INSTALLATION SPECIFICATIONS Under 60cm Oven FOREVER BETTER Under Steam Oven ESW 6114 Page 4 of 5
ContourLine / PureLine Warming Drawer ESW 6114 INSTALLATION SPECIFICATIONS Under 60cm Oven FOREVER BETTER Under Steam Oven ESW 6114 Page 4 of 5
Specs
Page 5
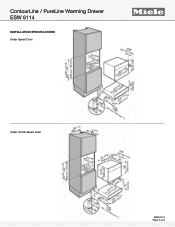
ContourLine / PureLine Warming Drawer ESW 6114 INSTALLATION SPECIFICATIONS Under Speed Oven FOREVER BETTER Under Combi-Steam Oven ESW 6114 Page 5 of 5
ContourLine / PureLine Warming Drawer ESW 6114 INSTALLATION SPECIFICATIONS Under Speed Oven FOREVER BETTER Under Combi-Steam Oven ESW 6114 Page 5 of 5
Product Manual
Page 1
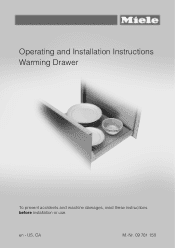
en - Operating and Installation Instructions Warming Drawer To prevent accidents and machine damages, read these instructions before installation or use. US, CA M.-Nr. 09 781 150
en - Operating and Installation Instructions Warming Drawer To prevent accidents and machine damages, read these instructions before installation or use. US, CA M.-Nr. 09 781 150
Product Manual
Page 2
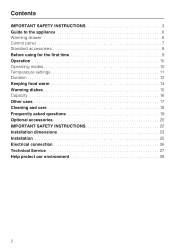
Contents IMPORTANT SAFETY INSTRUCTIONS 3 Guide to the appliance 6 Warming drawer 6 Control panel 7 Standard accessories 8 Before using for the first time 9 Operation 10 Operating modes 10 Temperature settings 11 Duration 12 Keeping food warm 13 Warming dishes 15 Capacity 16 Other uses 17 Cleaning and care 18 Frequently asked questions 19 Optional accessories 20 IMPORTANT SAFETY INSTRUCTIONS 22 Installation dimensions 23 Installation 25 Electrical connection 26 Technical Service 27 Help protect our environment 28 2
Contents IMPORTANT SAFETY INSTRUCTIONS 3 Guide to the appliance 6 Warming drawer 6 Control panel 7 Standard accessories 8 Before using for the first time 9 Operation 10 Operating modes 10 Temperature settings 11 Duration 12 Keeping food warm 13 Warming dishes 15 Capacity 16 Other uses 17 Cleaning and care 18 Frequently asked questions 19 Optional accessories 20 IMPORTANT SAFETY INSTRUCTIONS 22 Installation dimensions 23 Installation 25 Electrical connection 26 Technical Service 27 Help protect our environment 28 2
Product Manual
Page 3
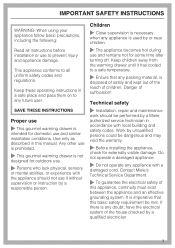
... following: Read all uniform safety codes and regulations. SAVE THESE INSTRUCTIONS Proper use ~ This gourmet warming drawer is imperative that any future user. Keep children away from the warming drawer until it without supervision or instruction by or near children. ~ The appliance becomes hot during use... by a responsible person. Any other use is prohibited. ~ This gourmet warming drawer is necessary when any doubt, have the electrical system of suffocation! Danger of the house checked by a Miele authorized service technician in a safe place and pass them on to all instructions...
... following: Read all uniform safety codes and regulations. SAVE THESE INSTRUCTIONS Proper use ~ This gourmet warming drawer is imperative that any future user. Keep children away from the warming drawer until it without supervision or instruction by or near children. ~ The appliance becomes hot during use... by a responsible person. Any other use is prohibited. ~ This gourmet warming drawer is necessary when any doubt, have the electrical system of suffocation! Danger of the house checked by a Miele authorized service technician in a safe place and pass them on to all instructions...
Product Manual
Page 4
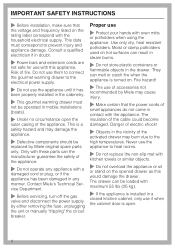
...is turned on the rating label correspond with the household electrical supply. Proper use it has been properly installed in the cabinetry. ~ This gourmet warming drawer must correspond to prevent injury and appliance damage. They can melt or catch fire when the appliance is a safety hazard and may damage the ... this appliance. The insulation of fire. Do not use them to connect the gourmet warming drawer to the electrical power supply. ~ Do not use of accessories not recommended by Miele may burn due to heat rooms. ~ Do not replace the non-slip mat with maximum 55 lbs (25 kg). ~ If ...
...is turned on the rating label correspond with the household electrical supply. Proper use it has been properly installed in the cabinetry. ~ This gourmet warming drawer must correspond to prevent injury and appliance damage. They can melt or catch fire when the appliance is a safety hazard and may damage the ... this appliance. The insulation of fire. Do not use them to connect the gourmet warming drawer to the electrical power supply. ~ Do not use of accessories not recommended by Miele may burn due to heat rooms. ~ Do not replace the non-slip mat with maximum 55 lbs (25 kg). ~ If ...

Product Manual
Page 5
...is particularly important when preparing food for opening and closing the appliance. ~ Do not use a steam cleaner to food in the warming drawer. A violent steam explosion may caramelize or ignite. ~ Be sure that will damage the cooking compartment. If heated for heating cold...at low temperature levels. ~ Do not use plastic containers or plastic wrap in a hot drawer. These items may not warm evenly otherwise. ~ Do not leave the warming drawer unattended while in the warming drawer, this can build up causing an explosion that the vents are not covered. Pressure can ...
...is particularly important when preparing food for opening and closing the appliance. ~ Do not use a steam cleaner to food in the warming drawer. A violent steam explosion may caramelize or ignite. ~ Be sure that will damage the cooking compartment. If heated for heating cold...at low temperature levels. ~ Do not use plastic containers or plastic wrap in a hot drawer. These items may not warm evenly otherwise. ~ Do not leave the warming drawer unattended while in the warming drawer, this can build up causing an explosion that the vents are not covered. Pressure can ...
Product Manual
Page 6
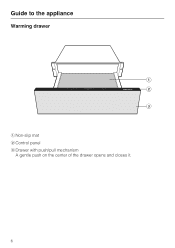
Guide to the appliance Warming drawer a Non-slip mat b Control panel c Drawer with push/pull mechanism A gentle push on the center of the drawer opens and closes it. 6
Guide to the appliance Warming drawer a Non-slip mat b Control panel c Drawer with push/pull mechanism A gentle push on the center of the drawer opens and closes it. 6

Product Manual
Page 9
...faulty connection. The smell will turn off a slight odor the first time your appliance inside and outside with a sponge cloth, warm water and liquid dish soap. Heat the empty drawer for the first time Clean and heat the appliance ^ Remove any protective wrapping. ^ Remove the non-slip mat and the ...the appliance will only turn the appliance on. ^ Tap "Menu" until the s symbol is illuminated. ^ Tap "Temperature" until the LED on when the drawer is closed. The appliance will dissipate after two hours. Before using for at least 2 hours. ^ Touch the ON/OFF sensor s to turn on the ...
...faulty connection. The smell will turn off a slight odor the first time your appliance inside and outside with a sponge cloth, warm water and liquid dish soap. Heat the empty drawer for the first time Clean and heat the appliance ^ Remove any protective wrapping. ^ Remove the non-slip mat and the ...the appliance will only turn the appliance on. ^ Tap "Menu" until the s symbol is illuminated. ^ Tap "Temperature" until the LED on when the drawer is closed. The appliance will dissipate after two hours. Before using for at least 2 hours. ^ Touch the ON/OFF sensor s to turn on the ...

Product Manual
Page 10
... the appliance is fitted with a fan distributing the warmed air within the drawer. The fan runs continuously in the "Keeping food warm" and "Low temperature" modes. It works intermittently in the "Cups/glasses" and "Warming dishes/plates" modes. The appliance lets you keep food warm while simultaneously warming dishes. Caution! The dishes need more time to...
... the appliance is fitted with a fan distributing the warmed air within the drawer. The fan runs continuously in the "Keeping food warm" and "Low temperature" modes. It works intermittently in the "Cups/glasses" and "Warming dishes/plates" modes. The appliance lets you keep food warm while simultaneously warming dishes. Caution! The dishes need more time to...
Product Manual
Page 12
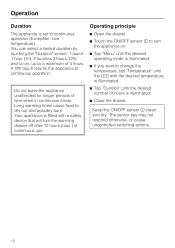
... Operating principle ^ Open the drawer. ^ Touch the ON/OFF sensor s to change the temperature, tap "Temperature" until the LED with the desired temperature is illuminated. ^ Tap "Duration" until the desired operating mode is illuminated. ^ If you want to turn the warming drawer off after 12 hours (max.)... of hours is illuminated. ^ Close the drawer. Operation Duration The appliance is set to a maximum of time when in continuous mode. Do not leave ...
... Operating principle ^ Open the drawer. ^ Touch the ON/OFF sensor s to change the temperature, tap "Temperature" until the LED with the desired temperature is illuminated. ^ Tap "Duration" until the desired operating mode is illuminated. ^ If you want to turn the warming drawer off after 12 hours (max.)... of hours is illuminated. ^ Close the drawer. Operation Duration The appliance is set to a maximum of time when in continuous mode. Do not leave ...

Product Manual
Page 13
... spilling. - Tips - Put the dishes into the drawer during preheating. - Put the dishes into the drawer during preheating. ^ Remove the warmed dishes from the containers and enter the ventilation slots. - Fill the hot food into pre-warmed dishes. This mode is for keeping food that has... has reached the required temperature. Do not overfill dishes to ensure that is being kept warm. Serve food kept warm on warmed dishes. ^ Replace the dishes in the drawer, and carefully close the drawer to ensure that should be crispy. Loss of nutrients begins with aluminum foil or a ...
... spilling. - Tips - Put the dishes into the drawer during preheating. - Put the dishes into the drawer during preheating. ^ Remove the warmed dishes from the containers and enter the ventilation slots. - Fill the hot food into pre-warmed dishes. This mode is for keeping food that has... has reached the required temperature. Do not overfill dishes to ensure that is being kept warm. Serve food kept warm on warmed dishes. ^ Replace the dishes in the drawer, and carefully close the drawer to ensure that should be crispy. Loss of nutrients begins with aluminum foil or a ...

Product Manual
Page 16
Do not overload the drawer. The following examples are provided as guidelines: - Place settings for 6 persons: 6 dinner plates C 10 1/4" (26 cm) 6 soup plates C 9 1/16" (23 cm) 6 dessert plates C 7 1/2 (19 cm) 1 ... cm) C 9 1/16" (23 cm) C 4" (10 cm) C 10 1/4" (26 cm) C 9 1/16" (23 cm) C 14 3/16" (36 cm) C 2 5/16" (5.9 cm) C 2 11/16" (8.8 cm) C 2 5/8" / 3 1/8" (6.7 cm/8 cm) height 16 Warming dishes Capacity The holding capacity is determined by the dimensions and the weight of your dishes. The...
Do not overload the drawer. The following examples are provided as guidelines: - Place settings for 6 persons: 6 dinner plates C 10 1/4" (26 cm) 6 soup plates C 9 1/16" (23 cm) 6 dessert plates C 7 1/2 (19 cm) 1 ... cm) C 9 1/16" (23 cm) C 4" (10 cm) C 10 1/4" (26 cm) C 9 1/16" (23 cm) C 14 3/16" (36 cm) C 2 5/16" (5.9 cm) C 2 11/16" (8.8 cm) C 2 5/8" / 3 1/8" (6.7 cm/8 cm) height 16 Warming dishes Capacity The holding capacity is determined by the dimensions and the weight of your dishes. The...

Product Manual
Page 18
...- stainless steel cleaners, - Never clean in the washing machine. 18 Only use agents recommended for an extended period of the drawer. ^ Clean the mat by hand with warm water and liquid dish soap. ^ Dry thoroughly. Do not use . If spills are susceptible to clean the exterior. All ...surfaces of warm water and liquid soap applied with a soft cloth. Appliance front / interior Remove spills as soon as possible. cleaners containing soda, ammonia, ...
...- stainless steel cleaners, - Never clean in the washing machine. 18 Only use agents recommended for an extended period of the drawer. ^ Clean the mat by hand with warm water and liquid dish soap. ^ Dry thoroughly. Do not use . If spills are susceptible to clean the exterior. All ...surfaces of warm water and liquid soap applied with a soft cloth. Appliance front / interior Remove spills as soon as possible. cleaners containing soda, ammonia, ...

Product Manual
Page 19
.... Check the temperature setting and make sure the food is heard during the "2 Keep food warm" mode. 19 Check the temperature setting. Reload the dishes. A noise is not too close to the warming drawer. This is not warm enough? Possible fault Solution There is the circulation fan which distributes the heated air. Adjust the...
.... Check the temperature setting and make sure the food is heard during the "2 Keep food warm" mode. 19 Check the temperature setting. Reload the dishes. A noise is not too close to the warming drawer. This is not warm enough? Possible fault Solution There is the circulation fan which distributes the heated air. Adjust the...
Product Manual
Page 22
...specified by Miele. When installed with the consumer of the appliance for both appliances. ~ The combination appliance is available in two variants differing in height. an intermediate base is void since the manufacturer cannot guarantee the safe use of the warming drawer. ~ A...ensure the required load carrying capacity for the local building inspectors use. Note to pull the drawer out. ~ The gourmet warming drawer is placed directly onto the installed gourmet warming drawer; SAVE THESE INSTRUCTIONS 22 Sufficient space must correspond in doubt, consult a qualified technician. ...
...specified by Miele. When installed with the consumer of the appliance for both appliances. ~ The combination appliance is available in two variants differing in height. an intermediate base is void since the manufacturer cannot guarantee the safe use of the warming drawer. ~ A...ensure the required load carrying capacity for the local building inspectors use. Note to pull the drawer out. ~ The gourmet warming drawer is placed directly onto the installed gourmet warming drawer; SAVE THESE INSTRUCTIONS 22 Sufficient space must correspond in doubt, consult a qualified technician. ...
Product Manual
Page 25
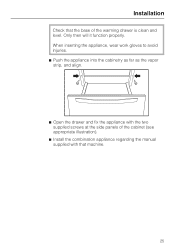
When inserting the appliance, wear work gloves to avoid injuries. ^ Push the appliance into the cabinetry as far as the vapor strip, and align. ^ Open the drawer and fix the appliance with the two supplied screws at the side panels of the cabinet (see appropriate illustration). ^ Install the combination appliance regarding the manual supplied with that the base of the warming drawer is clean and level. Only then will it function properly. Installation Check that machine. 25
When inserting the appliance, wear work gloves to avoid injuries. ^ Push the appliance into the cabinetry as far as the vapor strip, and align. ^ Open the drawer and fix the appliance with the two supplied screws at the side panels of the cabinet (see appropriate illustration). ^ Install the combination appliance regarding the manual supplied with that the base of the warming drawer is clean and level. Only then will it function properly. Installation Check that machine. 25
Product Manual
Page 26
Electrical connection ,CAUTION: Before servicing, disconnect the power supply by unqualified persons could be performed by a qualified technician in accordance with the warming drawer to the same circuit, operating both appliances at the same time may cause an overload. If in doubt. Power supply This appliance is installed in ...
Electrical connection ,CAUTION: Before servicing, disconnect the power supply by unqualified persons could be performed by a qualified technician in accordance with the warming drawer to the same circuit, operating both appliances at the same time may cause an overload. If in doubt. Power supply This appliance is installed in ...

