
Specs
Page 4
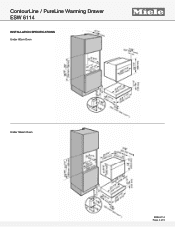
ContourLine / PureLine Warming Drawer ESW 6114 INSTALLATION SPECIFICATIONS Under 60cm Oven FOREVER BETTER Under Steam Oven ESW 6114 Page 4 of 5
ContourLine / PureLine Warming Drawer ESW 6114 INSTALLATION SPECIFICATIONS Under 60cm Oven FOREVER BETTER Under Steam Oven ESW 6114 Page 4 of 5
Specs
Page 5
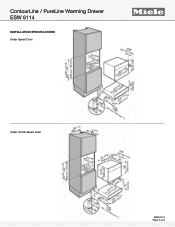
ContourLine / PureLine Warming Drawer ESW 6114 INSTALLATION SPECIFICATIONS Under Speed Oven FOREVER BETTER Under Combi-Steam Oven ESW 6114 Page 5 of 5
ContourLine / PureLine Warming Drawer ESW 6114 INSTALLATION SPECIFICATIONS Under Speed Oven FOREVER BETTER Under Combi-Steam Oven ESW 6114 Page 5 of 5
Product Manual
Page 1
US, CA M.-Nr. 09 781 150 en - Operating and Installation Instructions Warming Drawer To prevent accidents and machine damages, read these instructions before installation or use.
US, CA M.-Nr. 09 781 150 en - Operating and Installation Instructions Warming Drawer To prevent accidents and machine damages, read these instructions before installation or use.
Product Manual
Page 2
Contents IMPORTANT SAFETY INSTRUCTIONS 3 Guide to the appliance 6 Warming drawer 6 Control panel 7 Standard accessories 8 Before using for the first time 9 Operation 10 Operating modes 10 Temperature settings 11 Duration 12 Keeping food warm 13 Warming dishes 15 Capacity 16 Other uses 17 Cleaning and care 18 Frequently asked questions 19 Optional accessories 20 IMPORTANT SAFETY INSTRUCTIONS 22 Installation dimensions 23 Installation 25 Electrical connection 26 Technical Service 27 Help protect our environment 28 2
Contents IMPORTANT SAFETY INSTRUCTIONS 3 Guide to the appliance 6 Warming drawer 6 Control panel 7 Standard accessories 8 Before using for the first time 9 Operation 10 Operating modes 10 Temperature settings 11 Duration 12 Keeping food warm 13 Warming dishes 15 Capacity 16 Other uses 17 Cleaning and care 18 Frequently asked questions 19 Optional accessories 20 IMPORTANT SAFETY INSTRUCTIONS 22 Installation dimensions 23 Installation 25 Electrical connection 26 Technical Service 27 Help protect our environment 28 2
Product Manual
Page 3
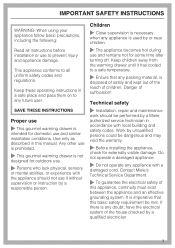
...~ This gourmet warming drawer is used by a qualified electrician. 3 This appliance conforms to all instructions before installation or use and similar installation conditions. Use only as described in accordance with the appliance should be met. Keep children away from the ...temperature. ~ Ensure that this basic safety requirement be performed by a Miele authorized service technician in this appliance, continuity must exist between the appliance and an effective grounding system. Technical safety ~ Installation, repair and maintenance work should not use ~ This gourmet warming ...
...~ This gourmet warming drawer is used by a qualified electrician. 3 This appliance conforms to all instructions before installation or use and similar installation conditions. Use only as described in accordance with the appliance should be met. Keep children away from the ...temperature. ~ Ensure that this basic safety requirement be performed by a Miele authorized service technician in this appliance, continuity must exist between the appliance and an effective grounding system. Technical safety ~ Installation, repair and maintenance work should not use ~ This gourmet warming ...
Product Manual
Page 4
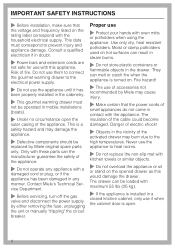
...turn off the gas valve and disconnect the power supply by Miele original spare parts only. They can the manufacturer guarantee the safety of the appliance. ~ Do not operate any manner. IMPORTANT SAFETY INSTRUCTIONS ~ Before installation, make sure that the power cords of small appliances do...be replaced by either removing the fuse, unplugging the unit or manually "tripping" the circuit breaker. Danger of electric shock! ~ Objects in mobile installations (boats). ~ Under no circumstance open . 4 Never use ~ Protect your hands with a damaged cord or plug, or if the appliance ...
...turn off the gas valve and disconnect the power supply by Miele original spare parts only. They can the manufacturer guarantee the safety of the appliance. ~ Do not operate any manner. IMPORTANT SAFETY INSTRUCTIONS ~ Before installation, make sure that the power cords of small appliances do...be replaced by either removing the fuse, unplugging the unit or manually "tripping" the circuit breaker. Danger of electric shock! ~ Objects in mobile installations (boats). ~ Under no circumstance open . 4 Never use ~ Protect your hands with a damaged cord or plug, or if the appliance ...

Product Manual
Page 21
Please refer to our website to change. To prevent accidents and machine damage read these instructions before installation or use. Installation Instructions IMPORTANT: SAVE FOR THE LOCAL ELECTRICAL INSPECTOR'S USE Information is subject to obtain the most current product specification, technical & warranty information.
Please refer to our website to change. To prevent accidents and machine damage read these instructions before installation or use. Installation Instructions IMPORTANT: SAVE FOR THE LOCAL ELECTRICAL INSPECTOR'S USE Information is subject to obtain the most current product specification, technical & warranty information.
Product Manual
Page 22
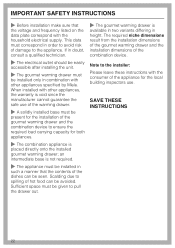
SAVE THESE INSTRUCTIONS 22 When installed with other appliances specified by Miele. an intermediate base is placed directly onto the installed gourmet warming drawer; Scalding due to spilling of the combination device. Sufficient space must correspond in order to avoid risk .... Note to ensure the required load carrying capacity for both appliances. ~ The combination appliance is not required. ~ The appliance must be installed only in such a manner that the voltage and frequency listed on the data plate correspond with the household electrical supply. The required niche ...
SAVE THESE INSTRUCTIONS 22 When installed with other appliances specified by Miele. an intermediate base is placed directly onto the installed gourmet warming drawer; Scalding due to spilling of the combination device. Sufficient space must correspond in order to avoid risk .... Note to ensure the required load carrying capacity for both appliances. ~ The combination appliance is not required. ~ The appliance must be installed only in such a manner that the voltage and frequency listed on the data plate correspond with the household electrical supply. The required niche ...

Product Manual
Page 23
Oven H 2xxx B(P) and H 6xxx B(P) Installation dimensions Speed Oven H 6xxx BM a Cut-out for ventilation when combined with a self-cleaning oven b Installation dimension with plug and power cord L= 7' 2 5/8" (2200 mm) * Appliances with glass front ** Appliances with stainless steel front 23
Oven H 2xxx B(P) and H 6xxx B(P) Installation dimensions Speed Oven H 6xxx BM a Cut-out for ventilation when combined with a self-cleaning oven b Installation dimension with plug and power cord L= 7' 2 5/8" (2200 mm) * Appliances with glass front ** Appliances with stainless steel front 23

Product Manual
Page 24
Installation dimensions Steam Oven DG 6500/ DG 6600 Combi Steam Oven DGC 670x / DGC 680x a Cut-out for ventilation when combined with a steam oven b Installation dimension with plug and power cord L= 7' 2 5/8" (2200 mm) a Cut-out for ventilation when combined with a steam and baking oven b Installation dimension with plug and power cord L= 7' 2 5/8" (2200 mm) * Appliances with glass front ** Appliances with stainless steel front * Appliances with glass front ** Appliances with stainless steel front 24
Installation dimensions Steam Oven DG 6500/ DG 6600 Combi Steam Oven DGC 670x / DGC 680x a Cut-out for ventilation when combined with a steam oven b Installation dimension with plug and power cord L= 7' 2 5/8" (2200 mm) a Cut-out for ventilation when combined with a steam and baking oven b Installation dimension with plug and power cord L= 7' 2 5/8" (2200 mm) * Appliances with glass front ** Appliances with stainless steel front * Appliances with glass front ** Appliances with stainless steel front 24
Product Manual
Page 25
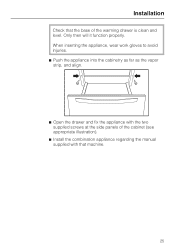
When inserting the appliance, wear work gloves to avoid injuries. ^ Push the appliance into the cabinetry as far as the vapor strip, and align. ^ Open the drawer and fix the appliance with the two supplied screws at the side panels of the cabinet (see appropriate illustration). ^ Install the combination appliance regarding the manual supplied with that the base of the warming drawer is clean and level. Installation Check that machine. 25 Only then will it function properly.
When inserting the appliance, wear work gloves to avoid injuries. ^ Push the appliance into the cabinetry as far as the vapor strip, and align. ^ Open the drawer and fix the appliance with the two supplied screws at the side panels of the cabinet (see appropriate illustration). ^ Install the combination appliance regarding the manual supplied with that the base of the warming drawer is clean and level. Installation Check that machine. 25 Only then will it function properly.
Product Manual
Page 26
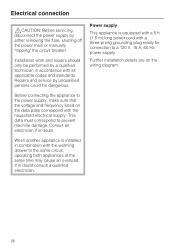
... a 5 ft (1.5 m) long power cord with the warming drawer to prevent machine damage. If in doubt. Installation work and repairs should only be dangerous. Power supply This appliance is installed in accordance with the household electrical supply. Further installation details are on the data plate correspond with all applicable codes and standards. Electrical connection...
... a 5 ft (1.5 m) long power cord with the warming drawer to prevent machine damage. If in doubt. Installation work and repairs should only be dangerous. Power supply This appliance is installed in accordance with the household electrical supply. Further installation details are on the data plate correspond with all applicable codes and standards. Electrical connection...

Product Manual
Page 27
... Extended Service Contract program; Please note that guarantees repairs by factory trained professionals can guarantee the safety, reliability and longevity of your home. Only genuine Miele parts installed by a Miele Authorized Service Provider using genuine Miele parts. Technical Service In the event of a fault which you cannot easily fix yourself, please contact the...
... Extended Service Contract program; Please note that guarantees repairs by factory trained professionals can guarantee the safety, reliability and longevity of your home. Only genuine Miele parts installed by a Miele Authorized Service Provider using genuine Miele parts. Technical Service In the event of a fault which you cannot easily fix yourself, please contact the...
