
MLT4601 60cm Decorative Lift Door
Page 1
SPECIFICATION SHEETS 240609 Notes • All installations must be done in accordance with local codes. NOTE: Drawing is not to scale. M 22 1/16" - 22 3/16" 23 7/16" Location Codes M - 110 Volt - 15 Amp - 3-wire device. (1 live / neutral / ground). Product and Cut-out Dimensions Micro Housing MLT4601 17 11/16" 18 1/8" 16 3/4" min.
SPECIFICATION SHEETS 240609 Notes • All installations must be done in accordance with local codes. NOTE: Drawing is not to scale. M 22 1/16" - 22 3/16" 23 7/16" Location Codes M - 110 Volt - 15 Amp - 3-wire device. (1 live / neutral / ground). Product and Cut-out Dimensions Micro Housing MLT4601 17 11/16" 18 1/8" 16 3/4" min.
Operating and Installation manual
Page 1
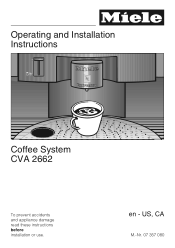
Operating and Installation Instructions Coffee System CVA 2662 To prevent accidents and appliance damage read these instructions before installation or use. en - US, CA M.-Nr. 07 357 080
Operating and Installation Instructions Coffee System CVA 2662 To prevent accidents and appliance damage read these instructions before installation or use. en - US, CA M.-Nr. 07 357 080
Operating and Installation manual
Page 3
Contents Installation instructions 61 Caring for the environment 62 Electrical connection 63 Installation 64 Coffee glossary 66 The Espresso range 67 The "Pure Origin" Espresso range 68 The Lungo range 69 3
Contents Installation instructions 61 Caring for the environment 62 Electrical connection 63 Installation 64 Coffee glossary 66 The Espresso range 67 The "Pure Origin" Espresso range 68 The Lungo range 69 3
Operating and Installation manual
Page 4
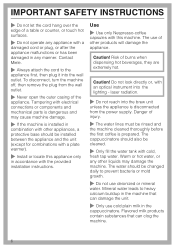
.... To avoid the risk of the coffee system. This appliance complies with the coffee system. ~ Install the appliance in a safe place and pass them on the safe installation, operation, and care of the appliance can cause personal injury and material damage. Read this machine ...other use it is important that you carefully read these instructions carefully to children. 4 Do not use this safety information carefully before installation or use . They could be followed, including the following: Read all instructions before operating the appliance. Keep them in an area ...
.... To avoid the risk of the coffee system. This appliance complies with the coffee system. ~ Install the appliance in a safe place and pass them on the safe installation, operation, and care of the appliance can cause personal injury and material damage. Read this machine ...other use it is important that you carefully read these instructions carefully to children. 4 Do not use this safety information carefully before installation or use . They could be followed, including the following: Read all instructions before operating the appliance. Keep them in an area ...

Operating and Installation manual
Page 5
...outdoors. ~ If the appliance is installed behind a door front, use the appliance only when the door front is performed. ~ Do not use an extension cord to connect the appliance to ensure that this appliance, continuity must not be performed by Miele original spare parts only. Do not... operate a damaged appliance. ~ Before connecting the appliance to the electrical supply make sure that power is not supplied to the appliance while installation work, repairs or maintenance is open. Extension...
...outdoors. ~ If the appliance is installed behind a door front, use the appliance only when the door front is performed. ~ Do not use an extension cord to connect the appliance to ensure that this appliance, continuity must not be performed by Miele original spare parts only. Do not... operate a damaged appliance. ~ Before connecting the appliance to the electrical supply make sure that power is not supplied to the appliance while installation work, repairs or maintenance is open. Extension...
Operating and Installation manual
Page 6
Contact Miele. ~ Always attach the cord to the appliance first, then plug it into the lighting - Use ~ Use only Nespresso-coffee capsules with this appliance only in the cappuccinatore. The use cold plain milk in accordance with the provided installation instructions. Caution! Flavored milk products ...plug, or after the appliance malfunctions or has been damaged in any other liquids may cause machine damage. ~ If the machine is installed in combination with other appliances, a protective base should be changed daily to heavy calcium buildup in the machine that can damage the...
Contact Miele. ~ Always attach the cord to the appliance first, then plug it into the lighting - Use ~ Use only Nespresso-coffee capsules with this appliance only in the cappuccinatore. The use cold plain milk in accordance with the provided installation instructions. Caution! Flavored milk products ...plug, or after the appliance malfunctions or has been damaged in any other liquids may cause machine damage. ~ If the machine is installed in combination with other appliances, a protective base should be changed daily to heavy calcium buildup in the machine that can damage the...
Operating and Installation manual
Page 11
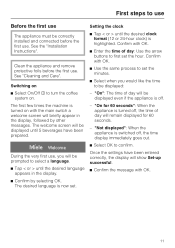
... the desired clock format (12 or 24-hour clock) is now set. First steps to use Before the first use The appliance must be correctly installed and connected before the first use . The desired language is highlighted. "On for 60 seconds. - See the...
... the desired clock format (12 or 24-hour clock) is now set. First steps to use Before the first use The appliance must be correctly installed and connected before the first use . The desired language is highlighted. "On for 60 seconds. - See the...

Operating and Installation manual
Page 34
... temporarily unlocked and drinks can be locked so that is highlighted. The water hardness will not work. If the water hardness is visible in your installation kit. To deactivate the system lock, follow the same procedure as you know when a descaling cycle is necessary. Confirm with OK. ^ Use < or > to maintain...
... temporarily unlocked and drinks can be locked so that is highlighted. The water hardness will not work. If the water hardness is visible in your installation kit. To deactivate the system lock, follow the same procedure as you know when a descaling cycle is necessary. Confirm with OK. ^ Use < or > to maintain...

Operating and Installation manual
Page 59
... program, gives you the assurance of knowing that guarantees repairs by 5 years of worry free ownership. MieleCare is covered by a Miele Authorized Service Provider using genuine Miele parts. Only genuine Miele parts installed by Miele. Please note that unless expressly approved in the industry that your appliance investment is the only Extended Service Contract in...
... program, gives you the assurance of knowing that guarantees repairs by 5 years of worry free ownership. MieleCare is covered by a Miele Authorized Service Provider using genuine Miele parts. Only genuine Miele parts installed by Miele. Please note that unless expressly approved in the industry that your appliance investment is the only Extended Service Contract in...

Operating and Installation manual
Page 61
Installation instructions Information is subject to obtain the most current product specification, technical & warranty information. Please refer to our website to change.
Installation instructions Information is subject to obtain the most current product specification, technical & warranty information. Please refer to our website to change.

Operating and Installation manual
Page 63
...power surges and tripped breakers when the appliance is turned on the data plate match the household electrical supply before installing or performing maintenance or repairs. Do not connect the appliance to power produced outside of the normal electrical grid ...All electrical work by these devices will cause the appliance to your power supply, please consult a licensed electrician or contact Miele's Technical Service Department. Installation, repairs and other work should be dangerous. WARNING: THIS APPLIANCE MUST BE GROUNDED Important The coffee system comes equipped with ...
...power surges and tripped breakers when the appliance is turned on the data plate match the household electrical supply before installing or performing maintenance or repairs. Do not connect the appliance to power produced outside of the normal electrical grid ...All electrical work by these devices will cause the appliance to your power supply, please consult a licensed electrician or contact Miele's Technical Service Department. Installation, repairs and other work should be dangerous. WARNING: THIS APPLIANCE MUST BE GROUNDED Important The coffee system comes equipped with ...

Operating and Installation manual
Page 64
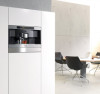
Miele appliances can be built into cabinetry. Installation Installation options The coffee system is designed to be installed flush or proud. Discuss your installation requirements with your architect, designer and installer. 64
Miele appliances can be built into cabinetry. Installation Installation options The coffee system is designed to be installed flush or proud. Discuss your installation requirements with your architect, designer and installer. 64
Operating and Installation manual
Page 65
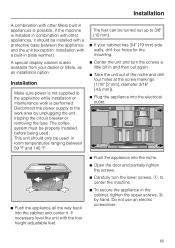
...) side walls, drill four holes for the mounting. ^ Center the unit and turn the lower screws, a, to the work is installed in combination with other Miele built in plate warmer). A special display cabinet is possible. The coffee system must be used...into the cabinet and center it should only be properly installed before being used in room temperatures ranging between the appliance and the unit (exception: installation with a built-in appliances is also available from your dealer or Miele, as an installation option. Installation A combination with other appliances, it . If the...
...) side walls, drill four holes for the mounting. ^ Center the unit and turn the lower screws, a, to the work is installed in combination with other Miele built in plate warmer). A special display cabinet is possible. The coffee system must be used...into the cabinet and center it should only be properly installed before being used in room temperatures ranging between the appliance and the unit (exception: installation with a built-in appliances is also available from your dealer or Miele, as an installation option. Installation A combination with other appliances, it . If the...

ESS 2060 System Drawer Operating and Installation manual
Page 4
...INSTRUCTIONS! Do not keep cooked food in combination with the plate warmer. Do not let children access or play with the following Miele appliances: - Supervise its intended purpose. Keep these operating instructions in a safe place and pass them on the opened drawer. ... responsibility. Pressurized steam could be dangerous and may cause damage. Coffee System CVA 2660 Use the drawer only once it has been installed into cabinetry. The condensation may void the warranty. Installation, repair and maintenance work should be performed by the elderly or infirm. ...
...INSTRUCTIONS! Do not keep cooked food in combination with the plate warmer. Do not let children access or play with the following Miele appliances: - Supervise its intended purpose. Keep these operating instructions in a safe place and pass them on the opened drawer. ... responsibility. Pressurized steam could be dangerous and may cause damage. Coffee System CVA 2660 Use the drawer only once it has been installed into cabinetry. The condensation may void the warranty. Installation, repair and maintenance work should be performed by the elderly or infirm. ...

ESS 2060 System Drawer Operating and Installation manual
Page 11
... appliance, a built-in shelf must always be set without a base directly onto the drawer. The combination appliance can be installed beneath the other appliance. A shelf between the appliances is not necessary. ^ Open the drawer and fix the appliance with the... screws to support the weight of the cabinet. ^ Install the combination appliance regarding the manual supplied with that machine. Use the appliances only after correctly installed. Installation To install the combination appliance, please read the installation manual supplied with that machine. ^ Set the drawer into...
... appliance, a built-in shelf must always be set without a base directly onto the drawer. The combination appliance can be installed beneath the other appliance. A shelf between the appliances is not necessary. ^ Open the drawer and fix the appliance with the... screws to support the weight of the cabinet. ^ Install the combination appliance regarding the manual supplied with that machine. Use the appliances only after correctly installed. Installation To install the combination appliance, please read the installation manual supplied with that machine. ^ Set the drawer into...

CVA2662 Coffee System
Page 1
Location must be done in Coffee System CVA 2662 - NOTE: Drawing is not to scale. Notes • All installations must be installed without removable feet. Standard NEMA 5-15 outlet. SPECIFICATION SHEETS 062409 Wall cabinet installation Lower Edge Detail - Full overhang CVA Housing Front of Unit O 12" min. 22 1/ 16" - 22 3/ 8" E 13 3/ 4" See Detail Cabinet base 5/8" Unit should...
Location must be done in Coffee System CVA 2662 - NOTE: Drawing is not to scale. Notes • All installations must be installed without removable feet. Standard NEMA 5-15 outlet. SPECIFICATION SHEETS 062409 Wall cabinet installation Lower Edge Detail - Full overhang CVA Housing Front of Unit O 12" min. 22 1/ 16" - 22 3/ 8" E 13 3/ 4" See Detail Cabinet base 5/8" Unit should...
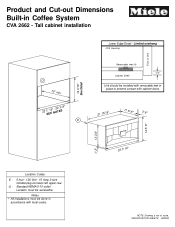
CVA2662 Coffee System
Page 2
... 15 Amp 3-wire molded plug connects left upper rear. SPECIFICATION SHEETS 062409 Location must be done in Coffee System CVA 2662 - Standard NEMA 5-15 outlet. Tall cabinet installation O 12" min. 22 1S/E1E6"N-O2T2E3S/ 8" E 14 3/16" See Detail Front of Unit Lower Edge Detail - Limited overhang... CVA Housing Removable feet (4) 1/4" Cabinet Shelf Unit should be accessible. Notes • All installations must be installed with removable feet in place to prevent contact with local codes. 1/ 2" 23 7/ 16...
... 15 Amp 3-wire molded plug connects left upper rear. SPECIFICATION SHEETS 062409 Location must be done in Coffee System CVA 2662 - Standard NEMA 5-15 outlet. Tall cabinet installation O 12" min. 22 1S/E1E6"N-O2T2E3S/ 8" E 14 3/16" See Detail Front of Unit Lower Edge Detail - Limited overhang... CVA Housing Removable feet (4) 1/4" Cabinet Shelf Unit should be accessible. Notes • All installations must be installed with removable feet in place to prevent contact with local codes. 1/ 2" 23 7/ 16...

EGW2062 Plate & Cup Warmer
Page 1
... side (NEMA 5-15P). 01 - 120 Volt - 15 Amp - 3 Wire outlet (live / neutral / ground - NEMA 5-15R). SPECIFICATION SHEETS 010409 Locate in adjoining cabinet Notes • All installations must be done in adjoining cabinet E2- Product and Cut-out Dimensions Plate Warmer and Coffee System EGW2062 & CVA2662 14 5/ 8" O1 O2 21 7/8" min. 22...
... side (NEMA 5-15P). 01 - 120 Volt - 15 Amp - 3 Wire outlet (live / neutral / ground - NEMA 5-15R). SPECIFICATION SHEETS 010409 Locate in adjoining cabinet Notes • All installations must be done in adjoining cabinet E2- Product and Cut-out Dimensions Plate Warmer and Coffee System EGW2062 & CVA2662 14 5/ 8" O1 O2 21 7/8" min. 22...

ESS2062 System Drawer
Page 1
Locate in adjoining cabinet Notes • All installations must be done in accordance with local codes. 4" 21 1/8" 3 1/16" 20 1/2" 3/4" 1/8" 23 7/ 16" 7/ 8" NOTE: Drawing is not to scale. Plugged electrical main connects left back side (NEMA 5-15P). 0 - 120 Volt - 15 Amp - 3 Wire outlet (live / neutral / ground - NEMA 5-15R). Product and Cut-out Dimensions System Drawer and Coffee System ESS2062 & CVA2662 14 5/ 8" O 21 7/8" min. 22 1/16" - 22 3/8" 17 3/4" 1/ 2" 21 15/16" 11 5/ 8" 7/ 8" E 13 3/4" 23 7/ 16" Location Codes E- SPECIFICATION SHEETS 010409
Locate in adjoining cabinet Notes • All installations must be done in accordance with local codes. 4" 21 1/8" 3 1/16" 20 1/2" 3/4" 1/8" 23 7/ 16" 7/ 8" NOTE: Drawing is not to scale. Plugged electrical main connects left back side (NEMA 5-15P). 0 - 120 Volt - 15 Amp - 3 Wire outlet (live / neutral / ground - NEMA 5-15R). Product and Cut-out Dimensions System Drawer and Coffee System ESS2062 & CVA2662 14 5/ 8" O 21 7/8" min. 22 1/16" - 22 3/8" 17 3/4" 1/ 2" 21 15/16" 11 5/ 8" 7/ 8" E 13 3/4" 23 7/ 16" Location Codes E- SPECIFICATION SHEETS 010409