Operating and Installation manual
Page 2
Contents IMPORTANT SAFETY INSTRUCTIONS 4 Guide to the coffee system 8 Display 10 First steps to use 11 Filling water and coffee capsules 13 Allocating various coffee types 15 Making coffee / espresso 17 Coffee and Espresso 18 Preparing hot milk, frothed milk, and Cappuccino 19 After use 22 Setting serving sizes 23 User profiles 25 Selecting a user profile 25 Setting a user profile 25 Making coffee / espresso with user profiles 27 Setting serving sizes for user profiles 27 Settings 28 Selecting a language 28 Time of drinks 33 System lock...
Contents IMPORTANT SAFETY INSTRUCTIONS 4 Guide to the coffee system 8 Display 10 First steps to use 11 Filling water and coffee capsules 13 Allocating various coffee types 15 Making coffee / espresso 17 Coffee and Espresso 18 Preparing hot milk, frothed milk, and Cappuccino 19 After use 22 Setting serving sizes 23 User profiles 25 Selecting a user profile 25 Setting a user profile 25 Making coffee / espresso with user profiles 27 Setting serving sizes for user profiles 27 Settings 28 Selecting a language 28 Time of drinks 33 System lock...
Operating and Installation manual
Page 4
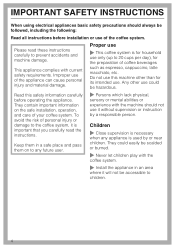
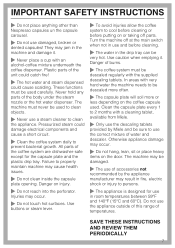
... when any future user. ~ Persons which lack physical, sensory or mental abilities or experience with the machine should always be hazardous. They could be followed, including the following: Read all instructions before operating the appliance. Read this machine other use of your coffee system. Do not use this safety information carefully before installation or use of coffee beverages such as espresso, cappuccino, latte macchiato, etc...
... when any future user. ~ Persons which lack physical, sensory or mental abilities or experience with the machine should always be hazardous. They could be followed, including the following: Read all instructions before operating the appliance. Read this machine other use of your coffee system. Do not use this safety information carefully before installation or use of coffee beverages such as espresso, cappuccino, latte macchiato, etc...

Operating and Installation manual
Page 5
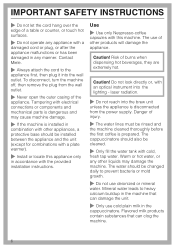
... unit. ~ This appliance must exist between the appliance and an effective grounding system. It is properly installed and grounded by Miele original spare parts only. Ensure that this appliance, continuity must not be met. Repairs and other liquids. 5 IMPORTANT SAFETY INSTRUCTIONS Technical safety ~ Before installing the appliance check for externally visible damage. If in water or other work , repairs or maintenance...
... unit. ~ This appliance must exist between the appliance and an effective grounding system. It is properly installed and grounded by Miele original spare parts only. Ensure that this appliance, continuity must not be met. Repairs and other liquids. 5 IMPORTANT SAFETY INSTRUCTIONS Technical safety ~ Before installing the appliance check for externally visible damage. If in water or other work , repairs or maintenance...
Operating and Installation manual
Page 6
... reach into the lighting - Warm or hot water, or any manner. Do not look directly or, with this appliance only in the machine that can damage the unit. ~ Only use of burns when dispensing hot beverages, they are extremely hot. Flavored milk products contain substances that can clog the machine. 6 The water should be rinsed and the machine cleaned thoroughly before the first coffee is disconnected from...
... reach into the lighting - Warm or hot water, or any manner. Do not look directly or, with this appliance only in the machine that can damage the unit. ~ Only use of burns when dispensing hot beverages, they are extremely hot. Flavored milk products contain substances that can clog the machine. 6 The water should be rinsed and the machine cleaned thoroughly before the first coffee is disconnected from...
Operating and Installation manual
Page 7
... must be used to clean objects. ~ Never use damaged, broken or dented capsules! The machine must be very hot. All parts of the coffee system are dishwasher-safe except for use the correct mixture of water and descaler. Injuries may cause health issues. ~ Do not clean inside the capsule plate opening. Clean the capsule plate every 1 to 2 months with very hard water the machine needs to be...
... must be used to clean objects. ~ Never use damaged, broken or dented capsules! The machine must be very hot. All parts of the coffee system are dishwasher-safe except for use the correct mixture of water and descaler. Injuries may cause health issues. ~ Do not clean inside the capsule plate opening. Clean the capsule plate every 1 to 2 months with very hard water the machine needs to be...

Operating and Installation manual
Page 10
Display COSI o Espresso K1 K2 K3 K4 K5 L o n G k C The main menu in the display. rinse k Maintenance program - customize appliance ^ Use < or > to select a program item in the display shows the following symbols: K Up to 5 different coffee types L Steam o Hot water n User profile for up to use the machine. descale C Settings - When the desired program item is highlighted, select OK. 10 Display Touch controls Select a touch control with your fingertip to 9 different users G Maintenance program -
Display COSI o Espresso K1 K2 K3 K4 K5 L o n G k C The main menu in the display. rinse k Maintenance program - customize appliance ^ Use < or > to select a program item in the display shows the following symbols: K Up to 5 different coffee types L Steam o Hot water n User profile for up to use the machine. descale C Settings - When the desired program item is highlighted, select OK. 10 Display Touch controls Select a touch control with your fingertip to 9 different users G Maintenance program -
Operating and Installation manual
Page 11
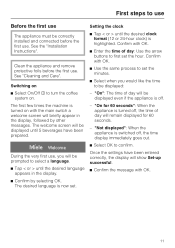
... "Cleaning and Care". The desired language is highlighted. Clean the appliance and remove protective foils before the first use. Switching on ^ Select On/Off s to turn the coffee system on with OK. ^ Use the same process to set the minutes. ^ Select when you will be displayed even if the appliance is switched off , the time of day: Use the arrow buttons to first set...
... "Cleaning and Care". The desired language is highlighted. Clean the appliance and remove protective foils before the first use. Switching on ^ Select On/Off s to turn the coffee system on with OK. ^ Use the same process to set the minutes. ^ Select when you will be displayed even if the appliance is switched off , the time of day: Use the arrow buttons to first set...
Operating and Installation manual
Page 17
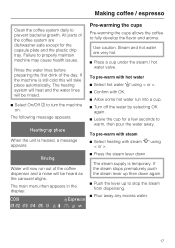
... again. ^ Push the lever up phase When the unit is heated, a message appears: Pre-warming the cups Pre-warming the cups allows the coffee to stop the steam from dispensing. ^ Pour away any excess water. 17 Failure to turn the machine on. To pre-warm with steam ^ Select heating with steam "L" using < or >. ^ Confirm with hot water ^ Select hot water "o" using < or >. The steam supply is still cold...
... again. ^ Push the lever up phase When the unit is heated, a message appears: Pre-warming the cups Pre-warming the cups allows the coffee to stop the steam from dispensing. ^ Pour away any excess water. 17 Failure to turn the machine on. To pre-warm with steam ^ Select heating with steam "L" using < or >. ^ Confirm with hot water ^ Select hot water "o" using < or >. The steam supply is still cold...

Operating and Installation manual
Page 22
..."). The process will stop automatically when the lid is best to rinse the lines automatically, they should be rinsed with OK button. ^ Push the cappuccinatore spout "in a dishwasher. Making coffee / espresso Rinsing the lid For a quick cleaning between uses of the cappuccinatore in ". ^ Place an empty cup under the cappuccinatore spout. ^ Press the steam lever down. The lines can be flushed manually before it switches...
..."). The process will stop automatically when the lid is best to rinse the lines automatically, they should be rinsed with OK button. ^ Push the cappuccinatore spout "in a dishwasher. Making coffee / espresso Rinsing the lid For a quick cleaning between uses of the cappuccinatore in ". ^ Place an empty cup under the cappuccinatore spout. ^ Press the steam lever down. The lines can be flushed manually before it switches...
Operating and Installation manual
Page 27
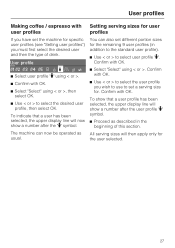
... display line will then apply only for the user selected. 27 You can now be operated as described in addition to the standard user profile). ^ Use < or > to select user profile "n". The machine can also set a serving size for. Confirm with OK. User profiles Making coffee / espresso with Setting serving sizes for user user profiles profiles If you have set the machine for specific user profiles (see "Setting user profiles") you wish to use to set different...
... display line will then apply only for the user selected. 27 You can now be operated as described in addition to the standard user profile). ^ Use < or > to select user profile "n". The machine can also set a serving size for. Confirm with OK. User profiles Making coffee / espresso with Setting serving sizes for user user profiles profiles If you have set the machine for specific user profiles (see "Setting user profiles") you wish to use to set different...
Operating and Installation manual
Page 28
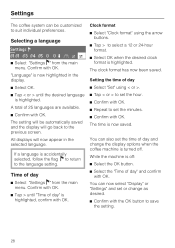
... also set or change the display options when the coffee machine is off . A total of day" and confirm with OK. You can now select "Display" or "Settings" and set the time of day" is highlighted. "Language" is now highlighted in the selected language. If a language is highlighted. Confirm with the OK button to save the setting. 28 Clock format ^ Select "Clock format" using < or...
... also set or change the display options when the coffee machine is off . A total of day" and confirm with OK. You can now select "Display" or "Settings" and set the time of day" is highlighted. "Language" is now highlighted in the selected language. If a language is highlighted. Confirm with the OK button to save the setting. 28 Clock format ^ Select "Clock format" using < or...

Operating and Installation manual
Page 34
... will not operate. Settings System lock The coffee system can be determined and programmed into the appliance. To deactivate the system lock, follow the same procedure as you know when a descaling cycle is visible in your kitchen tap for approx. 3 seconds. Place the test strip under your installation kit. The machine monitors the volume of the water used by children...
... will not operate. Settings System lock The coffee system can be determined and programmed into the appliance. To deactivate the system lock, follow the same procedure as you know when a descaling cycle is visible in your kitchen tap for approx. 3 seconds. Place the test strip under your installation kit. The machine monitors the volume of the water used by children...

Operating and Installation manual
Page 35
... be reset. 35 All settings If you wish to reset All settings to the factory default (Timer, Steam system, Lighting, System lock, Water hardness, Display, most recent coffee type selected and all standard user profile settings) or to delete the User profile. ^ Select "Settings F" from the main menu. Confirm with OK. ^ Use < or >" to set to the factory default settings. All settings will be restored. ^ Under "All settings" select...
... be reset. 35 All settings If you wish to reset All settings to the factory default (Timer, Steam system, Lighting, System lock, Water hardness, Display, most recent coffee type selected and all standard user profile settings) or to delete the User profile. ^ Select "Settings F" from the main menu. Confirm with OK. ^ Use < or >" to set to the factory default settings. All settings will be restored. ^ Under "All settings" select...

Operating and Installation manual
Page 37
... of the appliance (especially right after descaling) Once a month Clean the capsule plate (use cleaning tablets) After approx 15,000 portions Change the perforator Depending on water hardness Descale the appliance 37 Every time milk is prepared if there Rinse out the lid to the Cappuccinatore is more than one hour between uses Rinse the system (intake lines) Everyday (at least at the...
... of the appliance (especially right after descaling) Once a month Clean the capsule plate (use cleaning tablets) After approx 15,000 portions Change the perforator Depending on water hardness Descale the appliance 37 Every time milk is prepared if there Rinse out the lid to the Cappuccinatore is more than one hour between uses Rinse the system (intake lines) Everyday (at least at the...

Operating and Installation manual
Page 45
... be purchased from the main menu. Settings F K1 K2 K3 K4 K5 L o n G k C ^ Select "Settings F" from Miele. Confirm with OK. ^ Tap < or > until "Maintenance" is recommended to loosen and remove the perforator ^ Screw the new perforator firmly into the unit. Danger of coffee / espresso. The spring and ball must be changed after 15,000 cups of injury! ^ Insert the tool (supplied...
... be purchased from the main menu. Settings F K1 K2 K3 K4 K5 L o n G k C ^ Select "Settings F" from Miele. Confirm with OK. ^ Tap < or > until "Maintenance" is recommended to loosen and remove the perforator ^ Screw the new perforator firmly into the unit. Danger of coffee / espresso. The spring and ball must be changed after 15,000 cups of injury! ^ Insert the tool (supplied...
Operating and Installation manual
Page 49
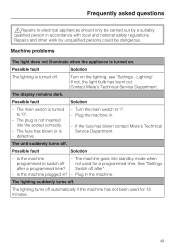
... machine has not been used for 15 minutes. 49 The unit suddenly turns off . See "Settings after ". - Plug in ? - Possible fault Solution The lighting is defective. - Is the machine - Is the machine plugged in the machine. The lighting turns off . Lighting". If the fuse has blown contact Miele's Technical Service Department. The plug is not inserted into standby mode when programmed to switch off after a programmed time...
... machine has not been used for 15 minutes. 49 The unit suddenly turns off . See "Settings after ". - Plug in ? - Possible fault Solution The lighting is defective. - Is the machine - Is the machine plugged in the machine. The lighting turns off . Lighting". If the fuse has blown contact Miele's Technical Service Department. The plug is not inserted into standby mode when programmed to switch off after a programmed time...

Operating and Installation manual
Page 53
... time and amount of coffee the - Check the water amount saved in it. The espresso / coffee is clogged. - Check if the capsule plate is not hot enough. Possible fault Solution - Maintenance". 53 The water flow stopped while the quantity was not enough water in the tank. Refill the water tank and reset the serving size. Possible fault Solution The capsule plate is reached, the water dispensing stops automatically. If the maximum water...
... time and amount of coffee the - Check the water amount saved in it. The espresso / coffee is clogged. - Check if the capsule plate is not hot enough. Possible fault Solution - Maintenance". 53 The water flow stopped while the quantity was not enough water in the tank. Refill the water tank and reset the serving size. Possible fault Solution The capsule plate is reached, the water dispensing stops automatically. If the maximum water...

Operating and Installation manual
Page 63
.... Direct connection to such power sources can cause power surges and tripped breakers when the appliance is turned on the data plate match the household electrical supply before installing or performing maintenance or repairs. If there is OFF before installing the coffee system. Verify that the power to the machine is any question concerning the electrical connection of this appliance to run hot...
.... Direct connection to such power sources can cause power surges and tripped breakers when the appliance is turned on the data plate match the household electrical supply before installing or performing maintenance or repairs. If there is OFF before installing the coffee system. Verify that the power to the machine is any question concerning the electrical connection of this appliance to run hot...
Operating and Installation manual
Page 65
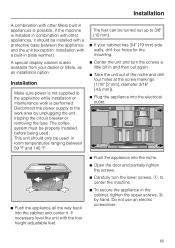
... maintenance work area by hand. A special display cabinet is installed in combination with other Miele built in appliances is not supplied to the work is performed. This unit should be turned out up to center the machine. ^ To secure the appliance in the cabinet, tighten the upper screws, b, by unplugging the unit, tripping the circuit breaker or removing the fuse. Installation Make sure power...
... maintenance work area by hand. A special display cabinet is installed in combination with other Miele built in appliances is not supplied to the work is performed. This unit should be turned out up to center the machine. ^ To secure the appliance in the cabinet, tighten the upper screws, b, by unplugging the unit, tripping the circuit breaker or removing the fuse. Installation Make sure power...

ESS 2060 System Drawer Operating and Installation manual
Page 4
... with the plate warmer. Do not let children access or play with the drawer. Only use a steam cleaner to clean this drawer. READ ALL INSTRUCTIONS! The condensation may void the warranty. Coffee System CVA 2660 Use the drawer only once it has been installed into cabinetry. Pressurized steam could be dangerous and may cause damage. Work by a Miele authorized service technician. IMPORTANT...
... with the plate warmer. Do not let children access or play with the drawer. Only use a steam cleaner to clean this drawer. READ ALL INSTRUCTIONS! The condensation may void the warranty. Coffee System CVA 2660 Use the drawer only once it has been installed into cabinetry. Pressurized steam could be dangerous and may cause damage. Work by a Miele authorized service technician. IMPORTANT...


