User Guide
Page 2
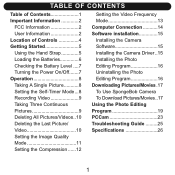
... the Video Frequency Mode 13 Computer Connection ...........14 Software installation 15 Installing the Camera Software 15 Installing the Camera Driver ..15 Installing the Photo Editing Program 16 Uninstalling the Photo Editing Program 16 Downloading Pictures/Movies .17 To Use SpongeBob Camera To Download Pictures/Movies..17 Using the Photo Editing Program 19 PCCam 23...
... the Video Frequency Mode 13 Computer Connection ...........14 Software installation 15 Installing the Camera Software 15 Installing the Camera Driver ..15 Installing the Photo Editing Program 16 Uninstalling the Photo Editing Program 16 Downloading Pictures/Movies .17 To Use SpongeBob Camera To Download Pictures/Movies..17 Using the Photo Editing Program 19 PCCam 23...

User Guide
Page 4
...matter or water get wet. Be sure to always keep backup copies of the camera can cause the image data stored in dimly-lit areas will vary. • Never attempt your own repairs. This Class B digital apparatus complies with electrostatic discharge, the user may fall. • Do not ...touch or press on the display or lens. Results in its memory to be deleted. Never use re-chargeable batteries. • Do not leave the camera in places subject to extremely ...
...matter or water get wet. Be sure to always keep backup copies of the camera can cause the image data stored in dimly-lit areas will vary. • Never attempt your own repairs. This Class B digital apparatus complies with electrostatic discharge, the user may fall. • Do not ...touch or press on the display or lens. Results in its memory to be deleted. Never use re-chargeable batteries. • Do not leave the camera in places subject to extremely ...

User Guide
Page 8
...off the unit by pressing the MODE button 2, "oFF" will appear in memory. • For self portraits, use the mirror on the front of the camera. • The power will blink; replace the batteries as described on the previous page. You can also turn the unit on. GETTING STARTED (CONTINUED) ... THE BATTERY LEVEL If the battery is low, the display will automatically turn on when a USB cable is connected to the computer and turn the camera off, press the Power button 1 until a beep is removed. 7 Then, press the SMILE button 3 to confirm. NOTES: • To save the battery power, the...
...off the unit by pressing the MODE button 2, "oFF" will appear in memory. • For self portraits, use the mirror on the front of the camera. • The power will blink; replace the batteries as described on the previous page. You can also turn the unit on. GETTING STARTED (CONTINUED) ... THE BATTERY LEVEL If the battery is low, the display will automatically turn on when a USB cable is connected to the computer and turn the camera off, press the Power button 1 until a beep is removed. 7 Then, press the SMILE button 3 to confirm. NOTES: • To save the battery power, the...
User Guide
Page 9
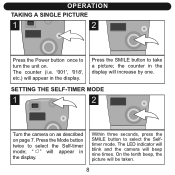
.... Press the SMILE button to turn the unit on page 7. SETTING THE SELF-TIMER MODE 1 2 Turn the camera on as described on . " " will appear in the display. The LED indicator will blink and the camera will beep nine times. Within three seconds, press the SMILE button to select the Self-timer mode...
.... Press the SMILE button to turn the unit on page 7. SETTING THE SELF-TIMER MODE 1 2 Turn the camera on as described on . " " will appear in the display. The LED indicator will blink and the camera will beep nine times. Within three seconds, press the SMILE button to select the Self-timer mode...

User Guide
Page 10
Press and hold the SMILE button to select the Continuous mode; TAKING THREE CONTINUOUS PICTURES 1 2 Turn the camera on as described on page 7. Press the Mode button four times to record a video. Within three seconds, press the SMILE button to select the Video ... available for HI (High) image quality mode. Release when you take the pictures, the unit will increase by three. OPERATION (CONTINUED) RECORDING VIDEO 1 2 Turn the camera on as described on page 7.
Press and hold the SMILE button to select the Continuous mode; TAKING THREE CONTINUOUS PICTURES 1 2 Turn the camera on as described on page 7. Press the Mode button four times to record a video. Within three seconds, press the SMILE button to select the Video ... available for HI (High) image quality mode. Release when you take the pictures, the unit will increase by three. OPERATION (CONTINUED) RECORDING VIDEO 1 2 Turn the camera on as described on page 7.
User Guide
Page 11
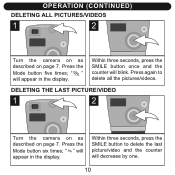
Press again to delete the last picture/video and the counter will appear in the display. DELETING THE LAST PICTURE/VIDEO 1 2 Turn the camera on as described on page 7. Press the Mode button five times; " " will blink. Within three seconds, press the SMILE button once and the counter will appear in the display. OPERATION (CONTINUED) DELETING ALL PICTURES/VIDEOS 1 2 Turn the camera on as described on page 7. " " will decrease by one. 10 Press the Mode button six times; Within three seconds, press the SMILE button to delete all the pictures/videos.
Press again to delete the last picture/video and the counter will appear in the display. DELETING THE LAST PICTURE/VIDEO 1 2 Turn the camera on as described on page 7. Press the Mode button five times; " " will blink. Within three seconds, press the SMILE button once and the counter will appear in the display. OPERATION (CONTINUED) DELETING ALL PICTURES/VIDEOS 1 2 Turn the camera on as described on page 7. " " will decrease by one. 10 Press the Mode button six times; Within three seconds, press the SMILE button to delete all the pictures/videos.
User Guide
Page 12
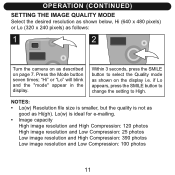
...) SETTING THE IMAGE QUALITY MODE Select the desired resolution as shown below, Hi (640 x 480 pixels) or Lo (320 x 240 pixels) as follows: 1 2 Turn the camera on as shown on page 7. Within 3 seconds, press the SMILE button to High. NOTES: • Lo(w) Resolution file size is smaller, but the quality is...
...) SETTING THE IMAGE QUALITY MODE Select the desired resolution as shown below, Hi (640 x 480 pixels) or Lo (320 x 240 pixels) as follows: 1 2 Turn the camera on as shown on page 7. Within 3 seconds, press the SMILE button to High. NOTES: • Lo(w) Resolution file size is smaller, but the quality is...

User Guide
Page 13
... will compress the pictures, allowing more pictures to Ld. 12 If "Hd" appears, then press the SMILE button to change to be stored in the camera. OPERATION (CONTINUED) SETTING THE COMPRESSION 1 Turn the...
... will compress the pictures, allowing more pictures to Ld. 12 If "Hd" appears, then press the SMILE button to change to be stored in the camera. OPERATION (CONTINUED) SETTING THE COMPRESSION 1 Turn the...
User Guide
Page 14
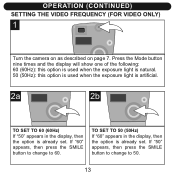
... 60 (60Hz) If "50" appears in the display, then the option is already set . OPERATION (CONTINUED) SETTING THE VIDEO FREQUENCY (FOR VIDEO ONLY) 1 Turn the camera on as described on page 7. If "50" appears, then press the SMILE button to change to 50. 13
... 60 (60Hz) If "50" appears in the display, then the option is already set . OPERATION (CONTINUED) SETTING THE VIDEO FREQUENCY (FOR VIDEO ONLY) 1 Turn the camera on as described on page 7. If "50" appears, then press the SMILE button to change to 50. 13
User Guide
Page 15
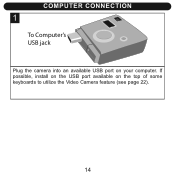
COMPUTER CONNECTION 1 To Computer's USB jack Plug the camera into an available USB port on the top of some keyboards to utilize the Video Camera feature (see page 22). 14 If possible, install on the USB port available on your computer.
COMPUTER CONNECTION 1 To Computer's USB jack Plug the camera into an available USB port on the top of some keyboards to utilize the Video Camera feature (see page 22). 14 If possible, install on the USB port available on your computer.
User Guide
Page 16
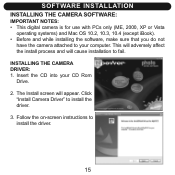
...: 1. Follow the on-screen instructions to install the driver. 3. Insert the CD into your computer. SOFTWARE INSTALLATION INSTALLING THE CAMERA SOFTWARE: IMPORTANT NOTES: • This digital camera is for use with PCs only (ME, 2000, XP or Vista operating systems) and Mac OS 10.2, 10.3, 10.4 (except iBook). &#...8226; Before and while installing the software, make sure that you do not have the camera attached to your CD Rom Drive. ...
...: 1. Follow the on-screen instructions to install the driver. 3. Insert the CD into your computer. SOFTWARE INSTALLATION INSTALLING THE CAMERA SOFTWARE: IMPORTANT NOTES: • This digital camera is for use with PCs only (ME, 2000, XP or Vista operating systems) and Mac OS 10.2, 10.3, 10.4 (except iBook). &#...8226; Before and while installing the software, make sure that you do not have the camera attached to your CD Rom Drive. ...
User Guide
Page 18
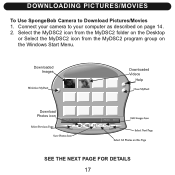
Connect your camera to Download Pictures/Movies 1. Select the MyDSC2 icon from the MyDSC2 folder on the Desktop or Select the MyDSC2 icon from the MyDSC2 program group on page 14. 2. Downloaded Images Downloaded Videos Help Download Photos icon SEE THE NEXT PAGE FOR DETAILS 17 DOWNLOADING PICTURES/MOVIES To Use SpongeBob Camera to your computer as described on the Windows Start Menu.
Connect your camera to Download Pictures/Movies 1. Select the MyDSC2 icon from the MyDSC2 folder on the Desktop or Select the MyDSC2 icon from the MyDSC2 program group on page 14. 2. Downloaded Images Downloaded Videos Help Download Photos icon SEE THE NEXT PAGE FOR DETAILS 17 DOWNLOADING PICTURES/MOVIES To Use SpongeBob Camera to your computer as described on the Windows Start Menu.

User Guide
Page 19
... Page" icon (to select all images on this , a "SAVE AS" pop-up window will appear, follow the instructions to view other pages. VIEW PICTURES/MOVIES: SpongeBob Camera shows 12 pictures/movies on an image to save the Picture/Movie. 18
... Page" icon (to select all images on this , a "SAVE AS" pop-up window will appear, follow the instructions to view other pages. VIEW PICTURES/MOVIES: SpongeBob Camera shows 12 pictures/movies on an image to save the Picture/Movie. 18
User Guide
Page 24
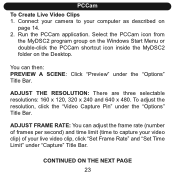
... Windows Start Menu or double-click the PCCam shortcut icon inside the MyDSC2 folder on page 14. 2. PCCam To Create Live Video Clips 1. Connect your camera to capture your video clip) of frames per second) and time limit (time to your live video clip, click "Set Frame Rate" and "Set Time...
... Windows Start Menu or double-click the PCCam shortcut icon inside the MyDSC2 folder on page 14. 2. PCCam To Create Live Video Clips 1. Connect your camera to capture your video clip) of frames per second) and time limit (time to your live video clip, click "Set Frame Rate" and "Set Time...
User Guide
Page 25
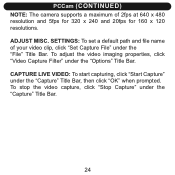
SETTINGS: To set a default path and file name of 2fps at 640 x 480 resolution and 5fps for 320 x 240 and 20fps for 160 x 120 resolutions. CAPTURE LIVE VIDEO: To start capturing, click "Start Capture" under the "File" Title Bar. PCCam (CONTINUED) NOTE: The camera supports a maximum of your video clip, click "Set Capture File" under the "Capture" Title Bar, then click "OK" when prompted. To adjust the video imaging properties, click "Video Capture Filter" under the "Capture" Title Bar. 24 To stop the video capture, click "Stop Capture" under the "Options" Title Bar. ADJUST MISC.
SETTINGS: To set a default path and file name of 2fps at 640 x 480 resolution and 5fps for 320 x 240 and 20fps for 160 x 120 resolutions. CAPTURE LIVE VIDEO: To start capturing, click "Start Capture" under the "File" Title Bar. PCCam (CONTINUED) NOTE: The camera supports a maximum of your video clip, click "Set Capture File" under the "Capture" Title Bar, then click "OK" when prompted. To adjust the video imaging properties, click "Video Capture Filter" under the "Capture" Title Bar. 24 To stop the video capture, click "Stop Capture" under the "Options" Title Bar. ADJUST MISC.

User Guide
Page 26
...Wrong frequency setting. Clean lens with a soft cloth. is grainy. Video is taken. Securely connect to the computer as Hold camera steady until picture picture was taken. Replace battery. TROUBLESHOOTING GUIDE Symptom Display is dirty. Poor lighting. Lens is not on. Subject or... camera moved as described in better lighting. Pictures are poor quality. Battery is weak or dead. Set Image Quality to Lo(w). Poor...
...Wrong frequency setting. Clean lens with a soft cloth. is grainy. Video is taken. Securely connect to the computer as Hold camera steady until picture picture was taken. Replace battery. TROUBLESHOOTING GUIDE Symptom Display is dirty. Poor lighting. Lens is not on. Subject or... camera moved as described in better lighting. Pictures are poor quality. Battery is weak or dead. Set Image Quality to Lo(w). Poor...
User Guide
Page 27
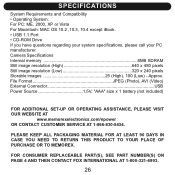
...CASE YOU NEED TO RETURN THIS PRODUCT TO YOUR PLACE OF PURCHASE OR TO MEMOREX. Approx. FOR CONSUMER REPLACEABLE PART(S), SEE PART NUMBER(S) ON PAGE 4 AND...FOR ADDITIONAL SET-UP OR OPERATING ASSISTANCE, PLEASE VISIT OUR WEBSITE AT www.memorexelectronics.com/npower OR CONTACT CUSTOMER SERVICE AT 1-866-830-5434. SPECIFICATIONS System Requirements and Compatibility •... CD-ROM Drive If you have questions regarding your system specifications, please call your PC manufacturer. Camera Specifications Internal memory 8MB SDRAM Still image resolution (High 640 x 480 pixels Still image resolution (...
...CASE YOU NEED TO RETURN THIS PRODUCT TO YOUR PLACE OF PURCHASE OR TO MEMOREX. Approx. FOR CONSUMER REPLACEABLE PART(S), SEE PART NUMBER(S) ON PAGE 4 AND...FOR ADDITIONAL SET-UP OR OPERATING ASSISTANCE, PLEASE VISIT OUR WEBSITE AT www.memorexelectronics.com/npower OR CONTACT CUSTOMER SERVICE AT 1-866-830-5434. SPECIFICATIONS System Requirements and Compatibility •... CD-ROM Drive If you have questions regarding your system specifications, please call your PC manufacturer. Camera Specifications Internal memory 8MB SDRAM Still image resolution (High 640 x 480 pixels Still image resolution (...


