User Guide
Page 2
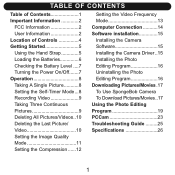
...Important Information 2 FCC Information 2 User Information 2 Location of Controls 4 Getting Started 5 Using the Hand Strap 5 Loading the Batteries 6 Checking the Battery Level ....7 Turning the Power On/Off.......7 Operation 8 Taking A Single Picture...........8 Setting the Self-Timer Mode...8 Recording Video 9 ... Software installation 15 Installing the Camera Software 15 Installing the Camera Driver ..15 Installing the Photo Editing Program 16 Uninstalling the Photo Editing Program 16 Downloading Pictures/Movies .17 To Use SpongeBob Camera To Download Pictures/Movies..17 Using...
...Important Information 2 FCC Information 2 User Information 2 Location of Controls 4 Getting Started 5 Using the Hand Strap 5 Loading the Batteries 6 Checking the Battery Level ....7 Turning the Power On/Off.......7 Operation 8 Taking A Single Picture...........8 Setting the Self-Timer Mode...8 Recording Video 9 ... Software installation 15 Installing the Camera Software 15 Installing the Camera Driver ..15 Installing the Photo Editing Program 16 Uninstalling the Photo Editing Program 16 Downloading Pictures/Movies .17 To Use SpongeBob Camera To Download Pictures/Movies..17 Using...

User Guide
Page 4
.... • Should foreign matter or water get wet. Be sure to always keep backup copies of the camera can cause the image data stored in its memory to be deleted. This Class B digital apparatus complies with electrostatic discharge, the user may fall. • Do not touch or press on the... own repairs. Cet appareil numérique de la classe B est conforme à la norme NMB-003 du Canada. 3 Never use re-chargeable batteries. • Do not leave the camera in places subject to extremely high temperatures, such as a sealed vehicle or in direct sunlight. • Do not place the...
.... • Should foreign matter or water get wet. Be sure to always keep backup copies of the camera can cause the image data stored in its memory to be deleted. This Class B digital apparatus complies with electrostatic discharge, the user may fall. • Do not touch or press on the... own repairs. Cet appareil numérique de la classe B est conforme à la norme NMB-003 du Canada. 3 Never use re-chargeable batteries. • Do not leave the camera in places subject to extremely high temperatures, such as a sealed vehicle or in direct sunlight. • Do not place the...
User Guide
Page 5
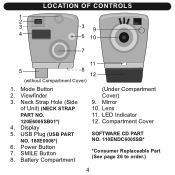
Mirror 10. Lens 11. Mode Button 2. Viewfinder 3. Compartment Cover SOFTWARE CD PART NO. 110ENDC6005SB* *Consumer Replaceable Part (See page 26 to order.) 4 Power Button 7. Display 5. USB Plug (USB PART NO. 180E0008*) 6. Neck Strap Hole (Side of Unit) (NECK STRAP PART NO. 120E6005SB01*) 4. LED Indicator 12. LOCATION OF CONTROLS 1 2 3 39 4 6 10 7 11 5 8 12 (without Compartment Cover) 1. Battery Compartment (Under Compartment Cover) 9. SMILE Button 8.
Mirror 10. Lens 11. Mode Button 2. Viewfinder 3. Compartment Cover SOFTWARE CD PART NO. 110ENDC6005SB* *Consumer Replaceable Part (See page 26 to order.) 4 Power Button 7. Display 5. USB Plug (USB PART NO. 180E0008*) 6. Neck Strap Hole (Side of Unit) (NECK STRAP PART NO. 120E6005SB01*) 4. LED Indicator 12. LOCATION OF CONTROLS 1 2 3 39 4 6 10 7 11 5 8 12 (without Compartment Cover) 1. Battery Compartment (Under Compartment Cover) 9. SMILE Button 8.
User Guide
Page 7
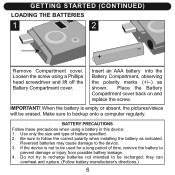
...these precautions when using a Phillips head screwdriver and lift off the Battery Compartment cover. Be sure to the device. 3. Reversed batteries may cause damage to follow the correct polarity when installing the battery as shown. If the device is empty or absent, the pictures...recharged; Loosen the screw using a battery in this device: 1. Insert an AAA battery into the Battery Compartment, observing the polarity marks (+/-) as indicated. Do not try to recharge batteries not intended to backup onto a computer regularly. When the battery is not to prevent damage or injury...
...these precautions when using a Phillips head screwdriver and lift off the Battery Compartment cover. Be sure to the device. 3. Reversed batteries may cause damage to follow the correct polarity when installing the battery as shown. If the device is empty or absent, the pictures...recharged; Loosen the screw using a battery in this device: 1. Insert an AAA battery into the Battery Compartment, observing the polarity marks (+/-) as indicated. Do not try to recharge batteries not intended to backup onto a computer regularly. When the battery is not to prevent damage or injury...

User Guide
Page 8
GETTING STARTED (CONTINUED) CHECKING THE BATTERY LEVEL If the battery is low, the display will automatically turn on when a USB cable is connected to confirm. To turn off , press the Power button 1 until a beep is removed. 7 You can also turn the camera off the unit by pressing the MODE button 2, ..."oFF" will appear in memory. • For self portraits, use the mirror on the front of the camera. • The power will blink; NOTES: • To save the battery power, the unit will automatically turn off . Then, press the SMILE button 3 to the computer and turn the ...
GETTING STARTED (CONTINUED) CHECKING THE BATTERY LEVEL If the battery is low, the display will automatically turn on when a USB cable is connected to confirm. To turn off , press the Power button 1 until a beep is removed. 7 You can also turn the camera off the unit by pressing the MODE button 2, ..."oFF" will appear in memory. • For self portraits, use the mirror on the front of the camera. • The power will blink; NOTES: • To save the battery power, the unit will automatically turn off . Then, press the SMILE button 3 to the computer and turn the ...

User Guide
Page 26
...25 TROUBLESHOOTING GUIDE Symptom Display is not on . Battery is taken. Replace battery. Memory is grainy. Delete some pictures. Video is full. Image Quality set to the computer as Hold camera steady until picture picture was taken. Battery is dirty. Possible Cause Power is off. Lens... is weak or dead. Subject or camera moved as described in better lighting. Can't upload pictures. Power is...
...25 TROUBLESHOOTING GUIDE Symptom Display is not on . Battery is taken. Replace battery. Memory is grainy. Delete some pictures. Video is full. Image Quality set to the computer as Hold camera steady until picture picture was taken. Battery is dirty. Possible Cause Power is off. Lens... is weak or dead. Subject or camera moved as described in better lighting. Can't upload pictures. Power is...
User Guide
Page 27
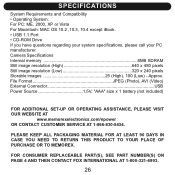
... PACKAGING MATERIAL FOR AT LEAST 90 DAYS IN CASE YOU NEED TO RETURN THIS PRODUCT TO YOUR PLACE OF PURCHASE OR TO MEMOREX. Approx. Camera Specifications Internal memory 8MB SDRAM Still image resolution (High 640 x 480 pixels Still image resolution (Low 320 x 240 pixels Storable...(Photo), AVI (Video) External Connector USB Power Source 1.5V, "AAA" size x 1 battery (not included) FOR ADDITIONAL SET-UP OR OPERATING ASSISTANCE, PLEASE VISIT OUR WEBSITE AT www.memorexelectronics.com/npower OR CONTACT CUSTOMER SERVICE AT 1-866-830-5434. FOR CONSUMER REPLACEABLE PART(S), SEE PART NUMBER(S) ...
... PACKAGING MATERIAL FOR AT LEAST 90 DAYS IN CASE YOU NEED TO RETURN THIS PRODUCT TO YOUR PLACE OF PURCHASE OR TO MEMOREX. Approx. Camera Specifications Internal memory 8MB SDRAM Still image resolution (High 640 x 480 pixels Still image resolution (Low 320 x 240 pixels Storable...(Photo), AVI (Video) External Connector USB Power Source 1.5V, "AAA" size x 1 battery (not included) FOR ADDITIONAL SET-UP OR OPERATING ASSISTANCE, PLEASE VISIT OUR WEBSITE AT www.memorexelectronics.com/npower OR CONTACT CUSTOMER SERVICE AT 1-866-830-5434. FOR CONSUMER REPLACEABLE PART(S), SEE PART NUMBER(S) ...
