
User Guide
Page 3
IMPORTANT INFORMATION FCC INFORMATION FCC WARNING: This equipment meets the limits for a class B digital device, pursuant to Part 15 of the FCC Rules. USER INFORMATION This equipment has ...television reception, which the receiver is connected. • Consult the dealer or an experienced radio/TV technician for a class B digital device, pursuant to which can radiate radio frequency energy and, if not installed and used in a residential installation. Changes or ... is subject to provide reasonable protection against harmful interference in accordance with the limits for help. 2
IMPORTANT INFORMATION FCC INFORMATION FCC WARNING: This equipment meets the limits for a class B digital device, pursuant to Part 15 of the FCC Rules. USER INFORMATION This equipment has ...television reception, which the receiver is connected. • Consult the dealer or an experienced radio/TV technician for a class B digital device, pursuant to which can radiate radio frequency energy and, if not installed and used in a residential installation. Changes or ... is subject to provide reasonable protection against harmful interference in accordance with the limits for help. 2
User Guide
Page 18
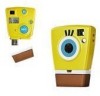
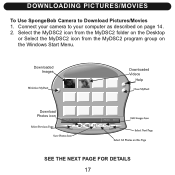
Downloaded Images Downloaded Videos Help Download Photos icon SEE THE NEXT PAGE FOR DETAILS 17 DOWNLOADING PICTURES/MOVIES To Use SpongeBob Camera to your computer as described on the Windows Start Menu. Select the MyDSC2 icon from the MyDSC2 folder on the Desktop or Select the MyDSC2 icon from the MyDSC2 program group on page 14. 2. Connect your camera to Download Pictures/Movies 1.
Downloaded Images Downloaded Videos Help Download Photos icon SEE THE NEXT PAGE FOR DETAILS 17 DOWNLOADING PICTURES/MOVIES To Use SpongeBob Camera to your computer as described on the Windows Start Menu. Select the MyDSC2 icon from the MyDSC2 folder on the Desktop or Select the MyDSC2 icon from the MyDSC2 program group on page 14. 2. Connect your camera to Download Pictures/Movies 1.
User Guide
Page 21
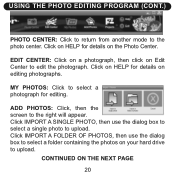
Click on HELP for editing. Click IMPORT A SINGLE PHOTO, then use the dialog box to upload. CONTINUED ON THE NEXT PAGE 20 MY PHOTOS: Click to select a photograph ... click on editing photographs. USING THE PHOTO EDITING PROGRAM (CONT.) PHOTO CENTER: Click to return from another mode to the right will appear. Click on HELP for details on Edit Center to upload. Click IMPORT A FOLDER OF PHOTOS, then use the dialog box to select a single photo to edit the photograph...
Click on HELP for editing. Click IMPORT A SINGLE PHOTO, then use the dialog box to upload. CONTINUED ON THE NEXT PAGE 20 MY PHOTOS: Click to select a photograph ... click on editing photographs. USING THE PHOTO EDITING PROGRAM (CONT.) PHOTO CENTER: Click to return from another mode to the right will appear. Click on HELP for details on Edit Center to upload. Click IMPORT A FOLDER OF PHOTOS, then use the dialog box to select a single photo to edit the photograph...
User Guide
Page 22
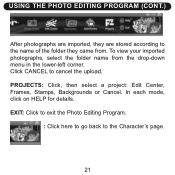
To view your imported photographs, select the folder name from . PROJECTS: Click, then select a project: Edit Center, Frames, Stamps, Backgrounds or Cancel. EXIT: Click to exit the Photo Editing Program. : Click here to go back to cancel the upload. In each mode, click on HELP for details. Click CANCEL to the Character's page. 21 USING THE PHOTO EDITING PROGRAM (CONT.) After photographs are imported, they are stored according to the name of the folder they came from the drop-down menu in the lower-left corner.
To view your imported photographs, select the folder name from . PROJECTS: Click, then select a project: Edit Center, Frames, Stamps, Backgrounds or Cancel. EXIT: Click to exit the Photo Editing Program. : Click here to go back to cancel the upload. In each mode, click on HELP for details. Click CANCEL to the Character's page. 21 USING THE PHOTO EDITING PROGRAM (CONT.) After photographs are imported, they are stored according to the name of the folder they came from the drop-down menu in the lower-left corner.