
User Guide
Page 1
MPD8812 User's Guide Personal Compact Disc MP3 Player Before operating this product, please read these instructions completely.
MPD8812 User's Guide Personal Compact Disc MP3 Player Before operating this product, please read these instructions completely.
User Guide
Page 2
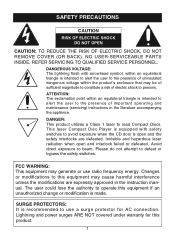
... within an equilateral triangle is recommended to use radio frequency energy. Lightning and power surges ARE NOT covered under warranty for AC connection. Changes or modifications to avoid exposure when the CD door is made. DANGEROUS VOLTAGE: The lightning flash with safety switches to this equipment may generate or use a surge protector for this equipment if an...
... within an equilateral triangle is recommended to use radio frequency energy. Lightning and power surges ARE NOT covered under warranty for AC connection. Changes or modifications to avoid exposure when the CD door is made. DANGEROUS VOLTAGE: The lightning flash with safety switches to this equipment may generate or use a surge protector for this equipment if an...

User Guide
Page 3
.... • Connect the equipment into an outlet on a stable surface. • Avoid installing the unit in accordance with the limits for help. • Do not open the CD compartment while the CD is rotating. • Always keep the CD compartment closed when not in use. •... harmful interference in a particular installation. If this equipment does cause harmful interference to radio or television reception, which the receiver is connected. • Consult the dealer or an experienced radio/TV technician for a Class B digital device, pursuant to Part 15 of other stereo equipment ...
.... • Connect the equipment into an outlet on a stable surface. • Avoid installing the unit in accordance with the limits for help. • Do not open the CD compartment while the CD is rotating. • Always keep the CD compartment closed when not in use. •... harmful interference in a particular installation. If this equipment does cause harmful interference to radio or television reception, which the receiver is connected. • Consult the dealer or an experienced radio/TV technician for a Class B digital device, pursuant to Part 15 of other stereo equipment ...

User Guide
Page 4
... disposals, alarm clock at a low setting. • Slowly increase the sound until it is only the start of your musical enjoyment. We Want You LISTENING For A Lifetime NIC O IND U EIA EST. 1924 S SO C I A TIO ELECTR N TRIES S A 3 Dear Customer: Selecting fine audio equipment such as... Deafness Research Foundation. Sound can hear it there. Once you listening for your new sound equipment will help to higher volumes of fun and enjoyment. Guard against this now will provide a lifetime of sound. We Want You Listening For A Lifetime Used wisely, your protection...
... disposals, alarm clock at a low setting. • Slowly increase the sound until it is only the start of your musical enjoyment. We Want You LISTENING For A Lifetime NIC O IND U EIA EST. 1924 S SO C I A TIO ELECTR N TRIES S A 3 Dear Customer: Selecting fine audio equipment such as... Deafness Research Foundation. Sound can hear it there. Once you listening for your new sound equipment will help to higher volumes of fun and enjoyment. Guard against this now will provide a lifetime of sound. We Want You Listening For A Lifetime Used wisely, your protection...

User Guide
Page 5
DC 4.5V Jack (Rear of Unit) 12. CD Door Open Switch 15. PLAY/PAUSE (®p)/POWER ON/L Button 9. PHONES Jack (Side of Unit) - + 10. Skip (o)/¦ Button 2. CD Compartment 14. STOP (I)/POWER OFF/M Button 4 ESP/MENU Button 6. MODE/CLEAR Button 7. Skip (n)/‹ Button 3. PROG./EQ/ENTER Button 4. VOLUME Buttons (Side of Unit) 8. Display 5. Battery Compartment (Bottom of Unit) 13. LINE OUT Jack (Side of Unit) 11. MAIN UNIT LOCATION OF CONTROLS 1 2 34 5 6 7 8 9 10 11 12 13 14 15 1.
DC 4.5V Jack (Rear of Unit) 12. CD Door Open Switch 15. PLAY/PAUSE (®p)/POWER ON/L Button 9. PHONES Jack (Side of Unit) - + 10. Skip (o)/¦ Button 2. CD Compartment 14. STOP (I)/POWER OFF/M Button 4 ESP/MENU Button 6. MODE/CLEAR Button 7. Skip (n)/‹ Button 3. PROG./EQ/ENTER Button 4. VOLUME Buttons (Side of Unit) 8. Display 5. Battery Compartment (Bottom of Unit) 13. LINE OUT Jack (Side of Unit) 11. MAIN UNIT LOCATION OF CONTROLS 1 2 34 5 6 7 8 9 10 11 12 13 14 15 1.

User Guide
Page 7
... cannot be recharged; If the device is used for the longest playing time. they can overheat and rupture. (Follow battery manufacturer's directions.) AC OPERATION To operate the unit using AC power, connect an AC adapter (not included) to the polarity diagram inside the battery compartment. POWER SOURCES This CD player requires either two (2) "AA" cell standard batteries (not included) or the AC adapter (not included). Insert two (2) "AA...
... cannot be recharged; If the device is used for the longest playing time. they can overheat and rupture. (Follow battery manufacturer's directions.) AC OPERATION To operate the unit using AC power, connect an AC adapter (not included) to the polarity diagram inside the battery compartment. POWER SOURCES This CD player requires either two (2) "AA" cell standard batteries (not included) or the AC adapter (not included). Insert two (2) "AA...

User Guide
Page 8
.... Before making any buttons on . The unit will light for one minute. Radio Sound Through a Home Audio System By using an AC adapter, the backlight will light on . CD OPERATION TURNING POWER ON/OFF ADJUSTING THE VOLUME 1 1 21 1 2 Press the PLAY/PAUSE (®p) /POWER ON/L button 1 to turn off the power to all equipment. To turn the unit is on, the backlight will always be playing to change the EQ setting...
.... Before making any buttons on . The unit will light for one minute. Radio Sound Through a Home Audio System By using an AC adapter, the backlight will light on . CD OPERATION TURNING POWER ON/OFF ADJUSTING THE VOLUME 1 1 21 1 2 Press the PLAY/PAUSE (®p) /POWER ON/L button 1 to turn off the power to all equipment. To turn the unit is on, the backlight will always be playing to change the EQ setting...
User Guide
Page 9
... Audio Discs and MP3 CD ROMS, such as desired. the current track and elapsed playing time (CD information and folder will also appear, if using MP3) will stop the disc before it is through the preset EQ settings: NORMAL, CLASSIC, POP, JAZZ and ROCK.The CD must be playing to change the EQ setting. Press the STOP (I )/POWER OFF/M button to stop . Press the STOP (I )/POWER OFF/M button again to turn...
... Audio Discs and MP3 CD ROMS, such as desired. the current track and elapsed playing time (CD information and folder will also appear, if using MP3) will stop the disc before it is through the preset EQ settings: NORMAL, CLASSIC, POP, JAZZ and ROCK.The CD must be playing to change the EQ setting. Press the STOP (I )/POWER OFF/M button to stop . Press the STOP (I )/POWER OFF/M button again to turn...

User Guide
Page 10
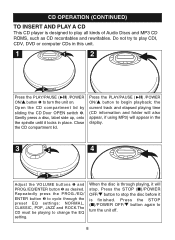
... wish to read an MP3 CD and begin playback, depending on the CD. CD OPERATION (CONTINUED) CD PLAYBACK NOTES: • See page 16 for the player to pause the disc momentarily, press the PLAY/PAUSE (®p) /POWER ON/L button. The sound returns and the elapsed time in the display stops flashing. 9 Playback stops but it is not recorded properly, "No File" will appear in the display. • Playback will blink in...
... wish to read an MP3 CD and begin playback, depending on the CD. CD OPERATION (CONTINUED) CD PLAYBACK NOTES: • See page 16 for the player to pause the disc momentarily, press the PLAY/PAUSE (®p) /POWER ON/L button. The sound returns and the elapsed time in the display stops flashing. 9 Playback stops but it is not recorded properly, "No File" will appear in the display. • Playback will blink in...
User Guide
Page 11
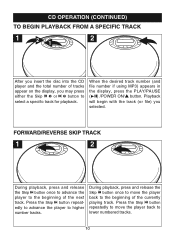
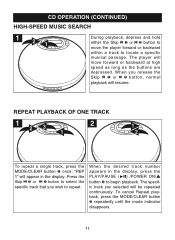
... file number if using MP3) appears in the display, press the PLAY/PAUSE (®p) /POWER ON/L button. CD OPERATION (CONTINUED) TO BEGIN PLAYBACK FROM A SPECIFIC TRACK 1 21 2 After you insert the disc into the CD player and the total number of tracks appear on the display, you selected. FORWARD/REVERSE SKIP TRACK 1 2 During playback, press and release the Skip n button once to advance the player to select a specific track for playback...
... file number if using MP3) appears in the display, press the PLAY/PAUSE (®p) /POWER ON/L button. CD OPERATION (CONTINUED) TO BEGIN PLAYBACK FROM A SPECIFIC TRACK 1 21 2 After you insert the disc into the CD player and the total number of tracks appear on the display, you selected. FORWARD/REVERSE SKIP TRACK 1 2 During playback, press and release the Skip n button once to advance the player to select a specific track for playback...
User Guide
Page 12
... display, press the PLAY/PAUSE (®p) /POWER ON/L button 1 to select the specific track that you release the Skip o 1 or n 2 button, normal playback will move the player forward or backward within a track to repeat. When the desired track number appears in the display. To cancel Repeat playback, press the MODE/CLEAR button 2 repeatedly until the mode indicator disappears. 11 The player will resume. When you wish to locate a specific musical...
... display, press the PLAY/PAUSE (®p) /POWER ON/L button 1 to select the specific track that you release the Skip o 1 or n 2 button, normal playback will move the player forward or backward within a track to repeat. When the desired track number appears in the display. To cancel Repeat playback, press the MODE/CLEAR button 2 repeatedly until the mode indicator disappears. 11 The player will resume. When you wish to locate a specific musical...

User Guide
Page 13
... button 1 three times; To cancel Repeat playback, press the MODE/CLEAR button 2 repeatedly until the mode indicator disappears. All tracks on MP3 format. 12 To cancel Repeat playback, press the MODE/CLEAR button 2 repeatedly until the mode indicator disappears. Press the PLAY/PAUSE (®p)/POWER ON/L button 1 to begin playback. Press the Skip o 2 or n 3 button to select the specific directory that you wish to begin playback. Press the PLAY/PAUSE (®p)/POWER ON/L button 1 to repeat. CD OPERATION (CONTINUED) REPEAT PLAYBACK...
... button 1 three times; To cancel Repeat playback, press the MODE/CLEAR button 2 repeatedly until the mode indicator disappears. All tracks on MP3 format. 12 To cancel Repeat playback, press the MODE/CLEAR button 2 repeatedly until the mode indicator disappears. Press the PLAY/PAUSE (®p)/POWER ON/L button 1 to begin playback. Press the Skip o 2 or n 3 button to select the specific directory that you wish to begin playback. Press the PLAY/PAUSE (®p)/POWER ON/L button 1 to repeat. CD OPERATION (CONTINUED) REPEAT PLAYBACK...
User Guide
Page 15
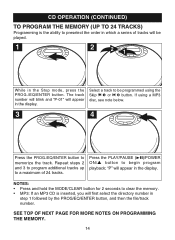
... file/track number. If using the Skip o 1 or n 2 button. CD OPERATION (CONTINUED) TO PROGRAM THE MEMORY (UP TO 24 TRACKS) Programming is inserted, you will first select the directory number in the display. Select a track to a maximum of tracks will be programmed using a MP3 disc, see note below. 3 4 Press the PROG./EQ/ENTER button to begin program playback; Press the PLAY/PAUSE (®p)/POWER ON/L button to memorize the track. Repeat...
... file/track number. If using the Skip o 1 or n 2 button. CD OPERATION (CONTINUED) TO PROGRAM THE MEMORY (UP TO 24 TRACKS) Programming is inserted, you will first select the directory number in the display. Select a track to a maximum of tracks will be programmed using a MP3 disc, see note below. 3 4 Press the PROG./EQ/ENTER button to begin program playback; Press the PLAY/PAUSE (®p)/POWER ON/L button to memorize the track. Repeat...
User Guide
Page 16
... program memory, simply press the PROG./EQ/ ENTER button repeatedly until the track (directory for MP3) appears and "00" blinks in the display. ESP (ELECTRONIC SKIP PROTECTION) This feature protects against loss of sound caused by simply pressing the MENU/ESP button; CD OPERATION (CONTINUED) NOTES ON PROGRAM PLAYBACK • You can review the program by pressing the PROG./EQ/ENTER button repeatedly while in the Stop mode...
... program memory, simply press the PROG./EQ/ ENTER button repeatedly until the track (directory for MP3) appears and "00" blinks in the display. ESP (ELECTRONIC SKIP PROTECTION) This feature protects against loss of sound caused by simply pressing the MENU/ESP button; CD OPERATION (CONTINUED) NOTES ON PROGRAM PLAYBACK • You can review the program by pressing the PROG./EQ/ENTER button repeatedly while in the Stop mode...
User Guide
Page 17
... on the CDR. Does the unit support multi-session CDRs? CD OPERATION (CONTINUED) MP3 FAQs - You can read only the MP3 files on the display when playing back MP3 CDs? However you jog or run on a treadmill or drive on the same CD. There will ignore those files and read MP3 files from subfolders. Can I use the MP3 extension for non-audio data files? Yes it can . What it means...
... on the CDR. Does the unit support multi-session CDRs? CD OPERATION (CONTINUED) MP3 FAQs - You can read only the MP3 files on the display when playing back MP3 CDs? However you jog or run on a treadmill or drive on the same CD. There will ignore those files and read MP3 files from subfolders. Can I use the MP3 extension for non-audio data files? Yes it can . What it means...

User Guide
Page 18
... through the list. Select the first letter of files starting with the selected letter will automatically start playing. When the desired file appears, press the PROG./EQ/ENTER button and the file will appear. Press the Skip o/¦ 2 and/or n/‹ 3 buttons to using the Skip o/¦ 1 and/or n/‹ 2 buttons. CD OPERATION (CONTINUED) SELECTING SONGS BY MP3 TITLE You can search for a song by title...
... through the list. Select the first letter of files starting with the selected letter will automatically start playing. When the desired file appears, press the PROG./EQ/ENTER button and the file will appear. Press the Skip o/¦ 2 and/or n/‹ 3 buttons to using the Skip o/¦ 1 and/or n/‹ 2 buttons. CD OPERATION (CONTINUED) SELECTING SONGS BY MP3 TITLE You can search for a song by title...
User Guide
Page 19
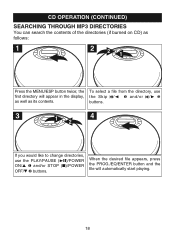
... change directories, use first directory will automatically start playing. 18 When the desired file appears, press the PROG./EQ/ENTER button and the file will appear in the display, the Skip o/¦ 1 and/or n/‹ 2 as well as follows: 1 2 21 Press the MENU/ESP button twice; the To select a file from the directory, use the PLAY/PAUSE (®p)/POWER ON/L 1 and/or STOP (I)/POWER OFF/M 2 buttons. CD OPERATION...
... change directories, use first directory will automatically start playing. 18 When the desired file appears, press the PROG./EQ/ENTER button and the file will appear in the display, the Skip o/¦ 1 and/or n/‹ 2 as well as follows: 1 2 21 Press the MENU/ESP button twice; the To select a file from the directory, use the PLAY/PAUSE (®p)/POWER ON/L 1 and/or STOP (I)/POWER OFF/M 2 buttons. CD OPERATION...
User Guide
Page 20
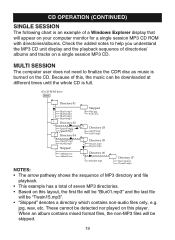
... non-MP3 files will appear on your computer monitor for a single session MP3 CD ROM with directories/albums. Check the added notes to finalize the CDR disc as music is burned on this player. These cannot be detected nor played on a single session MP3 CD. Because of this, the music can be downloaded at different times until the whole CD is full. (E) CD-ROM drive...
... non-MP3 files will appear on your computer monitor for a single session MP3 CD ROM with directories/albums. Check the added notes to finalize the CDR disc as music is burned on this player. These cannot be detected nor played on a single session MP3 CD. Because of this, the music can be downloaded at different times until the whole CD is full. (E) CD-ROM drive...
User Guide
Page 22
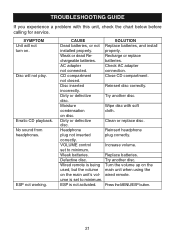
... batteries, or not Replace batteries, and install installed properly. Recharge or replace chargeable batteries. connection. Dirty or defective disc. Headphone Reinsert headphone plug not inserted plug correctly. set to minimum. TROUBLESHOOTING GUIDE If you experience a problem with soft condensation cloth. No sound from headphones. properly. Disc inserted Reinsert disc correctly. Dirty or defective Try another disc. VOLUME control Increase volume. Defective disc. SYMPTOM Unit will not play. batteries...
... batteries, or not Replace batteries, and install installed properly. Recharge or replace chargeable batteries. connection. Dirty or defective disc. Headphone Reinsert headphone plug not inserted plug correctly. set to minimum. TROUBLESHOOTING GUIDE If you experience a problem with soft condensation cloth. No sound from headphones. properly. Disc inserted Reinsert disc correctly. Dirty or defective Try another disc. VOLUME control Increase volume. Defective disc. SYMPTOM Unit will not play. batteries...

User Guide
Page 23
... ALL PACKAGING MATERIAL FOR AT LEAST 90 DAYS IN CASE YOU NEED TO RETURN THIS PRODUCT TO YOUR PLACE OF PURCHASE OR MEMOREX. SPECIFICATIONS Power Requirement DC 2 x AA (LR6) Alkaline batteries Power requirement AC DC IN 4.5V Adapter (center positive) Output Level (Line Out 0.6VMS...for MPEG1 MP3 Playback ISO9660 format compatible Check the CD burner/recorder's documentation to see if it complies with these specifications. FOR ADDITIONAL SET-UP OR OPERATING ASSISTANCE, PLEASE VISIT OUR WEBSITE AT WWW.MEMOREXELECTRONICS.COM OR CONTACT CUSTOMER SERVICE AT 1-800-919-3647. FOR PARTS AND ...
... ALL PACKAGING MATERIAL FOR AT LEAST 90 DAYS IN CASE YOU NEED TO RETURN THIS PRODUCT TO YOUR PLACE OF PURCHASE OR MEMOREX. SPECIFICATIONS Power Requirement DC 2 x AA (LR6) Alkaline batteries Power requirement AC DC IN 4.5V Adapter (center positive) Output Level (Line Out 0.6VMS...for MPEG1 MP3 Playback ISO9660 format compatible Check the CD burner/recorder's documentation to see if it complies with these specifications. FOR ADDITIONAL SET-UP OR OPERATING ASSISTANCE, PLEASE VISIT OUR WEBSITE AT WWW.MEMOREXELECTRONICS.COM OR CONTACT CUSTOMER SERVICE AT 1-800-919-3647. FOR PARTS AND ...


