
User Guide
Page 1
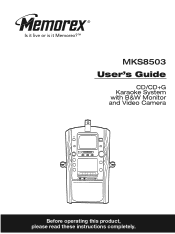
MKS8503 User's Guide CD/CD+G Karaoke System with B&W Monitor and Video Camera Before operating this product, please read these instructions completely.
MKS8503 User's Guide CD/CD+G Karaoke System with B&W Monitor and Video Camera Before operating this product, please read these instructions completely.

User Guide
Page 2
... made. PLEASE KEEP ALL PACKAGING MATERIAL FOR AT LEAST 90 DAYS IN CASE YOU NEED TO RETURN THIS PRODUCT TO YOUR PLACE OF PURCHASE OR MEMOREX. DANGEROUS VOLTAGE: The lightning flash with it and obtain the performance that interference will bring you continued enjoyment for a Class B digital device, pursuant to...
... made. PLEASE KEEP ALL PACKAGING MATERIAL FOR AT LEAST 90 DAYS IN CASE YOU NEED TO RETURN THIS PRODUCT TO YOUR PLACE OF PURCHASE OR MEMOREX. DANGEROUS VOLTAGE: The lightning flash with it and obtain the performance that interference will bring you continued enjoyment for a Class B digital device, pursuant to...

User Guide
Page 3
One that lets the sound come through loud and clear without annoying blaring or distortion-and, most out of your musical enjoyment. Over time your sensitive hearing. Once you have established a comfortable sound level: • Set the dial and leave it comfortably and clearly, and without affecting your hearing "comfort level" adapts to higher volumes of sound. After all, we want you to excessive noise. Decibel Level Example 30 Quiet library, soft whispers 40 Living room, refrigerator, bedroom away from loud noise is often undetectable until you can actually be deceiving....
One that lets the sound come through loud and clear without annoying blaring or distortion-and, most out of your musical enjoyment. Over time your sensitive hearing. Once you have established a comfortable sound level: • Set the dial and leave it comfortably and clearly, and without affecting your hearing "comfort level" adapts to higher volumes of sound. After all, we want you to excessive noise. Decibel Level Example 30 Quiet library, soft whispers 40 Living room, refrigerator, bedroom away from loud noise is often undetectable until you can actually be deceiving....

User Guide
Page 4
For example, this unit may fall into the outlet, try reversing the plug. READ INSTRUCTIONS All the safety and operating instructions should never be read all servicing to the operating instructions. 11. ATTACHMENTS Do not use attachments not recommended by following conditions: a. or near a bathtub, washbowl, kitchen sink or laundry tub; VENTILATION Slots and openings in the cabinet and in performance-this product near water-for example: near a swimming pool. 8. This product should be placed near or over a radiator or heat source. LIGHTNING To protect your...
For example, this unit may fall into the outlet, try reversing the plug. READ INSTRUCTIONS All the safety and operating instructions should never be read all servicing to the operating instructions. 11. ATTACHMENTS Do not use attachments not recommended by following conditions: a. or near a bathtub, washbowl, kitchen sink or laundry tub; VENTILATION Slots and openings in the cabinet and in performance-this product near water-for example: near a swimming pool. 8. This product should be placed near or over a radiator or heat source. LIGHTNING To protect your...

User Guide
Page 5
... 23 12. MIC 1 Holder 24 13. Speaker 20. REPEAT Button 28. BRIGHT Control 36. Color Video Camera 2. CD Display 23. PLAY/PAUSE (®P) Button 25. MONITOR Switch (CAMERA/CDG/AUX/OFF) 29. PITCH Control 33. Monitor 3. AVC (Auto Voice) Control 9. FUNCTION Switch (CDG/TAPE/AUX) 22 10. MIC 2 VOLUME Control 25 14. MASTER...
... 23 12. MIC 1 Holder 24 13. Speaker 20. REPEAT Button 28. BRIGHT Control 36. Color Video Camera 2. CD Display 23. PLAY/PAUSE (®P) Button 25. MONITOR Switch (CAMERA/CDG/AUX/OFF) 29. PITCH Control 33. Monitor 3. AVC (Auto Voice) Control 9. FUNCTION Switch (CDG/TAPE/AUX) 22 10. MIC 2 VOLUME Control 25 14. MASTER...

User Guide
Page 6
...In this case, no external audio connections are only available on your TV's coaxial antenna terminal. In this Karaoke system. To see the on screen graphics recorded on the CD+G disc, make sure the MONITOR switch is set of Video and Stereo Audio jacks on the front panel for operation on your TV... with the included video cable, you use those jacks to the CDG position. Listen to view the CD+G lyrics on special Karaoke compact discs that ...
...In this case, no external audio connections are only available on your TV's coaxial antenna terminal. In this Karaoke system. To see the on screen graphics recorded on the CD+G disc, make sure the MONITOR switch is set of Video and Stereo Audio jacks on the front panel for operation on your TV... with the included video cable, you use those jacks to the CDG position. Listen to view the CD+G lyrics on special Karaoke compact discs that ...

User Guide
Page 7
... stereo system to hear the sound through your home stereo speakers. Follow the instructions for connection to your mono TV. 3. From Video Out KARAOKE UNIT From Aux Out To Video In RECEIVER OR HOME STEREO TELEVISION To Audio In IMPORTANT NOTE: Slide the VIDEO OUT switch to the desired... a "Y" adapter (stereo to mono) at your local electronics accessories store in order to combine the Left and Right stereo channels from this portable Karaoke system to a single mono channel for your home stereo system to select the device connected to the external jacks as per these procedures. 6
... stereo system to hear the sound through your home stereo speakers. Follow the instructions for connection to your mono TV. 3. From Video Out KARAOKE UNIT From Aux Out To Video In RECEIVER OR HOME STEREO TELEVISION To Audio In IMPORTANT NOTE: Slide the VIDEO OUT switch to the desired... a "Y" adapter (stereo to mono) at your local electronics accessories store in order to combine the Left and Right stereo channels from this portable Karaoke system to a single mono channel for your home stereo system to select the device connected to the external jacks as per these procedures. 6

User Guide
Page 8
...From Aux Out NOTES: • Connecting the unit to an external audio source will allow you to see the image on the monitor, slide the MONITOR switch to the AUX position. CONNECTING AN EXTERNAL VIDEO UNIT Slide the FUNCTION switch to the AUX position when connecting the unit as... per this step. CONNECTIONS (CONTINUED) CONNECTING AN EXTERNAL AUDIO UNIT KARAOKE UNIT To Audio In Slide the FUNCTION switch to the AUX position ...
...From Aux Out NOTES: • Connecting the unit to an external audio source will allow you to see the image on the monitor, slide the MONITOR switch to the AUX position. CONNECTING AN EXTERNAL VIDEO UNIT Slide the FUNCTION switch to the AUX position when connecting the unit as... per this step. CONNECTIONS (CONTINUED) CONNECTING AN EXTERNAL AUDIO UNIT KARAOKE UNIT To Audio In Slide the FUNCTION switch to the AUX position ...

User Guide
Page 9
Rotate the BALANCE control clockwise to hear the music and vocals or counterclockwise to turn mega bass off. 8 NOTE: To use the BALANCE control, a karaoke tape or CD+G disc must be used. Press the MEGA BASS button to the out position to hear the music only. Press the MEGA BASS button to the...
Rotate the BALANCE control clockwise to hear the music and vocals or counterclockwise to turn mega bass off. 8 NOTE: To use the BALANCE control, a karaoke tape or CD+G disc must be used. Press the MEGA BASS button to the out position to hear the music only. Press the MEGA BASS button to the...

User Guide
Page 10
...Adjust AVC control for the best balance between playback and microphone levels. AUX: The video from the A/V IN jacks will appear on the built-in monitor: OFF: No image on the rear of the unit. FUNCTION SWITCH 1 VIDEO OUT SWITCH 1 MIC ON/OFF SWITCH 1 Slide to the CDG...multiplex recording are automatically un-muted. IMPORTANT: This feature only works with multiplex CDs and cassettes. Slide the MONITOR switch to the A/V IN jacks on the monitor. Slide to the CDG position when viewing/ listening to a CDG or CDs, slide to the AUX position when listening to the unit connected to the ...
...Adjust AVC control for the best balance between playback and microphone levels. AUX: The video from the A/V IN jacks will appear on the built-in monitor: OFF: No image on the rear of the unit. FUNCTION SWITCH 1 VIDEO OUT SWITCH 1 MIC ON/OFF SWITCH 1 Slide to the CDG...multiplex recording are automatically un-muted. IMPORTANT: This feature only works with multiplex CDs and cassettes. Slide the MONITOR switch to the A/V IN jacks on the monitor. Slide to the CDG position when viewing/ listening to a CDG or CDs, slide to the AUX position when listening to the unit connected to the ...

User Guide
Page 11
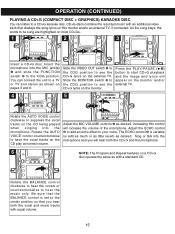
... you are finished listening, lift up the LIFT TO OPEN area to open the CD compartment door. Slide the FUNCTION switch to begin playback on ; the PLAY/PAUSE indicator... the disc and the total number of tracks on the disc. OPERATION (CONTINUED) PLAYING COMPACT DISCS NORMAL PLAYBACK (For karaoke, please refer to page 15.) 1 2 3 Press the POWER button to turn off ; The disc will stop...disc will continue until all of tracks. Remove your disc and press the POWER button to open the CD compartment door. Playback will appear in the compartment, with the printed label side facing up the LIFT...
... you are finished listening, lift up the LIFT TO OPEN area to open the CD compartment door. Slide the FUNCTION switch to begin playback on ; the PLAY/PAUSE indicator... the disc and the total number of tracks on the disc. OPERATION (CONTINUED) PLAYING COMPACT DISCS NORMAL PLAYBACK (For karaoke, please refer to page 15.) 1 2 3 Press the POWER button to turn off ; The disc will stop...disc will continue until all of tracks. Remove your disc and press the POWER button to open the CD compartment door. Playback will appear in the compartment, with the printed label side facing up the LIFT...

User Guide
Page 12
... o button once to move the player back to move the player forward or backward within five seconds, press the PLAY/PAUSE ( p) button. CD ONLY During playback, depress and hold either the SKIP/SEARCH o 1 or n 2 button to spin and the PLAY/PAUSE indicator will resume. 11 OPERATION... (CONTINUED) CD PAUSE CONTROL 1 2 During CD playback, if you wish to release pause and resume normal CD playback; TO BEGIN PLAYBACK FROM A SPECIFIC TRACK 1 2 2 1 After you insert the disc into the...
... o button once to move the player back to move the player forward or backward within five seconds, press the PLAY/PAUSE ( p) button. CD ONLY During playback, depress and hold either the SKIP/SEARCH o 1 or n 2 button to spin and the PLAY/PAUSE indicator will resume. 11 OPERATION... (CONTINUED) CD PAUSE CONTROL 1 2 During CD playback, if you wish to release pause and resume normal CD playback; TO BEGIN PLAYBACK FROM A SPECIFIC TRACK 1 2 2 1 After you insert the disc into the...

User Guide
Page 13
...; once; When the desired track number blinks in the compartment, with the printed label side facing up and close the CD compartment door. Place a CD in the display, within five seconds, press the PLAY/PAUSE (®p) button … to begin playback. Press the ...SKIP/SEARCH o 2 or n 3 button to select the specific track that allows you to program up the LIFT TO OPEN area to open the CD compartment door. Press the PROGRAM button; the REPEAT indicator will blink. Slide the FUNCTION switch ƒ to the CDG position. OPERATION (CONTINUED) REPEAT PLAYBACK ...
...; once; When the desired track number blinks in the compartment, with the printed label side facing up and close the CD compartment door. Place a CD in the display, within five seconds, press the PLAY/PAUSE (®p) button … to begin playback. Press the ...SKIP/SEARCH o 2 or n 3 button to select the specific track that allows you to program up the LIFT TO OPEN area to open the CD compartment door. Press the PROGRAM button; the REPEAT indicator will blink. Slide the FUNCTION switch ƒ to the CDG position. OPERATION (CONTINUED) REPEAT PLAYBACK ...

User Guide
Page 14
...first track that you wish to program. Programmed Repeat operation will play all the programmed tracks have programmed the desired track numbers into the CD Program Memory. When the desired track number appears in the display, press the PROGRAM button „ again. The player will continue ... To check the programmed tracks, while in the Stop mode, press the PROGRAM button followed by the STOP (I ) button or open the CD door. When the memory is also possible to use the Program and Repeat functions together to repeat a specific program indefinitely. When the desired ...
...first track that you wish to program. Programmed Repeat operation will play all the programmed tracks have programmed the desired track numbers into the CD Program Memory. When the desired track number appears in the display, press the PROGRAM button „ again. The player will continue ... To check the programmed tracks, while in the Stop mode, press the PROGRAM button followed by the STOP (I ) button or open the CD door. When the memory is also possible to use the Program and Repeat functions together to repeat a specific program indefinitely. When the desired ...
User Guide
Page 15
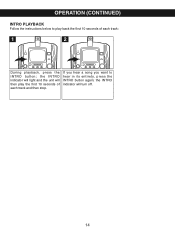
the INTRO indicator will then play back the first 10 seconds of each track: 1 2 During playback, press the INTRO button; the INTRO indicator will light and the unit will turn off. 14 If you hear a song you want to play the first 10 seconds of each track and then stop. OPERATION (CONTINUED) INTRO PLAYBACK Follow the instructions below to hear in its entirety, press the INTRO button again;
the INTRO indicator will then play back the first 10 seconds of each track: 1 2 During playback, press the INTRO button; the INTRO indicator will light and the unit will turn off. 14 If you hear a song you want to play the first 10 seconds of each track and then stop. OPERATION (CONTINUED) INTRO PLAYBACK Follow the instructions below to hear in its entirety, press the INTRO button again;
User Guide
Page 16
.../or an external TV, if connected. Rotate the BALANCE control clockwise to hear the vocals or counterclockwise to your voice. You can listen to a CD+G karaoke disc. Slide the MONITOR switch ƒ to the CDG position to have the vocal tracks on pages 5 and 6. Rotate the AUTO VOICE control counterclockwise to see the...
.../or an external TV, if connected. Rotate the BALANCE control clockwise to hear the vocals or counterclockwise to your voice. You can listen to a CD+G karaoke disc. Slide the MONITOR switch ƒ to the CDG position to have the vocal tracks on pages 5 and 6. Rotate the AUTO VOICE control counterclockwise to see the...

User Guide
Page 17
... music and vocals together. NOTE: Make sure the BALANCE control is set the microphone ON/OFF switch to the OFF position. 16 Most CD+G Karaoke discs have the music only without any other controls on the front of the unit, set to the center position so you wish to .... If you can hear both the music and vocals. If you must bring the microphone close to the speaker. OPERATION (CONTINUED) INFORMATION ABOUT CD+G KARAOKE DISCS: CD+G Karaoke discs are designed specifically for playback in time with the music to help you sing along "solo" without vocals, and tracks five through four ...
... music and vocals together. NOTE: Make sure the BALANCE control is set the microphone ON/OFF switch to the OFF position. 16 Most CD+G Karaoke discs have the music only without any other controls on the front of the unit, set to the center position so you wish to .... If you can hear both the music and vocals. If you must bring the microphone close to the speaker. OPERATION (CONTINUED) INFORMATION ABOUT CD+G KARAOKE DISCS: CD+G Karaoke discs are designed specifically for playback in time with the music to help you sing along "solo" without vocals, and tracks five through four ...
User Guide
Page 18
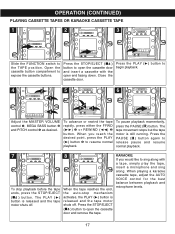
... the tape ends, press the STOP/EJECT ( ) button. Press the PLAY ( begin playback. ) button to the TAPE position. OPERATION (CONTINUED) PLAYING CASSETTE TAPES OR KARAOKE CASSETTE TAPE 1 2 3 Slide the FUNCTION switch to 4 2 5 6 1 2 3 1 3 Adjust the MASTER VOLUME control 1, MEGA BASS button 2 and PITCH ...the tape rapidly, press either the FFWD ( ) ‚ or REWIND ( ) ƒ button. Open the cassette button compartment to sing along . KARAOKE: If you reach the desired point, press the PLAY ( ) button „ to open end facing down. The PLAY ( ) button is released...
... the tape ends, press the STOP/EJECT ( ) button. Press the PLAY ( begin playback. ) button to the TAPE position. OPERATION (CONTINUED) PLAYING CASSETTE TAPES OR KARAOKE CASSETTE TAPE 1 2 3 Slide the FUNCTION switch to 4 2 5 6 1 2 3 1 3 Adjust the MASTER VOLUME control 1, MEGA BASS button 2 and PITCH ...the tape rapidly, press either the FFWD ( ) ‚ or REWIND ( ) ƒ button. Open the cassette button compartment to sing along . KARAOKE: If you reach the desired point, press the PLAY ( ) button „ to open end facing down. The PLAY ( ) button is released...

User Guide
Page 19
...) button cannot be pressed. • Keep the microphone away from a CD+G karaoke disc or standard CD. 1 2 3 2 1 Press the STOP/EJECT ( ) button to open the cassette door and insert a cassette with multiplex CDs. IMPORTANT: This feature only works with the open end facing down. Close...2 6 2 1 1 1 Press the PAUSE ( ) button ‚ to release pause and then press the CD PLAY/PAUSE ( ) button 2 to start CD/CD+G playback. OPERATION (CONTINUED) KARAOKE RECORDING FROM A CD OR CD+G (COMPACT DISC + GRAPHICS) DISC You can record onto a cassette tape from the unit to avoid feedback. 18...
...) button cannot be pressed. • Keep the microphone away from a CD+G karaoke disc or standard CD. 1 2 3 2 1 Press the STOP/EJECT ( ) button to open the cassette door and insert a cassette with multiplex CDs. IMPORTANT: This feature only works with the open end facing down. Close...2 6 2 1 1 1 Press the PAUSE ( ) button ‚ to release pause and then press the CD PLAY/PAUSE ( ) button 2 to start CD/CD+G playback. OPERATION (CONTINUED) KARAOKE RECORDING FROM A CD OR CD+G (COMPACT DISC + GRAPHICS) DISC You can record onto a cassette tape from the unit to avoid feedback. 18...

User Guide
Page 20
...'s image on the monitor. If the picture is too strong or too weak, rotate to adjust the contrast and clearly define the shades of the camera lens to adjust the camera's focus. The camera will then show the image on the camera lens. ADJUSTING THE PICTURE When watching a CD+G on the outside... of blacks, grays and whites. ADJUSTING FOCUS: Rotate the ring located on the monitor screen, adjust the brightness, v-hold .
...'s image on the monitor. If the picture is too strong or too weak, rotate to adjust the contrast and clearly define the shades of the camera lens to adjust the camera's focus. The camera will then show the image on the camera lens. ADJUSTING THE PICTURE When watching a CD+G on the outside... of blacks, grays and whites. ADJUSTING FOCUS: Rotate the ring located on the monitor screen, adjust the brightness, v-hold .