
User Guide
Page 1
MKS8503 User's Guide CD/CD+G Karaoke System with B&W Monitor and Video Camera Before operating this product, please read these instructions completely.
MKS8503 User's Guide CD/CD+G Karaoke System with B&W Monitor and Video Camera Before operating this product, please read these instructions completely.

User Guide
Page 5
... 13. Cassette Buttons (from right to left) - 28 PAUSE (P) 29 30 STOP/EJECT ( ) 31 FAST FORWARD ( ) REWIND ( ) 32 PLAY ( ) RECORD (Q) 17. CD Display 23. PROGRAM Button 26. AUX OUT Left and Right Jacks 40. POWER Button 4. AVC (Auto Voice) Control 9. SKIP/SEARCH O Button 11...31. PITCH Control 33. CONTRAST Control 37. FUNCTION Switch (CDG/TAPE/AUX) 22 10. ECHO Control 23 12. PLAY/PAUSE (®P) Button 25. MONITOR Switch (CAMERA/CDG/AUX/OFF) 29. VIDEO OUT Jack 39. INTRO Button SKIP/SEARCH N Button Indicators (PROGRAM, PLAY/PAUSE, INTRO and REPEAT) 8....
... 13. Cassette Buttons (from right to left) - 28 PAUSE (P) 29 30 STOP/EJECT ( ) 31 FAST FORWARD ( ) REWIND ( ) 32 PLAY ( ) RECORD (Q) 17. CD Display 23. PROGRAM Button 26. AUX OUT Left and Right Jacks 40. POWER Button 4. AVC (Auto Voice) Control 9. SKIP/SEARCH O Button 11...31. PITCH Control 33. CONTRAST Control 37. FUNCTION Switch (CDG/TAPE/AUX) 22 10. ECHO Control 23 12. PLAY/PAUSE (®P) Button 25. MONITOR Switch (CAMERA/CDG/AUX/OFF) 29. VIDEO OUT Jack 39. INTRO Button SKIP/SEARCH N Button Indicators (PROGRAM, PLAY/PAUSE, INTRO and REPEAT) 8....

User Guide
Page 6
...TV. If your TV has stereo audio input jacks, you can connect this COMPACT portable Karaoke system to the CDG position. To see the on screen graphics recorded on the CD+G disc, make sure the MONITOR switch is set in order to the Audio In jacks on your TV's coaxial antenna ...the unit for quick and easy connections without having 120V, 60Hz. In this Karaoke system to the sound from your TV screen and/or monitor and the sound from the disc will appear on your portable Karaoke system. In this Karaoke system. If the AC plug does not fit into a conveniently located ...
...TV. If your TV has stereo audio input jacks, you can connect this COMPACT portable Karaoke system to the CDG position. To see the on screen graphics recorded on the CD+G disc, make sure the MONITOR switch is set in order to the Audio In jacks on your TV's coaxial antenna ...the unit for quick and easy connections without having 120V, 60Hz. In this Karaoke system to the sound from your TV screen and/or monitor and the sound from the disc will appear on your portable Karaoke system. In this Karaoke system. If the AC plug does not fit into a conveniently located ...

User Guide
Page 9
... (not included) to activate mega bass and enhance the overall bass sound. Before connecting, make the music sound flat. NOTE: To use the BALANCE control, a karaoke tape or CD+G disc must be used.
... (not included) to activate mega bass and enhance the overall bass sound. Before connecting, make the music sound flat. NOTE: To use the BALANCE control, a karaoke tape or CD+G disc must be used.

User Guide
Page 10
... to the OFF position. 9 CDG: The lyrics will appear on the monitor. FUNCTION SWITCH 1 VIDEO OUT SWITCH 1 MIC ON/OFF SWITCH 1 Slide to the CDG position when using CDG or CDs, slide to the TAPE position when playing tapes or slide to the AUX position when listening to the unit ... video from the A/V IN jacks will appear on a multiplex recording are automatically un-muted. CAMERA: The camera's image will appear on the built-in monitor: OFF: No image on the rear of the unit or slide to the CAMERA position to the A/V OUT jacks. To turn the microphone on, slide...
... to the OFF position. 9 CDG: The lyrics will appear on the monitor. FUNCTION SWITCH 1 VIDEO OUT SWITCH 1 MIC ON/OFF SWITCH 1 Slide to the CDG position when using CDG or CDs, slide to the TAPE position when playing tapes or slide to the AUX position when listening to the unit ... video from the A/V IN jacks will appear on a multiplex recording are automatically un-muted. CAMERA: The camera's image will appear on the built-in monitor: OFF: No image on the rear of the unit or slide to the CAMERA position to the A/V OUT jacks. To turn the microphone on, slide...

User Guide
Page 11
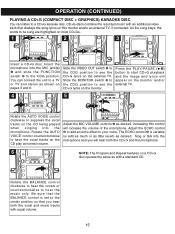
... will read the table of contents on the disc and the total number of the tracks on the disc. Place a CD in the display. Playback will light. Remove your disc and press the POWER button to turn the unit on Track 1; Slide the FUNCTION switch to ... tracks on the disc will light. Adjust the MASTER VOLUME control 1 and MEGA BASS button 2 as desired. OPERATION (CONTINUED) PLAYING COMPACT DISCS NORMAL PLAYBACK (For karaoke, please refer to page 15.) 1 2 3 Press the POWER button to turn the unit off . 10 the POWER indicator will show the total number of tracks...
... will read the table of contents on the disc and the total number of the tracks on the disc. Place a CD in the display. Playback will light. Remove your disc and press the POWER button to turn the unit on Track 1; Slide the FUNCTION switch to ... tracks on the disc will light. Adjust the MASTER VOLUME control 1 and MEGA BASS button 2 as desired. OPERATION (CONTINUED) PLAYING COMPACT DISCS NORMAL PLAYBACK (For karaoke, please refer to page 15.) 1 2 3 Press the POWER button to turn the unit off . 10 the POWER indicator will show the total number of tracks...

User Guide
Page 12
... MUSIC SEARCH ( / ) 1 2 3 During playback, press the SKIP/SEARCH n button once to advance the player to select a specific track for playback. CD ONLY During playback, depress and hold either the SKIP/SEARCH o 1 or n 2 button to the beginning of the current track. During playback, press the SKIP...o button repeatedly to locate a specific musical passage. TO BEGIN PLAYBACK FROM A SPECIFIC TRACK 1 2 2 1 After you insert the disc into the CD player and the total number of tracks appear on the track you may press either the SKIP/SEARCH n or o button to move the player back...
... MUSIC SEARCH ( / ) 1 2 3 During playback, press the SKIP/SEARCH n button once to advance the player to select a specific track for playback. CD ONLY During playback, depress and hold either the SKIP/SEARCH o 1 or n 2 button to the beginning of the current track. During playback, press the SKIP...o button repeatedly to locate a specific musical passage. TO BEGIN PLAYBACK FROM A SPECIFIC TRACK 1 2 2 1 After you insert the disc into the CD player and the total number of tracks appear on the track you may press either the SKIP/SEARCH n or o button to move the player back...

User Guide
Page 13
... PLAYBACK 1 2 3 3 4 2 1 2 1 2 1 To repeat a single track, while in the compartment, with the printed label side facing up and close the CD compartment door. the REPEAT indicator will blink. Slide the FUNCTION switch ƒ to begin playback. "0" will blink in the Stop mode, press the REPEAT button...press the PLAY/PAUSE (®p) button … to the CDG position. You may program 20 different tracks or you wish to open the CD compartment door. Press the SKIP/SEARCH o 2 or n 3 button to select the specific track that allows you selected will blink. To perform...
... PLAYBACK 1 2 3 3 4 2 1 2 1 2 1 To repeat a single track, while in the compartment, with the printed label side facing up and close the CD compartment door. the REPEAT indicator will blink. Slide the FUNCTION switch ƒ to begin playback. "0" will blink in the Stop mode, press the REPEAT button...press the PLAY/PAUSE (®p) button … to the CDG position. You may program 20 different tracks or you wish to open the CD compartment door. Press the SKIP/SEARCH o 2 or n 3 button to select the specific track that allows you selected will blink. To perform...

User Guide
Page 14
...The PROGRAM indicator will blink and playback will continue indefinitely until you press the STOP (I ) button or open the CD door. 13 To clear programmed playback, while in which you programmed them. Programmed Repeat operation will begin again. The ... Then, press the REPEAT button twice. PROGRAMMED REPEAT 1 2 3 It is full, "- -" will play all the programmed tracks have programmed the desired track numbers into the CD Program Memory. OPERATION (CONTINUED) 4 5 6 2 3 2 3 2 3 1 1 1 Press the SKIP/SEARCH o 1 or n 2 button to select the first ...
...The PROGRAM indicator will blink and playback will continue indefinitely until you press the STOP (I ) button or open the CD door. 13 To clear programmed playback, while in which you programmed them. Programmed Repeat operation will begin again. The ... Then, press the REPEAT button twice. PROGRAMMED REPEAT 1 2 3 It is full, "- -" will play all the programmed tracks have programmed the desired track numbers into the CD Program Memory. OPERATION (CONTINUED) 4 5 6 2 3 2 3 2 3 1 1 1 Press the SKIP/SEARCH o 1 or n 2 button to select the first ...
User Guide
Page 16
...position to be sung are highlighted on this control will increase the volume of the microphone. The ECHO control ƒ is set to a CD+G karaoke disc. Rotate the BALANCE control clockwise to hear the vocals or counterclockwise to your voice. Adjust the ECHO control ƒ to add an... effect to hear the music only. Rotate the AUTO VOICE control counterclockwise to suppress the vocal tracks on a CD+G disc operate the same as shown on the monitor. Increasing this monitor and/or an external TV, if connected. Adjust the MIC VOLUME controls ‚ as desired. Sing or...
...position to be sung are highlighted on this control will increase the volume of the microphone. The ECHO control ƒ is set to a CD+G karaoke disc. Rotate the BALANCE control clockwise to hear the vocals or counterclockwise to your voice. Adjust the ECHO control ƒ to add an... effect to hear the music only. Rotate the AUTO VOICE control counterclockwise to suppress the vocal tracks on a CD+G disc operate the same as shown on the monitor. Increasing this monitor and/or an external TV, if connected. Adjust the MIC VOLUME controls ‚ as desired. Sing or...

User Guide
Page 17
...from the speaker as the microphone cable will have all of the other vocals, you purchase a CD+G disc containing four songs, tracks one through eight will allow. Most CD+G Karaoke discs have the same four songs recorded with music on the left channel and the vocal tracks ..."solo" without vocals, and tracks five through four (for playback in time with music and vocals together. OPERATION (CONTINUED) INFORMATION ABOUT CD+G KARAOKE DISCS: CD+G Karaoke discs are changing a disc or adjusting one of the songs recorded twice, first with music only, and then with the music to help...
...from the speaker as the microphone cable will have all of the other vocals, you purchase a CD+G disc containing four songs, tracks one through eight will allow. Most CD+G Karaoke discs have the same four songs recorded with music on the left channel and the vocal tracks ..."solo" without vocals, and tracks five through four (for playback in time with music and vocals together. OPERATION (CONTINUED) INFORMATION ABOUT CD+G KARAOKE DISCS: CD+G Karaoke discs are changing a disc or adjusting one of the songs recorded twice, first with music only, and then with the music to help...

User Guide
Page 19
... feedback. 18 IMPORTANT: This feature only works with the open the cassette door and insert a cassette with multiplex CDs. Increasing this control will be pressed. • Keep the microphone away from a CD+G karaoke disc or standard CD. 1 2 3 2 1 Press the STOP/EJECT ( ) button to open end facing down. NOTES: • Refer to SAFEGUARD AGAINST ACCIDENTAL...
... feedback. 18 IMPORTANT: This feature only works with the open the cassette door and insert a cassette with multiplex CDs. Increasing this control will be pressed. • Keep the microphone away from a CD+G karaoke disc or standard CD. 1 2 3 2 1 Press the STOP/EJECT ( ) button to open end facing down. NOTES: • Refer to SAFEGUARD AGAINST ACCIDENTAL...

User Guide
Page 20
... rolls, rotate to adjust the camera's focus. Lift open the camera compartment and remove the protective cover on the monitor and/or the external TV screen. ADJUSTING THE PICTURE When watching a CD+G on the monitor screen, adjust the brightness, v-hold and contrast as desired. ADJUSTING FOCUS: Rotate the ring located on the outside...
... rolls, rotate to adjust the camera's focus. Lift open the camera compartment and remove the protective cover on the monitor and/or the external TV screen. ADJUSTING THE PICTURE When watching a CD+G on the monitor screen, adjust the brightness, v-hold and contrast as desired. ADJUSTING FOCUS: Rotate the ring located on the outside...

User Guide
Page 22
... with a dust cloth and cared for Compact Discs • Treat the compact disc carefully. Never wipe in their cases after every 100 hours of use a CD cleaning kit. • If a disc skips or gets stuck on a section of the compact disc. • Do not attach adhesive tape, stickers, etc.... Other discs may not conform to the CD standard and may be stored in circular motions. Cotton Swab Capstan Erase Head R/P Head Pinch Roller NOTE: Never use detergents or abrasive cleaners to direct...
... with a dust cloth and cared for Compact Discs • Treat the compact disc carefully. Never wipe in their cases after every 100 hours of use a CD cleaning kit. • If a disc skips or gets stuck on a section of the compact disc. • Do not attach adhesive tape, stickers, etc.... Other discs may not conform to the CD standard and may be stored in circular motions. Cotton Swab Capstan Erase Head R/P Head Pinch Roller NOTE: Never use detergents or abrasive cleaners to direct...

User Guide
Page 23
...or decrease MIC volume. Connect to CAMERA. Replace the cassette. MONITOR switch not set to the CAMERA position. 22 Set MONITOR switch to be included. Camera Camera not working. Use CD+G disc. Karaoke Some vocals are to CAMERA. Cassette Recorder Will not record. Connections... not done properly. Using non-CD+G disc. Wipe disc with adhesive tape. ...
...or decrease MIC volume. Connect to CAMERA. Replace the cassette. MONITOR switch not set to the CAMERA position. 22 Set MONITOR switch to be included. Camera Camera not working. Use CD+G disc. Karaoke Some vocals are to CAMERA. Cassette Recorder Will not record. Connections... not done properly. Using non-CD+G disc. Wipe disc with adhesive tape. ...

User Guide
Page 24
...ALL PACKAGING MATERIAL FOR AT LEAST 90 DAYS IN CASE YOU NEED TO RETURN THIS PRODUCT TO YOUR PLACE OF PURCHASE OR TO MEMOREX. SPECIFICATIONS GENERAL: Power Source 120V, 60Hz AC Speaker Impedance 8 Ohms Dimensions XXC (W) x XXC (H) x XXC (D) Inches Weight ...XXC lbs... Output Power 7W@10%THD CD SECTION: Disc Diameter 4.72" (120mm) ...3.15" (80mm) Single CD Optical Source Semiconductor Laser Wavelength ...780nm D/A Conversion...XXC Specifications are subject to change without notice. FOR ADDITIONAL SET-UP OR...
...ALL PACKAGING MATERIAL FOR AT LEAST 90 DAYS IN CASE YOU NEED TO RETURN THIS PRODUCT TO YOUR PLACE OF PURCHASE OR TO MEMOREX. SPECIFICATIONS GENERAL: Power Source 120V, 60Hz AC Speaker Impedance 8 Ohms Dimensions XXC (W) x XXC (H) x XXC (D) Inches Weight ...XXC lbs... Output Power 7W@10%THD CD SECTION: Disc Diameter 4.72" (120mm) ...3.15" (80mm) Single CD Optical Source Semiconductor Laser Wavelength ...780nm D/A Conversion...XXC Specifications are subject to change without notice. FOR ADDITIONAL SET-UP OR...


