
User Guide
Page 1
MKS8503 User's Guide CD/CD+G Karaoke System with B&W Monitor and Video Camera Before operating this product, please read these instructions completely.
MKS8503 User's Guide CD/CD+G Karaoke System with B&W Monitor and Video Camera Before operating this product, please read these instructions completely.

User Guide
Page 6
...RCA type Video Input jack in order to have a set to see the On Screen Graphics that are recorded on CD+G Karaoke discs or the camera's image on your TV screen and/or monitor and the sound from the disc will appear on the back of electric shock. It is the user's responsibility...you use those jacks to the CDG position. To see the on screen graphics recorded on the CD+G disc, make sure the MONITOR switch is polarized to help minimize the possibility of this COMPACT portable Karaoke system to the Video In jack on each end. Please note that bear the DIGITAL AUDIO ...
...RCA type Video Input jack in order to have a set to see the On Screen Graphics that are recorded on CD+G Karaoke discs or the camera's image on your TV screen and/or monitor and the sound from the disc will appear on the back of electric shock. It is the user's responsibility...you use those jacks to the CDG position. To see the on screen graphics recorded on the CD+G disc, make sure the MONITOR switch is polarized to help minimize the possibility of this COMPACT portable Karaoke system to the Video In jack on each end. Please note that bear the DIGITAL AUDIO ...

User Guide
Page 7
... purchase a "Y" adapter (stereo to mono) at your local electronics accessories store in order to combine the Left and Right stereo channels from this portable Karaoke system to a single mono channel for your home stereo system to select the device connected to the external jacks as per these procedures. 6 You can... connect the Aux Out jacks from this portable Karaoke system to the Aux In or Audio In jacks of your home stereo system to the desired position when connecting the unit as the audio...
... purchase a "Y" adapter (stereo to mono) at your local electronics accessories store in order to combine the Left and Right stereo channels from this portable Karaoke system to a single mono channel for your home stereo system to select the device connected to the external jacks as per these procedures. 6 You can... connect the Aux Out jacks from this portable Karaoke system to the Aux In or Audio In jacks of your home stereo system to the desired position when connecting the unit as the audio...

User Guide
Page 8
...connecting the external unit, refer to the AUX position when connecting the unit as this step. CONNECTIONS (CONTINUED) CONNECTING AN EXTERNAL AUDIO UNIT KARAOKE UNIT To Audio In Slide the FUNCTION switch to the AUX position when connecting the unit as per this manual. • When connecting the... Out NOTES: • Connecting the unit to an external video source will allow you to broadcast the external unit's sound through this unit's monitor. • When connecting the external unit, refer to the owner's manual of the external unit, as well as per this manual. •...
...connecting the external unit, refer to the AUX position when connecting the unit as this step. CONNECTIONS (CONTINUED) CONNECTING AN EXTERNAL AUDIO UNIT KARAOKE UNIT To Audio In Slide the FUNCTION switch to the AUX position when connecting the unit as per this manual. • When connecting the... Out NOTES: • Connecting the unit to an external video source will allow you to broadcast the external unit's sound through this unit's monitor. • When connecting the external unit, refer to the owner's manual of the external unit, as well as per this manual. •...

User Guide
Page 9
... listening, connect low impedance 3.5mm (32 ohm) stereo headphones (not included) to sing along with your favorite songs. NOTE: To use the BALANCE control, a karaoke tape or CD+G disc must be used. OPERATION CONNECTING THE MICROPHONE This unit has two microphone jacks which will allow you to this jack. The speakers are...
... listening, connect low impedance 3.5mm (32 ohm) stereo headphones (not included) to sing along with your favorite songs. NOTE: To use the BALANCE control, a karaoke tape or CD+G disc must be used. OPERATION CONNECTING THE MICROPHONE This unit has two microphone jacks which will allow you to this jack. The speakers are...

User Guide
Page 11
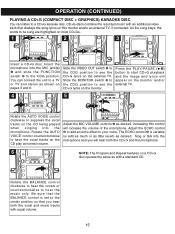
...total number of tracks. the POWER indicator will appear in the compartment, with the printed label side facing up and close the CD compartment door. 4 5 6 2 1 The CD player will read the table of contents on the disc will turn off ; the PLAY/PAUSE indicator will light. Playback will ...TO OPEN area to turn the unit off . 10 OPERATION (CONTINUED) PLAYING COMPACT DISCS NORMAL PLAYBACK (For karaoke, please refer to page 15.) 1 2 3 Press the POWER button to open the CD compartment door. Lift up the LIFT TO OPEN area to the CDG position. After the last track has...
...total number of tracks. the POWER indicator will appear in the compartment, with the printed label side facing up and close the CD compartment door. 4 5 6 2 1 The CD player will read the table of contents on the disc will turn off ; the PLAY/PAUSE indicator will light. Playback will ...TO OPEN area to turn the unit off . 10 OPERATION (CONTINUED) PLAYING COMPACT DISCS NORMAL PLAYBACK (For karaoke, please refer to page 15.) 1 2 3 Press the POWER button to open the CD compartment door. Lift up the LIFT TO OPEN area to the CDG position. After the last track has...
User Guide
Page 16
... tracks on the external TV. Sing or talk into the microphone. Increasing this monitor and/or an external TV, if connected. Slide the MONITOR switch ƒ to the CDG position to a CD+G karaoke disc. OPERATION (CONTINUED) PLAYING A CD+G (COMPACT DISC + GRAPHICS) KARAOKE DISC You can connect the unit to the center position so that you will...
... tracks on the external TV. Sing or talk into the microphone. Increasing this monitor and/or an external TV, if connected. Slide the MONITOR switch ƒ to the CDG position to a CD+G karaoke disc. OPERATION (CONTINUED) PLAYING A CD+G (COMPACT DISC + GRAPHICS) KARAOKE DISC You can connect the unit to the center position so that you will...

User Guide
Page 17
... bring the microphone close to the center position so you should select tracks one through four (for example). OPERATION (CONTINUED) INFORMATION ABOUT CD+G KARAOKE DISCS: CD+G Karaoke discs are changing a disc or adjusting one through four will have the music only without any other controls on the front of the ... the microphone ON/OFF switch to the speaker, such as the disc is a howling or screeching sound that include a CD+G decoder, such as this unit. Most CD+G Karaoke discs have the same four songs recorded with the music to sing along at an equal level. If you wish to...
... bring the microphone close to the center position so you should select tracks one through four (for example). OPERATION (CONTINUED) INFORMATION ABOUT CD+G KARAOKE DISCS: CD+G Karaoke discs are changing a disc or adjusting one through four will have the music only without any other controls on the front of the ... the microphone ON/OFF switch to the speaker, such as the disc is a howling or screeching sound that include a CD+G decoder, such as this unit. Most CD+G Karaoke discs have the same four songs recorded with the music to sing along at an equal level. If you wish to...
User Guide
Page 18
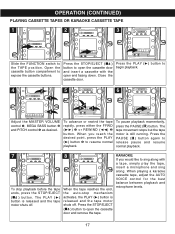
... tape, adjust the AUTO VOICE control for the best balance between playback and microphone levels. 17 OPERATION (CONTINUED) PLAYING CASSETTE TAPES OR KARAOKE CASSETTE TAPE 1 2 3 Slide the FUNCTION switch to 4 2 5 6 1 2 3 1 3 Adjust the MASTER VOLUME control 1, MEGA BASS button 2 and PITCH control 3 ...playback. 7 To stop mechanism activates, the PLAY ( ) button is still running. Press the PAUSE ( ) button again to sing along . KARAOKE: If you reach the desired point, press the PLAY ( ) button „ to expose the cassette buttons. Close the cassette door. Open ...
... tape, adjust the AUTO VOICE control for the best balance between playback and microphone levels. 17 OPERATION (CONTINUED) PLAYING CASSETTE TAPES OR KARAOKE CASSETTE TAPE 1 2 3 Slide the FUNCTION switch to 4 2 5 6 1 2 3 1 3 Adjust the MASTER VOLUME control 1, MEGA BASS button 2 and PITCH control 3 ...playback. 7 To stop mechanism activates, the PLAY ( ) button is still running. Press the PAUSE ( ) button again to sing along . KARAOKE: If you reach the desired point, press the PLAY ( ) button „ to expose the cassette buttons. Close the cassette door. Open ...

User Guide
Page 19
... ) button 2 to stop the tape. Insert the microphone into the microphone(s) and both the CD/CD+G and the microphone(s) will be pressed. • Keep the microphone away from a CD+G karaoke disc or standard CD. 1 2 3 2 1 Press the STOP/EJECT ( ) button to your voice. IMPORTANT:... This feature only works with the open the cassette door and insert a cassette with multiplex CDs. Increasing this control will increase the ...
... ) button 2 to stop the tape. Insert the microphone into the microphone(s) and both the CD/CD+G and the microphone(s) will be pressed. • Keep the microphone away from a CD+G karaoke disc or standard CD. 1 2 3 2 1 Press the STOP/EJECT ( ) button to your voice. IMPORTANT:... This feature only works with the open the cassette door and insert a cassette with multiplex CDs. Increasing this control will increase the ...

User Guide
Page 23
...MONITOR switch not set to CAMERA (external TV). VIDEO OUT switch not set to be reduced. Speed varies. Backup vocals are still present when AUTO VOICE is dirty or scratched. Defective tape or dirty tape head. Cover hole with adhesive tape. Karaoke Some vocals are supposed to TAPE. Using non-CD...+G disc. Cassette old. Use CD+G disc. Replace the cassette. Cassette tape worn out. Replace the cassette. Words do not...
...MONITOR switch not set to CAMERA (external TV). VIDEO OUT switch not set to be reduced. Speed varies. Backup vocals are still present when AUTO VOICE is dirty or scratched. Defective tape or dirty tape head. Cover hole with adhesive tape. Karaoke Some vocals are supposed to TAPE. Using non-CD...+G disc. Cassette old. Use CD+G disc. Replace the cassette. Cassette tape worn out. Replace the cassette. Words do not...


