Owners Manual
Page 1
...Canada, register your freezer at www.maytag.com. Model Number Serial Number TABLE OF CONTENTS SAFETY 1 Proper Disposal of Your Old Freezer or Refrigerator 2 INSTALLING YOUR FREEZER 3 Unpacking 3 Location Requirements 3 Electrical Requirements 4 Freezer Door 4 Freezer Leveling and Door Closing 6 OPERATING YOUR FREEZER 7 Ensuring Proper Air Circulation 7 Using the Control 7 Freezer Features 8 CARING FOR YOUR FREEZER 8 Cleaning Your Freezer 8 Changing the Light Bulb(s 9 Power Interruptions 9 Moving Care 9 TROUBLESHOOTING 10 Freezer Operation 10 WARRANTY 12 SAFETY Your...
...Canada, register your freezer at www.maytag.com. Model Number Serial Number TABLE OF CONTENTS SAFETY 1 Proper Disposal of Your Old Freezer or Refrigerator 2 INSTALLING YOUR FREEZER 3 Unpacking 3 Location Requirements 3 Electrical Requirements 4 Freezer Door 4 Freezer Leveling and Door Closing 6 OPERATING YOUR FREEZER 7 Ensuring Proper Air Circulation 7 Using the Control 7 Freezer Features 8 CARING FOR YOUR FREEZER 8 Cleaning Your Freezer 8 Changing the Light Bulb(s 9 Power Interruptions 9 Moving Care 9 TROUBLESHOOTING 10 Freezer Operation 10 WARRANTY 12 SAFETY Your...
Owners Manual
Page 2
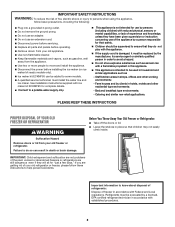
...; Plug into a grounded 3-prong outlet. Do not remove the ground prong. Do not use an adapter. Do not use an extension cord. Disconnect power before servicing. Replace all parts and panels before operating. Remove doors from the appliance. Use two or more people to move and install the appliance. Disconnect the power before installing the ice maker (on ice maker kit-ready models only). Ice maker kit...
...; Plug into a grounded 3-prong outlet. Do not remove the ground prong. Do not use an adapter. Do not use an extension cord. Disconnect power before servicing. Replace all parts and panels before operating. Remove doors from the appliance. Use two or more people to move and install the appliance. Disconnect the power before installing the ice maker (on ice maker kit-ready models only). Ice maker kit...
Owners Manual
Page 3
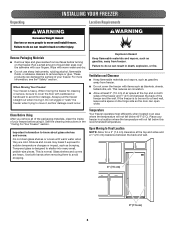
... on the hinge side so the door can open wider. See the cleaning instructions in a location where the temperature will not fall below 40°F (5°C). Clean Before Using After you remove all of the packaging materials, clean the inside of the freezer and the wall. Temperature Your freezer operates most efficiently when located in back or other injury. Wipe with items such as blankets, sheets, tablecloths, etc...
... on the hinge side so the door can open wider. See the cleaning instructions in a location where the temperature will not fall below 40°F (5°C). Clean Before Using After you remove all of the packaging materials, clean the inside of the freezer and the wall. Temperature Your freezer operates most efficiently when located in back or other injury. Wipe with items such as blankets, sheets, tablecloths, etc...
Owners Manual
Page 4
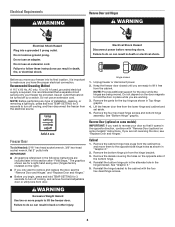
... cabinet hinge hole plugs from the cabinet top and move your door so that it free from the cabinet. Electrical Requirements WARNING Remove Door and Hinges WARNING Electrical Shock Hazard Plug into its final location, it is important to make sure you want to remove and replace the door, see "Replace Door and Hinges." Remove the parts for 3 seconds to turn off cooling, and remove food and adjustable door or utility bins from door. Electrical Shock Hazard Disconnect power before removing doors. Do not use...
... cabinet hinge hole plugs from the cabinet top and move your door so that it free from the cabinet. Electrical Requirements WARNING Remove Door and Hinges WARNING Electrical Shock Hazard Plug into its final location, it is important to make sure you want to remove and replace the door, see "Replace Door and Hinges." Remove the parts for 3 seconds to turn off cooling, and remove food and adjustable door or utility bins from door. Electrical Shock Hazard Disconnect power before removing doors. Do not use...
Owners Manual
Page 5
... "Top Hinge" graphic. See "Bottom Hinge" graphic. Do not remove ground prong. Reset the control. See "Using the Control." 5. Door 1. Replace the freezer door. Reinstall top hinge cover. NOTE: Provide additional support for the bottom hinge as shown in place. Check all holes to follow these instructions can result in place. Do not use an adapter. Failure to make sure that the hole in the door stop bracket is...
... "Top Hinge" graphic. See "Bottom Hinge" graphic. Do not remove ground prong. Reset the control. See "Using the Control." 5. Door 1. Replace the freezer door. Reinstall top hinge cover. NOTE: Provide additional support for the bottom hinge as shown in place. Check all holes to follow these instructions can result in place. Do not use an adapter. Failure to make sure that the hole in the door stop bracket is...
Owners Manual
Page 6
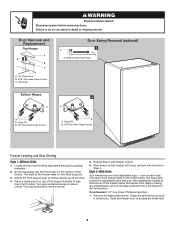
... two fixed supports. 3. Before making any adjustments, remove the base grille and move the freezer to lift the cabinet up off the floor. 4. Adjust the front legs enough to its final location. Turn leg clockwise to access the brake feet. 6 Hinge Pin B. 3/8" Hex-Head Hinge Screws Freezer Leveling and Door Closing Style 1-Without Grille 1. Screw these legs into the front holes on each side. WARNING Electrical Shock...
... two fixed supports. 3. Before making any adjustments, remove the base grille and move the freezer to lift the cabinet up off the floor. 4. Adjust the front legs enough to its final location. Turn leg clockwise to access the brake feet. 6 Hinge Pin B. 3/8" Hex-Head Hinge Screws Freezer Leveling and Door Closing Style 1-Without Grille 1. Screw these legs into the front holes on each side. WARNING Electrical Shock...
Owners Manual
Page 7
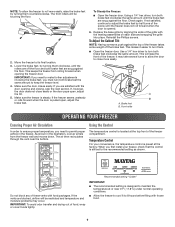
... Circulation Using the Control In order to make further adjustments involving the brake feet, you are snug against the floor. As shown in the freezer. When you need to ensure proper temperature, you first install your convenience, the temperature control is opened. 6. Make sure the freezer is located at or near the bottom. Replace the base grille by half turns of food, wrap or cover foods tightly. The temperature control...
... Circulation Using the Control In order to make further adjustments involving the brake feet, you are snug against the floor. As shown in the freezer. When you need to ensure proper temperature, you first install your convenience, the temperature control is opened. 6. Make sure the freezer is located at or near the bottom. Replace the base grille by half turns of food, wrap or cover foods tightly. The temperature control...
Owners Manual
Page 8
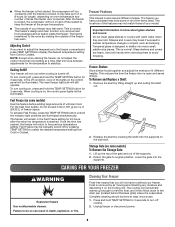
... freezer compartment, press TEMP SETTING to the drain pan (located behind the base grille) where it on , the control panel lights will be manually turned off as bumping. ft (28.32 L) of the supports. 2. To activate Fast Freeze, press the TEMP SETTING button until the freezer is opened. Fast Freeze may have to defrost your freezer. Lower the gate into many small, pebble-size pieces. Cleaning Your Freezer Frost-free means that you need to adjust the temperature...
... freezer compartment, press TEMP SETTING to the drain pan (located behind the base grille) where it on , the control panel lights will be manually turned off as bumping. ft (28.32 L) of the supports. 2. To activate Fast Freeze, press the TEMP SETTING button until the freezer is opened. Fast Freeze may have to defrost your freezer. Lower the gate into many small, pebble-size pieces. Cleaning Your Freezer Frost-free means that you need to adjust the temperature...
Owners Manual
Page 9
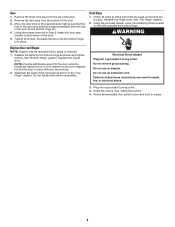
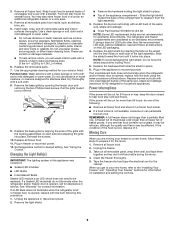
... filled one of it in warm water. Reinstall the screws. 10. Remove all frozen food. Tape the freezer shut and tape the electrical cord to desired setting. These can wash interior walls with the leveling assemblies on plastic parts, interior and door liners or gaskets. Use the appropriate cleaning method for your new home, refer to 0.95 L] of the light assembly. The refrigerator and freezer compartments are not recommended for...
... filled one of it in warm water. Reinstall the screws. 10. Remove all frozen food. Tape the freezer shut and tape the electrical cord to desired setting. These can wash interior walls with the leveling assemblies on plastic parts, interior and door liners or gaskets. Use the appropriate cleaning method for your new home, refer to 0.95 L] of the light assembly. The refrigerator and freezer compartments are not recommended for...
Owners Manual
Page 10
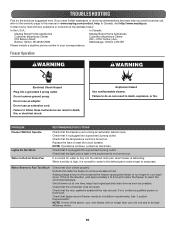
.... Freezer Operation WARNING WARNING Electrical Shock Hazard Plug into the defrost drain pan when freezer is not burned out. Explosion Hazard Use nonflammable cleaner. Failure to cool back down. Check that it is tight in death, fire, or electrical shock. Replace the fuse or reset the circuit breaker. Check that the condenser coils are clean. Defrost and clean the freezer to reach the correct temperature. Check that the light bulb is normal for water...
.... Freezer Operation WARNING WARNING Electrical Shock Hazard Plug into the defrost drain pan when freezer is not burned out. Explosion Hazard Use nonflammable cleaner. Failure to cool back down. Check that it is tight in death, fire, or electrical shock. Replace the fuse or reset the circuit breaker. Check that the condenser coils are clean. Defrost and clean the freezer to reach the correct temperature. Check that the light bulb is normal for water...
Owners Manual
Page 11
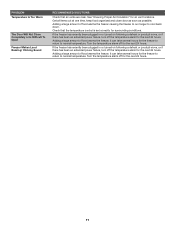
.... Adding a large amount of food warms the freezer. PROBLEM Temperature Is Too Warm The Door Will Not Close Completely or Is Difficult To Open Freezer Makes Loud Buzzing/ Clicking Sound RECOMMENDED SOLUTIONS Check that the temperature control is set correctly for surrounding conditions. Adding a large amount of food warms the freezer. Turn the temperature alarm off for the freezer to return to normal temperature. See "Ensuring Proper Air Circulation" for air vent locations.
.... Adding a large amount of food warms the freezer. PROBLEM Temperature Is Too Warm The Door Will Not Close Completely or Is Difficult To Open Freezer Makes Loud Buzzing/ Clicking Sound RECOMMENDED SOLUTIONS Check that the temperature control is set correctly for surrounding conditions. Adding a large amount of food warms the freezer. Turn the temperature alarm off for the freezer to return to normal temperature. See "Ensuring Proper Air Circulation" for air vent locations.
Owners Manual
Page 12
... wiring, fuses or water inlet hoses). 4. light bulbs, batteries, air or water filters, preservation solutions, etc.). Pick-up or delivery. Service or parts for the compressor only and does not include labor. 11. Commercial, non-residential or multiple-family use, or use with For one year from accident, misuse, abuse, fire, floods, acts of original 8. for appliances with servicing, removal or replacement of purchase, when this warranty...
... wiring, fuses or water inlet hoses). 4. light bulbs, batteries, air or water filters, preservation solutions, etc.). Pick-up or delivery. Service or parts for the compressor only and does not include labor. 11. Commercial, non-residential or multiple-family use, or use with For one year from accident, misuse, abuse, fire, floods, acts of original 8. for appliances with servicing, removal or replacement of purchase, when this warranty...

Owners Manual
Page 28
Utilisé sous licence au Canada. 04/19 Printed in Canada. All rights reserved. Tous droits réservés. Used under license in U.S.A. Imprimé aux É.-U. W11320184A W11320195A - SP ®/™ ©2019 Maytag.
Utilisé sous licence au Canada. 04/19 Printed in Canada. All rights reserved. Tous droits réservés. Used under license in U.S.A. Imprimé aux É.-U. W11320184A W11320195A - SP ®/™ ©2019 Maytag.
Dimension Guide
Page 1
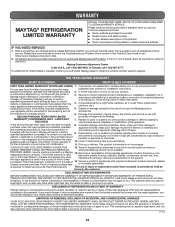
... hinge side so the door can open wider. Specifications subject to change without notice. It is recommended that cannot be turned off by side with water pressure of the floor before installing your cold water supply , the water pressure to the system needs to be provided. Do not use an extension cord. PRODUCT DIMENSIONS C B D E A F 90˚ Height Model Reversible (Overall) Number Model Size Door "A" Height (Top of a freezer fully loaded with product...
... hinge side so the door can open wider. Specifications subject to change without notice. It is recommended that cannot be turned off by side with water pressure of the floor before installing your cold water supply , the water pressure to the system needs to be provided. Do not use an extension cord. PRODUCT DIMENSIONS C B D E A F 90˚ Height Model Reversible (Overall) Number Model Size Door "A" Height (Top of a freezer fully loaded with product...


