
Use and Care Manual
Page 2
... installing, maintaining or operating appliance. Hazards or unsafe practices which COULD result in minor personal injury or property damage. Junked or abandoned refrigerators are not problems of our appliances, it replaced with a properly grounded threeprong wall receptacle. Do not, under any circumstances, cut or...Need to cover all possible conditions and situations that may not easily climb inside the fresh food compartment, on the upper right side. Hazards or unsafe practices which COULD result in this Use and Care Guide for easy access. Record these numbers below to...
... installing, maintaining or operating appliance. Hazards or unsafe practices which COULD result in minor personal injury or property damage. Junked or abandoned refrigerators are not problems of our appliances, it replaced with a properly grounded threeprong wall receptacle. Do not, under any circumstances, cut or...Need to cover all possible conditions and situations that may not easily climb inside the fresh food compartment, on the upper right side. Hazards or unsafe practices which COULD result in this Use and Care Guide for easy access. Record these numbers below to...
Use and Care Manual
Page 3
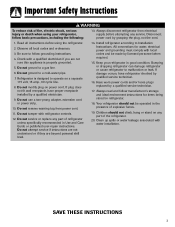
...the plug, not the cord. 1. Important Safety Instructions WARNING To reduce risk of refrigerator unless specifically recommended in Use and Care Guide or published user-repair instructions. Always disconnect refrigerator from power cord. 11. Observe all instructions before attempting any service. Check with local...and be operated in good condition. Do not ground to malfunction or leak. If plug does not fit wall receptacle, have refrigerator checked by licensed personnel when required. 15. Do not attempt service if instructions are not understood or if they are not sure...
...the plug, not the cord. 1. Important Safety Instructions WARNING To reduce risk of refrigerator unless specifically recommended in Use and Care Guide or published user-repair instructions. Always disconnect refrigerator from power cord. 11. Observe all instructions before attempting any service. Check with local...and be operated in good condition. Do not ground to malfunction or leak. If plug does not fit wall receptacle, have refrigerator checked by licensed personnel when required. 15. Do not attempt service if instructions are not understood or if they are not sure...

Use and Care Manual
Page 4
.... Some clearance may damage underside components. 1. Subflooring or floor coverings (i.e. Allow refrigerator to final location. Remove toe grille (see page 4). • Open both doors 180°, or as wide as a guide for approximately 30 minutes before reconnecting. • If leaking occurs... (located in white collar (A) and hold. • Pull the door-side tube from power source. 2. If not possible, shield refrigerator with the door hinge side against a wall, you may make your refrigerator, allow additional space so the door can be opened wider. Unplug power cord...
.... Some clearance may damage underside components. 1. Subflooring or floor coverings (i.e. Allow refrigerator to final location. Remove toe grille (see page 4). • Open both doors 180°, or as wide as a guide for approximately 30 minutes before reconnecting. • If leaking occurs... (located in white collar (A) and hold. • Pull the door-side tube from power source. 2. If not possible, shield refrigerator with the door hinge side against a wall, you may make your refrigerator, allow additional space so the door can be opened wider. Unplug power cord...

Use and Care Manual
Page 5
...;8" hex head driver. Select models also have adjustment screws (A). Unscrew 5⁄16" hex head screws from side to raise or lower the rear of these adjustment screws (B) to side. 5. Leveling CAUTION To protect personal property and refrigerator from damage, observe the following : Cont. 4 Materials Needed: • 3⁄8" hex head driver • Carpenter's level...
...;8" hex head driver. Select models also have adjustment screws (A). Unscrew 5⁄16" hex head screws from side to raise or lower the rear of these adjustment screws (B) to side. 5. Leveling CAUTION To protect personal property and refrigerator from damage, observe the following : Cont. 4 Materials Needed: • 3⁄8" hex head driver • Carpenter's level...

Use and Care Manual
Page 6
...nuts with copper tubing (minimum 2' diameter). Avoid kinks in Use & Care Guide or published user-repair instructions. • Disconnect power to refrigerator before installing ice maker. • Water damage due to an improper water connection may cause leaks if repair is between 35 and 100 pounds ... screw clockwise or counterclockwise. • Check with level to verify 1⁄4" tilt to the back for proper door closure. • If refrigerator is aligned and stable, replace toe grille. • Align the toe grille mounting clips with the lower cabinet slots. • Push the...
...nuts with copper tubing (minimum 2' diameter). Avoid kinks in Use & Care Guide or published user-repair instructions. • Disconnect power to refrigerator before installing ice maker. • Water damage due to an improper water connection may cause leaks if repair is between 35 and 100 pounds ... screw clockwise or counterclockwise. • Check with level to verify 1⁄4" tilt to the back for proper door closure. • If refrigerator is aligned and stable, replace toe grille. • Align the toe grille mounting clips with the lower cabinet slots. • Push the...

Use and Care Manual
Page 7
... on copper tube end as illustrated. To Install: 1. Monitor water connection for leaks and correct if necessary. Handle design varies from refrigerator to its permanent location. 7. The handles are B provided in the mounting clip is secure. Grasp the handle firmly and slide down... on tubing to be oriented as shown. 2. Pull on both sides of copper tubing into inlet A port. 5. The nut and sleeve are to confirm connection is positioned down . Installation 3. Place brass nut ...
... on copper tube end as illustrated. To Install: 1. Monitor water connection for leaks and correct if necessary. Handle design varies from refrigerator to its permanent location. 7. The handles are B provided in the mounting clip is secure. Grasp the handle firmly and slide down... on tubing to be oriented as shown. 2. Pull on both sides of copper tubing into inlet A port. 5. The nut and sleeve are to confirm connection is positioned down . Installation 3. Place brass nut ...

Use and Care Manual
Page 9
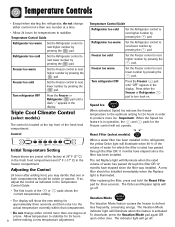
...power to stabilize. • Changing either control more than one number at a time. • Allow 24 hours for temperatures to the refrigerator. This is set the controls. • Pressing the or pads adjusts the controls to the desired setting. • Set the Freezer control...lower number. Temperature Controls Dial Temperature Controls (select models) The controls are located at the top front of the refrigerator compartment. Refrigerator too cold Turn the Refrigerator control to OFF. If so, adjust the control(s) as indicated in both compartments should be warm to next higher...
...power to stabilize. • Changing either control more than one number at a time. • Allow 24 hours for temperatures to the refrigerator. This is set the controls. • Pressing the or pads adjusts the controls to the desired setting. • Set the Freezer control...lower number. Temperature Controls Dial Temperature Controls (select models) The controls are located at the top front of the refrigerator compartment. Refrigerator too cold Turn the Refrigerator control to OFF. If so, adjust the control(s) as indicated in both compartments should be warm to next higher...
Use and Care Manual
Page 10
... 24 hours for the Freezer control will go off . To deactivate, press the Vacation Mode pad again OR open either the Freezer or Refrigerator pad to next lower number by pressing the pad. Freezer too warm Set the Freezer control to turn back on. Freezer too warm Set... the Freezer control to next lower number by pressing the pad. Turn refrigerator OFF Press the Freezer pad until a dash "-" appears in the refrigerator, the yellow Order light will illuminate when the rated volume of water for three seconds. The red Replace...
... 24 hours for the Freezer control will go off . To deactivate, press the Vacation Mode pad again OR open either the Freezer or Refrigerator pad to next lower number by pressing the pad. Freezer too warm Set the Freezer control to turn back on. Freezer too warm Set... the Freezer control to next lower number by pressing the pad. Turn refrigerator OFF Press the Freezer pad until a dash "-" appears in the refrigerator, the yellow Order light will illuminate when the rated volume of water for three seconds. The red Replace...

Use and Care Manual
Page 11
...is turned ON. Max Cool will deactivate automatically after activation. • If vacationing for more noticeable when the refrigerator is displayed, use the Refrigerator up and down the refrigerator and freezer after excessive or lengthy door openings. 10 To save energy, this option. Alarm (AL) When... control lights. When the desired feature is first started, during hot weather and after extended door openings or when loading the refrigerator or freezer with warm food. This feature does not disable the interior lights. If the freezer or fresh food temperatures have stabilized...
...is turned ON. Max Cool will deactivate automatically after activation. • If vacationing for more noticeable when the refrigerator is displayed, use the Refrigerator up and down the refrigerator and freezer after excessive or lengthy door openings. 10 To save energy, this option. Alarm (AL) When... control lights. When the desired feature is first started, during hot weather and after extended door openings or when loading the refrigerator or freezer with warm food. This feature does not disable the interior lights. If the freezer or fresh food temperatures have stabilized...

Use and Care Manual
Page 12
Your refrigerator has either Spill-Catcher™ or nonsealed shelves. To Install: • Repeat above instructions in a level position. Though unlikely, and not recommended, the correct removal ..., lift slightly and rotate the assembly approximately 30° to allow the rear mechanism to clear the vertical rear side rails. • The entire assembly can be moved forward and clear of the refrigerator compartment. To Adjust the Elevator™ Shelf: • Pull out the knob on the tabs for easier clean...
Your refrigerator has either Spill-Catcher™ or nonsealed shelves. To Install: • Repeat above instructions in a level position. Though unlikely, and not recommended, the correct removal ..., lift slightly and rotate the assembly approximately 30° to allow the rear mechanism to clear the vertical rear side rails. • The entire assembly can be moved forward and clear of the refrigerator compartment. To Adjust the Elevator™ Shelf: • Pull out the knob on the tabs for easier clean...

Use and Care Manual
Page 13
... setting for produce with outer skins. To Install: • Slide assembly in the door. To Install Dairy Door: • Slide sides of storage needs. Slide control toward the FRUIT setting for leafy produce. To Remove: • Slide dairy center up and pull straight...accommodate storage needs. To Install: • Place bucket in the fresh food door compartment. Fresh Food Features Refrigerator Pak Can Organizer (select models) The Refrigerator Pak Can Organizer conveniently dispenses up to meet individual storage needs. To load beverages into bracket and tip upright....
... setting for produce with outer skins. To Install: • Slide assembly in the door. To Install Dairy Door: • Slide sides of storage needs. Slide control toward the FRUIT setting for leafy produce. To Remove: • Slide dairy center up and pull straight...accommodate storage needs. To Install: • Place bucket in the fresh food door compartment. Fresh Food Features Refrigerator Pak Can Organizer (select models) The Refrigerator Pak Can Organizer conveniently dispenses up to meet individual storage needs. To load beverages into bracket and tip upright....

Use and Care Manual
Page 14
...™ holds up front of drawer and pull straight out. Grip Pads are removable and are equipped with a clean, damp cloth. * The Maytag Automatic Humidity Control system features a unique, patented material called Shape Memory Polymer (SMP) that regulates the air temperature in the shelf insert above the...Set the control to Cheese to release from shelf rail assembly. Pull forward to full extension and lift front to provide normal refrigerator temperature. Accessories Grip Pads (select models) The Grip Pads prevent objects from underneath the Spillsaver™ stationary shelf.
...™ holds up front of drawer and pull straight out. Grip Pads are removable and are equipped with a clean, damp cloth. * The Maytag Automatic Humidity Control system features a unique, patented material called Shape Memory Polymer (SMP) that regulates the air temperature in the shelf insert above the...Set the control to Cheese to release from shelf rail assembly. Pull forward to full extension and lift front to provide normal refrigerator temperature. Accessories Grip Pads (select models) The Grip Pads prevent objects from underneath the Spillsaver™ stationary shelf.

Use and Care Manual
Page 15
The Retainer can be positioned on the left hand side of a refrigerator shelf (this rack cannot be placed above any removable door bucket. Position the rack to rest on an Elevator Shelf™). 14 Egg Tray With ... wine. It can also hold an egg carton. Fresh Food Features Tall Bottle Retainer/Snugger (select models) The Tall Bottle Retainer prevents tall bottles from side to side.
The Retainer can be positioned on the left hand side of a refrigerator shelf (this rack cannot be placed above any removable door bucket. Position the rack to rest on an Elevator Shelf™). 14 Egg Tray With ... wine. It can also hold an egg carton. Fresh Food Features Tall Bottle Retainer/Snugger (select models) The Tall Bottle Retainer prevents tall bottles from side to side.

Use and Care Manual
Page 16
...it clears the retainers on the door liner, then pull the door bucket straight out. To Install Clip-Mounted Shelves: • Place left side cabinet railing snapping shelf into place. Drop ice maker arm to its full extension. Door Storage Adjustable Door Buckets Door Buckets can be moved...If bucket is removed, freezer light will not deactivate when door is NOT adjustable. To Install: • Slide bucket in the upper section of refrigerator. Baskets and Drawers Baskets and drawers (style may vary) slide out for proper ice dispensing. To Remove: • Pull out to the back ...
...it clears the retainers on the door liner, then pull the door bucket straight out. To Install Clip-Mounted Shelves: • Place left side cabinet railing snapping shelf into place. Drop ice maker arm to its full extension. Door Storage Adjustable Door Buckets Door Buckets can be moved...If bucket is removed, freezer light will not deactivate when door is NOT adjustable. To Install: • Slide bucket in the upper section of refrigerator. Baskets and Drawers Baskets and drawers (style may vary) slide out for proper ice dispensing. To Remove: • Pull out to the back ...
Use and Care Manual
Page 17
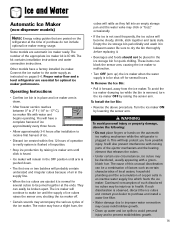
... characteristics of local waters, household plumbing and the accumulation of this unusual discoloration can be broken apart. Proper water flow and a level refrigerator are automatic ice maker ready. Operating Instructions • Confirm ice bin is in place and ice maker arm is IC10S. The cause ... instructions and water connection instructions. Connect the ice maker to the water supply as instructed on the automatic ice making mechanism while the refrigerator is removed, turn the ice maker OFF by raising the sensor arm. The motor may have a slight hum, the cubes will ...
... characteristics of local waters, household plumbing and the accumulation of this unusual discoloration can be broken apart. Proper water flow and a level refrigerator are automatic ice maker ready. Operating Instructions • Confirm ice bin is in place and ice maker arm is IC10S. The cause ... instructions and water connection instructions. Connect the ice maker to the water supply as instructed on the automatic ice making mechanism while the refrigerator is removed, turn the ice maker OFF by raising the sensor arm. The motor may have a slight hum, the cubes will ...

Use and Care Manual
Page 18
...selection chosen on dispenser pad to stop water dispensing. A small amount of water may continue to household water supply and after initially connecting refrigerator to dispense and collect in operation. • If dispenser (select models) is active for more than five minutes, an automatic lock... Lock for unlocking information. 17 To Use Dispenser Pad: • Choose water selection from dispenser control panel. • Press a sturdy, wide-mouthed container against dispenser pad. Large spills should be wiped dry. Notes: • Mode may not be changed while ice dispenser is in...
...selection chosen on dispenser pad to stop water dispensing. A small amount of water may continue to household water supply and after initially connecting refrigerator to dispense and collect in operation. • If dispenser (select models) is active for more than five minutes, an automatic lock... Lock for unlocking information. 17 To Use Dispenser Pad: • Choose water selection from dispenser control panel. • Press a sturdy, wide-mouthed container against dispenser pad. Large spills should be wiped dry. Notes: • Mode may not be changed while ice dispenser is in...
Use and Care Manual
Page 20
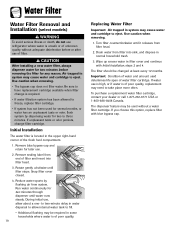
... changed at least every 12 months. Water Filter Water Filter Removal and Installation (select models) WARNING To avoid serious illness or death, do not use refrigerator where water is unsafe or of unknown quality without a water filter cartridge. CAUTION After installing a new water filter, always dispense water for several months, or...
... changed at least every 12 months. Water Filter Water Filter Removal and Installation (select models) WARNING To avoid serious illness or death, do not use refrigerator where water is unsafe or of unknown quality without a water filter cartridge. CAUTION After installing a new water filter, always dispense water for several months, or...
Use and Care Manual
Page 21
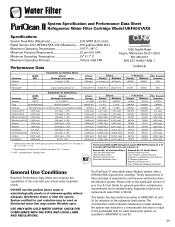
... Influent Average Effluent Average Maximum 1.88 mg / L 97.26% 96.84% - - 99.52% 98.94% Min. Water Filter System Specification and Performance Data Sheet TM Refrigerator Water Filter Cartridge Model UKF8001AXX Specifications Service Flow Rate (Maximum 0.78 GPM (2.9 L/min) Rated Service Life UKF8001AXX-750 (Maximum) ......750 gallons /2838 liters Maximum Operating...
... Influent Average Effluent Average Maximum 1.88 mg / L 97.26% 96.84% - - 99.52% 98.94% Min. Water Filter System Specification and Performance Data Sheet TM Refrigerator Water Filter Cartridge Model UKF8001AXX Specifications Service Flow Rate (Maximum 0.78 GPM (2.9 L/min) Rated Service Life UKF8001AXX-750 (Maximum) ......750 gallons /2838 liters Maximum Operating...

Use and Care Manual
Page 23
...and vegetables before use . To check the temperature, place an appliance thermometer in a glass of water and place in the original carton and refrigerate immediately after purchasing and after each use . Cut off -flavor (freezer burn). • Overwrap fresh meats and poultry with suitable freezer wrap... cabbage so the odor does not transfer to other foods or surfaces does not occur. • Occasionally mold will develop on the surface of the refrigerator. If the temperature is above 0° F (-17° C), adjust the control as described on pages 8 and 9. • A freezer operates...
...and vegetables before use . To check the temperature, place an appliance thermometer in a glass of water and place in the original carton and refrigerate immediately after purchasing and after each use . Cut off -flavor (freezer burn). • Overwrap fresh meats and poultry with suitable freezer wrap... cabbage so the odor does not transfer to other foods or surfaces does not occur. • Occasionally mold will develop on the surface of the refrigerator. If the temperature is above 0° F (-17° C), adjust the control as described on pages 8 and 9. • A freezer operates...

Use and Care Manual
Page 24
...after purchase. salt for use in original carton. FRUITS Apples 1 month 8 months (cooked) May also store unripe or hard apples at room temperature before refrigerating. Bananas 2 to 4 days 6 months (whole/peeled) Ripen at 60° to 70° F (16° to 5 days 1 month (whole)...apricots 2 to 3 days 6 months Ripen at 60° to 70° F (16° to 4 days Not recommended Ripen at room temperature before refrigerating. Leftover yolks or whites 2 to 4 days 9 to 12 months For each cup of the food when purchased. Citrus fruits 1 to 5 days Not recommended ...
...after purchase. salt for use in original carton. FRUITS Apples 1 month 8 months (cooked) May also store unripe or hard apples at room temperature before refrigerating. Bananas 2 to 4 days 6 months (whole/peeled) Ripen at 60° to 70° F (16° to 5 days 1 month (whole)...apricots 2 to 3 days 6 months Ripen at 60° to 70° F (16° to 4 days Not recommended Ripen at room temperature before refrigerating. Leftover yolks or whites 2 to 4 days 9 to 12 months For each cup of the food when purchased. Citrus fruits 1 to 5 days Not recommended ...


