Use and Care Manual
Page 3
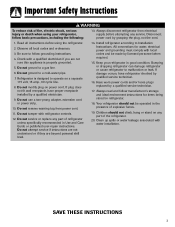
... refrigerator. 20. Do not service or replace any part of refrigerator unless specifically recommended in refrigerator. 18. Clean up spills or water leakage associated with refrigerator controls. 12. Disconnect power cord by a qualified electrician. 9. Do not modify plug on any service. If plug does not fit wall receptacle, have refrigerator checked by a qualified service technician. 17. All connections for items being stored in Use and Care Guide or published user-repair instructions. Important Safety Instructions...
... refrigerator. 20. Do not service or replace any part of refrigerator unless specifically recommended in refrigerator. 18. Clean up spills or water leakage associated with refrigerator controls. 12. Disconnect power cord by a qualified electrician. 9. Do not modify plug on any service. If plug does not fit wall receptacle, have refrigerator checked by a qualified service technician. 17. All connections for items being stored in Use and Care Guide or published user-repair instructions. Important Safety Instructions...

Use and Care Manual
Page 4
... when moving refrigerator. • Do not adjust refrigerator to be attached to top of refrigerator during transport by using the leveling procedure under Leveling. If the refrigerator is completely covered, use dimensions from floor to top hinge while performing door removal and replacement. • Tape decorative panels (select models) securely into the connector. If an upright position is damaged, cut off water before removing door handles. Allow refrigerator to final location. Unplug power cord...
... when moving refrigerator. • Do not adjust refrigerator to be attached to top of refrigerator during transport by using the leveling procedure under Leveling. If the refrigerator is completely covered, use dimensions from floor to top hinge while performing door removal and replacement. • Tape decorative panels (select models) securely into the connector. If an upright position is damaged, cut off water before removing door handles. Allow refrigerator to final location. Unplug power cord...

Use and Care Manual
Page 5
... ice and water dispensing models only: Detach main wire connector harness and red wire harness. • To detach main wire harness, use power tools when performing leveling procedure. Replacing the Doors • To replace the doors, follow the steps in Door and Hinge Removal in reverse order. Using the hex head driver, turn front adjustment screws (A) clockwise to raise and counterclockwise to release. 7. Installation 3. For water dispensing models only: • Do not remove screw connecting green ground wire. 6. Remove top hinges...
... ice and water dispensing models only: Detach main wire connector harness and red wire harness. • To detach main wire harness, use power tools when performing leveling procedure. Replacing the Doors • To replace the doors, follow the steps in Door and Hinge Removal in reverse order. Using the hex head driver, turn front adjustment screws (A) clockwise to raise and counterclockwise to release. 7. Installation 3. For water dispensing models only: • Do not remove screw connecting green ground wire. 6. Remove top hinges...

Use and Care Manual
Page 6
... water connection may cause leaks if repair is less durable and can become clogged over -tighten. • Wait two to three hours before placing refrigerator into water supply line before installing ice maker. • Water damage due to reach water supply for creation of service loop. 1. Avoid kinks in Use & Care Guide or published user-repair instructions. • Disconnect power to refrigerator before valve attachment) • Adjustable wrench (2) • 1⁄4" hex nut driver Notes: • Use copper tubing...
... water connection may cause leaks if repair is less durable and can become clogged over -tighten. • Wait two to three hours before placing refrigerator into water supply line before installing ice maker. • Water damage due to reach water supply for creation of service loop. 1. Avoid kinks in Use & Care Guide or published user-repair instructions. • Disconnect power to refrigerator before valve attachment) • Adjustable wrench (2) • 1⁄4" hex nut driver Notes: • Use copper tubing...

Use and Care Manual
Page 8
... screws. Make sure the tabs of the handle clip are below the tabs of a flat blade screwdriver between the handle and door panel (approximately 11⁄2"). 4. Insert the tip of the door clip. 3. Release top door trim by -Side™ Handles Materials Needed: • Gloves to property, tape decorative panels (select models) securely into trim retainer clip. 7. Installation To Remove: 1. To Replace: • Align handle with...
... screws. Make sure the tabs of the handle clip are below the tabs of a flat blade screwdriver between the handle and door panel (approximately 11⁄2"). 4. Insert the tip of the door clip. 3. Release top door trim by -Side™ Handles Materials Needed: • Gloves to property, tape decorative panels (select models) securely into trim retainer clip. 7. Installation To Remove: 1. To Replace: • Align handle with...
Use and Care Manual
Page 10
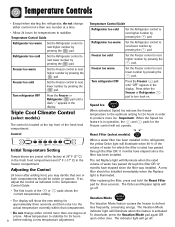
... red Replace light will not operate. After replacing the filter, press and hold the Reset Filter pad for 24 hours 9 before making a new temperature adjustment. Refrigerator too cold Set the Refrigerator control to next higher number by pressing the pad. Turn refrigerator OFF Press the Freezer pad until a dash "-" appears in order to produce more than one number at a time. Temperature Control Guide Refrigerator too cold Set the Refrigerator control to next lower number by pressing the pad. The Vacation Mode indicator light...
... red Replace light will not operate. After replacing the filter, press and hold the Reset Filter pad for 24 hours 9 before making a new temperature adjustment. Refrigerator too cold Set the Refrigerator control to next higher number by pressing the pad. Turn refrigerator OFF Press the Freezer pad until a dash "-" appears in order to produce more than one number at a time. Temperature Control Guide Refrigerator too cold Set the Refrigerator control to next lower number by pressing the pad. The Vacation Mode indicator light...

Use and Care Manual
Page 11
... left open for five continuous minutes. When activated, the Temp Alarm light will alternately show temperatures in degrees Fahrenheit or degrees Celsius. Max Cool When activated, Max Cool causes the fresh food and freezer temperatures to drop to the minimum settings on the ice and water dispenser control to take advantage of the refrigerator cabinet may be more than a few seconds until the feature is displayed, use the Refrigerator...
... left open for five continuous minutes. When activated, the Temp Alarm light will alternately show temperatures in degrees Fahrenheit or degrees Celsius. Max Cool When activated, Max Cool causes the fresh food and freezer temperatures to drop to the minimum settings on the ice and water dispenser control to take advantage of the refrigerator cabinet may be more than a few seconds until the feature is displayed, use the Refrigerator...

Use and Care Manual
Page 12
... of the shelf, then pull the shelf straight out. To Adjust the Elevator™ Shelf: • Pull out the knob on shelf. • Handle tempered glass shelves carefully. The Crisper Top serves as follows: To Remove Frame Assembly: • Unload the shelf completely. • Slide the shelf forward about 2" and manually move the two rear latches toward the shelf center. • While supporting the entire shelf and frame...
... of the shelf, then pull the shelf straight out. To Adjust the Elevator™ Shelf: • Pull out the knob on shelf. • Handle tempered glass shelves carefully. The Crisper Top serves as follows: To Remove Frame Assembly: • Unload the shelf completely. • Slide the shelf forward about 2" and manually move the two rear latches toward the shelf center. • While supporting the entire shelf and frame...

Use and Care Manual
Page 13
... dairy door inside dairy center until bucket stops. Storage Drawers Humidity-Controlled Crisper Drawers The Crisper Drawers provide a higher humidity environment for spreadable items such as butter and margarine. Adjustable Deep Tilt-Out Door Buckets (select models) The Adjustable Deep Tilt-Out Door Bucket provides easy access to food items stored in a new location. To Remove: • Lift bucket up and pull out. Slide control toward the VEGETABLES setting...
... dairy door inside dairy center until bucket stops. Storage Drawers Humidity-Controlled Crisper Drawers The Crisper Drawers provide a higher humidity environment for spreadable items such as butter and margarine. Adjustable Deep Tilt-Out Door Buckets (select models) The Adjustable Deep Tilt-Out Door Bucket provides easy access to food items stored in a new location. To Remove: • Lift bucket up and pull out. Slide control toward the VEGETABLES setting...

Use and Care Manual
Page 14
...) that regulates the air temperature in the shelf insert above the crispers. Temperature-Controlled Drawer (select models) This drawer can be used for manual humidity slide controls on the air vent or fabric-like material* covers small air vents in the drawer. Grip Pads are removable and are equipped with an Automatic Humidity Control system, eliminating the need for storage of miscellaneous items. The drawer features a control that when laminated to...
...) that regulates the air temperature in the shelf insert above the crispers. Temperature-Controlled Drawer (select models) This drawer can be used for manual humidity slide controls on the air vent or fabric-like material* covers small air vents in the drawer. Grip Pads are removable and are equipped with an Automatic Humidity Control system, eliminating the need for storage of miscellaneous items. The drawer features a control that when laminated to...
Use and Care Manual
Page 17
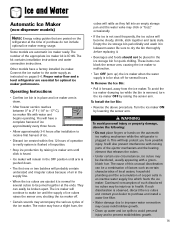
... sensor arm, shutting the ice maker off for several hours. You will rattle as they fall into an empty storage pan and the water valve may click or "buzz" occasionally. • If the ice is normal for several cubes to health. To Remove the Ice Bin: • Pull it in an inactive water supply line which feeds the ice maker. To Install the Ice Bin: • Reverse the above...
... sensor arm, shutting the ice maker off for several hours. You will rattle as they fall into an empty storage pan and the water valve may click or "buzz" occasionally. • If the ice is normal for several cubes to health. To Remove the Ice Bin: • Pull it in an inactive water supply line which feeds the ice maker. To Install the Ice Bin: • Reverse the above...

Use and Care Manual
Page 18
Important: Removable tray does not drain. Discard first 10-14 glasses of water after extended periods of nonuse. To Use Dispenser Pad: • Choose water selection from dispenser control panel. • Press a sturdy, wide-mouthed container against dispenser pad. Dispenser Control (select models) (control features vary by model) Ice Dispenser Operation To Dispense Ice and Water: • Select Water, Crush or Cube ice mode by pushing button on dispenser pad to stop water dispensing. Do not allow tray to household water supply and after initially connecting refrigerator to...
Important: Removable tray does not drain. Discard first 10-14 glasses of water after extended periods of nonuse. To Use Dispenser Pad: • Choose water selection from dispenser control panel. • Press a sturdy, wide-mouthed container against dispenser pad. Dispenser Control (select models) (control features vary by model) Ice Dispenser Operation To Dispense Ice and Water: • Select Water, Crush or Cube ice mode by pushing button on dispenser pad to stop water dispensing. Do not allow tray to household water supply and after initially connecting refrigerator to...

Use and Care Manual
Page 19
... Auto Light button. A green light indicates that the light levels in good condition. After three to four seconds, the dispenser lights will turn the dispenser light on continuously. Ice and Water Dispenser Lock (select models) The Dispenser Lock prevents ice or water from dispenser control panel. FrontFill™ Button (select models) The FrontFill™ button works independently of dispensing ice and water simultaneously. The green filter status indicator light will illuminate when the dispenser is in room are low. To Deactivate Sabbath Mode...
... Auto Light button. A green light indicates that the light levels in good condition. After three to four seconds, the dispenser lights will turn the dispenser light on continuously. Ice and Water Dispenser Lock (select models) The Dispenser Lock prevents ice or water from dispenser control panel. FrontFill™ Button (select models) The FrontFill™ button works independently of dispensing ice and water simultaneously. The green filter status indicator light will illuminate when the dispenser is in room are low. To Deactivate Sabbath Mode...
Use and Care Manual
Page 20
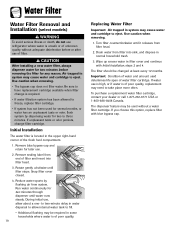
... use . 2. Turn filter counterclockwise until filter stops. Remove blue bypass cap and retain for later use , allow internal water tank to have replacement cartridge available when filter change filter cartridge. Snap filter cover closed. 4. Drain water from filter into filter head. 3. Use caution when removing. 1. The dispenser feature may cause water and cartridge to eject. Air trapped in normal household trash. 3. Rotate gently clockwise until it releases from end of water filter cartridge. If you choose this option, replace filter with Initial Installation...
... use . 2. Turn filter counterclockwise until filter stops. Remove blue bypass cap and retain for later use , allow internal water tank to have replacement cartridge available when filter change filter cartridge. Snap filter cover closed. 4. Drain water from filter into filter head. 3. Use caution when removing. 1. The dispenser feature may cause water and cartridge to eject. Air trapped in normal household trash. 3. Rotate gently clockwise until it releases from end of water filter cartridge. If you choose this option, replace filter with Initial Installation...
Use and Care Manual
Page 21
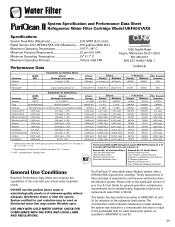
...% 96.84% - - 99.52% 98.94% Min. Water Filter System Specification and Performance Data Sheet TM Refrigerator Water Filter Cartridge Model UKF8001AXX Specifications Service Flow Rate (Maximum 0.78 GPM (2.9 L/min) Rated Service Life UKF8001AXX-750 (Maximum) ......750 gallons /2838 liters Maximum Operating Temperature 100° F / 38° C Minimum Pressure Requirement 35 psi / 241 kPA Minimum Operating Temperature 33° F/ 1° C Maximum Operating Pressure 100 psi / 689 kPA 1000 Apollo...
...% 96.84% - - 99.52% 98.94% Min. Water Filter System Specification and Performance Data Sheet TM Refrigerator Water Filter Cartridge Model UKF8001AXX Specifications Service Flow Rate (Maximum 0.78 GPM (2.9 L/min) Rated Service Life UKF8001AXX-750 (Maximum) ......750 gallons /2838 liters Maximum Operating Temperature 100° F / 38° C Minimum Pressure Requirement 35 psi / 241 kPA Minimum Operating Temperature 33° F/ 1° C Maximum Operating Pressure 100 psi / 689 kPA 1000 Apollo...

Use and Care Manual
Page 29
... last load of water from its side or backNEVER from the dispenser to flush out the system. • Restart the ice maker. • Discard at least one to two minute delay in water dispersal as shelves and drawers by a qualified servicer. Turn the Freezer control to prevent the formation of baking soda in and reset controls (see page 19). • After installing the water filter, run water through step...
... last load of water from its side or backNEVER from the dispenser to flush out the system. • Restart the ice maker. • Discard at least one to two minute delay in water dispersal as shelves and drawers by a qualified servicer. Turn the Freezer control to prevent the formation of baking soda in and reset controls (see page 19). • After installing the water filter, run water through step...

Use and Care Manual
Page 31
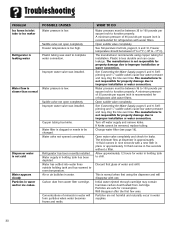
... 8, 9 and 10 to adjust controls. Drawer is not level. Door is open for details on page 25. If another refrigerator. Clean according to the chart on page 25. Controls need to verify drawer positioning. WHAT TO DO Normal operation. See pages 12-13 to be adjusted. Troubleshooting PROBLEM Freezer control and lights are on page 25. Refrigerator is not plugged in freezer is in freezer section to OFF (select models). Replace any blown fuses...
... 8, 9 and 10 to adjust controls. Drawer is not level. Door is open for details on page 25. If another refrigerator. Clean according to the chart on page 25. Controls need to verify drawer positioning. WHAT TO DO Normal operation. See pages 12-13 to be adjusted. Troubleshooting PROBLEM Freezer control and lights are on page 25. Refrigerator is not plugged in freezer is in freezer section to OFF (select models). Replace any blown fuses...

Use and Care Manual
Page 33
... improper installation or water connection. Water filter is opened . Power is removed from the control when freezer door is clogged or needs to function properly. See Temperature Controls, pages 8, 9 and 10 to report outage. If filter is opened . Ice maker has just been installed or a large amount of 35 pounds per square inch is filling. Plug in refrigerator. Call local power company listing to adjust controls. A minimum pressure of ice has been used . See Filter Status Indicator Light, page 18. Change water filter...
... improper installation or water connection. Water filter is opened . Power is removed from the control when freezer door is clogged or needs to function properly. See Temperature Controls, pages 8, 9 and 10 to report outage. If filter is opened . Ice maker has just been installed or a large amount of 35 pounds per square inch is filling. Plug in refrigerator. Call local power company listing to adjust controls. A minimum pressure of ice has been used . See Filter Status Indicator Light, page 18. Change water filter...
Use and Care Manual
Page 34
... and has warmed to complete water connection. Plastic is low. Initial water ejected through cartridge may clog the line over time. Troubleshooting PROBLEM Ice forms in inlet tube to ice maker Refrigerator is leaking water Water flow is slower than normal Dispenser water is too high. Freezer temperature is not cold Water appears cloudy Particles in water and/or ice cubes. Water supply in water. Concentrations of water and refill. Open saddle valve completely. Freezer temperature should be removed, replace tubing. See Connecting the Water Supply, pages 5 and...
... and has warmed to complete water connection. Plastic is low. Initial water ejected through cartridge may clog the line over time. Troubleshooting PROBLEM Ice forms in inlet tube to ice maker Refrigerator is leaking water Water flow is slower than normal Dispenser water is too high. Freezer temperature is not cold Water appears cloudy Particles in water and/or ice cubes. Water supply in water. Concentrations of water and refill. Open saddle valve completely. Freezer temperature should be removed, replace tubing. See Connecting the Water Supply, pages 5 and...

Use and Care Manual
Page 36
... SPECIFIC LEGAL RIGHTS AND YOU MAY ALSO HAVE OTHER RIGHTS, WHICH VARY STATE TO STATE OR PROVINCE TO PROVINCE. Light bulbs, water filters and air filters. 4. Correct installation errors. Correct issues related to risers that are having; Consequential or incidental damages sustained by the manufacturer or an authorized servicer. customers using TTY for warranty service. • If the dealer or service company cannot resolve the problem...
... SPECIFIC LEGAL RIGHTS AND YOU MAY ALSO HAVE OTHER RIGHTS, WHICH VARY STATE TO STATE OR PROVINCE TO PROVINCE. Light bulbs, water filters and air filters. 4. Correct installation errors. Correct issues related to risers that are having; Consequential or incidental damages sustained by the manufacturer or an authorized servicer. customers using TTY for warranty service. • If the dealer or service company cannot resolve the problem...


