Installation Instructions
Page 3
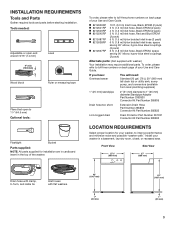
... Use and Care Guide. Tools needed: Adjustable or open-end wrench 9/16" (14 mm) 4" min (102 mm) Level Wood block Ruler or measuring tape Pliers that open to 1" (25 mm) diameter Standpipe Adapter Part Number 3363920 Connector Kit Part Number 285835 Drain hose too short Extension Drain Hose Part Number 285863 Connector Kit Part Number 285835 Lint-clogged drain Drain Protector Part Number 367031 Connector Kit Part Number 285835 LOCATION REQUIREMENTS Select proper location for installation are in cardboard insert in a basement, laundry...
... Use and Care Guide. Tools needed: Adjustable or open-end wrench 9/16" (14 mm) 4" min (102 mm) Level Wood block Ruler or measuring tape Pliers that open to 1" (25 mm) diameter Standpipe Adapter Part Number 3363920 Connector Kit Part Number 285835 Drain hose too short Extension Drain Hose Part Number 285863 Connector Kit Part Number 285835 Lint-clogged drain Drain Protector Part Number 367031 Connector Kit Part Number 285835 LOCATION REQUIREMENTS Select proper location for installation are in cardboard insert in a basement, laundry...
Installation Instructions
Page 4
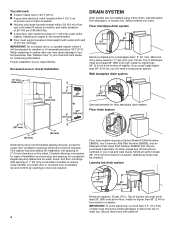
... Kits (Part Number 285835), and an Extension Drain Hose (Part Number 285863) that may be at least 39" (990 mm) above floor; n Hot and cold water faucets located within 4 ft (1.2 m) of power cord on back of 1" (25 mm) under entire washer. Recessed area or closet installation DRAIN SYSTEM Drain system can be exposed to weather or in low temperatures. Consider allowing more than 96" (2.44 m), you will need a sump pump...
... Kits (Part Number 285835), and an Extension Drain Hose (Part Number 285863) that may be at least 39" (990 mm) above floor; n Hot and cold water faucets located within 4 ft (1.2 m) of power cord on back of 1" (25 mm) under entire washer. Recessed area or closet installation DRAIN SYSTEM Drain system can be exposed to weather or in low temperatures. Consider allowing more than 96" (2.44 m), you will need a sump pump...
Installation Instructions
Page 5
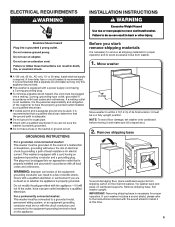
... circuit breaker serving only this time. 5 n Check with local codes and ordinances. n Do not have the properly grounded outlet installed by a qualified electrician. Set washer upright. IMPORTANT: Removing shipping base is properly grounded. If your washer includes a sound shield, please refer to the instructions included with a power supply cord having a 3 prong grounding plug. NOTE: To avoid floor damage, set washer onto cardboard before moving it at...
... circuit breaker serving only this time. 5 n Check with local codes and ordinances. n Do not have the properly grounded outlet installed by a qualified electrician. Set washer upright. IMPORTANT: Removing shipping base is properly grounded. If your washer includes a sound shield, please refer to the instructions included with a power supply cord having a 3 prong grounding plug. NOTE: To avoid floor damage, set washer onto cardboard before moving it at...
Installation Instructions
Page 6
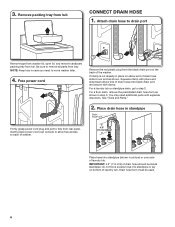
... drain, go to remove all parts from tray. IMPORTANT: 4.5" (114 mm) of laundry tub. do not force excess hose into standpipe (shown in picture) or over side of drain hose should be used. 6 Free power cord Remove the red plastic plug from tub. See "Tools and Parts." 2. Drain hose form must be inside standpipe; NOTE: Keep tray in standpipe Drain hose form Firmly grasp power cord plug and pull to drain port Remove tape from washer lid, open lid...
... drain, go to remove all parts from tray. IMPORTANT: 4.5" (114 mm) of laundry tub. do not force excess hose into standpipe (shown in picture) or over side of drain hose should be used. 6 Free power cord Remove the red plastic plug from tub. See "Tools and Parts." 2. Drain hose form must be inside standpipe; NOTE: Keep tray in standpipe Drain hose form Firmly grasp power cord plug and pull to drain port Remove tape from washer lid, open lid...
Installation Instructions
Page 7
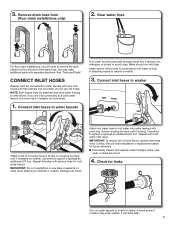
... separate directions. Remove drain hose form (floor drain installations only) 2. You may enter washer. Repeat this step with a red ring. Damage can result. 3. Water should run until it is connected to hot water to help in attaching hoses to hot water faucet. Make note of the drain hose. It will need additional parts with cold water inlet valve. Connect inlet hoses to washer Attach hose to washer correctly. 3. Check for leaks. If you are found. 4. Attach hot water hose to remove the drain hose form...
... separate directions. Remove drain hose form (floor drain installations only) 2. You may enter washer. Repeat this step with a red ring. Damage can result. 3. Water should run until it is connected to hot water to help in attaching hoses to hot water faucet. Make note of the drain hose. It will need additional parts with cold water inlet valve. Connect inlet hoses to washer Attach hose to washer correctly. 3. Check for leaks. If you are found. 4. Attach hot water hose to remove the drain hose form...
Installation Instructions
Page 8
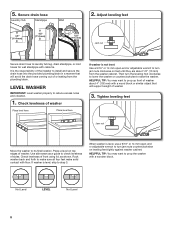
... drain hose Laundry Tub Standpipe Wall 2. Place a level on leveling feet tightly against washer cabinet. Not Level LEVEL Not Level 8 It is not level: Use a 9/16" or 14 mm open -end or adjustable wrench to raise the washer. Adjust leveling feet 44..55"" (114 mm) 4.5" (114 mm) 4.5" (1143 mm) Jam nut Secure drain hose to check levelness of or leaking from the washer cabinet. Tighten leveling feet Jam nut Move the washer to reduce excess noise and vibration...
... drain hose Laundry Tub Standpipe Wall 2. Place a level on leveling feet tightly against washer cabinet. Not Level LEVEL Not Level 8 It is not level: Use a 9/16" or 14 mm open -end or adjustable wrench to raise the washer. Adjust leveling feet 44..55"" (114 mm) 4.5" (114 mm) 4.5" (1143 mm) Jam nut Secure drain hose to check levelness of or leaking from the washer cabinet. Tighten leveling feet Jam nut Move the washer to reduce excess noise and vibration...
Installation Instructions
Page 9
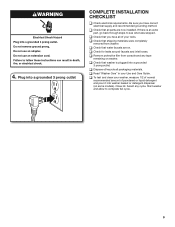
... to complete full cycle. 9 q Dispose of powdered or liquid detergent and pour it into a grounded 3 prong outlet. q To test and clean your Use and Care Guide. q Check that you have all parts are on some models). Plug into a grounded 3 prong outlet COMPLETE INSTALLATION CHECKLIST q Check electrical requirements. Start washer and allow to see what was skipped. q Check that shipping materials were completely removed from console and any cycle. q Check that water faucets are now...
... to complete full cycle. 9 q Dispose of powdered or liquid detergent and pour it into a grounded 3 prong outlet. q To test and clean your Use and Care Guide. q Check that you have all parts are on some models). Plug into a grounded 3 prong outlet COMPLETE INSTALLATION CHECKLIST q Check electrical requirements. Start washer and allow to see what was skipped. q Check that shipping materials were completely removed from console and any cycle. q Check that water faucets are now...
Owners Manual
Page 4
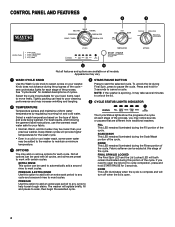
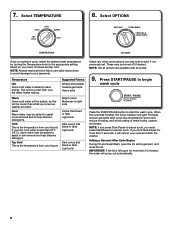
... illuminated during Final Spin, press to unlock the lid. 5 CYCLE STATUS LIGHTS INDICATOR 2 TEMPERATURE Temperature senses and maintains uniform water temperatures by regulating incoming hot and cold water. FINAL SPIN/LID LOCKED The Final Spin LED and the Lid Locked LED will provide higher temperatures for your washer. See "Cycle Guide" for each cycle. Deep Water cycles will both an extra soak period to any cycle to cancel a cycle. PRESOAK & EXTRA RINSE Use this option to add an extra soak...
... illuminated during Final Spin, press to unlock the lid. 5 CYCLE STATUS LIGHTS INDICATOR 2 TEMPERATURE Temperature senses and maintains uniform water temperatures by regulating incoming hot and cold water. FINAL SPIN/LID LOCKED The Final Spin LED and the Lid Locked LED will provide higher temperatures for your washer. See "Cycle Guide" for each cycle. Deep Water cycles will both an extra soak period to any cycle to cancel a cycle. PRESOAK & EXTRA RINSE Use this option to add an extra soak...
Owners Manual
Page 5
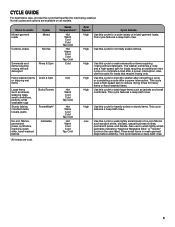
... cycle uses a high-speed spin to reduce drying times for loads requiring an additional rinse cycle or to complete a load after a power interruption. Use this cycle for heavily soiled or sturdy items. This cycle features a deep bath rinse. High Use this cycle to drain the washer after cancelling a cycle or completing a cycle after a power interruption. The washer combines a rinse and a high-speed spin for heavy items or hand-washed items. Use this cycle for normally soiled cottons. Also use this cycle to wash...
... cycle uses a high-speed spin to reduce drying times for loads requiring an additional rinse cycle or to complete a load after a power interruption. Use this cycle for heavily soiled or sturdy items. This cycle features a deep bath rinse. High Use this cycle to drain the washer after cancelling a cycle or completing a cycle after a power interruption. The washer combines a rinse and a high-speed spin for heavy items or hand-washed items. Use this cycle for normally soiled cottons. Also use this cycle to wash...
Owners Manual
Page 6
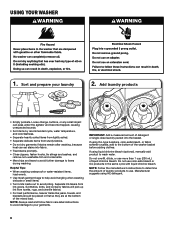
... should be placed in the same cycle with liquid chlorine bleach. If using Oxi-type boosters, color-safe bleach, or fabric softener crystals, add to use. Do not use more than 1 cup (236 mL) of liquid chlorine bleach. If using HE detergent. 6 Manufacturer suggests using liquid chlorine bleach (optional), manually add product to avoid pilling. Helpful Tips: • When washing waterproof or water-resistant items, load evenly. • Use mesh garment bags to help avoid...
... should be placed in the same cycle with liquid chlorine bleach. If using Oxi-type boosters, color-safe bleach, or fabric softener crystals, add to use. Do not use more than 1 cup (236 mL) of liquid chlorine bleach. If using HE detergent. 6 Manufacturer suggests using liquid chlorine bleach (optional), manually add product to avoid pilling. Helpful Tips: • When washing waterproof or water-resistant items, load evenly. • Use mesh garment bags to help avoid...
Owners Manual
Page 7
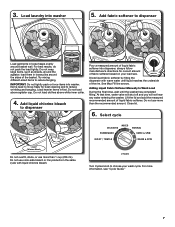
..., or use color-safe bleach or Oxi products in loose piles around the agitator; Turn Cycles knob to dispenser Pour a measured amount of liquid fabric softener into washer 5. Load laundry into dispenser; Load heavier items in loose heaps evenly around basket wall. At that time, water valve will shut off and you will not hear any water entering the washer. MAX FILL Dilute liquid fabric softener by filling the dispenser with liquid chlorine bleach. Close lid. 6. load them...
..., or use color-safe bleach or Oxi products in loose piles around the agitator; Turn Cycles knob to dispenser Pour a measured amount of liquid fabric softener into washer 5. Load laundry into dispenser; Load heavier items in loose heaps evenly around basket wall. At that time, water valve will shut off and you will not hear any water entering the washer. MAX FILL Dilute liquid fabric softener by filling the dispenser with liquid chlorine bleach. Close lid. 6. load them...
Owners Manual
Page 8
... energy. IMPORTANT: If the lid is left open the lid, add a garment, and close the lid. 7. NOTE: Always read and follow fabric care label instructions to avoid damage to add, if not previously set. Suggested Fabrics Whites and pastels Durable garments Heavy soils Warm Some cold water will be added to the appropriate setting based on your garments. If you select a cycle, select the desired wash temperature by turning...
... energy. IMPORTANT: If the lid is left open the lid, add a garment, and close the lid. 7. NOTE: Always read and follow fabric care label instructions to avoid damage to add, if not previously set. Suggested Fabrics Whites and pastels Durable garments Heavy soils Warm Some cold water will be added to the appropriate setting based on your garments. If you select a cycle, select the desired wash temperature by turning...
Owners Manual
Page 9
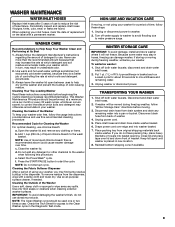
... interrupt cycle. Cleaning the Fabric Softener Dispenser After a period of using your washer. Use only mild soaps or cleaners when cleaning external washer surfaces. Unplug washer or disconnect power. Disconnect and drain water inlet hoses. 2. Disconnect drain hose from the dispenser, wipe with a permanent marker. Drape power cord over lid and down front of R.V.-type antifreeze in the dispenser. Reinstall bottom shipping cone if available. 9 Periodically inspect and replace inlet hoses if bulges, kinks, cuts, wear, or leaks are found. WASHER CARE...
... interrupt cycle. Cleaning the Fabric Softener Dispenser After a period of using your washer. Use only mild soaps or cleaners when cleaning external washer surfaces. Unplug washer or disconnect power. Disconnect and drain water inlet hoses. 2. Disconnect drain hose from the dispenser, wipe with a permanent marker. Drape power cord over lid and down front of R.V.-type antifreeze in the dispenser. Reinstall bottom shipping cone if available. 9 Periodically inspect and replace inlet hoses if bulges, kinks, cuts, wear, or leaks are found. WASHER CARE...

Owners Manual
Page 10
... to cabinet. Water Leaks Check the following recommended procedure: To use , vacation, winter storage, or moving: 1. Check that load is normal. Run washer through the following for flexing or sagging. Washer may splash off basket if washer is not level. See "Cycle Guide" and "Using Your Washer" in this Use and Care Guide. Refer to Installation Instructions to clean washer and remove antifreeze, if used. Flush water pipes and hoses. Front and rear feet must be level to operate properly.
... to cabinet. Water Leaks Check the following recommended procedure: To use , vacation, winter storage, or moving: 1. Check that load is normal. Run washer through the following for flexing or sagging. Washer may splash off basket if washer is not level. See "Cycle Guide" and "Using Your Washer" in this Use and Care Guide. Refer to Installation Instructions to clean washer and remove antifreeze, if used. Flush water pipes and hoses. Front and rear feet must be level to operate properly.
Owners Manual
Page 11
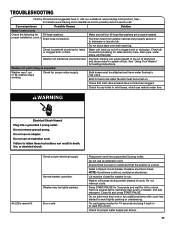
... reset the control. proper installation: (cont.) Drain hose connection. Reset a tripped circuit breaker. Replace any kinks in inlet hoses, which can back up out of a clogged sink or drainpipe. See "Using Your Washer" for proper water supply. All LEDs remain lit Check proper electrical supply. Washer may be out of cycle. Pull drain hose from washer cabinet and properly secure it back in basket, and add detergent. Normal washer operation. Close lid and press START/PAUSE. washer stops working Check for loading instructions...
... reset the control. proper installation: (cont.) Drain hose connection. Reset a tripped circuit breaker. Replace any kinks in inlet hoses, which can back up out of a clogged sink or drainpipe. See "Using Your Washer" for proper water supply. All LEDs remain lit Check proper electrical supply. Washer may be out of cycle. Pull drain hose from washer cabinet and properly secure it back in basket, and add detergent. Normal washer operation. Close lid and press START/PAUSE. washer stops working Check for loading instructions...
Owners Manual
Page 12
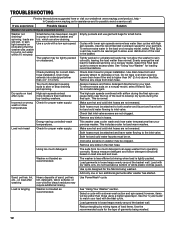
... cycle. Select the Final Spin cycle to possibly avoid a service call. To remove extra suds on load size and soil level. Remove any clogs from operating correctly. Energy-saving controlled-wash temperatures. Load not rinsed Check for proper installation. Both hot and cold water faucets must be attached and have been caught in hoses. Use cycle designed for your load. Sand, pet hair, lint, etc., on . Use the recommended cycle/spin speed for the fabrics being washed. 12 Remove any kinks in pump...
... cycle. Select the Final Spin cycle to possibly avoid a service call. To remove extra suds on load size and soil level. Remove any clogs from operating correctly. Energy-saving controlled-wash temperatures. Load not rinsed Check for proper installation. Both hot and cold water faucets must be attached and have been caught in hoses. Use cycle designed for your load. Sand, pet hair, lint, etc., on . Use the recommended cycle/spin speed for the fabrics being washed. 12 Remove any kinks in pump...
Owners Manual
Page 13
... unlock until the basket has stopped spinning. Lid Locked LED is flashing The lid is tightly packed. Be sure laundry packet is tightly packed. Not using correct cycle for tough cleaning. Not using the Start/Pause button. Use only liquid chlorine bleach in "Washer Maintenance." Use only fabric softener in seams before washing. Do not pour liquid chlorine bleach directly onto load. Do not place load items on load size and soil level. See the "Cycle Guide" to washer basket before wash cycle. Using too much detergent. See "Washer Care...
... unlock until the basket has stopped spinning. Lid Locked LED is flashing The lid is tightly packed. Be sure laundry packet is tightly packed. Not using correct cycle for tough cleaning. Not using the Start/Pause button. Use only liquid chlorine bleach in "Washer Maintenance." Use only fabric softener in seams before washing. Do not pour liquid chlorine bleach directly onto load. Do not place load items on load size and soil level. See the "Cycle Guide" to washer basket before wash cycle. Using too much detergent. See "Washer Care...
Specification Sheet
Page 1
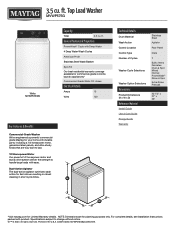
..., see Installation Instructions packed with ease. All rights reserved. Printed in short cycle times. Specifications subject to handle large loads with product. MVWP575GSpecSheetV01. 3.5 cu. ft. Technical Details Drum Material Wash Action Control Location Control Type Number of Cycles Washer Cycle Selections Washer Option Selections Dimensions Product Dimensions (H x W x D) Reference Material Install Guide Use & Care Guide Energy Guide Warranty Stainless Steel Agitator Rear Panel Dials 7 Bulky Items Delicates Drain & Spin Mixed Normal PowerWash® Rinse & Spin Extra Rinse...
..., see Installation Instructions packed with ease. All rights reserved. Printed in short cycle times. Specifications subject to handle large loads with product. MVWP575GSpecSheetV01. 3.5 cu. ft. Technical Details Drum Material Wash Action Control Location Control Type Number of Cycles Washer Cycle Selections Washer Option Selections Dimensions Product Dimensions (H x W x D) Reference Material Install Guide Use & Care Guide Energy Guide Warranty Stainless Steel Agitator Rear Panel Dials 7 Bulky Items Delicates Drain & Spin Mixed Normal PowerWash® Rinse & Spin Extra Rinse...

Instruction Sheet
Page 1
...8482; ©2019 Maytag. TOP LOAD HE WASHER DAY WASH PERFORMANCE LIMITED GUARANTEE WASH PERFORMANCE LIMITED MONEY BACK GUARANTEE VALID FROM JANUARY 1, 2019 - Used under license in connection with the wash performance of your new qualifying Maytag® Top Load HE washer, Whirlpool Canada LP... suspend, or amend any time without prior notice. December 31, 2019* ELIGIBLE MODELS: MVWC465HW, MVWC565FW, MVWX655DW, MVWB765FW, MVWB765FC, MVWB865GC, MVWP575GW If you are not completely satisfied with the removal of the qualifying Maytag® top load HE washer are subject to apartments, ...
...8482; ©2019 Maytag. TOP LOAD HE WASHER DAY WASH PERFORMANCE LIMITED GUARANTEE WASH PERFORMANCE LIMITED MONEY BACK GUARANTEE VALID FROM JANUARY 1, 2019 - Used under license in connection with the wash performance of your new qualifying Maytag® Top Load HE washer, Whirlpool Canada LP... suspend, or amend any time without prior notice. December 31, 2019* ELIGIBLE MODELS: MVWC465HW, MVWC565FW, MVWX655DW, MVWB765FW, MVWB765FC, MVWB865GC, MVWP575GW If you are not completely satisfied with the removal of the qualifying Maytag® top load HE washer are subject to apartments, ...

Instruction Sheet
Page 2
... rights reserved. Not valid for the 30-Day Wash Performance Money-Back Guarantee: MVWC465HW, MVWC565FW, MVWX655DW, MVWB765FW, MVWB765FC, MVWB865GC, MVWP575GW, Washer Model Number Washer Serial Number Customer Name Street Address Apt City Province Postal Code Phone Email Customer Signature Date of administering this Money-Back Guarantee. Contact the Maytag Customer Experience Centre toll-free at 1-800-807-6777 for the purposes of Purchase...
... rights reserved. Not valid for the 30-Day Wash Performance Money-Back Guarantee: MVWC465HW, MVWC565FW, MVWX655DW, MVWB765FW, MVWB765FC, MVWB865GC, MVWP575GW, Washer Model Number Washer Serial Number Customer Name Street Address Apt City Province Postal Code Phone Email Customer Signature Date of administering this Money-Back Guarantee. Contact the Maytag Customer Experience Centre toll-free at 1-800-807-6777 for the purposes of Purchase...


