

Installation Instructions
Page 2
...space saving 90° elbow, hypro-blue steel couplings (2 pack) Alternate parts: (Not supplied with flat washers To order, please refer to improve performance and minimize noise and possible "washer walk". To order, please refer to toll-free numbers on back page of your Use and Care Guide.... mm) Optional tools: Flashlight Bucket Parts supplied: NOTE: All parts supplied for your Use and Care Guide. Tools needed: Parts needed: (Not supplied with washer) Adjustable or open end wrench 9/16" (14 mm) 4" min (102 mm) Level Wood block Ruler or measuring tape Pliers that open to 1" (...
...space saving 90° elbow, hypro-blue steel couplings (2 pack) Alternate parts: (Not supplied with flat washers To order, please refer to improve performance and minimize noise and possible "washer walk". To order, please refer to toll-free numbers on back page of your Use and Care Guide.... mm) Optional tools: Flashlight Bucket Parts supplied: NOTE: All parts supplied for your Use and Care Guide. Tools needed: Parts needed: (Not supplied with washer) Adjustable or open end wrench 9/16" (14 mm) 4" min (102 mm) Level Wood block Ruler or measuring tape Pliers that open to 1" (...

Installation Instructions
Page 3
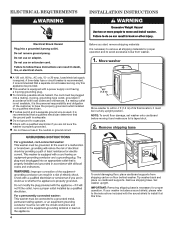
...Number 285385), and an Extension Drain Hose (Part Number 285863) that may be at least 39" (990 mm) above floor; Installing on back of washer. install no higher than 96" (2.44 m) from bottom of 315 lbs (143 kgs). IMPORTANT: To avoid siphoning, no more space for walls,...system Minimum capacity: 20 gal. (76 L). Consider allowing more than 96" (2.44 m), you need. n A level floor with water and load) of washer. (Additional hoses may cause damage in your responsibility. Minimum siphon break: 28" (710 mm) from bottom of drain hose should be installed using a floor ...
...Number 285385), and an Extension Drain Hose (Part Number 285863) that may be at least 39" (990 mm) above floor; Installing on back of washer. install no higher than 96" (2.44 m) from bottom of 315 lbs (143 kgs). IMPORTANT: To avoid siphoning, no more space for walls,...system Minimum capacity: 20 gal. (76 L). Consider allowing more than 96" (2.44 m), you need. n A level floor with water and load) of washer. (Additional hoses may cause damage in your responsibility. Minimum siphon break: 28" (710 mm) from bottom of drain hose should be installed using a floor ...
Installation Instructions
Page 4
...Check with a power supply cord having a 3 prong grounding plug. it is the personal responsibility and obligation of its final location; Tip washer back and place on floor behind washer. Remove shipping base. n To minimize possible shock hazard, the cord must be plugged into a mating, 3 prong, grounding-type outlet... shipping carton on cardboard supports. Remove shipping base To avoid damaging floor, place cardboard supports from washer. 1. Move washer n A 120 volt, 60 Hz., AC only, 15- ELECTRICAL REQUIREMENTS INSTALLATION INSTRUCTIONS Before you are not sure the...
...Check with a power supply cord having a 3 prong grounding plug. it is the personal responsibility and obligation of its final location; Tip washer back and place on floor behind washer. Remove shipping base. n To minimize possible shock hazard, the cord must be plugged into a mating, 3 prong, grounding-type outlet... shipping carton on cardboard supports. Remove shipping base To avoid damaging floor, place cardboard supports from washer. 1. Move washer n A 120 volt, 60 Hz., AC only, 15- ELECTRICAL REQUIREMENTS INSTALLATION INSTRUCTIONS Before you are not sure the...

Installation Instructions
Page 5
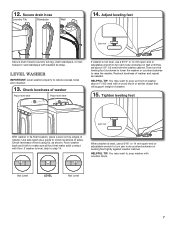
...drain hose onto black drain port and secure with separate directions. 3. Attach drain hose to move washer later. 4. Squeeze clamp with pliers and slide black elbow end of laundry tub. For a laundry tub ...or standpipe drain, go to back of washer. 4.5" (113 mm) Place hose into standpipe or lay on elbow end of drain hose, slide it ...used. 5 Be sure to free from tub. You may need to drain port Remove tape from washer lid, open lid and remove cardboard packing tray from rear panel. IMPORTANT: 4.5" (113 mm) of laundry tub...
...drain hose onto black drain port and secure with separate directions. 3. Attach drain hose to move washer later. 4. Squeeze clamp with pliers and slide black elbow end of laundry tub. For a laundry tub ...or standpipe drain, go to back of washer. 4.5" (113 mm) Place hose into standpipe or lay on elbow end of drain hose, slide it ...used. 5 Be sure to free from tub. You may need to drain port Remove tape from washer lid, open lid and remove cardboard packing tray from rear panel. IMPORTANT: 4.5" (113 mm) of laundry tub...

Installation Instructions
Page 6
... Record hose installation or replacement dates for cold water faucet. It will cross over each other when attached correctly. You may enter washer. Connect inlet hoses to washer Attach hose to hot water inlet valve marked with second hose for future reference. IMPORTANT: Do not overtighten or use old hoses...hand until it is connected to hot water to help in attaching hoses to inlet valves. Use pliers to faucets or washer. 7. Do not use tape or sealants on washer. Attach hot water hose to hot water faucet. IMPORTANT: To reduce risk of the drain hose. A small amount of...
... Record hose installation or replacement dates for cold water faucet. It will cross over each other when attached correctly. You may enter washer. Connect inlet hoses to washer Attach hose to hot water inlet valve marked with second hose for future reference. IMPORTANT: Do not overtighten or use old hoses...hand until it is connected to hot water to help in attaching hoses to inlet valves. Use pliers to faucets or washer. 7. Do not use tape or sealants on washer. Attach hot water hose to hot water faucet. IMPORTANT: To reduce risk of the drain hose. A small amount of...
Installation Instructions
Page 7
... to make sure all four feet make solid contact with beaded tie strap. Check levelness of washer. 15. If washer is level, use a 9/16" or 14 mm open -end or adjustable wrench to prop washer with a wood block or similar object that will support weight of front using lid, as needed...drain hose to step 14. Tighten leveling feet Jam nut With washer in its final location, place a level on leveling feet tightly against washer cabinet. Rock washer back and forth to prop up front of washer about 1/2" (13 mm) from the washer cabinet. HELPFUL TIP: You may want to turn the leveling ...
... to make sure all four feet make solid contact with beaded tie strap. Check levelness of washer. 15. If washer is level, use a 9/16" or 14 mm open -end or adjustable wrench to prop washer with a wood block or similar object that will support weight of front using lid, as needed...drain hose to step 14. Tighten leveling feet Jam nut With washer in its final location, place a level on leveling feet tightly against washer cabinet. Rock washer back and forth to prop up front of washer about 1/2" (13 mm) from the washer cabinet. HELPFUL TIP: You may want to turn the leveling ...

Installation Instructions
Page 8
... faucets are now installed. q Check that all packaging materials. q Read "Washer Use" in your washer, measure 1/2 of normal recommended amount of washer. Be sure you have correct electrical supply and recommended grounding method. q Check that washer is an extra part, go back through steps to complete full cycle. 8...and any cycle. q Remove protective film from back of powdered or liquid detergent and pour it into washer basket or detergent dispenser (on . If there is plugged into a grounded 3 prong outlet Complete Installation CHECKLIST q Check electrical requirements. 16....
... faucets are now installed. q Check that all packaging materials. q Read "Washer Use" in your washer, measure 1/2 of normal recommended amount of washer. Be sure you have correct electrical supply and recommended grounding method. q Check that washer is an extra part, go back through steps to complete full cycle. 8...and any cycle. q Remove protective film from back of powdered or liquid detergent and pour it into washer basket or detergent dispenser (on . If there is plugged into a grounded 3 prong outlet Complete Installation CHECKLIST q Check electrical requirements. 16....
Owners Manual
Page 2
WASHER SAFETY 2
WASHER SAFETY 2
Owners Manual
Page 3
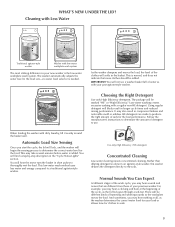
...hear nothing at the beginning of water as with low-water washplate wash system The most striking difference in an agitator-style washer, this washer delivers the detergent directly to soak. 3 This is the low-water washplate wash system. Low-water washing creates excessive ... WHAT'S NEW UNDER THE LID? Cleaning with Less Water Washplate Traditional agitator-style washer Washer with your new washer is normal, and does not indicate that are made to a traditional agitator-style washer. The package will likely result in the basket. Using regular detergent will be added...
...hear nothing at the beginning of water as with low-water washplate wash system The most striking difference in an agitator-style washer, this washer delivers the detergent directly to soak. 3 This is the low-water washplate wash system. Low-water washing creates excessive ... WHAT'S NEW UNDER THE LID? Cleaning with Less Water Washplate Traditional agitator-style washer Washer with your new washer is normal, and does not indicate that are made to a traditional agitator-style washer. The package will likely result in the basket. Using regular detergent will be added...
Owners Manual
Page 4
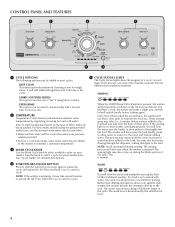
...turn the basket in short pulses to thoroughly wet the load. The sensing light may change at different stages in an agitator-style washer, this washer delivers the detergent directly to the soils. Low-water cleaning means concentrated cleaning. DEEP CLEAN This option provides enhanced cleaning action for...cycles on the type of these spins. For best results and following options may notice sounds or pauses that are different from traditional washers. You may take several minutes to "Yes" if using fabric softener. These sensing spins may also hear water flowing through the ...
...turn the basket in short pulses to thoroughly wet the load. The sensing light may change at different stages in an agitator-style washer, this washer delivers the detergent directly to the soils. Low-water cleaning means concentrated cleaning. DEEP CLEAN This option provides enhanced cleaning action for...cycles on the type of these spins. For best results and following options may notice sounds or pauses that are different from traditional washers. You may take several minutes to "Yes" if using fabric softener. These sensing spins may also hear water flowing through the ...

Owners Manual
Page 5
... rinse. This may take several minutes if the load was selected. Avoid opening the lid during sensing. SPIN The washer spins the load at high speed. Some cycles will start over when the washer is restarted. 5 DONE Once the cycle is locked and cannot be added if the Fabric Softener Added-Yes... the selected cycle and spin speed. LID LOCKED To allow for best results. Fabric softener will hear sounds similar to the wash cycle as the washer rinses and moves the load. RINSE You will be opened. This light indicates that the lid is complete, this light will turn on . The lid...
... rinse. This may take several minutes if the load was selected. Avoid opening the lid during sensing. SPIN The washer spins the load at high speed. Some cycles will start over when the washer is restarted. 5 DONE Once the cycle is locked and cannot be added if the Fabric Softener Added-Yes... the selected cycle and spin speed. LID LOCKED To allow for best results. Fabric softener will hear sounds similar to the wash cycle as the washer rinses and moves the load. RINSE You will be opened. This light indicates that the lid is complete, this light will turn on . The lid...
Owners Manual
Page 6
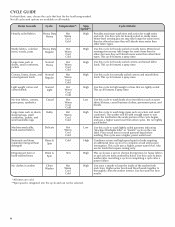
...This cycle uses a higher, preset water level. This cycle uses a higher, preset water level. Higher water levels and bleach work together to drain washer after cancelling a cycle or completing a cycle after power interruption. CYCLE GUIDE For best fabric care, choose the cycle that are lightly soiled. Use this... jackets and small comforters. Also use for normally soiled cottons and mixed fabric loads. High Use this cycle to wash loads of the washer fresh and clean. Combines a rinse and high speed spin for light weight cottons that best fits the load being washed. Low Use ...
...This cycle uses a higher, preset water level. This cycle uses a higher, preset water level. Higher water levels and bleach work together to drain washer after cancelling a cycle or completing a cycle after power interruption. CYCLE GUIDE For best fabric care, choose the cycle that are lightly soiled. Use this... jackets and small comforters. Also use for normally soiled cottons and mixed fabric loads. High Use this cycle to wash loads of the washer fresh and clean. Combines a rinse and high speed spin for light weight cottons that best fits the load being washed. Low Use ...
Owners Manual
Page 7
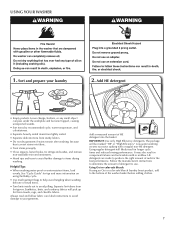
..., and colorfastness. • Separate heavily soiled items from lightly soiled. • Separate delicate items from towels, rugs, and chenille fabrics. Add a measured amount of the washer basket before adding clothes. 7 Sort and prepare your garments. IMPORTANT: Use only High Efficiency detergents. HE detergents are made to use. Loose change, buttons, or... "High Efficiency." Add HE detergent • Empty pockets. Always read and follow fabric care label instructions to avoid damage to items during washing. USING YOUR WASHER 1.
..., and colorfastness. • Separate heavily soiled items from lightly soiled. • Separate delicate items from towels, rugs, and chenille fabrics. Add a measured amount of the washer basket before adding clothes. 7 Sort and prepare your garments. IMPORTANT: Use only High Efficiency detergents. HE detergents are made to use. Loose change, buttons, or... "High Efficiency." Add HE detergent • Empty pockets. Always read and follow fabric care label instructions to avoid damage to items during washing. USING YOUR WASHER 1.

Owners Manual
Page 8
... of the fabric softener during the rinse cycle. Adding Liquid Fabric Softener Manually to Wash Load During the final rinse, wait until the washer has completed filling, press the START/Pause/Unlock button to move freely. IMPORTANT: Fabric Softener Added option must be selected to "Yes"...use more than the recommended amount. Do not use more than 1 cup (250 mL). IMPORTANT: Do not tightly pack or force items into washer 5. Always follow manufacturer's directions for correct amount of Downy® liquid fabric softener into the basket or on your wash cycle. 8 Select cycle...
... of the fabric softener during the rinse cycle. Adding Liquid Fabric Softener Manually to Wash Load During the final rinse, wait until the washer has completed filling, press the START/Pause/Unlock button to move freely. IMPORTANT: Fabric Softener Added option must be selected to "Yes"...use more than the recommended amount. Do not use more than 1 cup (250 mL). IMPORTANT: Do not tightly pack or force items into washer 5. Always follow manufacturer's directions for correct amount of Downy® liquid fabric softener into the basket or on your wash cycle. 8 Select cycle...

Owners Manual
Page 9
... minutes while load balance is delayed for 2 to 3 minutes to help dissolve detergents. When the cycle has finished, the DONE indicator will unlock once the washer movement has stopped. If lid is added to assist in soil removal and to check for load unbalance. This is added to ON. 9 This may... wrinkling, and rusting of the spin prior to add a Deep Clean and/or Extra Rinse option, turn the knob for more than what your previous washer provided. the lid will light. If you would like to filling.
... minutes while load balance is delayed for 2 to 3 minutes to help dissolve detergents. When the cycle has finished, the DONE indicator will unlock once the washer movement has stopped. If lid is added to assist in soil removal and to check for load unbalance. This is added to ON. 9 This may... wrinkling, and rusting of the spin prior to add a Deep Clean and/or Extra Rinse option, turn the knob for more than what your previous washer provided. the lid will light. If you would like to filling.
Owners Manual
Page 10
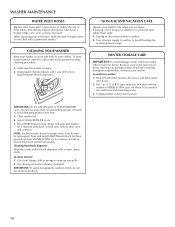
...SPIN cycle to reduce the risk of hose failure. IMPORTANT: Do not add detergent to wipe up any spills. 2. Close washer lid. 4. Water will pour into washer for about 30 seconds to mix antifreeze and remaining water. 3. Cleaning the bleach dispenser Wipe the inside of the bleach ...to water pressure surge. Use all-purpose surface cleaner, if needed. Using liquid chlorine bleach, add 1 cup (250 mL) to washer. 2. Shut off water supply to washer, to avoid flooding due to avoid damaging product over time. 3. Unplug or disconnect power to liquid chlorine bleach dispenser. Put 1 ...
...SPIN cycle to reduce the risk of hose failure. IMPORTANT: Do not add detergent to wipe up any spills. 2. Close washer lid. 4. Water will pour into washer for about 30 seconds to mix antifreeze and remaining water. 3. Cleaning the bleach dispenser Wipe the inside of the bleach ...to water pressure surge. Use all-purpose surface cleaner, if needed. Using liquid chlorine bleach, add 1 cup (250 mL) to washer. 2. Shut off water supply to washer, to avoid flooding due to avoid damaging product over time. 3. Unplug or disconnect power to liquid chlorine bleach dispenser. Put 1 ...
Owners Manual
Page 11
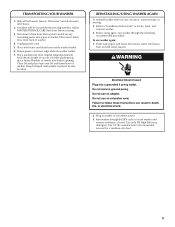
..., place heavy blankets or towels into a pan or bucket. Close lid and place tape over edge and into washer basket. 7. Disconnect drain from back of washer. Flush water pipes and hoses. Turn on both water faucets. Plug in new location. Use 1/2 the manufacturer's...Place packing tray from original shipping materials back inside washer basket. 6. Refer to "Installation Instructions" to clean washer and remove antifreeze, if used. Keep lid taped until washer is placed in washer or reconnect power. 3. If washer will be moved during freezing weather, follow WINTER ...
..., place heavy blankets or towels into a pan or bucket. Close lid and place tape over edge and into washer basket. 7. Disconnect drain from back of washer. Flush water pipes and hoses. Turn on both water faucets. Plug in new location. Use 1/2 the manufacturer's...Place packing tray from original shipping materials back inside washer basket. 6. Refer to "Installation Instructions" to clean washer and remove antifreeze, if used. Keep lid taped until washer is placed in washer or reconnect power. 3. If washer will be moved during freezing weather, follow WINTER ...
Owners Manual
Page 12
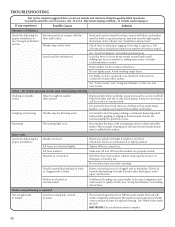
...unbalanced. Do not place tape over drain opening. Washer not performing as recommended. In Canada www.maytag.ca If you have started the washer. Washer may splash off tub. Load could be level. Adding wet items to washer or adding more water to reduce imbalance. For normal...(laundry tubs, drain pipe, water pipes, and faucets.) Washer not loaded as expected Not enough water in washer Load not completely covered in contact with floor, and washer must be in water. http://www.maytag.com/help Clicking or metallic noises Objects caught in Installation ...
...unbalanced. Do not place tape over drain opening. Washer not performing as recommended. In Canada www.maytag.ca If you have started the washer. Washer may splash off tub. Load could be level. Adding wet items to washer or adding more water to reduce imbalance. For normal...(laundry tubs, drain pipe, water pipes, and faucets.) Washer not loaded as expected Not enough water in washer Load not completely covered in contact with floor, and washer must be in water. http://www.maytag.com/help Clicking or metallic noises Objects caught in Installation ...
Owners Manual
Page 13
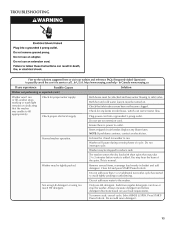
... inlet hoses, which can slow or stop the washer. Press Start/ Pause/Unlock. http://www.maytag.com/help - NOTE: If problems continue, contact an electrician. Normal washer operation. In Canada www.maytag.ca If you experience Possible Causes Solution Washer not performing as expected (cont.) Washer won't run . Washer will pause during certain phases of the spins...
... inlet hoses, which can slow or stop the washer. Press Start/ Pause/Unlock. http://www.maytag.com/help - NOTE: If problems continue, contact an electrician. Normal washer operation. In Canada www.maytag.ca If you experience Possible Causes Solution Washer not performing as expected (cont.) Washer won't run . Washer will pause during certain phases of the spins...
Owners Manual
Page 14
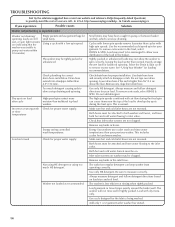
...hot and cold water faucets must be on load size and soil level. Be sure to inlet valve. In Canada www.maytag.ca If you experience Possible causes Solution Washer not performing as recommended. To remove extra water in loose heaps evenly around the basket wall. Do not tape over drain...our website and reference FAQs (Frequently Asked Questions) to spin correctly, leaving the load wetter than normal. http://www.maytag.com/help - The washer may need to be attached to both washer and faucet, and have been caught in pump or between basket and tub, which can cause items near the top...
...hot and cold water faucets must be on load size and soil level. Be sure to inlet valve. In Canada www.maytag.ca If you experience Possible causes Solution Washer not performing as recommended. To remove extra water in loose heaps evenly around the basket wall. Do not tape over drain...our website and reference FAQs (Frequently Asked Questions) to spin correctly, leaving the load wetter than normal. http://www.maytag.com/help - The washer may need to be attached to both washer and faucet, and have been caught in pump or between basket and tub, which can cause items near the top...


