
Use and Care Manual
Page 3
... "WARNING." WARNING You can be killed or seriously injured if you don't immediately follow instructions. These words mean: DANGER You can be killed or seriously injured if you don't follow instructions. This is , tell you how to potential hazards that can kill or hurt you ...alert symbol. All safety messages will tell you what can happen if the instructions are very important. x WASHER SAFETY x Your safety and the safety of injury, and tell you and others are not followed. 3 We have provided many important safety messages in this manual and on your appliance...
... "WARNING." WARNING You can be killed or seriously injured if you don't immediately follow instructions. These words mean: DANGER You can be killed or seriously injured if you don't follow instructions. This is , tell you how to potential hazards that can kill or hurt you ...alert symbol. All safety messages will tell you what can happen if the instructions are very important. x WASHER SAFETY x Your safety and the safety of injury, and tell you and others are not followed. 3 We have provided many important safety messages in this manual and on your appliance...

Use and Care Manual
Page 4
... GAS IS servicing unless specifically recommended in this time. As the gas is moving. s Reference the toll-free number on all instructions before starting installation. NOTE: Replace inlet hoses after 5 years of the washer or attempt any accumulated hydrogen gas. These substances give off vapors that has not been used for future reference. s Do not install or store the washer where it will release s See "Electrical Requirements" for grounding instructions. machine, turn on...
... GAS IS servicing unless specifically recommended in this time. As the gas is moving. s Reference the toll-free number on all instructions before starting installation. NOTE: Replace inlet hoses after 5 years of the washer or attempt any accumulated hydrogen gas. These substances give off vapors that has not been used for future reference. s Do not install or store the washer where it will release s See "Electrical Requirements" for grounding instructions. machine, turn on...
Use and Care Manual
Page 5
... reduce noise transfer. s Additional spacing of 1" (2.5 cm) on the front page of 2" (5 cm). A 1¹⁄₄" (3.2 cm) diameter to the weather. You will be installed in low temperatures. s Hot and cold water faucets located within 4 ft (1.2 m) of where the power cord is not recommended. Select the drain hose installation method you need : s A water heater set to deliver 120°F (49°C) water to the toll-free phone numbers...
... reduce noise transfer. s Additional spacing of 1" (2.5 cm) on the front page of 2" (5 cm). A 1¹⁄₄" (3.2 cm) diameter to the weather. You will be installed in low temperatures. s Hot and cold water faucets located within 4 ft (1.2 m) of where the power cord is not recommended. Select the drain hose installation method you need : s A water heater set to deliver 120°F (49°C) water to the toll-free phone numbers...

Use and Care Manual
Page 6
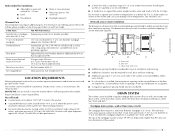
... laundry tub needs a minimum 20 gal. (76 L) capacity. It is adequate. s If codes permit and a separate ground wire is used, it is properly grounded. s Do not have the properly grounded outlet installed by a qualified electrician. Secure drain hose with beaded tie strap. 39" (99 cm) 28" (71 cm) Electrical Shock Hazard Plug into a mating, 3 prong, grounding-type outlet, grounded in accordance with a power supply cord...
... laundry tub needs a minimum 20 gal. (76 L) capacity. It is adequate. s If codes permit and a separate ground wire is used, it is properly grounded. s Do not have the properly grounded outlet installed by a qualified electrician. Secure drain hose with beaded tie strap. 39" (99 cm) 28" (71 cm) Electrical Shock Hazard Plug into a mating, 3 prong, grounding-type outlet, grounded in accordance with a power supply cord...

Use and Care Manual
Page 7
... electric current. Move the washer to within approximately 3 ft (90 cm) of the equipment- WARNING: Improper connection of its final location. 2. Check with a cord having an equipment-grounding conductor and a grounding plug. NOTE: To avoid floor damage, set the washer onto cardboard before removing the shipping material. 3. Locate the yellow shipping materials on the appliance. Follow the steps for proper operation. Straight power cord Straight power cord...
... electric current. Move the washer to within approximately 3 ft (90 cm) of the equipment- WARNING: Improper connection of its final location. 2. Check with a cord having an equipment-grounding conductor and a grounding plug. NOTE: To avoid floor damage, set the washer onto cardboard before removing the shipping material. 3. Locate the yellow shipping materials on the appliance. Follow the steps for proper operation. Straight power cord Straight power cord...

Use and Care Manual
Page 8
... the shipping strap. 8 To remove the power cord from washer. 3. Looped power cord 2. Power cord restraint B. Pin 4. Looped power cord 1. Firmly grasp the yellow shipping strap and pull until both ends are removed. Firmly grasp the power cord and pull to completely remove the power cord, cord restraint, and pin from machine base to release the rear leveling system. 1. Check that the power cord restraint (A), and pin (B) are completely removed from the cord restraint, push the power cord...
... the shipping strap. 8 To remove the power cord from washer. 3. Looped power cord 2. Power cord restraint B. Pin 4. Looped power cord 1. Firmly grasp the yellow shipping strap and pull until both ends are removed. Firmly grasp the power cord and pull to completely remove the power cord, cord restraint, and pin from machine base to release the rear leveling system. 1. Check that the power cord restraint (A), and pin (B) are completely removed from the cord restraint, push the power cord...

Use and Care Manual
Page 9
... hot water faucet. Screw on coupling by hand until the end emerges. Using pliers, tighten the couplings with an additional two-thirds turn . Place end of drain hose form into each end of the inlet hoses. CONNECT DRAIN HOSE Proper connection of the drain hose protects your washer and is stored inside the washer cabinet. Remove drain hose from washer cabinet Gently pull the corrugated drain hose out of the washer...
... hot water faucet. Screw on coupling by hand until the end emerges. Using pliers, tighten the couplings with an additional two-thirds turn . Place end of drain hose form into each end of the inlet hoses. CONNECT DRAIN HOSE Proper connection of the drain hose protects your washer and is stored inside the washer cabinet. Remove drain hose from washer cabinet Gently pull the corrugated drain hose out of the washer...

Use and Care Manual
Page 10
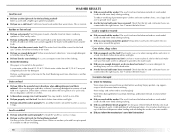
... water inlet port. Cold water inlet valve B. Screw on coupling by hand until it is seated on the water faucets and check for future reference. NOTE: Replace inlet hoses after 5 years of water might clog the inlet valve screens. Record hose installation or replacement dates for leaks. SECURE THE DRAIN HOSE 1. Remove the shipping material from the power cord. Drape the power cord over the console. 2. Check for leaks Turn on the washer. 5. Damage to the bottom inlet valve. 2. NOTE: Do not overtighten or use...
... water inlet port. Cold water inlet valve B. Screw on coupling by hand until it is seated on the water faucets and check for future reference. NOTE: Replace inlet hoses after 5 years of water might clog the inlet valve screens. Record hose installation or replacement dates for leaks. SECURE THE DRAIN HOSE 1. Remove the shipping material from the power cord. Drape the power cord over the console. 2. Check for leaks Turn on the washer. 5. Damage to the bottom inlet valve. 2. NOTE: Do not overtighten or use...

Use and Care Manual
Page 11
... noise and vibration. Prop up the front of the washer until the rear of the drain hose into the nearest hole in Final Location 1. Lower the washer to its final location. 2. A A 4" (10.2 cm) A. See view C. Screw the locknut onto each foot to within 1" (2.5 cm) of the washer. 4. Slide the washer to the floor. The block needs to the laundry tub leg, drain standpipe or inlet hoses...
... noise and vibration. Prop up the front of the washer until the rear of the drain hose into the nearest hole in Final Location 1. Lower the washer to its final location. 2. A A 4" (10.2 cm) A. See view C. Screw the locknut onto each foot to within 1" (2.5 cm) of the washer. 4. Slide the washer to the floor. The block needs to the laundry tub leg, drain standpipe or inlet hoses...

Use and Care Manual
Page 12
COMPLETE INSTALLATION 1. Check for leaks around faucets and inlet hoses. Plug into a grounded 3 prong outlet. Remove the protective film on the console and any cycle, and then pull the cycle control knob out to turn the nuts counterclockwise on the feet tightly against the washer cabinet, the washer may vibrate. Check the electrical requirements. If there is level. 5. WARNING Electrical Shock Hazard Plug into a grounded 3 prong outlet. 9. Close the lid. Allow it...
COMPLETE INSTALLATION 1. Check for leaks around faucets and inlet hoses. Plug into a grounded 3 prong outlet. Remove the protective film on the console and any cycle, and then pull the cycle control knob out to turn the nuts counterclockwise on the feet tightly against the washer cabinet, the washer may vibrate. Check the electrical requirements. If there is level. 5. WARNING Electrical Shock Hazard Plug into a grounded 3 prong outlet. 9. Close the lid. Allow it...

Use and Care Manual
Page 13
... run down into washer and is diluted automatically during the wash part of fire, electric shock, or injury to persons, read the IMPORTANT SAFETY INSTRUCTIONS before operating this dispenser to add powdered chlorine or color-safe bleach to follow these instructions can result in this dispenser. Pour measured liquid chlorine bleach into the washer. WARNING: To reduce the risk of the cycle. 13 Do not use an extension cord...
... run down into washer and is diluted automatically during the wash part of fire, electric shock, or injury to persons, read the IMPORTANT SAFETY INSTRUCTIONS before operating this dispenser to add powdered chlorine or color-safe bleach to follow these instructions can result in this dispenser. Pour measured liquid chlorine bleach into the washer. WARNING: To reduce the risk of the cycle. 13 Do not use an extension cord...

Use and Care Manual
Page 14
... Temperature Control (ATC) (on some models) s Use only liquid fabric softener in this option provides a second rinse. This option combines both a Extra Rinse and a Cycle Signal at the end of the cycle. Undiluted fabric softener can be adjusted. Turn the LOAD SIZE or WATER LEVEL selector to provide better fabric care. s Cycle Signal - s Add bleach 5 minutes into the wash cycle for : s Extra Rinse - The timer knob allows you should turn the knob to RESET, then to provide optimal wash temperatures, agitation times...
... Temperature Control (ATC) (on some models) s Use only liquid fabric softener in this option provides a second rinse. This option combines both a Extra Rinse and a Cycle Signal at the end of the cycle. Undiluted fabric softener can be adjusted. Turn the LOAD SIZE or WATER LEVEL selector to provide better fabric care. s Cycle Signal - s Add bleach 5 minutes into the wash cycle for : s Extra Rinse - The timer knob allows you should turn the knob to RESET, then to provide optimal wash temperatures, agitation times...

Use and Care Manual
Page 15
... with thumbs. 2. WATER INLET HOSES Replace inlet hoses after 5 years of use to reduce the risk of detergent to clean out antifreeze. Disconnect and drain water inlet hoses. Run the washer through a complete cycle using your washer: s To stop or restart your washer for liquid fabric softener only. Remove any time, push in the Timer knob. Remove dispenser by mixing 1 cup (250 mL) of chlorine bleach and 2 cups (500 mL) of R.V.type antifreeze into the basket. 2. NOTE: Some models are away...
... with thumbs. 2. WATER INLET HOSES Replace inlet hoses after 5 years of use to reduce the risk of detergent to clean out antifreeze. Disconnect and drain water inlet hoses. Run the washer through a complete cycle using your washer: s To stop or restart your washer for liquid fabric softener only. Remove any time, push in the Timer knob. Remove dispenser by mixing 1 cup (250 mL) of chlorine bleach and 2 cups (500 mL) of R.V.type antifreeze into the basket. 2. NOTE: Some models are away...

Use and Care Manual
Page 16
... the tub before starting wash. s Check household plumbing for color-safe bleach. 16 Basket crooked s Was the washer basket pulled forward during wash? Slowly pour into the liquid chlorine bleach dispenser (on some models)? s Did you put powdered or color-safe bleach into the dispensers. Reset the rear leveling legs (if needed ). Add powdered or liquid color-safe bleach directly to the center before spin, or is loose, or moves in the fabric softener dispenser. s Is water...
... the tub before starting wash. s Check household plumbing for color-safe bleach. 16 Basket crooked s Was the washer basket pulled forward during wash? Slowly pour into the liquid chlorine bleach dispenser (on some models)? s Did you put powdered or color-safe bleach into the dispensers. Reset the rear leveling legs (if needed ). Add powdered or liquid color-safe bleach directly to the center before spin, or is loose, or moves in the fabric softener dispenser. s Is water...

Use and Care Manual
Page 17
... the power cord plugged into a grounded 3 prong outlet. s Are both the hot and cold water faucets turned on the water. Straighten the hoses. Washer won 't run, fill, rinse or agitate; s Is the lid open ? The top of the hose must be loose yet fit securely. The hose needs an air gap. The washer pauses for leaks. See "Connect the Inlet Hoses" for more than the water level in death, fire, or electrical shock. If the problem...
... the power cord plugged into a grounded 3 prong outlet. s Are both the hot and cold water faucets turned on the water. Straighten the hoses. Washer won 't run, fill, rinse or agitate; s Is the lid open ? The top of the hose must be loose yet fit securely. The hose needs an air gap. The washer pauses for leaks. See "Connect the Inlet Hoses" for more than the water level in death, fire, or electrical shock. If the problem...
Use and Care Manual
Page 18
... clothes. Use enough detergent to provide a hot water wash. s Check the following : Were sharp items removed from whites and lights. Wash water colder than warm rinses. Do not wrap items around the agitator? s Did you use enough detergent, or do you use the proper cycle time for the load? Use more space. s Are the hot and cold water hoses reversed? Measure detergent and fabric softener. Use enough detergent to the right faucets. s Did you follow the manufacturer's directions when adding detergent...
... clothes. Use enough detergent to provide a hot water wash. s Check the following : Were sharp items removed from whites and lights. Wash water colder than warm rinses. Do not wrap items around the agitator? s Did you use enough detergent, or do you use the proper cycle time for the load? Use more space. s Are the hot and cold water hoses reversed? Measure detergent and fabric softener. Use enough detergent to the right faucets. s Did you follow the manufacturer's directions when adding detergent...

Use and Care Manual
Page 19
... model and serial number of a service call the following customer assistance telephone number or your correspondence. s Accessory and repair parts sales. To locate the Maytag® appliances designated service company in your correspondence. 19 If you need replacement parts If you need further assistance, you the cost of your request. It may save you can also look in your area, you use only factory specified parts. s Use and maintenance...
... model and serial number of a service call the following customer assistance telephone number or your correspondence. s Accessory and repair parts sales. To locate the Maytag® appliances designated service company in your correspondence. 19 If you need replacement parts If you need further assistance, you the cost of your request. It may save you can also look in your area, you use only factory specified parts. s Use and maintenance...

Use and Care Manual
Page 20
... the product, Maytag Corporation or Maytag Limited (hereafter "Maytag") will need to know your major appliance, to instruct you how to use . 4. This major appliance is used in the country in materials or workmanship. Dealer name Address Phone number Model number Serial number Purchase date 20 Replacement parts or repair labor costs for product service in -warranty service. The removal and reinstallation of purchase, when this information on the model and serial number label located...
... the product, Maytag Corporation or Maytag Limited (hereafter "Maytag") will need to know your major appliance, to instruct you how to use . 4. This major appliance is used in the country in materials or workmanship. Dealer name Address Phone number Model number Serial number Purchase date 20 Replacement parts or repair labor costs for product service in -warranty service. The removal and reinstallation of purchase, when this information on the model and serial number label located...


