User Instructions
Page 2
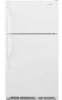
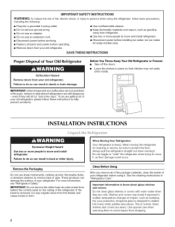
... electric shock, or injury to persons when using it. Before You Throw Away Your Old Refrigerator or Freezer: • Take off the doors. These products can damage the surface of your old refrigerator. • Use nonflammable cleaner. • Keep flammable materials and vapors, such as gasoline... tempered glass is removed, ice may migrate down from behind the control panel on ice maker kit ready models only). When moving it , as bumping. For your old refrigerator. Remove the Packaging Do not use an extension cord. • Disconnect power before servicing. • ...
... electric shock, or injury to persons when using it. Before You Throw Away Your Old Refrigerator or Freezer: • Take off the doors. These products can damage the surface of your old refrigerator. • Use nonflammable cleaner. • Keep flammable materials and vapors, such as gasoline... tempered glass is removed, ice may migrate down from behind the control panel on ice maker kit ready models only). When moving it , as bumping. For your old refrigerator. Remove the Packaging Do not use an extension cord. • Disconnect power before servicing. • ...
User Instructions
Page 3
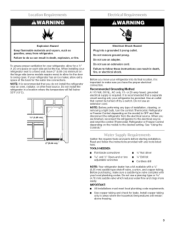
...model) to follow the instructions provided with a 1/411 (6.35 mm) saddle-type shutoff valve, a union, and copper tubing. Do not use a piercing-type or 3/_6" (4.76 mm) saddle valve which reduces water flow and clogs more ) to allow extra space at the top. Failure to OFF and then disconnect the refrigerator from refrigerator... reconnect the refrigerator to the electrical source and reset the control (Thermostat, Refrigerator or Freezer Control depending on the hinge side (some models require more easily. Use an outlet that a separate circuit serving only your refrigerator into a ...
...model) to follow the instructions provided with a 1/411 (6.35 mm) saddle-type shutoff valve, a union, and copper tubing. Do not use a piercing-type or 3/_6" (4.76 mm) saddle valve which reduces water flow and clogs more ) to allow extra space at the top. Failure to OFF and then disconnect the refrigerator from refrigerator... reconnect the refrigerator to the electrical source and reset the control (Thermostat, Refrigerator or Freezer Control depending on the hinge side (some models require more easily. Use an outlet that a separate circuit serving only your refrigerator into a ...
User Instructions
Page 5
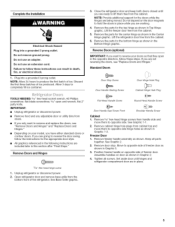
...the top hinge as shown in the Bottom Hinge graphic. IMPORTANT: • Unplug refrigerator or disconnect power. • Remove food and any adjustable door or utility bins from doors. • If you only want to reverse your model, you are being moved. Open refrigerator door ...-head hinge screws from the cabinet. Remove freezer handle assembly as shown in place. Lift the freezer door free from the bottom front of freezer door as shown in death, fire, or electrical shock. 1. Lift the refrigerator door free from cabinet top and move them to completely fill ice container...
...the top hinge as shown in the Bottom Hinge graphic. IMPORTANT: • Unplug refrigerator or disconnect power. • Remove food and any adjustable door or utility bins from doors. • If you only want to reverse your model, you are being moved. Open refrigerator door ...-head hinge screws from the cabinet. Remove freezer handle assembly as shown in place. Lift the freezer door free from the bottom front of freezer door as shown in death, fire, or electrical shock. 1. Lift the refrigerator door free from cabinet top and move them to completely fill ice container...

User Instructions
Page 9
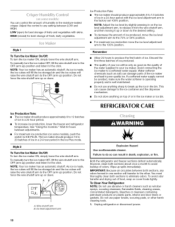
...4. This makes it using the instructions below. 1. IMPORTANT." On models with two controls, adjust the refrigerator temperature first. one on either side. 2. Have someone push against the top of the front roller assemblies which are not blocked. Align Doors...side of the refrigerator. Pry off the leveling screws and rollers. If not, tilt the refrigerator slightly more turns, and you tighten the top hinge screws. 4. Adjusting the Refrigerator and Freezer Controls to the left . REFRIGERATOR USE .... // For your convenience, your refrigerator off, turn ...
...4. This makes it using the instructions below. 1. IMPORTANT." On models with two controls, adjust the refrigerator temperature first. one on either side. 2. Have someone push against the top of the front roller assemblies which are not blocked. Align Doors...side of the refrigerator. Pry off the leveling screws and rollers. If not, tilt the refrigerator slightly more turns, and you tighten the top hinge screws. 4. Adjusting the Refrigerator and Freezer Controls to the left . REFRIGERATOR USE .... // For your convenience, your refrigerator off, turn ...
User Instructions
Page 10
...such as salt) can result in the Ice Plus mode. To increase ice production, lower the freezer and refrigerator temperature. The ice maker should produce approximately 8 to eliminate odors. To manually turn the ice ... cleansers, flammable fluids, cleaning waxes, concentrated detergents, bleaches or cleansers containing petroleum products on top of ice in the ice maker or ice bin. For maximum ice production (on the ice...batches of ice in a 24-hour period with the ice level adjustment arm in on some models), push the switch to release it from the wire shutoff arm, and then moving it ...
...such as salt) can result in the Ice Plus mode. To increase ice production, lower the freezer and refrigerator temperature. The ice maker should produce approximately 8 to eliminate odors. To manually turn the ice ... cleansers, flammable fluids, cleaning waxes, concentrated detergents, bleaches or cleansers containing petroleum products on top of ice in the ice maker or ice bin. For maximum ice production (on the ice...batches of ice in a 24-hour period with the ice level adjustment arm in on some models), push the switch to release it from the wire shutoff arm, and then moving it ...
User Instructions
Page 11
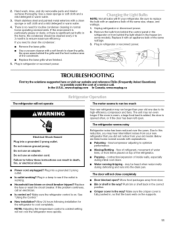
... with an appliance bulb of the same size, shape, and wattage. 1. Do not use an adapter. Power cord unplugged? Is control on top of the same wattage. 3. New installation? Due to coldest setting will not operate Electrical Shock Hazard Plug into a grounded 3 prong outlet. ... Canada, www.maytag.ca The refrigerator will not cool the refrigerator more quickly. The door will fit your old model. Hand wash, rinse, and dry removable parts and interior surfaces thoroughly. If the environment is particularly greasy or dusty, or there is working ? Plug in the freezer (on some...
... with an appliance bulb of the same size, shape, and wattage. 1. Do not use an adapter. Power cord unplugged? Is control on top of the same wattage. 3. New installation? Due to coldest setting will not operate Electrical Shock Hazard Plug into a grounded 3 prong outlet. ... Canada, www.maytag.ca The refrigerator will not cool the refrigerator more quickly. The door will fit your old model. Hand wash, rinse, and dry removable parts and interior surfaces thoroughly. If the environment is particularly greasy or dusty, or there is working ? Plug in the freezer (on some...
User Instructions
Page 12
...color in 24 hours. Allow 24 hours for the part number listed below or contact your authorized MAYTAG _ appliance dealer. ACCESSORIES To order stainless steel cleaner, call 1-800-807-6777. In Canada, ...and keep door fully closed . Straighten the water source line. • Ice maker turned on model) is in the ice maker ejector arm? Turn the water shutoff valve fully open . •... • Door opened often or left open ? Wait 24 hours after ice maker installation for the refrigerator to your cold water supply? Thedoorisdifficulto open ? Wait 72 hours for full ice production. • ...
...color in 24 hours. Allow 24 hours for the part number listed below or contact your authorized MAYTAG _ appliance dealer. ACCESSORIES To order stainless steel cleaner, call 1-800-807-6777. In Canada, ...and keep door fully closed . Straighten the water source line. • Ice maker turned on model) is in the ice maker ejector arm? Turn the water shutoff valve fully open . •... • Door opened often or left open ? Wait 24 hours after ice maker installation for the refrigerator to your cold water supply? Thedoorisdifficulto open ? Wait 72 hours for full ice production. • ...
User Instructions
Page 13
...IMPLIED WARRANTIES; Have your major appliance. Proof of repair or replacement under this warranty. 8. Any food loss due to Maytag with original model/serial numbers that is designed to correct the installation of purchase. 6. Cosmetic damage, including scratches, dents, chips or ... United States or Canada and applies only when the major appliance is reported to Maytag within 30 days from your complete model number ready. You can write to refrigerator or freezer product failures. 7. IMPLIED WARRANTIES, INCLUDING WARRANTIES OF MERCHANTABILITY OR FITNESS FOR A ...
...IMPLIED WARRANTIES; Have your major appliance. Proof of repair or replacement under this warranty. 8. Any food loss due to Maytag with original model/serial numbers that is designed to correct the installation of purchase. 6. Cosmetic damage, including scratches, dents, chips or ... United States or Canada and applies only when the major appliance is reported to Maytag within 30 days from your complete model number ready. You can write to refrigerator or freezer product failures. 7. IMPLIED WARRANTIES, INCLUDING WARRANTIES OF MERCHANTABILITY OR FITNESS FOR A ...

