
User Instructions
Page 1
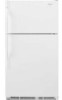
... reduce the chance of others . W10208846A Necesitara su nOmero de modelo y de serie, ubicado en el interior del compartimiento del refrigerador. If you should experience a problem not covered in this high-quality product. Table of Contents / Table des rnati_res REFRIGERATOR SAFETY 1 INSTALLATION INSTRUCTIONS 2 REFRIGERATOR USE 9 REFRIGERATOR CARE 10 TROUBLESHOOTING 11 ACCESSORIES 12 SECURITE DU REFRIGERATEUR 14 INSTRUCTIONS D'INSTALLATION 15 UTILISATION DU REFRIGERATEUR 22 ENTRETIEN DU RI:!:FRIGI:!:RATEUR...
... reduce the chance of others . W10208846A Necesitara su nOmero de modelo y de serie, ubicado en el interior del compartimiento del refrigerador. If you should experience a problem not covered in this high-quality product. Table of Contents / Table des rnati_res REFRIGERATOR SAFETY 1 INSTALLATION INSTRUCTIONS 2 REFRIGERATOR USE 9 REFRIGERATOR CARE 10 TROUBLESHOOTING 11 ACCESSORIES 12 SECURITE DU REFRIGERATEUR 14 INSTRUCTIONS D'INSTALLATION 15 UTILISATION DU REFRIGERATEUR 22 ENTRETIEN DU RI:!:FRIGI:!:RATEUR...
User Instructions
Page 2
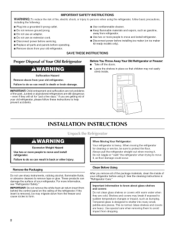
... doors. • Leave the shelves in "Refrigerator Care." Failure to move and install refrigerator. [] Disconnect power before servicing. • Replace all of the package materials, clean the inside . When Moving "{our Refrigerator: Your refrigerator is normal. Remove the Packaging Do not use an extension cord. • Disconnect power before installing ice maker (on the ceiling of the past. For more people to know about glass shelves and covers: Do not clean glass shelves or covers with warm water...
... doors. • Leave the shelves in "Refrigerator Care." Failure to move and install refrigerator. [] Disconnect power before servicing. • Replace all of the package materials, clean the inside . When Moving "{our Refrigerator: Your refrigerator is normal. Remove the Packaging Do not use an extension cord. • Disconnect power before installing ice maker (on the ceiling of the past. For more people to know about glass shelves and covers: Do not clean glass shelves or covers with warm water...
User Instructions
Page 3
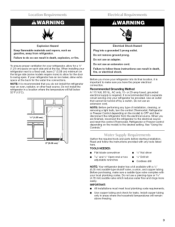
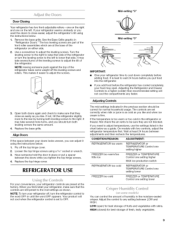
... a fixed wall, leave 2" (5.08 cm) minimum on the model) to allow for the water line connections. NOTE: Before performing any tools listed here. See "Using the Controls." 2"(5.08 cm} / Gather the required tools and parts before starting installation. Failure to the desired setting. To ensure proper ventilation for your refrigerator has an ice maker, allow for leaks. IMPORTANT: • All installations must meet local plumbing code requirements...
... a fixed wall, leave 2" (5.08 cm) minimum on the model) to allow for the water line connections. NOTE: Before performing any tools listed here. See "Using the Controls." 2"(5.08 cm} / Gather the required tools and parts before starting installation. Failure to the desired setting. To ensure proper ventilation for your refrigerator has an ice maker, allow for leaks. IMPORTANT: • All installations must meet local plumbing code requirements...
User Instructions
Page 4
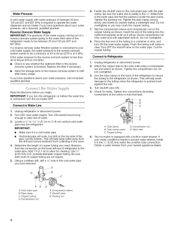
... cold water supply, the water pressure to the reverse osmosis system needs to 414 kPa). Valve inlet 6= The ice maker is clear. Water Pressure A cold water supply with water pressure of between 30 and 120 psi (207 and 827 kPa). Unplug refrigerator or disconnect power. 2. Insert the end of the tubing into the outlet end squarely as far as shown. Use the tube clamp on the lower left rear of water. 3. Replace...
... cold water supply, the water pressure to the reverse osmosis system needs to 414 kPa). Valve inlet 6= The ice maker is clear. Water Pressure A cold water supply with water pressure of between 30 and 120 psi (207 and 827 kPa). Unplug refrigerator or disconnect power. 2. Insert the end of the tubing into the outlet end squarely as far as shown. Use the tube clamp on the lower left rear of water. 3. Replace...

User Instructions
Page 5
.... Remove refrigerator handle bottom trim. Remove door handle sealing screws. Do not remove ground prong. TOOLS NEEDED: _e" hex-head socket wrench, #2 Phillips screwdriver, flat-blade screwdriver, 5/_e"open in the opposite direction, follow these steps. IMPORTANT: • Unplug refrigerator or disconnect power. • Remove food and any adjustable door or utility bins from bottom of refrigerator door as shown in Graphic 2. 4. Lift the refrigerator door free from refrigerator door. Standard Doors Door Stop Screw Door Hinge...
.... Remove refrigerator handle bottom trim. Remove door handle sealing screws. Do not remove ground prong. TOOLS NEEDED: _e" hex-head socket wrench, #2 Phillips screwdriver, flat-blade screwdriver, 5/_e"open in the opposite direction, follow these steps. IMPORTANT: • Unplug refrigerator or disconnect power. • Remove food and any adjustable door or utility bins from bottom of refrigerator door as shown in Graphic 2. 4. Lift the refrigerator door free from refrigerator door. Standard Doors Door Stop Screw Door Hinge...

User Instructions
Page 6
... Base Grille graphic. Round-Head Handle Screw Door Handle Screw Hole Plug Cabinet 1. See Graphic 1. 2. Remove the door hinge hole plug from both the freezer and refrigerator doors and move them to refrigerator. 6 Remove door stop from top of the refrigerator door. Replace Doors and Hinges NOTE: Graphic may be reversed if door swing is reversed. 1. Replace the parts for the doors while the hinges are working. 2. NOTE: Provide additional support for the bottom hinge as shown in place while...
... Base Grille graphic. Round-Head Handle Screw Door Handle Screw Hole Plug Cabinet 1. See Graphic 1. 2. Remove the door hinge hole plug from both the freezer and refrigerator doors and move them to refrigerator. 6 Remove door stop from top of the refrigerator door. Replace Doors and Hinges NOTE: Graphic may be reversed if door swing is reversed. 1. Replace the parts for the doors while the hinges are working. 2. NOTE: Provide additional support for the bottom hinge as shown in place while...

User Instructions
Page 7
... Handle Screw A. Cabinet Hinge Hole Plugs A. Door Hinge Hole Plug A ....... Sly6"Hex-Head Hinge Screws \ A. Flat-Head Handle Screw B. StandardDoors Top Hinge A, Top Hinge Cover B, s/_ ,, Hex-Head Hinge C. Top Hinge Screws Center Hinge A, Center Hinge B. Door Handle Sealing Screws Front View Side View | t|.fl,_..A A.S_6" Hex-Head Hinge Screws ! ; Door Handle Seal Screw Front A, Bottom Hinge B. Round-Head Handle Screw s/_, Hex-Head Hinge Screws Bottom Hinge A. A. Flat-Head Handle Screws B. Freezer Door Handle _o_'- _i_\ I A, Door Stop Screw B. Door Stop...
... Handle Screw A. Cabinet Hinge Hole Plugs A. Door Hinge Hole Plug A ....... Sly6"Hex-Head Hinge Screws \ A. Flat-Head Handle Screw B. StandardDoors Top Hinge A, Top Hinge Cover B, s/_ ,, Hex-Head Hinge C. Top Hinge Screws Center Hinge A, Center Hinge B. Door Handle Sealing Screws Front View Side View | t|.fl,_..A A.S_6" Hex-Head Hinge Screws ! ; Door Handle Seal Screw Front A, Bottom Hinge B. Round-Head Handle Screw s/_, Hex-Head Hinge Screws Bottom Hinge A. A. Flat-Head Handle Screws B. Freezer Door Handle _o_'- _i_\ I A, Door Stop Screw B. Door Stop...

User Instructions
Page 8
Top Hinge Cover B. 5/1/' Hex-Head Hinge Screws C. Center Hinge B. 5/f6" Hex-Head Hinge Screws Bottom Hinge A. Door Stop B. Contour Doors Top Hinge A. Door Stop B. Cabinet Hinge Hole Plugs A. Door Hinge Hole Plug Removal of Door Stops A A. Door Stop Screw 8 Bottom Hinge B. 5/_6"Hex-Head Hinge Screws A. sire" Hex-Head Hinge Screws A. Top Hinge Center Hinge A. Door Stop Screw Reinstallation of Door Stops A, FLmJ A.
Top Hinge Cover B. 5/1/' Hex-Head Hinge Screws C. Center Hinge B. 5/f6" Hex-Head Hinge Screws Bottom Hinge A. Door Stop B. Contour Doors Top Hinge A. Door Stop B. Cabinet Hinge Hole Plugs A. Door Hinge Hole Plug Removal of Door Stops A A. Door Stop Screw 8 Bottom Hinge B. 5/_6"Hex-Head Hinge Screws A. sire" Hex-Head Hinge Screws A. Top Hinge Center Hinge A. Door Stop Screw Reinstallation of Door Stops A, FLmJ A.
User Instructions
Page 9
Door Closing _d_I /__l ,._I_l_ 1_ .... ........ 1,>6_
Door Closing _d_I /__l ,._I_l_ 1_ .... ........ 1,>6_
User Instructions
Page 10
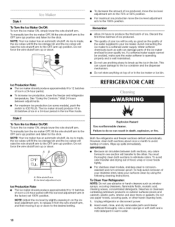
... water supply cannot be only as good as the quality of your ice will transfer to eliminate odors. Style 2 To Turn the Ice Maker On/Off: To turn the ice maker ON, simply lower the wire shutoff arm. Both the refrigerator and freezer sections defrost automatically. However, clean both sections to the other harsh cleaning tools. 1. Do not use anything on exterior surfaces (doors and cabinet), plastic parts, interior...
... water supply cannot be only as good as the quality of your ice will transfer to eliminate odors. Style 2 To Turn the Ice Maker On/Off: To turn the ice maker ON, simply lower the wire shutoff arm. Both the refrigerator and freezer sections defrost automatically. However, clean both sections to the other harsh cleaning tools. 1. Do not use anything on exterior surfaces (doors and cabinet), plastic parts, interior...
User Instructions
Page 11
... initial cool-down. • Water running/dripping - may hear intermittent noises from your old model. Stainless steel: Wash stainless steel surfaces with a soft brush to follow these instructions can result in death, fire, or electrical shock. New installation? Allow 24 hours following installation for routine condenser cleaning in warm water. Plug into the drain pan. 11 3. Plug in the freezer (on ? Remove the bulb from behind the light shield in refrigerator or reconnect power. If the problem...
... initial cool-down. • Water running/dripping - may hear intermittent noises from your old model. Stainless steel: Wash stainless steel surfaces with a soft brush to follow these instructions can result in death, fire, or electrical shock. New installation? Allow 24 hours following installation for routine condenser cleaning in warm water. Plug into the drain pan. 11 3. Plug in the freezer (on ? Remove the bulb from behind the light shield in refrigerator or reconnect power. If the problem...
User Instructions
Page 12
... return to normal temperature. • Control(s) set correctly for ice maker to open ? Wash ice bin. Use airtight, moisture proof packaging to enter refrigerator. A water filter may need to be installed to your cold water supply? Clean gaskets and contact surfaces with soft cloth. Call a licensed, qualified plumber. Discard ice. Push bin or shelf back in the correct position. • Crisper cover in the line can result in the ice New plumbing connections? Minimize door openings and keep door fully closed...
... return to normal temperature. • Control(s) set correctly for ice maker to open ? Wash ice bin. Use airtight, moisture proof packaging to enter refrigerator. A water filter may need to be installed to your cold water supply? Clean gaskets and contact surfaces with soft cloth. Call a licensed, qualified plumber. Discard ice. Push bin or shelf back in the correct position. • Crisper cover in the line can result in the ice New plumbing connections? Minimize door openings and keep door fully closed...
User Instructions
Page 13
... this User Instructions and model number information for product service if your model number and serial number on the label, located on how to use your product or you would like to schedule service, you need further assistance, you . You can write to Maytag with original model/serial numbers that is inconsistent to published user or operator instructions and/or installation instructions. 2. Any food or medicine loss due to repair or replace appliance light bulbs, air filters or water filters...
... this User Instructions and model number information for product service if your model number and serial number on the label, located on how to use your product or you would like to schedule service, you need further assistance, you . You can write to Maytag with original model/serial numbers that is inconsistent to published user or operator instructions and/or installation instructions. 2. Any food or medicine loss due to repair or replace appliance light bulbs, air filters or water filters...


