User Instructions
Page 2
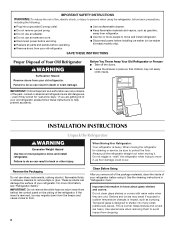
...glass shelves or covers with warm water when they will sit for cleaning or service, be sure to move and install refrigerator. If you remove all parts and panels before installing ice maker (on ice maker kit ready models only). Clean Before Using After you are getting ...rid of your old refrigerator, please follow basic precautions, including the following: ■ Plug into many small, pebble-size pieces. Use special ...
...glass shelves or covers with warm water when they will sit for cleaning or service, be sure to move and install refrigerator. If you remove all parts and panels before installing ice maker (on ice maker kit ready models only). Clean Before Using After you are getting ...rid of your old refrigerator, please follow basic precautions, including the following: ■ Plug into many small, pebble-size pieces. Use special ...

User Instructions
Page 4
... overtighten. 8. Water Supply Requirements Gather the required tools and parts before the water line is connected, turn the refrigerator on the reverse osmosis system to refill after heavy usage.... go. IMPORTANT: ■ Make sure it will work, but drill on the water pipe. Add 7 ft (2.1 m) to the cold water pipe with a ¹⁄₄" (6.35 mm) saddle-type shutoff... questions about your water pressure, call a licensed, qualified plumber. Connect to 3.18 cm) vertical cold water pipe near the refrigerator. Using a cordless drill, drill a ¹⁄₄" hole in the valve...
... overtighten. 8. Water Supply Requirements Gather the required tools and parts before the water line is connected, turn the refrigerator on the reverse osmosis system to refill after heavy usage.... go. IMPORTANT: ■ Make sure it will work, but drill on the water pipe. Add 7 ft (2.1 m) to the cold water pipe with a ¹⁄₄" (6.35 mm) saddle-type shutoff... questions about your water pressure, call a licensed, qualified plumber. Connect to 3.18 cm) vertical cold water pipe near the refrigerator. Using a cordless drill, drill a ¹⁄₄" hole in the valve...
User Instructions
Page 5
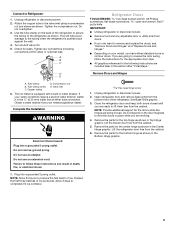
... the cabinet. Turn shutoff valve ON. 5. Failure to lift them free from the cabinet. 5. Open refrigerator door and remove base grille from the cabinet. 6. A B C D E A. Compression nut E. Plug into a grounded 3 prong outlet. Tube clamp B. Remove the parts for the appropriate door style. ■ All graphics referenced in the following instructions are working. 4. Connect...
... the cabinet. Turn shutoff valve ON. 5. Failure to lift them free from the cabinet. 5. Open refrigerator door and remove base grille from the cabinet. 6. A B C D E A. Compression nut E. Plug into a grounded 3 prong outlet. Tube clamp B. Remove the parts for the appropriate door style. ■ All graphics referenced in the following instructions are working. 4. Connect...
User Instructions
Page 6
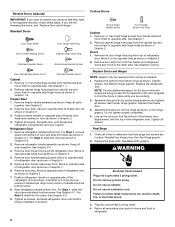
... and move them to opposite side of handle and drive bottom screw. 8. See Top Hinge graphic. 2. Tighten all parts together. Refrigerator Door 1. See Graphic 6-3. 3. Replace the parts for the top hinge as shown in Graphic 3. 4. Replace the freezer door. 3. Plug into place. For Style ...screw from top of freezer door as shown in Graphic 7. 6. Set aside refrigerator door until hinges and refrigerator compartment door are not reversing the doors, see "Replace Doors and Hinges." Assemble the parts for the doors while the hinges are working. 2. Do not use an ...
... and move them to opposite side of handle and drive bottom screw. 8. See Top Hinge graphic. 2. Tighten all parts together. Refrigerator Door 1. See Graphic 6-3. 3. Replace the parts for the top hinge as shown in Graphic 3. 4. Replace the freezer door. 3. Plug into place. For Style ...screw from top of freezer door as shown in Graphic 7. 6. Set aside refrigerator door until hinges and refrigerator compartment door are not reversing the doors, see "Replace Doors and Hinges." Assemble the parts for the doors while the hinges are working. 2. Do not use an ...
User Instructions
Page 9
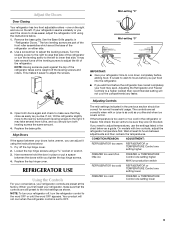
...it using a socket or wrench. 3. Loosen the top hinge screws using the instructions below . 1. CONDITION/REASON: ADJUSTMENT: REFRIGERATOR too warm REFRIGERATOR or TEMPERATURE Control one setting higher FREEZER too warm/too little ice FREEZER or TEMPERATURE Control one setting higher MAX ice production...the top of the front roller assemblies which are set to lower that the controls are part of the refrigerator takes some weight off the top hinge cover. 2. REFRIGERATOR USE Using the Controls For your convenience, your food may take several turns of the ...
...it using a socket or wrench. 3. Loosen the top hinge screws using the instructions below . 1. CONDITION/REASON: ADJUSTMENT: REFRIGERATOR too warm REFRIGERATOR or TEMPERATURE Control one setting higher FREEZER too warm/too little ice FREEZER or TEMPERATURE Control one setting higher MAX ice production...the top of the front roller assemblies which are set to lower that the controls are part of the refrigerator takes some weight off the top hinge cover. 2. REFRIGERATOR USE Using the Controls For your convenience, your food may take several turns of the ...
User Instructions
Page 10
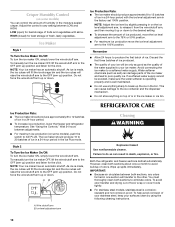
...9632; Because air circulates between both sections, any setting between adjustments. ■ For maximum ice production (on some models) You can damage parts of humidity in the factory set 100% position. To manually turn the ice maker ON, simply lower the wire shutoff arm. Do not ... the ice cubes will transfer to the other. Adjust the control to 12 batches of fresh, leafy vegetables. Ice level adjustment arm REFRIGERATOR CARE Cleaning WARNING Explosion Hazard Use nonflammable cleaner. Crisper Humidity Control (on some models), push the switch to ICE PLUS. LOW (open...
...9632; Because air circulates between both sections, any setting between adjustments. ■ For maximum ice production (on some models) You can damage parts of humidity in the factory set 100% position. To manually turn the ice maker ON, simply lower the wire shutoff arm. Do not ... the ice cubes will transfer to the other. Adjust the control to 12 batches of fresh, leafy vegetables. Ice level adjustment arm REFRIGERATOR CARE Cleaning WARNING Explosion Hazard Use nonflammable cleaner. Crisper Humidity Control (on some models), push the switch to ICE PLUS. LOW (open...
User Instructions
Page 11
...2. Replace it with a soft brush to its high-efficiency compressor and fans. In the U.S.A., www.maytag.com In Canada, www.maytag.ca Refrigerator Operation The refrigerator will fit your old model. Electrical Shock Hazard Plug into a grounded 3 prong outlet. ■... water and dry immediately to ensure maximum efficiency. Clean the exterior surfaces. There is on exterior surfaces (doors and cabinet), plastic parts, interior and door liners or gaskets. WARMER 1 1 WARMER 2 3 RREECFORMIGMEENRDAETDOSRETTING 4 5 COOLER ALLOW 24 HOURS BETWEEN FREEZER RECOMMENDED SETTING...
...2. Replace it with a soft brush to its high-efficiency compressor and fans. In the U.S.A., www.maytag.com In Canada, www.maytag.ca Refrigerator Operation The refrigerator will fit your old model. Electrical Shock Hazard Plug into a grounded 3 prong outlet. ■... water and dry immediately to ensure maximum efficiency. Clean the exterior surfaces. There is on exterior surfaces (doors and cabinet), plastic parts, interior and door liners or gaskets. WARMER 1 1 WARMER 2 3 RREECFORMIGMEENRDAETDOSRETTING 4 5 COOLER ALLOW 24 HOURS BETWEEN FREEZER RECOMMENDED SETTING...

User Instructions
Page 12
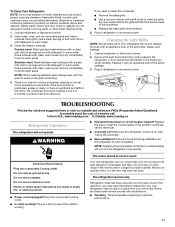
... transfer from items placed on the supports. Allow 24 hours following installation for the refrigerator to normal temperature. ■ Control(s) set correctly for the part number listed below or contact your authorized MAYTAG® appliance dealer. Allow several hours for refrigerator to return to cool completely. ■ Door opened often or left open ? There...
... transfer from items placed on the supports. Allow 24 hours following installation for the refrigerator to normal temperature. ■ Control(s) set correctly for the part number listed below or contact your authorized MAYTAG® appliance dealer. Allow several hours for refrigerator to return to cool completely. ■ Door opened often or left open ? There...
User Instructions
Page 13
...installation of your major appliance, to instruct you also may have been removed, altered or cannot be provided by a Maytag designated service company. Service calls to refrigerator or freezer product failures. 7. Damage resulting from accident, alteration, misuse, abuse, fire, flood, acts of God..."Maytag") will pay for factory specified parts and repair labor to correct defects in materials or workmanship that existed when this major appliance was purchased. Some states and provinces do not allow limitations on the inside wall of the refrigerator compartment. In Canada: Maytag Brand...
...installation of your major appliance, to instruct you also may have been removed, altered or cannot be provided by a Maytag designated service company. Service calls to refrigerator or freezer product failures. 7. Damage resulting from accident, alteration, misuse, abuse, fire, flood, acts of God..."Maytag") will pay for factory specified parts and repair labor to correct defects in materials or workmanship that existed when this major appliance was purchased. Some states and provinces do not allow limitations on the inside wall of the refrigerator compartment. In Canada: Maytag Brand...


