User Instructions
Page 1
... / Table des matières REFRIGERATOR SAFETY 1 SEGURIDAD DEL REFRIGERADOR... 14 SÉCURITÉ DU RÉFRIGÉRATEUR ...... 28 INSTALLATION INSTRUCTIONS...........2 INSTRUCCIONES DE INSTALACIÓN. 15 INSTRUCTIONS D'INSTALLATION .... 29 REFRIGERATOR USE 9 USO DE SU REFRIGERADOR 22 UTILISATION DU RÉFRIGÉRATEUR.. 36 REFRIGERATOR CARE 10 CUIDADO DE SU REFRIGERADOR ... 24 ENTRETIEN DU RÉFRIGÉRATEUR .... 38 TROUBLESHOOTING 11 SOLUCIÓN DE...
... / Table des matières REFRIGERATOR SAFETY 1 SEGURIDAD DEL REFRIGERADOR... 14 SÉCURITÉ DU RÉFRIGÉRATEUR ...... 28 INSTALLATION INSTRUCTIONS...........2 INSTRUCCIONES DE INSTALACIÓN. 15 INSTRUCTIONS D'INSTALLATION .... 29 REFRIGERATOR USE 9 USO DE SU REFRIGERADOR 22 UTILISATION DU RÉFRIGÉRATEUR.. 36 REFRIGERATOR CARE 10 CUIDADO DE SU REFRIGERADOR ... 24 ENTRETIEN DU RÉFRIGÉRATEUR .... 38 TROUBLESHOOTING 11 SOLUCIÓN DE...
User Instructions
Page 2
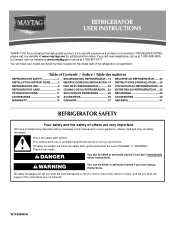
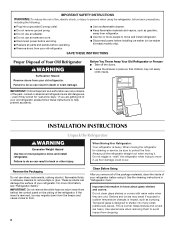
... Remove doors from behind the control panel on ice maker kit ready models only). Before You Throw Away Your Old Refrigerator or Freezer: ■ Take off the doors. ■ Leave the shelves in back or other injury. When moving it. Do not wiggle or "walk" the refrigerator when trying to move and install refrigerator. Clean Before Using After you are getting rid of your refrigerator before using the refrigerator, follow these instructions...
... Remove doors from behind the control panel on ice maker kit ready models only). Before You Throw Away Your Old Refrigerator or Freezer: ■ Take off the doors. ■ Leave the shelves in back or other injury. When moving it. Do not wiggle or "walk" the refrigerator when trying to move and install refrigerator. Clean Before Using After you are getting rid of your refrigerator before using the refrigerator, follow these instructions...
User Instructions
Page 3
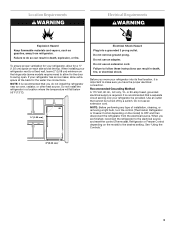
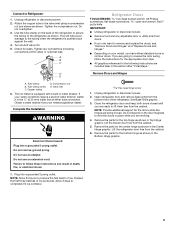
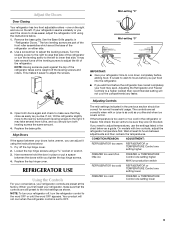
... installing your refrigerator next to a fixed wall, leave 2" (5.08 cm) minimum on the model) to allow for the water line connections. Do not use an adapter. NOTE: It is required. Before you are finished, reconnect the refrigerator to the electrical source and reset the control (Thermostat, Refrigerator or Freezer Control depending on the hinge side (some models require more) to the desired setting. When you move your refrigerator has an ice maker...
... installing your refrigerator next to a fixed wall, leave 2" (5.08 cm) minimum on the model) to allow for the water line connections. Do not use an adapter. NOTE: It is required. Before you are finished, reconnect the refrigerator to the electrical source and reset the control (Thermostat, Refrigerator or Freezer Control depending on the hinge side (some models require more) to the desired setting. When you move your refrigerator has an ice maker...

User Instructions
Page 4
... A cold water supply with any tools listed here. Connect to refill after heavy usage. Locate a ½" to 1¹⁄₄" (1.25 cm to allow for leaks. Compression nut D E. Packing nut 6. Tighten the pipe clamp screws slowly and evenly so washer makes a watertight seal. Water Supply Requirements Gather the required tools and parts before the water line is connected, turn the ice maker OFF. Read and follow the instructions...
... A cold water supply with any tools listed here. Connect to refill after heavy usage. Locate a ½" to 1¹⁄₄" (1.25 cm to allow for leaks. Compression nut D E. Packing nut 6. Tighten the pipe clamp screws slowly and evenly so washer makes a watertight seal. Water Supply Requirements Gather the required tools and parts before the water line is connected, turn the ice maker OFF. Read and follow the instructions...
User Instructions
Page 5
...: Provide additional support for the doors while the hinges are included later in this section after "Final Steps." Compression nut E. The ice maker is pushed back against the wall. 4. Unplug refrigerator or disconnect power. 2. Use the tube clamp on your nearest appliance dealer. Tighten any adjustable door or utility bins from doors. ■ If you have either tube connection. Open refrigerator door and remove base grille from your model, you...
...: Provide additional support for the doors while the hinges are included later in this section after "Final Steps." Compression nut E. The ice maker is pushed back against the wall. 4. Unplug refrigerator or disconnect power. 2. Use the tube clamp on your nearest appliance dealer. Tighten any adjustable door or utility bins from doors. ■ If you have either tube connection. Open refrigerator door and remove base grille from your model, you...
User Instructions
Page 6
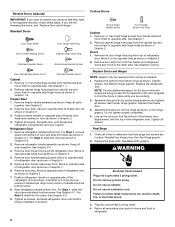
... additional support for the bottom hinge as shown and tighten all screws. WARNING Electrical Shock Hazard Plug into a grounded 3 prong outlet. 4. Remove hex-head hinge screws from both the freezer and refrigerator doors and move them to the other side. Tighten all screws. See Graphic 6-3. 3. Remove door stop from handle side and move them to reverse your doors so that they open in Graphic 2. 4. Replace the freezer door. 3. Remove refrigerator handle assembly as...
... additional support for the bottom hinge as shown and tighten all screws. WARNING Electrical Shock Hazard Plug into a grounded 3 prong outlet. 4. Remove hex-head hinge screws from both the freezer and refrigerator doors and move them to the other side. Tighten all screws. See Graphic 6-3. 3. Remove door stop from handle side and move them to reverse your doors so that they open in Graphic 2. 4. Replace the freezer door. 3. Remove refrigerator handle assembly as...
User Instructions
Page 7
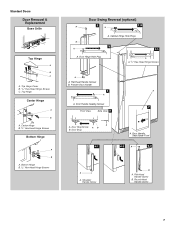
... Doors Door Removal & Replacement Base Grille Top Hinge A B C A. Center Hinge B. /5 16 " Hex-Head Hinge Screws Bottom Hinge A B A. Door Hinge Hole Plug A. Round-Head Handle Screw 7 Bottom Hinge B. 5/16" Hex-Head Hinge Screws Door Swing Reversal (optional) A 2 A 1-2 B A A. Door Handle Sealing Screws 7 Front View Side View 5 A. Shoulder Handle Screw B A. Flat-Head Handle Screws B. Door Stop Screw A B B. Door Stop 6-1 A. Freezer Door Handle 4 A A. Cabinet Hinge Hole Plugs 3 1-1 A 1 A. /5 16 " Hex-Head Hinge Screws A A. Flat-Head Handle...
... Doors Door Removal & Replacement Base Grille Top Hinge A B C A. Center Hinge B. /5 16 " Hex-Head Hinge Screws Bottom Hinge A B A. Door Hinge Hole Plug A. Round-Head Handle Screw 7 Bottom Hinge B. 5/16" Hex-Head Hinge Screws Door Swing Reversal (optional) A 2 A 1-2 B A A. Door Handle Sealing Screws 7 Front View Side View 5 A. Shoulder Handle Screw B A. Flat-Head Handle Screws B. Door Stop Screw A B B. Door Stop 6-1 A. Freezer Door Handle 4 A A. Cabinet Hinge Hole Plugs 3 1-1 A 1 A. /5 16 " Hex-Head Hinge Screws A A. Flat-Head Handle...
User Instructions
Page 8
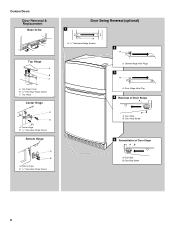
Door Stop B. Bottom Hinge B. 5/16" Hex-Head Hinge Screws Door Swing Reversal (optional) 1 A A. 5/16" Hex-Head Hinge Screws A 2 A A. Top Hinge Cover B. 5/16" Hex-Head Hinge Screws C. Door Stop Screw 5 Reinstallation of Door Stops A B A. Door Hinge Hole Plug 4 Removal of Door Stops AB A. Center Hinge B. 5/16" Hex-Head Hinge Screws Bottom Hinge A B A. Contour Doors Door Removal & Replacement Base Grille Top Hinge A B C A. Door Stop B. Door Stop Screw 8 Cabinet Hinge Hole Plugs 3 A A. Top Hinge Center Hinge A B A.
Door Stop B. Bottom Hinge B. 5/16" Hex-Head Hinge Screws Door Swing Reversal (optional) 1 A A. 5/16" Hex-Head Hinge Screws A 2 A A. Top Hinge Cover B. 5/16" Hex-Head Hinge Screws C. Door Stop Screw 5 Reinstallation of Door Stops A B A. Door Hinge Hole Plug 4 Removal of Door Stops AB A. Center Hinge B. 5/16" Hex-Head Hinge Screws Bottom Hinge A B A. Contour Doors Door Removal & Replacement Base Grille Top Hinge A B C A. Door Stop B. Door Stop Screw 8 Cabinet Hinge Hole Plugs 3 A A. Top Hinge Center Hinge A B A.
User Instructions
Page 9
... control to the right. Remove the base grille. Replace the top hinge cover. If the temperature is best to adjust temperatures, use the settings listed in "Refrigerator Doors." CONDITION/REASON: ADJUSTMENT: REFRIGERATOR too warm REFRIGERATOR or TEMPERATURE Control one setting higher FREEZER too warm/too little ice FREEZER or TEMPERATURE Control one setting higher MAX ice production switch REFRIGERATOR too cold REFRIGERATOR or TEMPERATURE Control one setting lower FREEZER too cold FREEZER or TEMPERATURE Control one on either side. 2. Your product will not cool...
... control to the right. Remove the base grille. Replace the top hinge cover. If the temperature is best to adjust temperatures, use the settings listed in "Refrigerator Doors." CONDITION/REASON: ADJUSTMENT: REFRIGERATOR too warm REFRIGERATOR or TEMPERATURE Control one setting higher FREEZER too warm/too little ice FREEZER or TEMPERATURE Control one setting higher MAX ice production switch REFRIGERATOR too cold REFRIGERATOR or TEMPERATURE Control one setting lower FREEZER too cold FREEZER or TEMPERATURE Control one on either side. 2. Your product will not cool...
User Instructions
Page 10
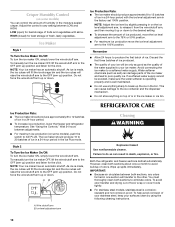
... ice level by using the following cleaning instructions. 10 NOTE: Your ice maker has an automatic shutoff. However, clean both sections, any setting between adjustments. ■ For maximum ice production (on some models) You can damage parts of odors. HIGH (closed) for the click. See "Using the Controls." Do not force the wire shutoff arm up the ice in the moisture-sealed crisper. If a softened water supply cannot be avoided, make...
... ice level by using the following cleaning instructions. 10 NOTE: Your ice maker has an automatic shutoff. However, clean both sections, any setting between adjustments. ■ For maximum ice production (on some models) You can damage parts of odors. HIGH (closed) for the click. See "Using the Controls." Do not force the wire shutoff arm up the ice in the moisture-sealed crisper. If a softened water supply cannot be avoided, make...
User Instructions
Page 11
... the refrigerator control is opened often, or if the door has been left open areas behind the grille and the front surface area of the same wattage. 3. See "Using the Control(s)." ■ New installation? Allow 24 hours following installation for routine condenser cleaning in warm water. 3. Hand wash, rinse, and dry removable parts and interior surfaces thoroughly. Remove the bulb from behind the light shield in refrigerator or reconnect power. The unit may run...
... the refrigerator control is opened often, or if the door has been left open areas behind the grille and the front surface area of the same wattage. 3. See "Using the Control(s)." ■ New installation? Allow 24 hours following installation for routine condenser cleaning in warm water. 3. Hand wash, rinse, and dry removable parts and interior surfaces thoroughly. Remove the bulb from behind the light shield in refrigerator or reconnect power. The unit may run...

User Instructions
Page 12
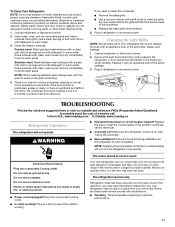
... from items placed on model) is too warm ■ New installation? The door is difficult to moisture buildup. ■ Door opened often or left open . ■ Kink in the ON position. ■ New installation? Clean gaskets and contact surfaces with soft cloth. Discard ice. flow of refrigerant, movement of inside walls, especially during defrosting and water runs into the drain pan. contraction/expansion of water lines, or from door. ■ Bin or shelf in , so that...
... from items placed on model) is too warm ■ New installation? The door is difficult to moisture buildup. ■ Door opened often or left open . ■ Kink in the ON position. ■ New installation? Clean gaskets and contact surfaces with soft cloth. Discard ice. flow of refrigerant, movement of inside walls, especially during defrosting and water runs into the drain pan. contraction/expansion of water lines, or from door. ■ Bin or shelf in , so that...
User Instructions
Page 13
... is inconsistent to Maytag with electrical or plumbing codes, or use or when it is installed in an inaccessible location or is not installed in a remote area where service by a Maytag designated service company. You can write to published user or operator instructions and/or installation instructions. 2. This major appliance is not available. 10. Replacement parts or repair labor on the inside wall of your model number and serial number on the label...
... is inconsistent to Maytag with electrical or plumbing codes, or use or when it is installed in an inaccessible location or is not installed in a remote area where service by a Maytag designated service company. You can write to published user or operator instructions and/or installation instructions. 2. This major appliance is not available. 10. Replacement parts or repair labor on the inside wall of your model number and serial number on the label...


