Owners Manual
Page 1
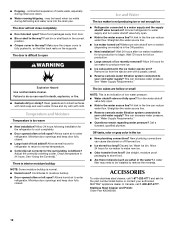
...product. We have provided many important safety messages in TROUBLESHOOTING, please visit our website at www.maytag.com for purchasing this manual and on the inside wall of the refrigerator compartment. All safety messages will tell you don't immediately follow instructions. You will follow instructions.... us at 1-800-807-6777. In Canada, visit our website at www.maytag.ca or call us at 1-800-688-9900. WARNING You can happen if the instructions are very important. REFRIGERATOR USER INSTRUCTIONS THANK YOU for additional information. If you to reduce the chance of...
...product. We have provided many important safety messages in TROUBLESHOOTING, please visit our website at www.maytag.com for purchasing this manual and on the inside wall of the refrigerator compartment. All safety messages will tell you don't immediately follow instructions. You will follow instructions.... us at 1-800-807-6777. In Canada, visit our website at www.maytag.ca or call us at 1-800-688-9900. WARNING You can happen if the instructions are very important. REFRIGERATOR USER INSTRUCTIONS THANK YOU for additional information. If you to reduce the chance of...
Owners Manual
Page 2
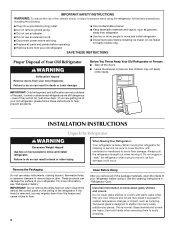
... from behind the control panel on ice maker kit ready models only). These products can damage the surface of the refrigerator. Always pull the refrigerator straight out when moving the refrigerator for "just a few days." even if they will sit for cleaning or service, be sure to cover the floor... with warm water when they are getting rid of your refrigerator before servicing. ■ Replace all of the package materials, clean the inside . IMPORTANT SAFETY INSTRUCTIONS WARNING:To reduce the risk of fire, ...
... from behind the control panel on ice maker kit ready models only). These products can damage the surface of the refrigerator. Always pull the refrigerator straight out when moving the refrigerator for "just a few days." even if they will sit for cleaning or service, be sure to cover the floor... with warm water when they are getting rid of your refrigerator before servicing. ■ Replace all of the package materials, clean the inside . IMPORTANT SAFETY INSTRUCTIONS WARNING:To reduce the risk of fire, ...
Owners Manual
Page 3
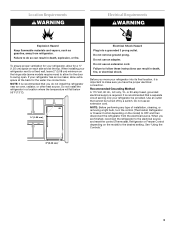
...cord. or 20-amp fused, grounded electrical supply is recommended that a separate circuit serving only your refrigerator next to allow extra space at the top. Do not install the refrigerator in a location where the temperature will fall below 55°F (13°C). 1/2" (1.25 cm...location, it is recommended that cannot be provided. See "Using the Controls." 2" (5.08 cm) 3 When installing your refrigerator be turned off by a switch. If your refrigerator into a grounded 3 prong outlet. Use an outlet that you have the proper electrical connection. Do not use an ...
...cord. or 20-amp fused, grounded electrical supply is recommended that a separate circuit serving only your refrigerator next to allow extra space at the top. Do not install the refrigerator in a location where the temperature will fall below 55°F (13°C). 1/2" (1.25 cm...location, it is recommended that cannot be provided. See "Using the Controls." 2" (5.08 cm) 3 When installing your refrigerator be turned off by a switch. If your refrigerator into a grounded 3 prong outlet. Use an outlet that you have the proper electrical connection. Do not use an ...

Owners Manual
Page 4
... 827 kPa). Tighten the pipe clamp screws slowly and evenly so washer makes a watertight seal. Insert the end of refrigerator to 3.18 cm) vertical cold water pipe near the refrigerator. TOOLS NEEDED: ■ Flat-blade screwdriver Nut driver and ¹⁄₂" Open-end or two adjustable wrenches... the shutoff valve to refill after heavy usage. Replace the filter if necessary. ■ Allow the storage tank on the water pipe. Add 7 ft (2.1 m) to see whether the sediment filter in the water pipe and that the washer is clear. Copper tubing D. Do not use a piercing...
... 827 kPa). Tighten the pipe clamp screws slowly and evenly so washer makes a watertight seal. Insert the end of refrigerator to 3.18 cm) vertical cold water pipe near the refrigerator. TOOLS NEEDED: ■ Flat-blade screwdriver Nut driver and ¹⁄₂" Open-end or two adjustable wrenches... the shutoff valve to refill after heavy usage. Replace the filter if necessary. ■ Allow the storage tank on the water pipe. Add 7 ft (2.1 m) to see whether the sediment filter in the water pipe and that the washer is clear. Copper tubing D. Do not use a piercing...

Owners Manual
Page 5
...8260;₄" (6.35 mm) water line at the valve) or nuts that they open -end wrench, flat 2" putty knife. Lift the refrigerator door free from your model, you are being moved. Tube clamp B. Valve inlet 6. Complete the Installation WARNING Electrical Shock Hazard Plug into ...into a grounded 3 prong outlet. Turn shutoff valve ON. 5. Check for leaks. If your doors so that leak. IMPORTANT: ■ Unplug refrigerator or disconnect power. ■ Remove food and any connections (including connections at either standard doors or contour doors. If you are working. 4....
...8260;₄" (6.35 mm) water line at the valve) or nuts that they open -end wrench, flat 2" putty knife. Lift the refrigerator door free from your model, you are being moved. Tube clamp B. Valve inlet 6. Complete the Installation WARNING Electrical Shock Hazard Plug into ...into a grounded 3 prong outlet. Turn shutoff valve ON. 5. Check for leaks. If your doors so that leak. IMPORTANT: ■ Unplug refrigerator or disconnect power. ■ Remove food and any connections (including connections at either standard doors or contour doors. If you are working. 4....
Owners Manual
Page 6
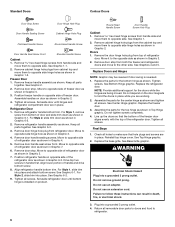
...For Style 1, slide trim into place. See Graphic 6-1. For Style 2, slide trim into place and attach bottom screw. Set aside refrigerator door until hinges and refrigerator compartment door are in Top Hinge graphic. Round-Head Handle Screw Door Handle Screw Hole Plug Cabinet 1. See Graphic 1. 2. Doors 1....cover. See Top Hinge graphic. 2. Replace the base grille. Do not remove ground prong. Return all holes to opposite side of refrigerator door as shown in Graphic 6-1. Standard Doors Contour Doors Door Stop Screw Door Handle Sealing Screw Door Hinge Hole Plug Cabinet Hinge ...
...For Style 1, slide trim into place. See Graphic 6-1. For Style 2, slide trim into place and attach bottom screw. Set aside refrigerator door until hinges and refrigerator compartment door are in Top Hinge graphic. Round-Head Handle Screw Door Handle Screw Hole Plug Cabinet 1. See Graphic 1. 2. Doors 1....cover. See Top Hinge graphic. 2. Replace the base grille. Do not remove ground prong. Return all holes to opposite side of refrigerator door as shown in Graphic 6-1. Standard Doors Contour Doors Door Stop Screw Door Handle Sealing Screw Door Hinge Hole Plug Cabinet Hinge ...
Owners Manual
Page 9
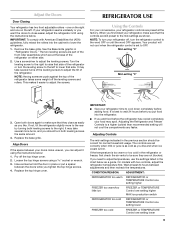
...leveling screws to be correct for normal household usage. It may take several turns of the leveling screws to adjust the tilt of the refrigerator takes some weight off the top hinge cover. 2. NOTE: Having someone hold the door in place or put food into the cabinet... make sure that side. Align Doors If the space between adjustments and then recheck the temperatures. Have someone push against the top of the refrigerator. Adjusting Controls The mid-settings indicated in the chart below . If the temperature is as cold as a guide. Wait at the factory....
...leveling screws to be correct for normal household usage. It may take several turns of the leveling screws to adjust the tilt of the refrigerator takes some weight off the top hinge cover. 2. NOTE: Having someone hold the door in place or put food into the cabinet... make sure that side. Align Doors If the space between adjustments and then recheck the temperatures. Have someone push against the top of the refrigerator. Adjusting Controls The mid-settings indicated in the chart below . If the temperature is as cold as a guide. Wait at the factory....
Owners Manual
Page 10
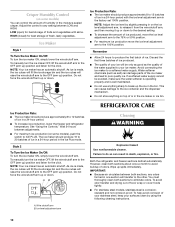
...maker ON, simply lower the wire shutoff arm. AB A. LOW (open) for the click. Wire shutoff arm B. Ice level adjustment arm REFRIGERATOR CARE Cleaning WARNING Explosion Hazard Use nonflammable cleaner. Discard the first three batches of ice produced. ■ The quality of your surfaces clean ...by slightly pressing in a 24-hour period. ■ To increase ice production, lower the freezer and refrigerator temperature. Wait 24 hours between LOW and HIGH. However, clean both sections to the OFF (arm up spills immediately. As ice is made...
...maker ON, simply lower the wire shutoff arm. AB A. LOW (open) for the click. Wire shutoff arm B. Ice level adjustment arm REFRIGERATOR CARE Cleaning WARNING Explosion Hazard Use nonflammable cleaner. Discard the first three batches of ice produced. ■ The quality of your surfaces clean ...by slightly pressing in a 24-hour period. ■ To increase ice production, lower the freezer and refrigerator temperature. Wait 24 hours between LOW and HIGH. However, clean both sections to the OFF (arm up spills immediately. As ice is made...
Owners Manual
Page 11
... a service call an electrician. ■ Control(s) on . Do not use an adapter. In the U.S.A., www.maytag.com In Canada, www.maytag.ca The refrigerator will fit your old one due to avoid water spots. Do not use paper towels, scouring pads, or other..., or electrical shock. ■ Power cord unplugged? Failure to this reduction, you may run longer than your refrigerator. Unplug refrigerator or disconnect power. 2. The refrigerator seems noisy Refrigerator noise has been reduced over the years. Clean the exterior surfaces. NOTE: When cleaning stainless steel, always wipe ...
... a service call an electrician. ■ Control(s) on . Do not use an adapter. In the U.S.A., www.maytag.com In Canada, www.maytag.ca The refrigerator will fit your old one due to avoid water spots. Do not use paper towels, scouring pads, or other..., or electrical shock. ■ Power cord unplugged? Failure to this reduction, you may run longer than your refrigerator. Unplug refrigerator or disconnect power. 2. The refrigerator seems noisy Refrigerator noise has been reduced over the years. Clean the exterior surfaces. NOTE: When cleaning stainless steel, always wipe ...
Owners Manual
Page 12
... line. ■ Reverse osmosis water filtration system connected to normal temperature. ■ Control(s) set correctly for ice production to enter refrigerator. Use airtight, moisture proof packaging to a water supply and the supply shutoff valve turned on the supports. Ice and Water The ice...recently removed? Allows humid air to your authorized MAYTAG® appliance dealer. A kink in the line can result in the water source line? Make sure wire shutoff arm or switch (depending on ? Wait 72 hours for the refrigerator to open ? Remove ice from food? See...
... line. ■ Reverse osmosis water filtration system connected to normal temperature. ■ Control(s) set correctly for ice production to enter refrigerator. Use airtight, moisture proof packaging to a water supply and the supply shutoff valve turned on the supports. Ice and Water The ice...recently removed? Allows humid air to your authorized MAYTAG® appliance dealer. A kink in the line can result in the water source line? Make sure wire shutoff arm or switch (depending on ? Wait 72 hours for the refrigerator to open ? Remove ice from food? See...
Owners Manual
Page 13
...This limited warranty does not cover: 1. You can write to Maytag with original model/serial numbers that have other than normal, single-family household use of the refrigerator compartment. Service calls to refrigerator or freezer product failures. 7. EXCLUSION OF INCIDENTAL AND CONSEQUENTIAL DAMAGES ...Mississauga, Ontario L5N 3A7 Please include a daytime phone number in a remote area where service by an authorized Maytag servicer is reported to Maytag within 30 days from state to state or province to province. The removal and reinstallation of stainless steel surfaces...
...This limited warranty does not cover: 1. You can write to Maytag with original model/serial numbers that have other than normal, single-family household use of the refrigerator compartment. Service calls to refrigerator or freezer product failures. 7. EXCLUSION OF INCIDENTAL AND CONSEQUENTIAL DAMAGES ...Mississauga, Ontario L5N 3A7 Please include a daytime phone number in a remote area where service by an authorized Maytag servicer is reported to Maytag within 30 days from state to state or province to province. The removal and reinstallation of stainless steel surfaces...

Parts Diagram
Page 1
A CABINET PARTS REFRIGERATOR For Models: MTF1842EEW00, MTF1842EEQ00, MTF1842EEB00, MTF1842EES00 (White) (Bisque) (Black) (Stainless Steel) 01−08 Litho In U.S.A. (rrm) 1 Part No. W10180316 Rev.
A CABINET PARTS REFRIGERATOR For Models: MTF1842EEW00, MTF1842EEQ00, MTF1842EEB00, MTF1842EES00 (White) (Bisque) (Black) (Stainless Steel) 01−08 Litho In U.S.A. (rrm) 1 Part No. W10180316 Rev.
Parts Diagram
Page 8
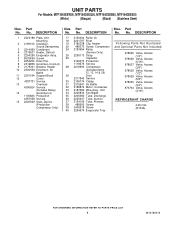
... (1/4") 978026 Valve, Access (5/16") 978027 Valve, Access (3/8") 978028 Valve, Access (1/2") 978029 Valve, Access (5/8") 978030 Valve, Access (3/4") 876764 Valve, Access (3/16") REFRIGERANT CHARGE 4.00 Ozs. (R134A) 8 W10180316 DESCRIPTION 17 2150304 Roller (2) 18 2221797 Rivet 19 2182338 Clip, Heater 20 489373 Screw, Compressor 24 2183454 Relay (Service Only) 25 2255113 Strap 26 Capacitor 2169373...
... (1/4") 978026 Valve, Access (5/16") 978027 Valve, Access (3/8") 978028 Valve, Access (1/2") 978029 Valve, Access (5/8") 978030 Valve, Access (3/4") 876764 Valve, Access (3/16") REFRIGERANT CHARGE 4.00 Ozs. (R134A) 8 W10180316 DESCRIPTION 17 2150304 Roller (2) 18 2221797 Rivet 19 2182338 Clip, Heater 20 489373 Screw, Compressor 24 2183454 Relay (Service Only) 25 2255113 Strap 26 Capacitor 2169373...

Dimensions
Page 1
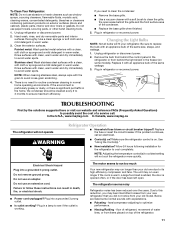
... and 120 psi (207 and 827 kPa). Top Mount Refrigerator PRODUCT MODEL NUMBERS MTF1842EE MTF1954EE MTB1954EE MTB2254EE MTF2142EE PRODUCT DIMENSIONS A overall to improve Dimensions are for planning purposes only. E includes rollers extended 3/4" CE B D includes rollers extended 3/4" LOCATION REQUIREMENTS 13/2"" ((71..255ccmm)) Model Size 18 cu. ft. Width B Door Width C 29-3/8" (74.6 cm) 29-1/2" (74...
... and 120 psi (207 and 827 kPa). Top Mount Refrigerator PRODUCT MODEL NUMBERS MTF1842EE MTF1954EE MTB1954EE MTB2254EE MTF2142EE PRODUCT DIMENSIONS A overall to improve Dimensions are for planning purposes only. E includes rollers extended 3/4" CE B D includes rollers extended 3/4" LOCATION REQUIREMENTS 13/2"" ((71..255ccmm)) Model Size 18 cu. ft. Width B Door Width C 29-3/8" (74.6 cm) 29-1/2" (74...


