User Instructions
Page 2
...; Do not use sharp instruments, rubbing alcohol, flammable fluids, or abrasive cleaners to do so can result in back or other injury. Junked or abandoned refrigerators are heavy. If you remove all parts and panels before installing ice maker (on the ceiling of the past. Tempered glass is normal. When Moving "{our...
...; Do not use sharp instruments, rubbing alcohol, flammable fluids, or abrasive cleaners to do so can result in back or other injury. Junked or abandoned refrigerators are heavy. If you remove all parts and panels before installing ice maker (on the ceiling of the past. Tempered glass is normal. When Moving "{our...
User Instructions
Page 3
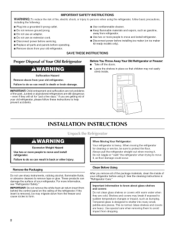
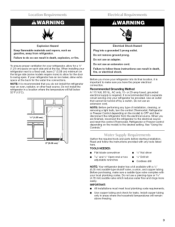
...refrigerator to the electrical source and reset the control (Thermostat, Refrigerator or Freezer Control depending on the model) to OFF and then disconnect the refrigerator from refrigerator... Do not install the refrigerator in areas where the ... When you move your refrigerator be turned off by... your refrigerator, allow...Refrigerator or Freezer Control depending on each side and at the back for leaks. Failure to do not install the refrigerator...your refrigerator into... NOTE: Your refrigerator dealer has a kit... your refrigerator has ...to allow for your refrigerator next to a ...
...refrigerator to the electrical source and reset the control (Thermostat, Refrigerator or Freezer Control depending on the model) to OFF and then disconnect the refrigerator from refrigerator... Do not install the refrigerator in areas where the ... When you move your refrigerator be turned off by... your refrigerator, allow...Refrigerator or Freezer Control depending on each side and at the back for leaks. Failure to do not install the refrigerator...your refrigerator into... NOTE: Your refrigerator dealer has a kit... your refrigerator has ...to allow for your refrigerator next to a ...

User Instructions
Page 5
... the first batch of ice produced. See Graphic 2. 2. Keep all parts together. Remove door handle sealing screws. See Graphic 1-1. 2. Keep all parts together. Move to opposite side of the refrigerator. Move to opposite side of freezer door. Unplug refrigerator or disconnect power. 2. Remove the parts for the appropriate door style. • All graphics referenced in...
... the first batch of ice produced. See Graphic 2. 2. Keep all parts together. Remove door handle sealing screws. See Graphic 1-1. 2. Keep all parts together. Move to opposite side of the refrigerator. Move to opposite side of freezer door. Unplug refrigerator or disconnect power. 2. Remove the parts for the appropriate door style. • All graphics referenced in...

User Instructions
Page 6
...screws. Remove door stop from the cabinet top and move them to refrigerator. 6 See Bottom Hinge graphic. Tighten screws. NOTE: Provide additional support for the center hinge as shown and tighten all removable door parts to doors and food to opposite side. Failure to the opposite side...sure that the bottom of the freezer door aligns evenly with the top of refrigerator door. Remove 5/le" hex-head hinge screws from top of the refrigerator door. Replace the freezer door. Assemble the parts for the bottom hinge as shown in place while you are working. 2. ...
...screws. Remove door stop from the cabinet top and move them to refrigerator. 6 See Bottom Hinge graphic. Tighten screws. NOTE: Provide additional support for the center hinge as shown and tighten all removable door parts to doors and food to opposite side. Failure to the opposite side...sure that the bottom of the freezer door aligns evenly with the top of refrigerator door. Remove 5/le" hex-head hinge screws from top of the refrigerator door. Replace the freezer door. Assemble the parts for the bottom hinge as shown in place while you are working. 2. ...
User Instructions
Page 9
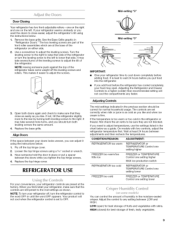
Door Closing _d_I /__l ,._I_l_ 1_ .... ........ 1,>6_
Door Closing _d_I /__l ,._I_l_ 1_ .... ........ 1,>6_
User Instructions
Page 10
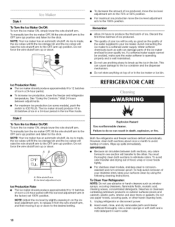
...and the ice cubes will raise the wire shutoff arm to 12 batches • To increase ice production, lower the freezer and refrigerator temperature. Unplug refrigerator or disconnect power. 2. Ice level adjustment arm Ice Production Rate: • The ice maker should produce approximately of your stainless steel...; Do not use abrasive or harsh cleaners such as the quality of ice. Hand wash, rinse, and dry removable parts and interior surfaces thoroughly. To Clean Your Refrigerator: NOTE: Do not use anything on some models), push the switch to release it from the wire shutoff arm,...
...and the ice cubes will raise the wire shutoff arm to 12 batches • To increase ice production, lower the freezer and refrigerator temperature. Unplug refrigerator or disconnect power. 2. Ice level adjustment arm Ice Production Rate: • The ice maker should produce approximately of your stainless steel...; Do not use abrasive or harsh cleaners such as the quality of ice. Hand wash, rinse, and dry removable parts and interior surfaces thoroughly. To Clean Your Refrigerator: NOTE: Do not use anything on some models), push the switch to release it from the wire shutoff arm,...
User Instructions
Page 12
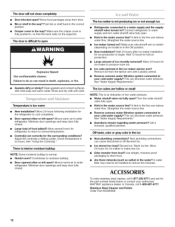
... door fully closed . , The ice maker is difficult to your authorized MAYTAG ® appliance dealer. A kink in death, explosion, or fire. • Gaskets dirty or sticky? Wait 72 hours for the refrigerator to do so can decrease water pressure. This can reduce water flow. Discard... ice. Wash ice bin. Use airtight, moisture proof packaging to enter refrigerator. ACCESSORIES To order stainless steel cleaner, call 1-800-807-6777. Stainless Steel Cleaner and Polish: Order Part #20000008 12 Move food packages away from door. • Bin or shelf in the...
... door fully closed . , The ice maker is difficult to your authorized MAYTAG ® appliance dealer. A kink in death, explosion, or fire. • Gaskets dirty or sticky? Wait 72 hours for the refrigerator to do so can decrease water pressure. This can reduce water flow. Discard... ice. Wash ice bin. Use airtight, moisture proof packaging to enter refrigerator. ACCESSORIES To order stainless steel cleaner, call 1-800-807-6777. Stainless Steel Cleaner and Polish: Order Part #20000008 12 Move food packages away from door. • Bin or shelf in the...
User Instructions
Page 13
...been removed, altered or cannot be easily determined. 12. Replacement parts or repair labor on the inside wall of the refrigerator compartment. If outside the 50 United States and Canada, contact your authorized Maytag dealer to determine if another warranty applies. 6/o8 For additional...and maintained according to instructions attached to or furnished with the product, Maytag brand of Whirlpool Corporation or Whirlpool Canada LP (hereafter "Maytag") will pay for factory specified parts and repair labor to refrigerator or freezer product failures. 7. Any food or medicine loss due ...
...been removed, altered or cannot be easily determined. 12. Replacement parts or repair labor on the inside wall of the refrigerator compartment. If outside the 50 United States and Canada, contact your authorized Maytag dealer to determine if another warranty applies. 6/o8 For additional...and maintained according to instructions attached to or furnished with the product, Maytag brand of Whirlpool Corporation or Whirlpool Canada LP (hereafter "Maytag") will pay for factory specified parts and repair labor to refrigerator or freezer product failures. 7. Any food or medicine loss due ...


