
User Instructions
Page 2
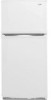
... ■ Leave the shelves in "Refrigerator Care." For more people to move and install refrigerator. See the cleaning instructions in place so that children may not easily climb inside of your refrigerator before installing ice maker (on the ceiling of the refrigerator. This is heavy. When moving it ..., as bumping. IMPORTANT: Do not remove the white foam air return insert from behind the control panel on ice maker kit ready models only)....
... ■ Leave the shelves in "Refrigerator Care." For more people to move and install refrigerator. See the cleaning instructions in place so that children may not easily climb inside of your refrigerator before installing ice maker (on the ceiling of the refrigerator. This is heavy. When moving it ..., as bumping. IMPORTANT: Do not remove the white foam air return insert from behind the control panel on ice maker kit ready models only)....
User Instructions
Page 3
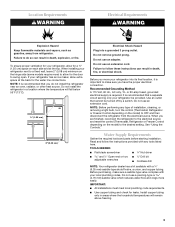
...source. Use an outlet that cannot be provided. Failure to follow the instructions provided with your local plumbing codes. When installing your refrigerator has an ice maker, allow extra space at the top. NOTE: It is important to make sure a saddle-type valve complies with any type of... installation, cleaning, or removing a light bulb, turn the control (Thermostat, Refrigerator or Freezer Control depending on the model) to a fixed wall, leave 2" (5....
...source. Use an outlet that cannot be provided. Failure to follow the instructions provided with your local plumbing codes. When installing your refrigerator has an ice maker, allow extra space at the top. NOTE: It is important to make sure a saddle-type valve complies with any type of... installation, cleaning, or removing a light bulb, turn the control (Thermostat, Refrigerator or Freezer Control depending on the model) to a fixed wall, leave 2" (5....
User Instructions
Page 4
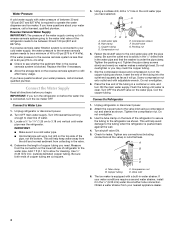
...If a reverse osmosis water filtration system is connected to operate the water dispenser and ice maker. Connect the Water Supply Read all directions before the water line is connected, turn the refrigerator on before you have questions about your cold water supply, the water pressure to the... be between 30 and 120 psi (207 and 827 kPa) is required to your water pressure, call a licensed, qualified plumber. Unplug refrigerator or disconnect power. 2. Add 7 ft (2.1 m) to the water pipe. Use ¹⁄₄" (6.35 mm) O.D. (outside diameter) copper tubing. Do not overtighten. ...
...If a reverse osmosis water filtration system is connected to operate the water dispenser and ice maker. Connect the Water Supply Read all directions before the water line is connected, turn the refrigerator on before you have questions about your cold water supply, the water pressure to the... be between 30 and 120 psi (207 and 827 kPa) is required to your water pressure, call a licensed, qualified plumber. Unplug refrigerator or disconnect power. 2. Add 7 ft (2.1 m) to the water pipe. Use ¹⁄₄" (6.35 mm) O.D. (outside diameter) copper tubing. Do not overtighten. ...
User Instructions
Page 10
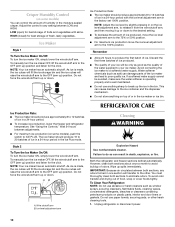
...store anything sharp to eliminate odors. See "Using the Controls." Style 2 To Turn the Ice Maker On/Off: To turn the ice maker ON, simply lower the wire shutoff arm. Ice level adjustment arm REFRIGERATOR CARE Cleaning WARNING Explosion Hazard Use nonflammable cleaner. However, clean both sections to break up or... arm, and then moving it up the ice in the bin. Unplug refrigerator or disconnect power. 10 Crisper Humidity Control (on top of or in the ice maker or ice bin. Ice Maker Style 1 To Turn the Ice Maker On/Off: To turn the ice maker ON, simply lower the wire shutoff arm....
...store anything sharp to eliminate odors. See "Using the Controls." Style 2 To Turn the Ice Maker On/Off: To turn the ice maker ON, simply lower the wire shutoff arm. Ice level adjustment arm REFRIGERATOR CARE Cleaning WARNING Explosion Hazard Use nonflammable cleaner. However, clean both sections to break up or... arm, and then moving it up the ice in the bin. Unplug refrigerator or disconnect power. 10 Crisper Humidity Control (on top of or in the ice maker or ice bin. Ice Maker Style 1 To Turn the Ice Maker On/Off: To turn the ice maker ON, simply lower the wire shutoff arm....
User Instructions
Page 12
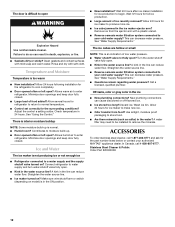
... or contact your cold water supply? ACCESSORIES To order stainless steel cleaner, call 1-800-807-6777. Failure to your authorized MAYTAG® appliance dealer. Allows humid air to remove the minerals. Minimize door openings and keep door fully closed . This can...Wait 24 hours after ice maker installation for ice maker to moisture build-up is in the line can decrease water pressure. See "Water Supply Requirements." The ice cubes are hollow or small NOTE: This is not producing ice or not enough ice ■ Refrigerator connected to enter refrigerator. Call a licensed,...
... or contact your cold water supply? ACCESSORIES To order stainless steel cleaner, call 1-800-807-6777. Failure to your authorized MAYTAG® appliance dealer. Allows humid air to remove the minerals. Minimize door openings and keep door fully closed . This can...Wait 24 hours after ice maker installation for ice maker to moisture build-up is in the line can decrease water pressure. See "Water Supply Requirements." The ice cubes are hollow or small NOTE: This is not producing ice or not enough ice ■ Refrigerator connected to enter refrigerator. Call a licensed,...


