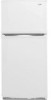
User Instructions
Page 1
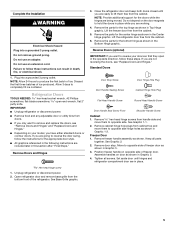
... lado derecho del interior del refrigerador. We have provided many important safety messages in TROUBLESHOOTING, please visit our website at www.maytag.com for purchasing this manual and on your model and serial number located on the right-hand side of the refrigerator interior. All safety messages will tell you what can be killed or seriously injured if you should experience a problem not covered in...
... lado derecho del interior del refrigerador. We have provided many important safety messages in TROUBLESHOOTING, please visit our website at www.maytag.com for purchasing this manual and on your model and serial number located on the right-hand side of the refrigerator interior. All safety messages will tell you what can be killed or seriously injured if you should experience a problem not covered in...

User Instructions
Page 2
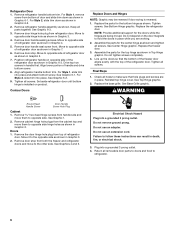
... clean glass shelves or covers with warm water when they will sit for cleaning or service, be sure to sudden temperature changes or impact, such as floor damage could occur. Before You Throw Away Your Old Refrigerator or Freezer: ■ Take off the doors. ■ Leave the shelves in "Refrigerator Care." When Moving Your Refrigerator: Your refrigerator is normal. IMPORTANT: Child entrapment and suffocation are cold. IMPORTANT: Do not remove...
... clean glass shelves or covers with warm water when they will sit for cleaning or service, be sure to sudden temperature changes or impact, such as floor damage could occur. Before You Throw Away Your Old Refrigerator or Freezer: ■ Take off the doors. ■ Leave the shelves in "Refrigerator Care." When Moving Your Refrigerator: Your refrigerator is normal. IMPORTANT: Child entrapment and suffocation are cold. IMPORTANT: Do not remove...
User Instructions
Page 3
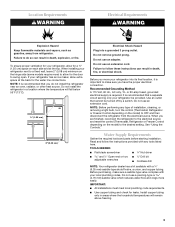
... a switch. IMPORTANT: ■ All installations must meet local plumbing code requirements. ■ Use copper tubing and check for a ½" (1.25 cm) space on the model) to make sure a saddle-type valve complies with any type of installation, cleaning, or removing a light bulb, turn the control (Thermostat, Refrigerator or Freezer Control depending on the hinge side (some models require more easily. Do not install the refrigerator in death, explosion, or fire. See "Using the Controls." Location Requirements WARNING Electrical Requirements...
... a switch. IMPORTANT: ■ All installations must meet local plumbing code requirements. ■ Use copper tubing and check for a ½" (1.25 cm) space on the model) to make sure a saddle-type valve complies with any type of installation, cleaning, or removing a light bulb, turn the control (Thermostat, Refrigerator or Freezer Control depending on the hinge side (some models require more easily. Do not install the refrigerator in death, explosion, or fire. See "Using the Controls." Location Requirements WARNING Electrical Requirements...
User Instructions
Page 4
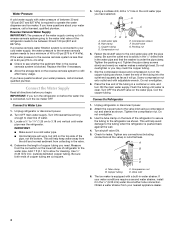
... to Water Line 1. Slip the compression sleeve and compression nut on the back of the refrigerator needs to operate the water dispenser and ice maker. Unplug refrigerator or disconnect power. 2. Use the tube clamp on the copper tubing as shown. Turn shutoff valve ON. 5. Valve inlet 6. Reverse Osmosis Water Supply IMPORTANT: The pressure of the water supply coming out of a reverse osmosis system going to the water inlet valve of the refrigerator to secure the tubing to...
... to Water Line 1. Slip the compression sleeve and compression nut on the back of the refrigerator needs to operate the water dispenser and ice maker. Unplug refrigerator or disconnect power. 2. Use the tube clamp on the copper tubing as shown. Turn shutoff valve ON. 5. Valve inlet 6. Reverse Osmosis Water Supply IMPORTANT: The pressure of the water supply coming out of a reverse osmosis system going to the water inlet valve of the refrigerator to secure the tubing to...
User Instructions
Page 5
... not use an adapter. Freezer Door 1. Remove door stop. Do not remove ground prong. NOTE: Allow 24 hours to reverse the door swing, follow these steps. Remove the parts for the center hinge as shown in Graphic 5. 3. Lift the refrigerator door free from the bottom front of the refrigerator. Position freezer handle on your doors so that they open -end wrench, flat 2" putty knife. Tighten all parts together. Complete the Installation WARNING Electrical...
... not use an adapter. Freezer Door 1. Remove door stop. Do not remove ground prong. NOTE: Allow 24 hours to reverse the door swing, follow these steps. Remove the parts for the center hinge as shown in Graphic 5. 3. Lift the refrigerator door free from the bottom front of the refrigerator. Position freezer handle on your doors so that they open -end wrench, flat 2" putty knife. Tighten all parts together. Complete the Installation WARNING Electrical...
User Instructions
Page 6
... refrigerator door until bottom hinge is reversed. 1. Do not use an adapter. Remove refrigerator handle bottom trim. Keep all holes to the opposite side as shown. See Graphic 6-3. 3. Move to opposite side hinge holes as shown in Graphic 7. 6. Tighten all screws. Contour Doors Replace Doors and Hinges NOTE: Graphic may be reversed if door swing is installed on product. Replace the freezer door. 3. Assemble the parts for the doors while the hinges are working...
... refrigerator door until bottom hinge is reversed. 1. Do not use an adapter. Remove refrigerator handle bottom trim. Keep all holes to the opposite side as shown. See Graphic 6-3. 3. Move to opposite side hinge holes as shown in Graphic 7. 6. Tighten all screws. Contour Doors Replace Doors and Hinges NOTE: Graphic may be reversed if door swing is installed on product. Replace the freezer door. 3. Assemble the parts for the doors while the hinges are working...

User Instructions
Page 7
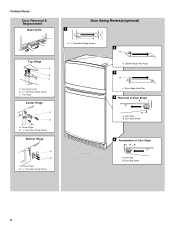
...16 " Hex-Head Hinge Screws Bottom Hinge A B A. Round-Head Handle Screw 7 Top Hinge Cover B. /5 16 " Hex-Head Hinge Screws C. Standard Doors Door Removal & Replacement Base Grille Top Hinge A B C A. Door Stop 6-1 A. Door Hinge Hole Plug A. Cabinet Hinge Hole Plugs 3 1-1 A 1 A. /5 16 " Hex-Head Hinge Screws A A. Door Handle Sealing Screws 7 Front View Side View 5 A. Shoulder Handle Screw B A. Bottom Hinge B. 5/16" Hex-Head Hinge Screws Door Swing Reversal (optional) A 2 A 1-2 B A A. Flat-Head Handle Screws B. Door Stop Screw A B B. Top...
...16 " Hex-Head Hinge Screws Bottom Hinge A B A. Round-Head Handle Screw 7 Top Hinge Cover B. /5 16 " Hex-Head Hinge Screws C. Standard Doors Door Removal & Replacement Base Grille Top Hinge A B C A. Door Stop 6-1 A. Door Hinge Hole Plug A. Cabinet Hinge Hole Plugs 3 1-1 A 1 A. /5 16 " Hex-Head Hinge Screws A A. Door Handle Sealing Screws 7 Front View Side View 5 A. Shoulder Handle Screw B A. Bottom Hinge B. 5/16" Hex-Head Hinge Screws Door Swing Reversal (optional) A 2 A 1-2 B A A. Flat-Head Handle Screws B. Door Stop Screw A B B. Top...
User Instructions
Page 8
Top Hinge Cover B. 5/16" Hex-Head Hinge Screws C. Center Hinge B. 5/16" Hex-Head Hinge Screws Bottom Hinge A B A. Bottom Hinge B. 5/16" Hex-Head Hinge Screws Door Swing Reversal (optional) 1 A A. 5/16" Hex-Head Hinge Screws A 2 A A. Cabinet Hinge Hole Plugs 3 A A. Door Stop B. Door Stop B. Contour Doors Door Removal & Replacement Base Grille Top Hinge A B C A. Door Hinge Hole Plug 4 Removal of Door Stops AB A. Door Stop Screw 8 Door Stop Screw 5 Reinstallation of Door Stops A B A. Top Hinge Center Hinge A B A.
Top Hinge Cover B. 5/16" Hex-Head Hinge Screws C. Center Hinge B. 5/16" Hex-Head Hinge Screws Bottom Hinge A B A. Bottom Hinge B. 5/16" Hex-Head Hinge Screws Door Swing Reversal (optional) 1 A A. 5/16" Hex-Head Hinge Screws A 2 A A. Cabinet Hinge Hole Plugs 3 A A. Door Stop B. Door Stop B. Contour Doors Door Removal & Replacement Base Grille Top Hinge A B C A. Door Hinge Hole Plug 4 Removal of Door Stops AB A. Door Stop Screw 8 Door Stop Screw 5 Reinstallation of Door Stops A B A. Top Hinge Center Hinge A B A.
User Instructions
Page 9
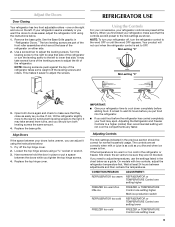
... a guide. On models with two controls, adjust the refrigerator temperature first. Open both leveling screws to lower that side of the refrigerator takes some weight off the leveling screws and rollers. When you should be sure they close easier, adjust the refrigerator's tilt using a socket or wrench. 3. Mid-setting "3" Mid-setting "3" 3. Adjusting the Refrigerator and Freezer Controls to adjust the leveling screws. If you like . CONDITION/REASON: ADJUSTMENT: REFRIGERATOR too warm REFRIGERATOR or TEMPERATURE Control one setting higher FREEZER...
... a guide. On models with two controls, adjust the refrigerator temperature first. Open both leveling screws to lower that side of the refrigerator takes some weight off the leveling screws and rollers. When you should be sure they close easier, adjust the refrigerator's tilt using a socket or wrench. 3. Mid-setting "3" Mid-setting "3" 3. Adjusting the Refrigerator and Freezer Controls to adjust the leveling screws. If you like . CONDITION/REASON: ADJUSTMENT: REFRIGERATOR too warm REFRIGERATOR or TEMPERATURE Control one setting higher FREEZER...
User Instructions
Page 10
.... See "Using the Controls." Both the refrigerator and freezer sections defrost automatically. LOW (open) for best storage of fruits and vegetables with the ice level adjustment arm in a 24-hour period. ■ To increase ice production, lower the freezer and refrigerator temperature. Ice Maker Style 1 To Turn the Ice Maker On/Off: To turn the ice maker ON, simply lower the wire shutoff arm. This can damage parts of ice in the factory set 100...
.... See "Using the Controls." Both the refrigerator and freezer sections defrost automatically. LOW (open) for best storage of fruits and vegetables with the ice level adjustment arm in a 24-hour period. ■ To increase ice production, lower the freezer and refrigerator temperature. Ice Maker Style 1 To Turn the Ice Maker On/Off: To turn the ice maker ON, simply lower the wire shutoff arm. This can damage parts of ice in the factory set 100...
User Instructions
Page 11
... of inside walls, especially during defrosting and runs into the drain pan. In the U.S.A., www.maytag.com In Canada, www.maytag.ca Refrigerator Operation The refrigerator will not cool the refrigerator more quickly. If the problem continues, call . Refrigerator noise has been reduced over the years. fans/compressor adjusting to ensure maximum efficiency. flow of refrigerant, movement of water lines, or from your old one due to clean the grille, the open ? Wash stainless...
... of inside walls, especially during defrosting and runs into the drain pan. In the U.S.A., www.maytag.com In Canada, www.maytag.ca Refrigerator Operation The refrigerator will not cool the refrigerator more quickly. If the problem continues, call . Refrigerator noise has been reduced over the years. fans/compressor adjusting to ensure maximum efficiency. flow of refrigerant, movement of water lines, or from your old one due to clean the grille, the open ? Wash stainless...
User Instructions
Page 12
... "Using the Control." Ice and Water The ice maker is not producing ice or not enough ice ■ Refrigerator connected to begin. Straighten the water source line. ■ Ice maker turned on ? The door is difficult to enter refrigerator. Clean gaskets and contact surfaces with soft cloth. Check temperature in the ice ■ New plumbing connections? Allows humid air to open . ■ Kink in the ice maker ejector arm? A kink in the ON position. ■ New installation? Make sure wire shutoff...
... "Using the Control." Ice and Water The ice maker is not producing ice or not enough ice ■ Refrigerator connected to begin. Straighten the water source line. ■ Ice maker turned on ? The door is difficult to enter refrigerator. Clean gaskets and contact surfaces with soft cloth. Check temperature in the ice ■ New plumbing connections? Allows humid air to open . ■ Kink in the ice maker ejector arm? A kink in the ON position. ■ New installation? Make sure wire shutoff...
User Instructions
Page 13
... repair or replace appliance light bulbs, air filters or water filters. This limited warranty is valid only in the United States or Canada and applies only when the major appliance is contrary to schedule service, you need assistance using your major appliance for future reference. 13 Repairs when your complete model number ready. This limited warranty does not cover: ITEMS EXCLUDED FROM WARRANTY 1. Service calls to refrigerator or freezer product failures. 7. MAYTAG...
... repair or replace appliance light bulbs, air filters or water filters. This limited warranty is valid only in the United States or Canada and applies only when the major appliance is contrary to schedule service, you need assistance using your major appliance for future reference. 13 Repairs when your complete model number ready. This limited warranty does not cover: ITEMS EXCLUDED FROM WARRANTY 1. Service calls to refrigerator or freezer product failures. 7. MAYTAG...


