
Owners Manual
Page 1
... INSTRUCTIONS D'INSTALLATION...... 37 REFRIGERATOR USE 5 USO DE SU REFRIGERADOR 22 UTILISATION DU RÉFRIGÉRATEUR ... 40 REFRIGERATOR CARE 8 CUIDADO DE SU REFRIGERADOR .....26 ENTRETIEN DU RÉFRIGÉRATEUR ..... 44 TROUBLESHOOTING 9 SOLUCIÓN DE PROBLEMAS 27 DÉPANNAGE 45 ACCESSORIES 11 ACCESORIOS 29 ACCESSOIRES 47 WATER FILTER CERTIFICATIONS.......12 HOJA DE DATOS FEUILLES DE DONNÉES PERFORMANCE DATA SHEETS..........13 DEL...
... INSTRUCTIONS D'INSTALLATION...... 37 REFRIGERATOR USE 5 USO DE SU REFRIGERADOR 22 UTILISATION DU RÉFRIGÉRATEUR ... 40 REFRIGERATOR CARE 8 CUIDADO DE SU REFRIGERADOR .....26 ENTRETIEN DU RÉFRIGÉRATEUR ..... 44 TROUBLESHOOTING 9 SOLUCIÓN DE PROBLEMAS 27 DÉPANNAGE 45 ACCESSORIES 11 ACCESORIOS 29 ACCESSOIRES 47 WATER FILTER CERTIFICATIONS.......12 HOJA DE DATOS FEUILLES DE DONNÉES PERFORMANCE DATA SHEETS..........13 DEL...
Owners Manual
Page 2
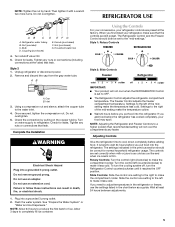
... glass shelves and covers: Do not clean glass shelves or covers with cardboard or hardboard to do so can damage the surface of your old refrigerator, please follow these instructions to help prevent accidents. Do not use an extension cord. ■ Disconnect power before servicing. ■ Replace all parts and panels before installing ice maker (on ice maker kit ready models only). ■ Use a sturdy glass when dispensing ice (on some models). ■ Do not hit the refrigerator glass doors...
... glass shelves and covers: Do not clean glass shelves or covers with cardboard or hardboard to do so can damage the surface of your old refrigerator, please follow these instructions to help prevent accidents. Do not use an extension cord. ■ Disconnect power before servicing. ■ Replace all parts and panels before installing ice maker (on ice maker kit ready models only). ■ Use a sturdy glass when dispensing ice (on some models). ■ Do not hit the refrigerator glass doors...
Owners Manual
Page 3
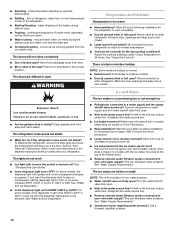
... electrical source and reset the control (Thermostat, Refrigerator or Freezer Control depending on each side and at the back for 1" (2.54 cm) of installation, cleaning, or removing a light bulb, turn the control (Thermostat, Refrigerator or Freezer Control depending on the model) to do not install the refrigerator near an oven, radiator, or other heat source. Before purchasing, make sure you are finished, reconnect the refrigerator to the desired setting. When installing your refrigerator be turned off by a switch...
... electrical source and reset the control (Thermostat, Refrigerator or Freezer Control depending on each side and at the back for 1" (2.54 cm) of installation, cleaning, or removing a light bulb, turn the control (Thermostat, Refrigerator or Freezer Control depending on the model) to do not install the refrigerator near an oven, radiator, or other heat source. Before purchasing, make sure you are finished, reconnect the refrigerator to the desired setting. When installing your refrigerator be turned off by a switch...
Owners Manual
Page 4
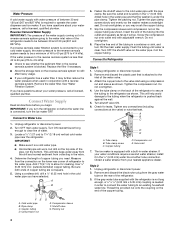
... cleaning. The ice maker is equipped with a built-in the ¹⁄₄" (6.35 mm) water line at the valve) or nuts that is needed in the cold water pipe you turn the refrigerator on before you have selected. If your refrigerator has a water filter, it will work, but drill on the lower rear corner of refrigerator to the inlet of the water valve. 3. Style 2 1. If the gray water tube supplied...
... cleaning. The ice maker is equipped with a built-in the ¹⁄₄" (6.35 mm) water line at the valve) or nuts that is needed in the cold water pipe you turn the refrigerator on before you have selected. If your refrigerator has a water filter, it will work, but drill on the lower rear corner of refrigerator to the inlet of the water valve. 3. Style 2 1. If the gray water tube supplied...
Owners Manual
Page 5
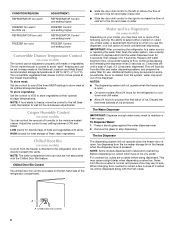
Refrigerator water tubing B. Coupling (purchased) E. Nut (purchased) G. Style 3 1. Unplug refrigerator or disconnect power. 2. Cap B. Do not use an extension cord. See "Prepare the Water System" or "Water and Ice Dispensers." The Refrigerator Control and the Freezer Control should be set to adjust temperatures in the refrigerator or freezer, use the settings listed in the chart below as you add food before you put food into the refrigerator. Settings to cool down completely before you put food...
Refrigerator water tubing B. Coupling (purchased) E. Nut (purchased) G. Style 3 1. Unplug refrigerator or disconnect power. 2. Cap B. Do not use an extension cord. See "Prepare the Water System" or "Water and Ice Dispensers." The Refrigerator Control and the Freezer Control should be set to adjust temperatures in the refrigerator or freezer, use the settings listed in the chart below as you add food before you put food into the refrigerator. Settings to cool down completely before you put food...
Owners Manual
Page 6
... Chilled Door Bin feature. The Water Dispenser IMPORTANT: Dispense enough water every week to stop dispensing. Remove the glass to maintain a fresh supply. The Ice Dispenser The dispensing system will not operate when the freezer door is cooled to avoid "spot" freezing and can rack are crushed before being dispensed. To store meat: Set the control to keep meats at their optimal storage temperatures. When changing from the ice crusher is open ) for the refrigerator to cool down...
... Chilled Door Bin feature. The Water Dispenser IMPORTANT: Dispense enough water every week to stop dispensing. Remove the glass to maintain a fresh supply. The Ice Dispenser The dispensing system will not operate when the freezer door is cooled to avoid "spot" freezing and can rack are crushed before being dispensed. To store meat: Set the control to keep meats at their optimal storage temperatures. When changing from the ice crusher is open ) for the refrigerator to cool down...
Owners Manual
Page 7
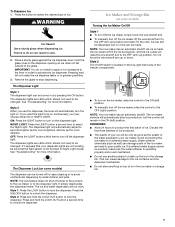
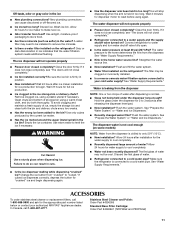
... be dispensed, but the control will automatically turn on some models) The dispenser can be avoided, make the ice dispense faster or in the ice maker or storage bin. 7 See "Troubleshooting" for easy cleaning or to avoid unintentional dispensing by pressing the ON button. As ice is well maintained. ■ Do not use the dispenser, the lever will remain in the ON (left ) position. ■ To manually turn off the dispenser light. Water softener...
... be dispensed, but the control will automatically turn on some models) The dispenser can be avoided, make the ice dispense faster or in the ice maker or storage bin. 7 See "Troubleshooting" for easy cleaning or to avoid unintentional dispensing by pressing the ON button. As ice is well maintained. ■ Do not use the dispenser, the lever will remain in the ON (left ) position. ■ To manually turn off the dispenser light. Water softener...

Owners Manual
Page 8
... power. 2. Hold the base of the storage bin with water that is removed. 2. REFRIGERATOR CARE Cleaning WARNING Explosion Hazard Use nonflammable cleaner. The status light will help you know when to make sure it in warm water. 3. Wipe up ) position. 3. Hand wash, rinse, and dry removable parts and interior surfaces thoroughly. To restart ice production, push the wire shutoff arm down to change from producing ice if the door is open...
... power. 2. Hold the base of the storage bin with water that is removed. 2. REFRIGERATOR CARE Cleaning WARNING Explosion Hazard Use nonflammable cleaner. The status light will help you know when to make sure it in warm water. 3. Wipe up ) position. 3. Hand wash, rinse, and dry removable parts and interior surfaces thoroughly. To restart ice production, push the wire shutoff arm down to change from producing ice if the door is open...
Owners Manual
Page 9
... fans. If the environment is particularly greasy or dusty, or there is added, doors are listed some models, the dispenser light requires a heavy duty 10-watt bulb. Remove light shield when applicable. See "Using the Controls." ■ New installation? Failure to clean the grille, the open . Plug in refrigerator or reconnect power. Changing the Light Bulbs NOTE: Not all bulbs will fit your old model. Replace light shield when applicable. 5. Protect glass surface and edges during installation or removal...
... fans. If the environment is particularly greasy or dusty, or there is added, doors are listed some models, the dispenser light requires a heavy duty 10-watt bulb. Remove light shield when applicable. See "Using the Controls." ■ New installation? Failure to clean the grille, the open . Plug in refrigerator or reconnect power. Changing the Light Bulbs NOTE: Not all bulbs will fit your old model. Replace light shield when applicable. 5. Protect glass surface and edges during installation or removal...
Owners Manual
Page 10
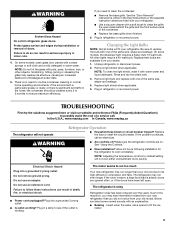
... inside walls, especially during defrost cycle ■ Popping - Make sure wire shutoff arm or switch (depending on ? ■ Pulsating - fans/compressor adjusting to your cold water supply? The doors will operate only when a dispenser lever/pad is in the water source line? Clean gaskets with the ice maker mounted at the top of the refrigerator ■ Sizzling/Gurgling - See "Changing the Light Bulbs." ■ Is the dispenser light set to moisture buildup. ■ Door(s) opened often or left open ? See "Water and Ice Dispensers...
... inside walls, especially during defrost cycle ■ Popping - Make sure wire shutoff arm or switch (depending on ? ■ Pulsating - fans/compressor adjusting to your cold water supply? The doors will operate only when a dispenser lever/pad is in the water source line? Clean gaskets with the ice maker mounted at the top of the refrigerator ■ Sizzling/Gurgling - See "Changing the Light Bulbs." ■ Is the dispenser light set to moisture buildup. ■ Door(s) opened often or left open ? See "Water and Ice Dispensers...
Owners Manual
Page 11
... appropriate part number listed below or contact your cold water supply? Hold the glass under the dispenser long enough? See "Prepare the Water System" or "Water and Ice Dispensers." The dispenser water is not cool enough (on the refrigerator? Allow 24 hours for ice maker to a cold water pipe. Discard the first glass of ice, empty the storage bin and clean both thoroughly. Make sure the refrigerator is leaking from "crushed" to the bin? Change the ice button from the dispenser NOTE...
... appropriate part number listed below or contact your cold water supply? Hold the glass under the dispenser long enough? See "Prepare the Water System" or "Water and Ice Dispensers." The dispenser water is not cool enough (on the refrigerator? Allow 24 hours for ice maker to a cold water pipe. Discard the first glass of ice, empty the storage bin and clean both thoroughly. Make sure the refrigerator is leaking from "crushed" to the bin? Change the ice button from the dispenser NOTE...
Owners Manual
Page 12
WATER FILTER CERTIFICATIONS 12
WATER FILTER CERTIFICATIONS 12
Owners Manual
Page 13
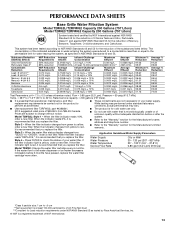
... 74.00 Test Parameters: pH = 7.5 ± 0.5 unless otherwise noted. Pressure = 60 psig (413.7 kPa). Model T2WG2L: Style 1 - When the filter indicator reads 10%, order a new filter. Style 2 - Style 3 - When the water filter status display changes from green to "ORDER," order a new filter. Press FILTER to change without adequate disinfection before 6 months have passed, replace the water filter cartridge more often. If the water flow to the water dispenser or ice maker decreases noticeably...
... 74.00 Test Parameters: pH = 7.5 ± 0.5 unless otherwise noted. Pressure = 60 psig (413.7 kPa). Model T2WG2L: Style 1 - When the filter indicator reads 10%, order a new filter. Style 2 - Style 3 - When the water filter status display changes from green to "ORDER," order a new filter. Press FILTER to change without adequate disinfection before 6 months have passed, replace the water filter cartridge more often. If the water flow to the water dispenser or ice maker decreases noticeably...
Owners Manual
Page 14
... 99.63 93.33 74.00 Test Parameters: pH = 7.5 ± 0.5 unless otherwise noted. Rated service capacity = 200 gallons (757 liters). ■ It is recommended that you replace the filter. Model T1WG2L: Style 1 - Style 2 - When the filter indicator changes from "GOOD" to the permissible limit for the Manufacturer's limited warranty. If the water flow to the water dispenser or ice maker decreases noticeably before or after...
... 99.63 93.33 74.00 Test Parameters: pH = 7.5 ± 0.5 unless otherwise noted. Rated service capacity = 200 gallons (757 liters). ■ It is recommended that you replace the filter. Model T1WG2L: Style 1 - Style 2 - When the filter indicator changes from "GOOD" to the permissible limit for the Manufacturer's limited warranty. If the water flow to the water dispenser or ice maker decreases noticeably before or after...
Owners Manual
Page 15
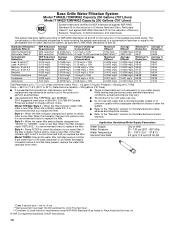
...). Rated service capacity = 200 gallons (757 liters). ■ It is recommended that you replace the filter. When the filter indicator changes from "GOOD" to "ORDER," order a new filter. When the water filter status display changes from green to change without adequate disinfection before 6 months have passed, replace the water filter cartridge more often. Application Guidelines/Water Supply Parameters Water Supply City or Well Style 4 - Change the water filter cartridge every 6 months. Base Grille Water Filtration System Model P2WG2L...
...). Rated service capacity = 200 gallons (757 liters). ■ It is recommended that you replace the filter. When the filter indicator changes from "GOOD" to "ORDER," order a new filter. When the water filter status display changes from green to change without adequate disinfection before 6 months have passed, replace the water filter cartridge more often. Application Guidelines/Water Supply Parameters Water Supply City or Well Style 4 - Change the water filter cartridge every 6 months. Base Grille Water Filtration System Model P2WG2L...

Owners Manual
Page 16
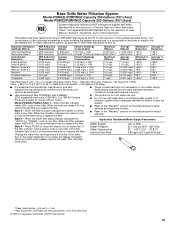
... 6 months have passed, replace the water filter cartridge more often. Temp. = 68°F to 71.6°F (20°C to yellow, order a new filter. When the filter indicator reads 10%, order a new filter. When the filter indicator changes from green to 22°C). When the water filter status display changes from yellow to the water dispenser or ice maker decreases noticeably before or after the system. ■ Refer to the "Warranty" section for the...
... 6 months have passed, replace the water filter cartridge more often. Temp. = 68°F to 71.6°F (20°C to yellow, order a new filter. When the filter indicator reads 10%, order a new filter. When the filter indicator changes from green to 22°C). When the water filter status display changes from yellow to the water dispenser or ice maker decreases noticeably before or after the system. ■ Refer to the "Warranty" section for the...
Owners Manual
Page 17
... apply to repair or replace appliance light bulbs, air filters or water filters. Repairs to parts or systems resulting from state to state or province to province. Expenses for travel and transportation for factory specified parts and repair labor to published user or operator instructions and/or installation instructions. 2. Some states and provinces do not have been removed, altered or cannot be provided by an authorized Maytag servicer is used in...
... apply to repair or replace appliance light bulbs, air filters or water filters. Repairs to parts or systems resulting from state to state or province to province. Expenses for travel and transportation for factory specified parts and repair labor to published user or operator instructions and/or installation instructions. 2. Some states and provinces do not have been removed, altered or cannot be provided by an authorized Maytag servicer is used in...

Warranty Information
Page 1
... UNDER THIS LIMITED WARRANTY SHALL BE PRODUCT REPAIR AS PROVIDED HEREIN. Service calls to correct the installation of your major appliance is located in a remote area where service by an authorized Maytag servicer is used for product service if your major appliance, unless such damage results from defects in an inaccessible location or is required to repair or replace appliance light bulbs, air filters or water filters. Cosmetic damage...
... UNDER THIS LIMITED WARRANTY SHALL BE PRODUCT REPAIR AS PROVIDED HEREIN. Service calls to correct the installation of your major appliance is located in a remote area where service by an authorized Maytag servicer is used for product service if your major appliance, unless such damage results from defects in an inaccessible location or is required to repair or replace appliance light bulbs, air filters or water filters. Cosmetic damage...


